benlilly1
-
Posts
2,045 -
Joined
-
Last visited
Content Type
Profiles
Forums
Events
Blogs
Gallery
Store
Everything posted by benlilly1
-
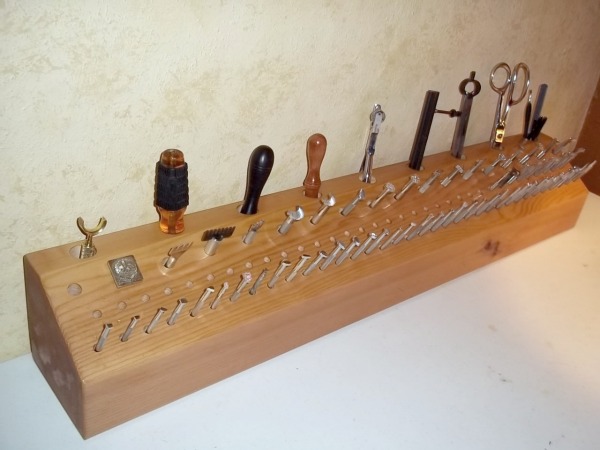
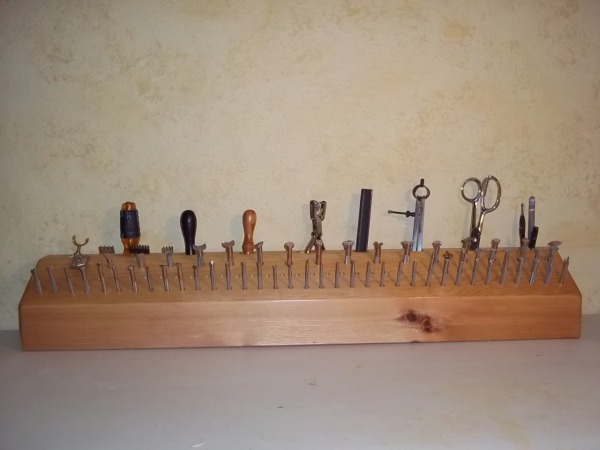
Thanks everyone!! DoubleU that is exactly how I work...all tools spread out on both sides of me. Hopefully this will keep me more organized. I might put the stamps I use most right in the middle for easy access. I have a special spot for this holder...hence the size 6x6x3' for a future topic. I got this cedar on Craigslist for $5 so the cost and my labor makes it cheap and custom.
-
That will be a cool design on a seat! Keep us posted.
-
First 2 rows are 1" apart for my smaller handled tools. 3rd row 2" apart and they are 7/16 holes. 1" holes in the back for holding my other hand tools. I couldn't keep my work space picked up so this was really needed. Thanks for the comments!
-
Decided I was tired of sticking my stamps in a 1" piece of styrofoam. So this weekend I made a tool holder out of a 6x6 piece of cedar 3 ft. long with 97 holes. I have empty holes but hoping to fill those up soon.
-
I love buying my leather already drum dyed black...if I need to touch it up, it's a breeze.
-
KurseD, I wet mold it using office clips to hold it until it's dry. I also use cut pieces of computer mouse pads to cushion where the clips sit or there will be marks left from the clips.
-
WOW, What a find!!!
-
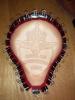
Yes too bad, Shtoink, I guess I didn't do too good on figuring out that center section...looks like part of a motorcycle motor. I initially surfed to find more images but couldn't so I guessed. The customer is happy with it though so I guess that's what counts.
-
I was just thinking about that same idea the other day but, I don't have a sand blaster:( Great job on that!!
-

Recent Bbq Rig
benlilly1 replied to JRCHolsters's topic in Gun Holsters, Rifle Slings and Knife Sheathes
That looks very nice! Great job! -
Help!: How Do I Avoid/fix This Dying Issue?
benlilly1 replied to LloydtownLeather's topic in Leather Sewing Machines
Here's why I think laying anything on top of it is the reason...if it's anything like woodworking, if you stain a piece of wood and lay another piece of wood crossways on top of it, it takes the shape of that top piece and it's darker where that piece laid. WHY I don't know -but this happens with wood. I guess because it's slowing down the dry time. -
Help!: How Do I Avoid/fix This Dying Issue?
benlilly1 replied to LloydtownLeather's topic in Leather Sewing Machines
I've never ever had to use deglazer on any of my leather whether it was from Tandy or elsewhere. I think the marks are from laying the wood on the leather after the deglazing. I don't think there's any way to make it lighter and if you dye over it I'm sure it will be darker. Good Luck -
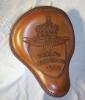
Cyberthrasher, I have no idea...this was on a ring...I exploded the image to see it better. I think there's eagles feet but everything else I had to guess on.
-
Sorry about the photo...I like taking outside shots but the weather doesn't permit today 1" neoprene, Fiebings Tan dye and 1/4" kangaroo lace.
-
Softail's Saddle With Self-Supporting Fender
benlilly1 replied to ivarian's topic in Motorcycles and Biker Gear
Very nice work! -
Thanks for the info Diezell!
-
Purse
benlilly1 replied to arbalet12's topic in Purses, Wallets, Belts and Miscellaneous Pocket Items
Beautiful!! Love that carving and those edges! -
Cool stamp...thanks for the link!
-
That is so cool!!
-
Very pretty...you can send one my way!
-
Trying Something New
benlilly1 replied to aguilerag's topic in Purses, Wallets, Belts and Miscellaneous Pocket Items
Doing something that small is hard even if you're experienced. Maybe it would look better if you just antiqued and not painted. It's a learning experience. -
Hey Renee, Cute bag! I had a hard time seeing the photo on my computer so I tweeked it. Love the fringe.
-
GREAT!!
-
I can't use the rotary punch either. Hurts my hands and it doesn't want to punch through thicker leather. So I use the mallet and a single punch. I could do that all day! I haven't tried the drill press yet...probably a lot easier and more accurate.
-
I think you did GREAT! Lucky Duck! I can't ever find stuff like that.