-
Posts
67 -
Joined
-
Last visited
Content Type
Profiles
Forums
Events
Blogs
Gallery
Store
Everything posted by Gabriel Rasa
-
I doooo~~ We're talking less than a minute between glop it on and wipe it off, and it still leaves more residue than I like. D:
-
'Chased'? This tooling is actually several years old, it was just the only pic I had on hand of a highlighted/un-highlighted contrast (and trust me, no one is more aware of its imperfections than me) -- but I think I'm unfamiliar with the technique you're suggesting? (Or don't know it by that name.) ;D This is the lesson I've been trying to beat into my ADD protege. DO NOT. TRY TO. RUSH THIS.
-
So I've never been satisfied with the amount of control I have when I'm putting highlight/gel antique on a project -- it settles into the crevices in a very patchy way, makes my cutlines look uneven in their depth, and it always seems to stain the raised surfaces much more than I'd like, even when it's been sealed with resolene before highlighting. I've attached a picture showing what I mean, how it just looks kind of muddy after it gets the highlight. I've only ever used Eco-Flo products for highlighting, but I'm considering ordering the Fiebings antique paste -- I'm thinking that maybe the paste wouldn't stain as quickly? (And also that Fiebings beats the pants off Eco Flo in every other product they make, why not this one too.) Anyway, I was wondering if anyone had suggestions -- how you prep your leather before highlighting, how you apply the highlight, what product to use, etc -- that might give me better results.
-
In my experience, Angelus dyes behave about identically to Fiebings spirit dyes -- they just have the advantage of being legal in California, where you can't get Fiebings without making a road trip to Reno. XD
-

avoiding scratches and nicks while working
Gabriel Rasa replied to amilcar's topic in How Do I Do That?
Leather picks up indentations very easily while it's wet, so make sure you're not wearing bracelets/watches/cuffs with buttons while you're working with it. Moving the leather around shouldn't be a problem in itself, but if your workspace is cluttered then your project is likely to brush/scrape against things that will put dents in it. Give yourself a big, uncramped space to work in, so that you can turn the leather without bumping into anything. You can also buff out minor scratches with the backside of a spoon (or anything else smooth & flat) when you're done tooling. -

Lets talk about WOW factor in leatherwork.
Gabriel Rasa replied to immiketoo's topic in Leatherwork Conversation
That's a distinction I've noticed before, wow-factor vs. detailing -- because I do fantasy costuming, which is all about the wow, about being unique and eye-catching and looking good when people snap pictures of the full costume. Then I get on here, and the high-end guys are talking about all of the thought and detail that goes into making their edges perfectly glassy, or their stitches all perfectly aligned, and I'm like, "lol, wow I'm a hack." Because I'm selling to people who aren't connoisseurs, which means I can get away with less attention to detail than someone making sheaths or belts -- indeed you have to, or you'll price yourself out of the market. Anyway, I'm belatedly getting good at the detailing aspects of the craft, but it's more for me than for my customers -- they can't tell the difference, so it's just to give me more pride and confidence in what I do, and help me not embarrass myself in front of other leatherworkers. :D -
Latigo's not exactly veg-tan -- it's a veg-tan/chrome-tan hybrid, with a waxy finish that means you can't case it, so you can't tool it. But you can tool on any type of veg-tan, it doesn't have to be labeled "tooling leather." When I see something advertised as tooling leather, I think they usually mean it's a higher quality hide, so you'll get better results from it. Cheap leather tends to be spongier, less uniform in thickness, with more scars and imperfections -- and it's usable, but it can be more difficult and less fun to work with. I tool a lot of cheap leather in my work (because I make costume pieces -- it's decorative, not functional, and gets black-dyed/painted anyway), and I've found that using a casing solution goes a long way toward making it easier to work with.
-
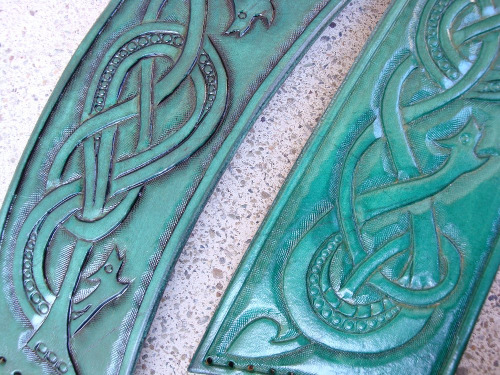
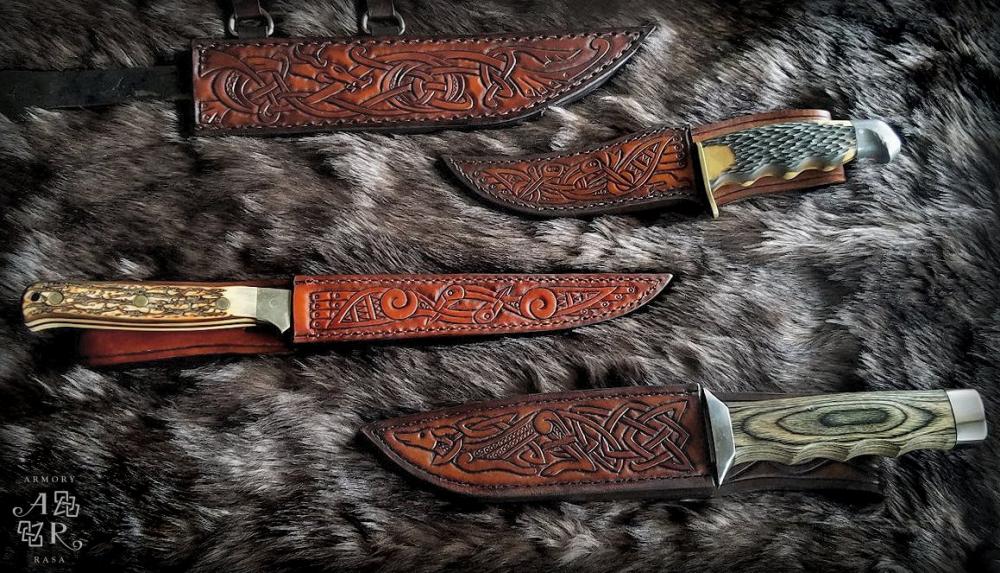
I know I'm late jumping on this train, but celtic/viking tooling is kind of my wheelhouse. :D As another person already commented, googling "celtic knotwork" etc is going to turn up a lot of modern interpretations mixed in with the attested styles. If you want historical accuracy: - Aidan Meehan has written prolifically on celtic styles, lots of examples and historical background, though he can be light on the information for how to design your own. - Jonas Lau Markussen is the expert on viking art specifically, and the fine distinctions in style between the different periods. - I got this book from the library (it comes with a CD), which has a ton of easy-to-work-with lineart, and saved copies of my favorites. Most (all?) of the pictures are taken from actual historical artifacts such as the Book of Kells, etc. - I've written a bit about the graph method for designing knotwork from scratch, which I learned from Christian Mercat. And if you're not so fussed about historical accuracy, there are some modern artists doing stunning work in that style: https://twistedstrokes.deviantart.com/ https://feivelyn.deviantart.com/ https://one-rook.deviantart.com/ Celtic tooling is about 95% beveling, there's really not much else to it. My only piece of advice would be to use textured bevelers instead of smooth ones, so that you get more contrast between the design and the background. Have fun!
-
You didn't misunderstand, the conversation just wandered over to die presses, because that's something else I'm interested in. The clicker looks handy, though I don't actually make the shield things often enough to merit one. I take it that's a different machine altogether, not an attachment you can put on an arbor press? GREAT info! Thank you so much!
-
Found it! Though for some reason it wasn't coming up when I tried to search for the keywords in the title. o_O It looks like an undertaking, but one that would be well worth it when it's done. I admit I'm a bit daunted because I've done very little work with metal before (apartment living for the past 15 years, puts a crimp on the power tools) -- how do you drill the holes into the ram? Can you use a regular power drill for that? Does it need special drill bits?
-
Ohhhh yes, that is *exactly* what I've been needing. Thanks! ...Except I can't find the thread you're talking about?
-
I've got an arbor press (?) that I picked up on sale a while ago at Harbor Freight, but haven't gotten it set up yet. (I'm not shy about buying tools/equipment -- business expenses don't get taxed, eyyy.) This one, I think: https://www.harborfreight.com/1-ton-arbor-press-3552.html I'm not clear on how to attach dies/stamps/etc to it though? It's just got a flat piece of metal in there now, and no visible way to screw or slot attachments to it.
-
Yeah, I've got two sizes of English strap punch, and I think I have that exact same rounded set from China. I've used them in combination to make the shields, but it can still be finicky if you get it from the wrong angle, or can't get them to punch symmetrically -- basically I'd been wondering if there was a clever trick to it that I was just overlooking, but it seems like the clever trick is "be careful." Anyway, thanks for weighing in on this, guys -- good to know I was on the right track, even if I'd been hoping for a shortcut.
-
Well yeah, it was easy enough to make the cardstock pattern symmetrical, but the leather was never as tidy as I wanted after I cut it out, either with shears or with a knife. Possibly I'm just being too fussy about it.
-
I've always used gum tragacanth for the flesh side of my projects because I really like the way it smooths down the fuzzies, but I don't know how waterproof it is. (Most of my projects don't need to be waterproof.) Personally I would not recommend Tan Kote, I've had some bad experiences and been very soured on it. Resolene/water is where my vote goes. But can anybody weigh in on using gum trag to smooth out the texture of the flesh side, and then resolene on top of that to make it waterproof?
-
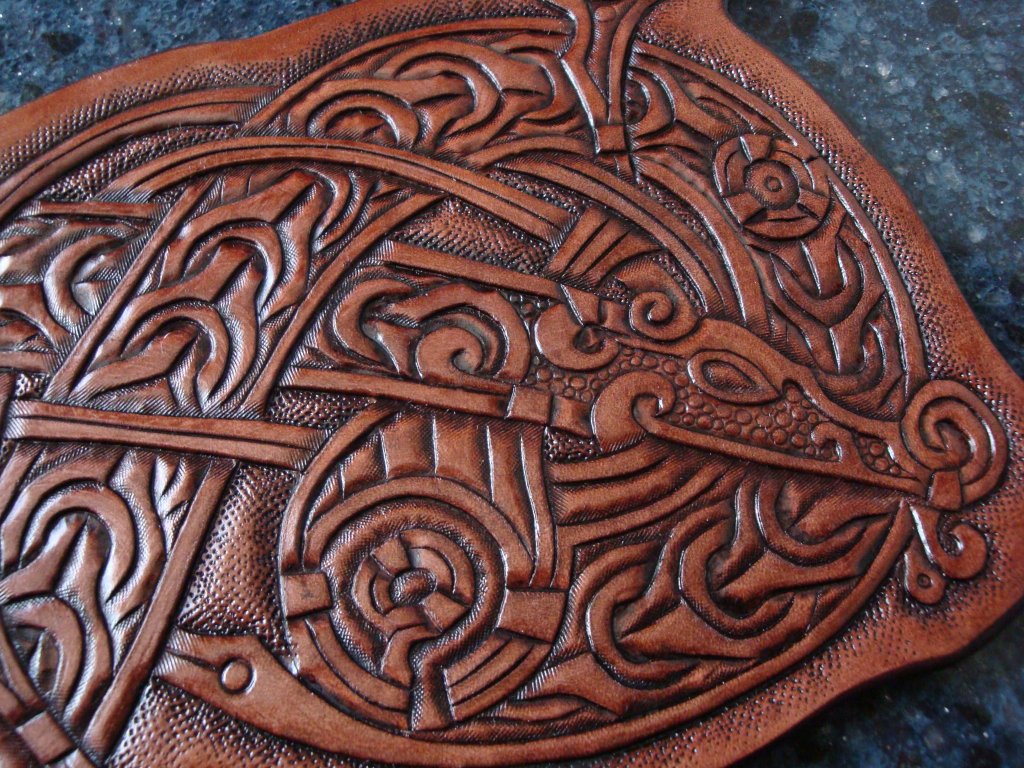
The E294-03 is the one you want for that effect, I use it all the time in my work. It's just a simple Craftool stamp, Tandy sells it too if there's a location near you. One thing that I've learned since making the thing in the picture (and what I'm seeing in the picture you linked) is that you should be rotating the tool between each strike, so you get a more random and less "tiled" looking background.
-
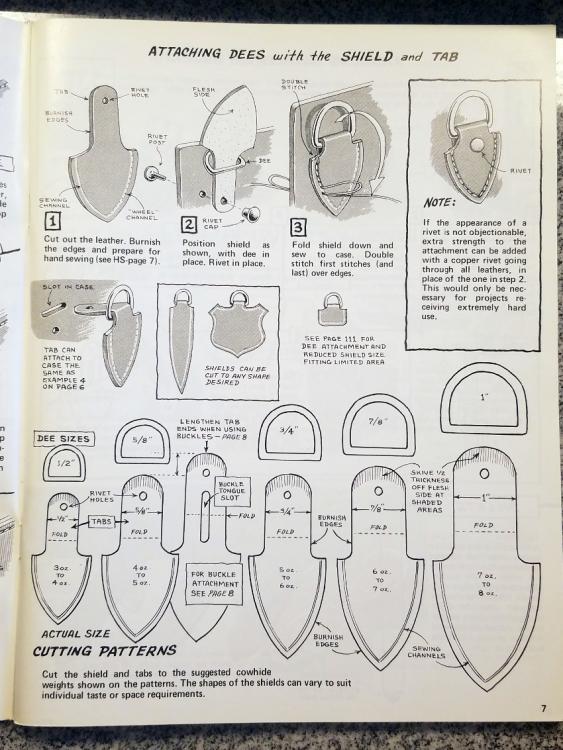
This is a page from Al Stohlman's book on leather cases; I like the shield-shaped tabs, but he doesn't talk about how to make them, and I've had some difficulty making them both (1) quick and (2) symmetrical. I was wondering if anyone knew a technique to punch these out quickly and cleanly.
-
Oh, I should add -- spirit dyes won't run or bleed, but sometimes you do get a dusty layer of pigment remaining on the surface after it dries. This is why the old-timers are always urging you to buff your pieces very thoroughly afterwards, so that the pigment won't rub off on anything, and so that the topcoat will adhere better.
-
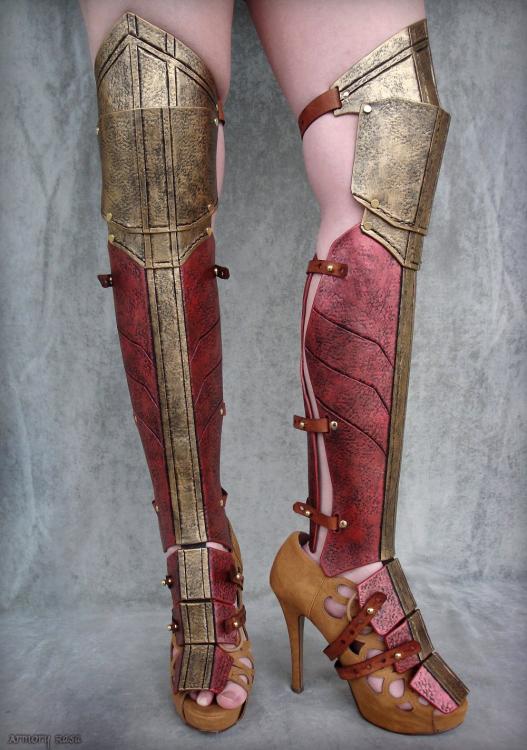
Oh wow, that leather repousse technique is REALLY cool. It makes me want to go out and get one of those little ball-headed modelers right now... even though the leather that I mostly use (and the belt leather that the OP was tooling in) is a bit thick for it, and probably isn't going to be as responsive to that technique. =/ Definitely bookmarking that though, for the next time I'm doing something in < 6 oz. And I do mostly costume replicas -- lately Wonder Woman and Aquaman, with a lot of MCU Loki and Lord of the Rings in the past. When left to my own devices though, my favorite thing is designing and tooling viking zoomorphs. :D
-
What jumped out at me is that the beveler you're using for your interior curves is too long (you can see where it's cutting lines into the knotwork in loops 4 & 5), you need to drop down a size for those. I haven't tried going for the "cylinder" effect you're talking about, but my instinct says you'd want (1) deeper cutlines, to make your stamping more 3D (if you're having trouble cutting deep enough, make sure you're casing your leather properly), (2) if you're going to double-bevel (not a technique I favor), use a textured beveler on one side and a smooth beveler on the other, to preserve the foreground/background distinction, and (3) if the leather's thin enough or the raised area is big enough, use a rounded tool to push your cylinders/dragons upward from the underside of the leather. I've attached a picture of one of my earliest attempts at rounding upward; this is more effective if the leather is spongy/pliable than if it's very dense. Honestly though, there's a limit to how much lift you can put in fine tooling, and the bas-relief effect you want just may not be possible. I do a lot of costume replica work that uses tooled & painted leather to imitate metal, and even though I frequently use technique #3 for adding more 3-dimensionality to my work, I'm never going to have as much Z-axis flexibility as someone doing the same project out of clay. But all nit-picking aside, that is a very cool project -- and I am delighted to see someone else honing the craft of non-cowboy tooling. XD
-
Alcohol based dye beats water based, any day of the week. Water-based is better for the environment, but that's about the only upside it has -- it's NOT waterproof (even putting a sealant on it is no guarantee) and it'll bleed like crazy if it gets wet, the colors tend not to be as vibrant as alcohol-based dyes, and Eco-Flo is *always* trying to change up their product line, and creating a bunch of duds that get phased out within a year or two. (Anybody else remember their attempt at "all-in-one"?) Learning how to work with alcohol-based dyes will stand you in good stead because the formula for that probably isn't going to change in your lifetime. Fiebings is Tandy's alcohol-based line, and Eco-Flo is their water-based. Depending on your state's chemical laws you may not be able to get Fiebings at your local Tandy's, nor can they ship it to you -- an equally good alternative (and what I use) is Angelus; their alcohol dyes behave exactly the same way as Fiebings' alcohol dyes, and somehow they manufacture it in a way that's legal under California's chemical laws. [Gah, just reread your first post and realized you're in the UK -- well, Fiebings or Angelus if they can ship to you, or any other "spirit-based dye" that's available on your side of the pond.] And chiming in with my support for resolene, diluted 50/50 with water. It's durable and flexible and gives you good control over how shiny/matte you want the surface to be, just add more coats to add more shine. Personally, I loathe Tan Kote and I don't even know how it still exists. There was an ~incident~ involving water-based dye and Tan Kote, and when I remarked on it the next time I was at Tandy's, the guy was like "lol yeah, Tan Kote runs if you so much as sneeze on it" and I'm like ...THEN WHY DO YOU ****ING SELL IT?? What Charon said about using it for the underside of the leather could work, though I haven't tried that, I just use gum trag for the flesh side.
-

Tooling hardened leather armor
Gabriel Rasa replied to TranscendentalTopiary's topic in Historical Reenactment
Well, extremely complicated tooling is my happy place, and I find that I really enjoy the technical challenge of reproducing something from a picture or a sketch, so it's not much of a tradeoff. :D And although cosplayers on the whole are remarkably forgiving of costume pieces that are uncomfortable or ill-fitting (I've heard enough horror stories that I think they pretty much all go into it expecting to Suffer For Their Art), I'm more satisfied when my work is both beautiful and functional, and when you're working with leather, there's no reason why it can't be. Double cap rivets and rapid rivets are really iffy when it comes to nailing two piece of 9-10 oz veg tan together -- the medium posts are too short, and always risk the caps popping off, and the long posts are too long and slide sideways when you try to set them. (This has been the cause for some table-flipping rage on occasion.) I've taken to using tubular rivets at points that are going to be taking a lot of stress, because they are never, ever going to pop off by accident. (There are definite downsides to tubular rivets though -- they can be harder to come by, a PIA to set, and the star it makes on the underside is relatively sharp and can irritate skin and put snags in fabric underneath it.) I mix and match double cap rivets and tubular rivets in my Wonder Woman greaves, with double cap rivets to attach the little straps, and tubular rivets where it's taking more stress around the knee and where it articulates: There's also a discreet line of stitching holding the knee caps in place, but for lack of an industrial sewing machine, I try to avoid stitching when I can -- it's just too time-consuming, and can very quickly drive the price up past what anyone's willing to pay. It's on my to-do list to explore posts-n-burrs style rivets, for an alternative that's stronger than double cap rivets but not as temperamental as tubular rivets. -

Tooling hardened leather armor
Gabriel Rasa replied to TranscendentalTopiary's topic in Historical Reenactment
Aaand I just realized that I never answered your question, re: connecting the pauldrons over vs. under the chestplate. Answer is that the conchos holding it on have broken a couple of times (I bought the conchos from Thailand off eBay; the screws they came with weren't long enough to go through two layers of 10 oz leather so I had to pop out to Home Depot and try to find something a smidgen longer; and nothing, neither metric nor standard, threads onto them quite right, so they're always kind of touchy) and so I've put it back together several times, and wound up trying it both ways, and It makes no difference. :D Seriously, that would seem to be a not-in-danger-of-chafing point, and the real issue is that it doesn't want to let me move my arms forward. -

Tooling hardened leather armor
Gabriel Rasa replied to TranscendentalTopiary's topic in Historical Reenactment
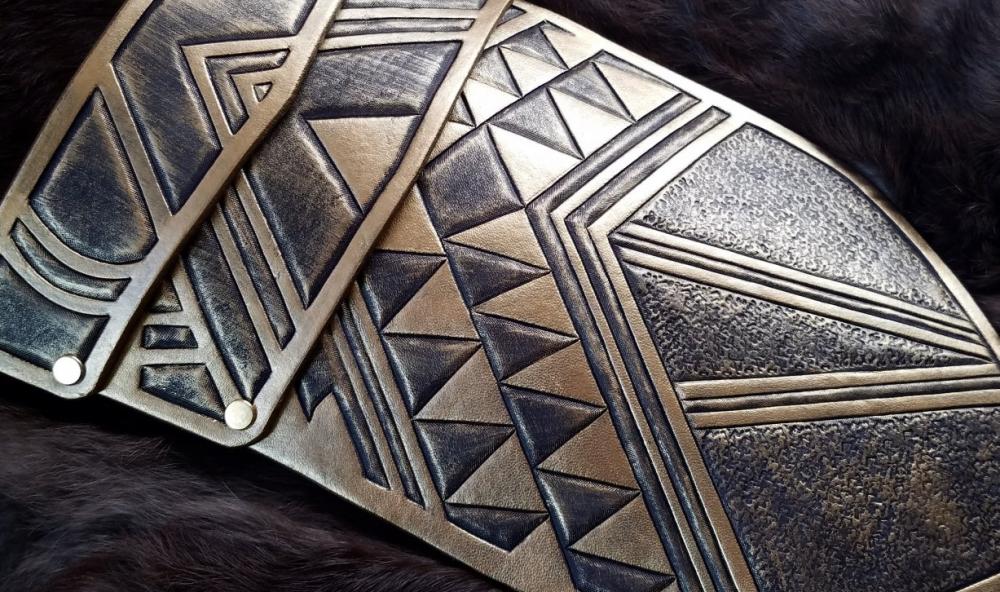
That was actually my first attempt at a chestplate, and it was a learning experience, in that I've learned better than to connect shoulders that way. :D It looks nice enough, and it's fine for faires/cosplay (and six years later it's still working-as-intended, so it's not fragile) but it restricts your arm motion too much to be good for actual combat. (It swivels up and down smoothly, but it's an obstruction if you try to bring your arms forward.) What I've found is a better solution (and also easier to put on and take off without a squire) is to have the chestplate/backplate be one unit, and the shoulders as a separate unit, either attached with straps across the chest or hooking onto D-rings at the shoulder. I've done a few of those, but like 80% of what people buy from me is bracers so I don't have any good pictures yet. I'm certainly no expert either on making armor that's intended to be used for combat, though I would very much like to learn. To a certain extent, ANY armor made out of 9-10 oz leather is going to be functional -- you make it out of armor-weight leather and it can't NOT be, assuming that the rivets don't pop off. The only difference between the cosplay stuff that I make and what I've gathered the OP is interested in making is the durability of the finish -- the acrylics that I use to get that metal effect would look pretty sad in pretty short order if you tried to use the pieces for combat, but the armor itself would hold up fine, including the tooling. It's the same basic technique, but instead of finishing with acrylics, you'd finish with an alcohol-based dye (to hell with eco-flo, seriously, that shit runs if you SNEEZE on it) and a topcoat of hot wax or resolene, depending on how waterproof you want it to be.


