gottaknow
-
Posts
941 -
Joined
-
Last visited
Content Type
Profiles
Forums
Events
Blogs
Gallery
Store
Everything posted by gottaknow
-
Nicely done. Regards, Eric
-
All of the old pictures have seemingly disappeared after the site upgrade. Makes a lot of the threads confusing. I buy parts from Universal Sewing Supply. Regards, Eric
-

Double Needle Machine Uses (Singer 112G139 & 300W-1)
gottaknow replied to landrand's topic in Leather Sewing Machines
That is a full fell folder, but the person using it needs some training. As I said before, chainstitch machines are not really for novices. Even though the 300w series are about as basic as they get, very different from lockstitch machines. Instead of hooks, there are loopers. There is different terminology such as looper gauge, looper avoid, synchronization, spreaders, and on and on. They are a necessity for apparel manufacturing for speed, seam stretch, no bobbin changes. They have limited use in leatherwork due to the fact that the chain is exposed and subject to abrasion. Without the theory knowledge, the manual is of little use in keeping them sewing. Regards, Eric -
Double Needle Machine Uses (Singer 112G139 & 300W-1)
gottaknow replied to landrand's topic in Leather Sewing Machines
And we're hiring next month! -
Double Needle Machine Uses (Singer 112G139 & 300W-1)
gottaknow replied to landrand's topic in Leather Sewing Machines
The 300W set up with either a 1/4" or 3/8" guage set, a full fell folder with your puller are ideal for making tents and tarps. No bobbin changes to worry about. The hardest part for a novice is learning how to set these beastly machines. They are nothing like a lockstitch machine, not even close. There's an entire different theory for how they sew, how to set them and how to trouble shoot them. On a lighter note, of all the chainstitch machines on the planet, this is the machine I always start a new mechanic on since they are relatively open and easy to work on. Regards, Eric -
Double Needle Machine Uses (Singer 112G139 & 300W-1)
gottaknow replied to landrand's topic in Leather Sewing Machines
The 300W class of machines are among my favorite of all time. They are a needle feed chainstitch that can be configured to sew with multiple needle gauges. They can handle a wide variety of operations depending on the need. I have at least 10 in operation. We use them for felling our heavy wool. As for leather, I have one that I set up with a speed reducer to sew chrome tanned leather for Navy issue welding jackets. We used Kevlar thread in T90 and I had to run the needle thread through a silicone dip. They have their design flaws, but easy enough to work around. Regards, Eric -
On some machines, the set screw for the tension unit is on the inside of the casting, requiring removal of the end cover plate. Once it's out of the machine, as Wiz said, there's a small set screw that locks down the adjustment for the check spring. Just wind it tighter and then tighten the small screw. As wimpy as that spring is, you almost can't have enough tension. After you've tightened the tension on the spring, I'd still rotate it up to the 12 o'clock position. Regards, Eric
-
The 116 subclass are pretty nifty. My supplier list parts for the cutter and says they're available. Not sure it would be worth the investment. Regard, Eric
-
Without seeing how your hook timing is and what kind of shape it's in, what I do see is not near enough travel on your check spring for the thread you're using. From the picture, the thread is exiting the check spring at the 10 o'clock position. There should be a set screw on the right side of your tension assembly that goes through the casting inline with the unit. Loosen it up and rotate the unit clockwise until the exit point of your thread is at 12 o'clock. The kind of damage I see is either your needle going through the thread, or the hook. Regards,Eric
-
No worries. That's a really good way of seeing exactly what's going on without guessing. I figured if you looked at it that way it would become obvious. If you watch Uwes video with his binder, you'll see the center foot pushing back quite a bit. At high speed with a garment needle feed machine, the slightest back feeding will cause some real headaches. New mechanics want to raise feed dogs if a machine is feeding poorly. Once they see what the paper reveals, it takes the guesswork out of making adjustments. Regards, Eric
-
Yeah, I wondered the very same thing, nice catch! That left side of the upper feed dog was ground off on purpose, smooth, good angle. I'm sure someone had a reason to eliminate all but just a small portion of what feeds material through this machine. I ordered a new set today. I figured I'd use this machine to make hanger loop for our heavy wool jackets. I'm having a folder made to take 1.5" of our 26 oz wool and fold it with finished edges, 3/8" wide. The beauty of using this type of feed on wool is that I can run the upper and lower feed dogs at different speeds. When sewing wool, the bottom ply will feed in. A skinny loop comes out of the machine twisted. We can still use it, just makes it harder to cut into 5" lengths. While I'm waiting for parts, I'll round up a table and get it all set up. This machine is really clean with just a smidge of rust. I'll take some fine steel wool to the hook and stuff. Regards, Eric
-
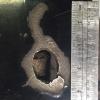
What's weird about this hole is as close as the lower shaft is below the bed, there's not a scratch or anything underneath. So I'm thinking Professor Plum in the study with the lead pipe. Anyone?
-
Downloaded the parts and instruction manual from Consew this morning. So far it looks like the only parts I'll be needing are different presser feet once I decide what I'm going to use this for. Regards, Eric
-
Take a piece of paper, put it under the feet. Unthread the needle and turn the hand wheel by hand, poking holes in the paper. Then measure the stitch length. Repeat the process, this time paying close attention to to movement of the holes in the paper. The holes should never move back towards you. If they do, lower your feed dogs until they only move forward. At no time when the machine is set to max stitch length should the feed dogs contact the throat plate. Regards, Eric
-
I would if it could stand on it's own, but I wrote it to coincide with my lecture and dry erase board. Looking back, I should have recorded it the last time I presented it, (last summer for our Seattle factory). It is so much easier to present the theory away from any machine, so I could actually do it at home. I used to do it with a machine, but it was kind of like the elephant in the room. Regards, Eric
-
I was a bit surprised myself. My mom has a near mint Morse home machine from the 50's. It's all metal, and on the casting is stamped Toyota! Regards,Eric
-
Never a dull moment, and I'm in teaching mode a lot with my apprentice. I wrote a curriculum for new mechanics. If you survive a week of theory lecture, I let you touch the machines. There's an open invitation for anyone who gets out this way to stop in for a visit. Regards, Eric
-
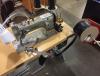
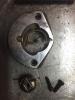
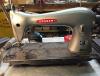
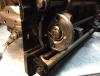
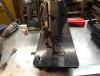
I came across this Consew 18 a few weeks ago in my storage area at work. I haven't seen it before as it has no table. (In my defense, I have 300 machines in storage) I brought it into the shop and I'm hoping next week to start going through it. I find the hole in the bed fascinating. I wish I knew the story behind it. I dropped a Singer 211 head 4' off a loading dock and the bed broke in half. Anyway, here's a few pictures, more to follow time permitting. Regards,Eric
-
Stitch Length Setting For Timing A 335 Hook
gottaknow replied to Hockeymender's topic in Leather Sewing Machines
As a general rule, I set my timing centered between the range I plan on using most of the time. If the machine is used between 5 spi and 7 spi, set it at 6. In reality, if your feed is perfectly centered, your needle will be in the same spot regardless of stitch length at loop taking time. If that's the case with your machine, you won't see a difference. My rule Is I don't get hung up on the rules. Set it where it sews the best. In my recent video of my Singer 153, most people here would look at the hook timing and say it's way off. I have it set pretty far advanced due to the play in the hook gears. If it were set by the book, it would skip and break thread all day. Regards, Eric -
How To "test Drive" A Used Industrial Machine.
gottaknow replied to nascenta's topic in Leather Sewing Machines
I've not seen one of those. It never ceases to amaze me the number of different machines Singer has produced. No wonder the most frequently asked question here is what machine to buy! Regards, Eric -
How To "test Drive" A Used Industrial Machine.
gottaknow replied to nascenta's topic in Leather Sewing Machines
This video was taken when we were making internment flags for the VA. The machine is a double needle chain stitch. We full-felled the stripes together 100 yards at a time. It takes 10 minutes to join 100 yards. The machine is powered by a clutch motor with an air cylinder actuating the clutch lever and holding it in the run position. The puller on the back is a Zero Max variable speed puller. The ghetto fan cooler kept the puller at a safe temp. This machine is a drop feed, so the machine can't feed the weight of the material. The video starts underneath where there are two loopers, each with a thread. You can then see the folder doing its thing and finally the puller. These Union Special machines have the best oil system I've seen. Enclosed splash system. If a bearing loses oil for a minute, it will seize. I monitored the oil temp to tell me when it was time for an oil change or if something was getting too hot. Machines like this is why there are anti foaming agents in sewing machine oil. Trust me, when these aren't set very precise, you know it immediately. Regards, Eric -
How To "test Drive" A Used Industrial Machine.
gottaknow replied to nascenta's topic in Leather Sewing Machines
You got it! It consumed 500 yards of binding in 4 days. A lot of times you'll find these with the goofy stitch length dial that's part of the hand wheel stripped out. There's any easy work around. The key to running these at high speed is knowing where your real hook timing is due to the gears. I also adjust the safety clutch super loose and the operator oils the bobbin basket with ever change. I rebuilt this particular machine 20 years ago, so it's about due. Regards, Eric -
How To "test Drive" A Used Industrial Machine.
gottaknow replied to nascenta's topic in Leather Sewing Machines
You often hear the descriptions of industrial machines having come from a factory. Since the majority of folks have never seen a factory, let alone on how we run the machines, I took a bit of video showing one of my binders in action. This is a common machine that you would see for sale in the secondary market. It's a Singer 153K301. It's set up with a right angle binder that we're using to finish the inside seams of one of the carry bags we make. This bag is made for shotgun shells. The fabric is our heavy Tin Cloth. You can see the wax buildup on the feet. This machine runs this speed for 8 hours a day. There's a big difference between a machine that has worked hard in a factory and one that has been abused. This machine is pampered so it can do what it does. I would sell it to anyone here with confidence so it could live out it's days with a servo motor going slowwww. That's not to say all factory machines are decent. I've seen some nightmares that appear on the secondary market. Regards, Eric -
How To "test Drive" A Used Industrial Machine.
gottaknow replied to nascenta's topic in Leather Sewing Machines
Really good advice here. I'll mention one additional thing. When I evaluate a machine for a private party, I always look for screwdriver marks or other tool damage. That doesn't count the screws you expect to see wear on like needle set, throat plate, presser feet etc. A case in point was the machine I did for Venator. By removing just the end cover, almost every screw inside had damage. To me that says someone was doing stuff they shouldn't have been. Turns out that machine had serious issues. Regards, Eric -
I buy my folders from Atlanta Attachment. They are serious folder makers and will tell you up front which is the best way to go based on your needs. I ordered one today for making hanger loops for our wool jackets. I probably have 100 folders that I can make hanger loop with, but nothing that would take our 26 oz. wool. I sent them a sewn finished sample along with plenty of fabric. Cost for the folder will be $398.00. The most expensive folder I've bought was $1800.00. It was for attaching a split waistband made of Lycra while inserting elastic. They will give quotes over the phone. I have learned over the years not to skimp on folders. For what you want to do, I'd get a folder as straight as your bag design will allow. Even the thin stuff doesn't like to turn corners. The binding in the picture is exactly what Wiz described. 1" split to 2 oz. that we'll use on a dog accessory. It's getting folded around a heavy pack cloth. The folder is one I modified and mounted on a swing arm in order to do the overlap. The machine is a Juki LU 562, one of my workhorse binding machines that simply won't die.