
.JPG.4e1168cf7a6fb5a83ffe216cc6d17428.JPG)
Tim Schroeder
-
Content Count
770 -
Joined
-
Last visited
5 Followers


Recent Profile Visitors


Single Status Update
See all updates by Tim Schroeder
-
Hi, Tim,
Just wanted to say I am a great fan of your work. It's some of the best I've ever seen on Leatherworker.net, and I am wondering if you can give me some tips.
I started doing leatherwork last fall when I bought a starter kit from Tandy, which included 8 weeks of free lessons. I am now thoroughly hooked! I moved in January, and that was the beginning of a long hiatus from leatherwork. I am only now getting into it again, and know I have a lot to learn.
Questions -
1) How do you get such remarkably smooth, even beveling? You'd almost swear your work was stamped rather than carved! I see you use a smooth beveler around the outside of your design, but what about on the inside of the carving?
2) Of course, due to time constraints in the leatherworking classes, we'd just moisten our projects with a sponge. Is Hidepounder's method of casing leather REALLY that much superior? What's the best way to tell if the leather is properly cased?
3) The finish on you work is absolutely first-class! Can you please tell this newbie how you achieve it? From reading your posts, I know you use Fiebing's dye, thin it and spray it on with an auto sprayer. In projects like the recent ones you did for your wife (computer case, etc.) how did you keep the dye off the areas you want to highlight? Did you use gel antique for highlighting the carving, or just let the dye stay in the cuts? And what is the order of the steps you use for dyeing and finishing your work?
Thanks for your time, and KEEP UP THE GREAT WORK!
Jane, in Ontario, Canada

- Show previous comments 2 more
-
Hi Jane,
I wrote a detailed description but it's not there now. When I added the pictures it covered it up.
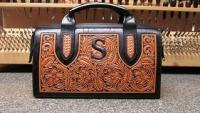
That color dye is Feibings Chocolate and Light Brown mixed 50/50 and thinned thinned 50/50 with Feibing's thinner. I spray the whole piece with the dye then dye the background and around the outside with black. You need to buff the dye with a piece of wool when it's dry. Then spray with Wyo-Sheen lightly and let dry 20 minutes then spray again both coats light. Wyo-Sheen is a Lacquer based finish. You can put it on thick but is to shiny for me. I am only trying to keep the Feibings Antique Finish from sticking to the tooling. Then using a piece of trimmed wool spread the Antique finish over the whole piece. To leave a lot in the depression I wrap a damp T-shirt around a flat block of wood and wipe off the excess. Most of the time I will take the Wyo-Sheen off the outside black with Tandy's Deglazer. This make the black a matte finish or flat no sheen. Thin using trimmed wool wipe Tandy's Eco-Flo Satin Sheen over everything let dry and buff with trimmed wool. By trimmed wool I mean taking my shears and cutting the wool from 1" thick down to 1/4" or 3/8".
Thanks Tim
-

I spray the whole piece with the dye then dye the background and around the outside with black.
How do you do the black dye? Brush it on, or spray? And how do you keep it off the tooled area?
...Then spray with Wyo-Sheen lightly...then spray again both coats.
Again, how do you block the the tooled area, and keep the colours separate?
Thanks again for your help,
Jane
-
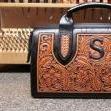
You dye the background with a small pointed brush. You dip the brush in dye then start in the middle of the area you are dying. The dye runs and stays pretty much in the background area. Then with the same brush now having less dye you can touch up the small spots where the dye didn't run. The outside I do with trimmed down wool.Trimmed from 1" down to 1/4" or so. I use like a 3" x 3" square and you can dye right up to the bevel lines. You will have to go around 2 or 3 times to get even coverage. Then with a small brush you go around and dye the beveled part. Dye runs pretty good and stays pretty much in the beveled area. Just don't try to put to much dye on at one time. Just dipping the brush in the dye lightly. Most pieces I make just have 1/2" outside the tooling and I will do the outside with one of Hidepounders dye pens. They are great and really work well.
- Show next comments 3 more