

.JPG.4e1168cf7a6fb5a83ffe216cc6d17428.JPG)
Tim Schroeder
-
Posts
840 -
Joined
-
Last visited
Content Type
Profiles
Forums
Events
Blogs
Gallery
Everything posted by Tim Schroeder
-
Thats where Cobra puts there's. Yes I put mine there as well. It's mounted on the #24 bolt. I had to use some needle nose to open up the hole a little to get the #24 bolt thru it.
-
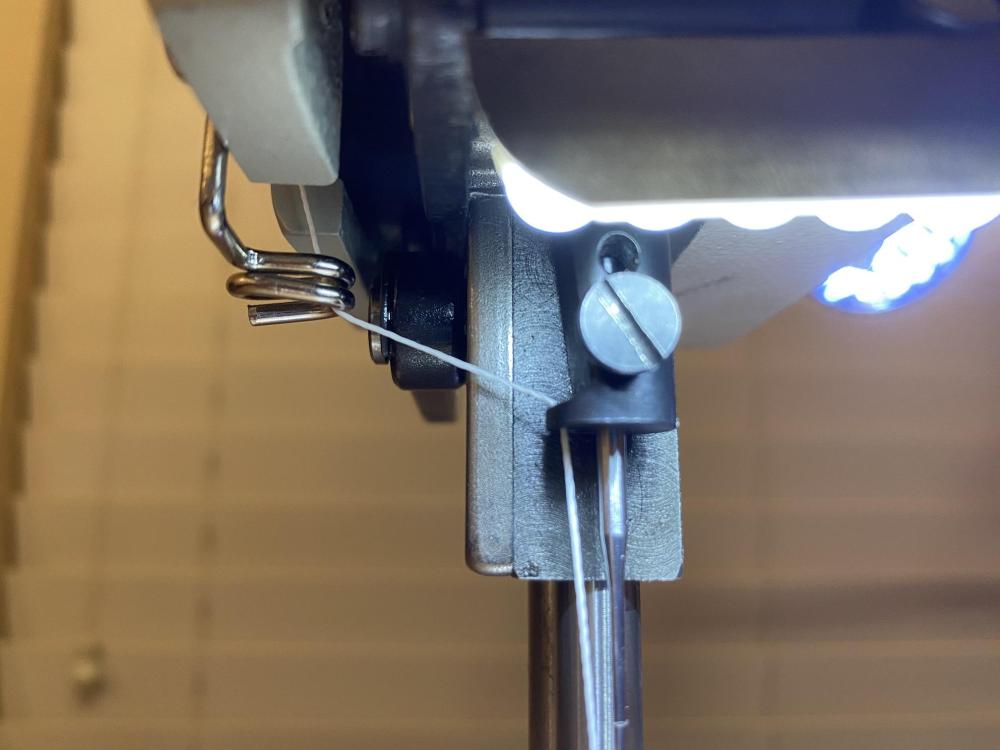
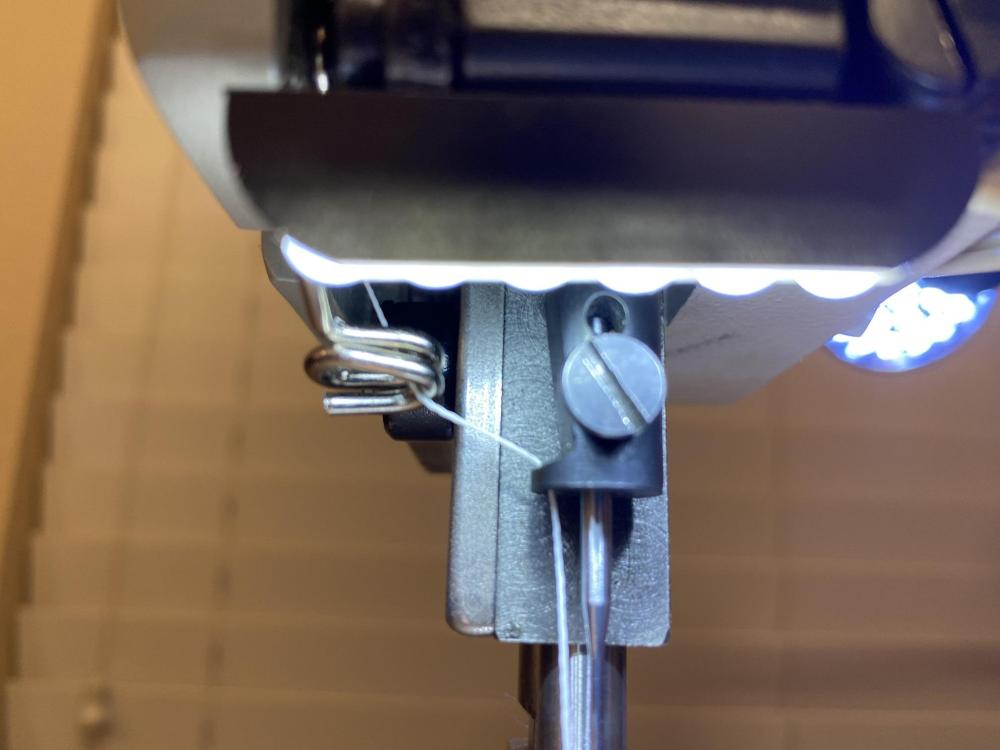
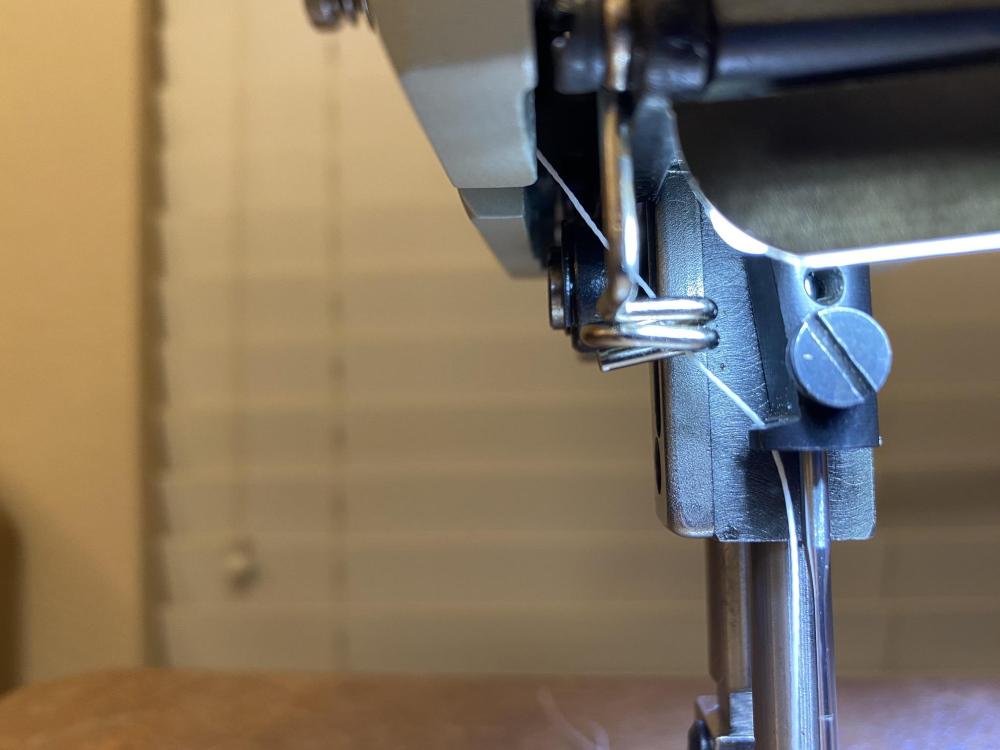
Here you can the path of the thread with last thread guide in the 3 different positions. I have found videos on YouTube where they would skip the last thread guide completely.
-
Going thru the bottom eyelet before wrapping around disc 1 1/2 times creates upper thread tension you can't get rid of. I looked up every manufacturer I could find, and Cobra is the only one who goes thru the eyelet before going around the disc. It is OK on bigger thread and needles but will never let you loosen the top tension enough to sew on the lighter end capabilities of this machine. You don't need another piece of leather. Don't go thru the bottom eyelet before going around the disc 1 1/2 times and tighten the bottom tension. I would still move the last thread guide to the inside of the faceplate.
-
Simple fix. The diagram is in the thread RockyAussie is quoting. When you loosen set screw #31 it allows you to push part #30 over either way if you needed to. Once you move the needle bar over you will be able to straighten up the center walking foot.
-
Good Looking work Bob. How you like that new Cobra.
-
Threading Juki TSC- 441, Cowboy, Cobra, Techsew
Tim Schroeder replied to kgg's topic in Leather Sewing Machines
I went back and threaded my machine like Cobra does, and the thread is rubbing on the tension release arm/lever after exiting the first tension eyelet. I wouldn't think that would be correct. It obviously doesn't make any difference to the Cobra people. The original Juki machines aren't threaded this way. Anybody figure out why our edit button disappeared? Anybody that lost their edit button running Windows 11?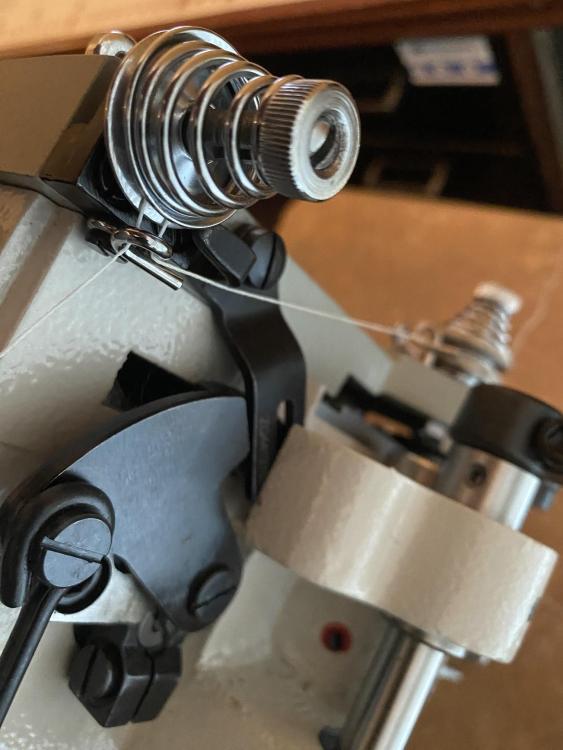
-
Threading Juki TSC- 441, Cowboy, Cobra, Techsew
Tim Schroeder replied to kgg's topic in Leather Sewing Machines
I think exiting thru the first eyelet and then going thru the second eyelet before wrapping around the second tensioner just adds unwanted tension. I looked up every 441 clone I could find and Cobra is the only one who threads their machine this way. -
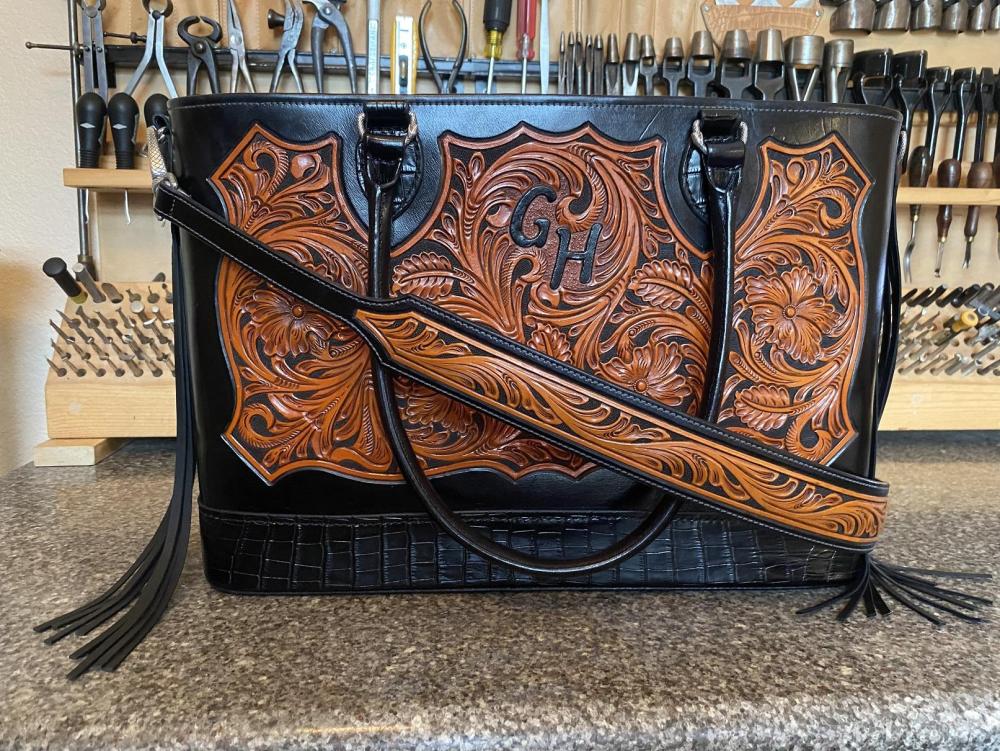
Still trying to learn carving.
Tim Schroeder replied to gregintenn's topic in Gun Holsters, Rifle Slings and Knife Sheathes
Much easier practice pattern.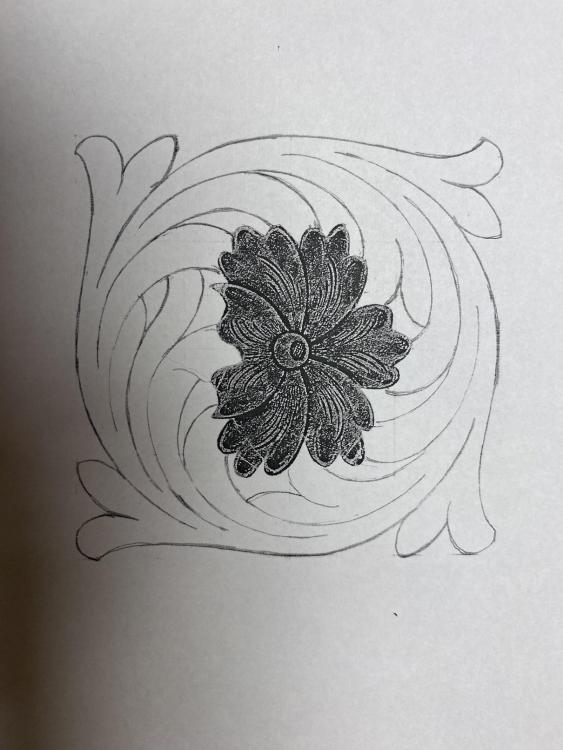
-
Still trying to learn carving.
Tim Schroeder replied to gregintenn's topic in Gun Holsters, Rifle Slings and Knife Sheathes
Try to feather everything. Shaders, bevelers and decorative cuts. Everything starts deep and feathers to nothing. When you cut the pattern try not to let any lines touch each other. I try to cut a little less than half way thru the leather and then bevel firm not hard and not soft. You can fine detail the inside corners with the background tool and modeling spoon. Point the shaders towards the middle of the flower and the center of the leaf or whatever they are. You can walk the shaders like the bevelers. A little tap tap tap as you are moving the beveler or shader. Bevel all the lines that run into another line first then bevel the ones they run into. Try to make the background area as small as possible. It's a lot easier to make a small area look good with bargrounders or a regular background tool. I trace outside my lines and then by the time you cut and bevel the background area will be the size it is in the picture. I do use some special swivel knife blades. The blade I cut the pattern with is a Leatherwrangler that has been ground down to .040 and decorative cuts with one ground down to .025. Standard is .0625 You can still make it look good with a standard blade. Depending on the leather you are using the tool imprints should be darker like burnishing. Especially the beveler and shaders. Usually if it's not leaving a burnishing color the leather is still to wet. -
Still trying to learn carving.
Tim Schroeder replied to gregintenn's topic in Gun Holsters, Rifle Slings and Knife Sheathes
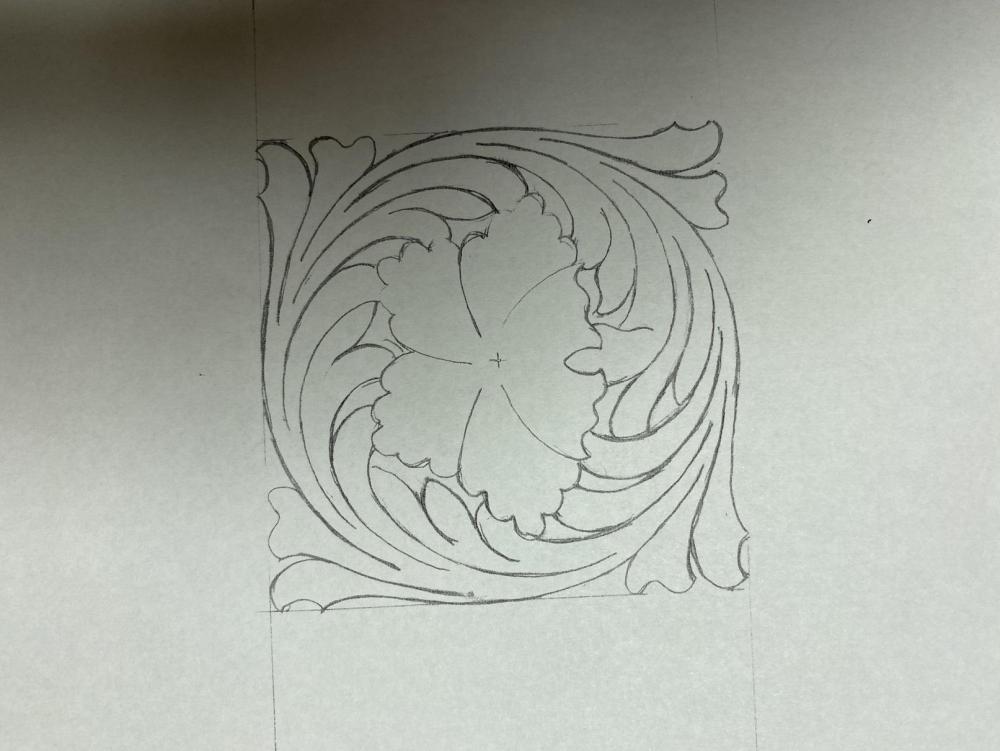
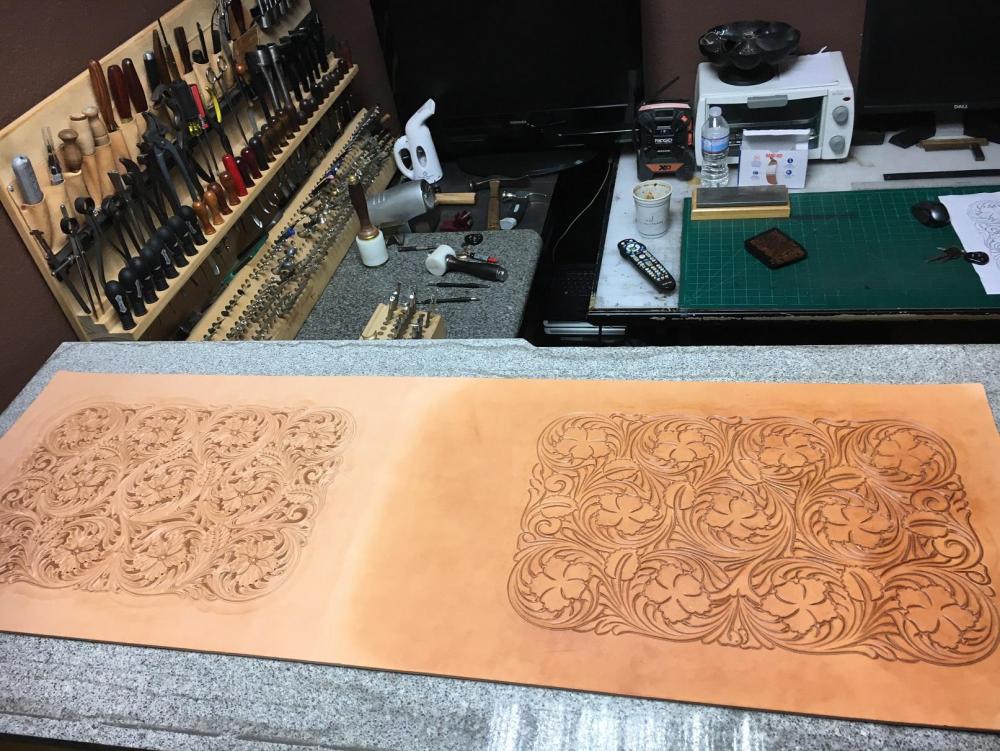
Here's a tracing pattern and a picture to look at. Tool it as many times as it takes to get where you want. Use the same pattern every time. Eventually you will make those tools do what you want. A picture of what it should look like after beveling.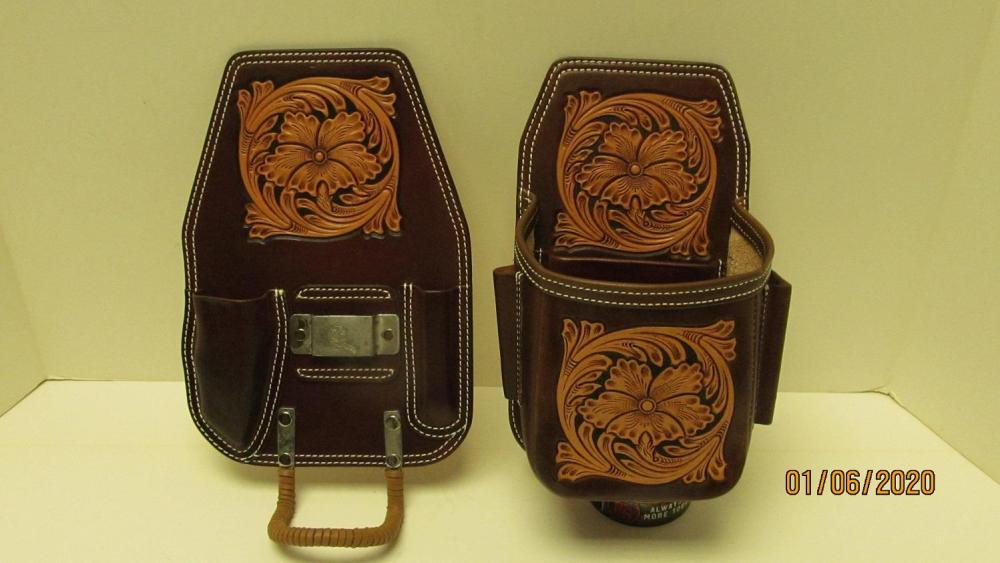
-
Still trying to learn carving.
Tim Schroeder replied to gregintenn's topic in Gun Holsters, Rifle Slings and Knife Sheathes
We’ll get you there don’t worry -
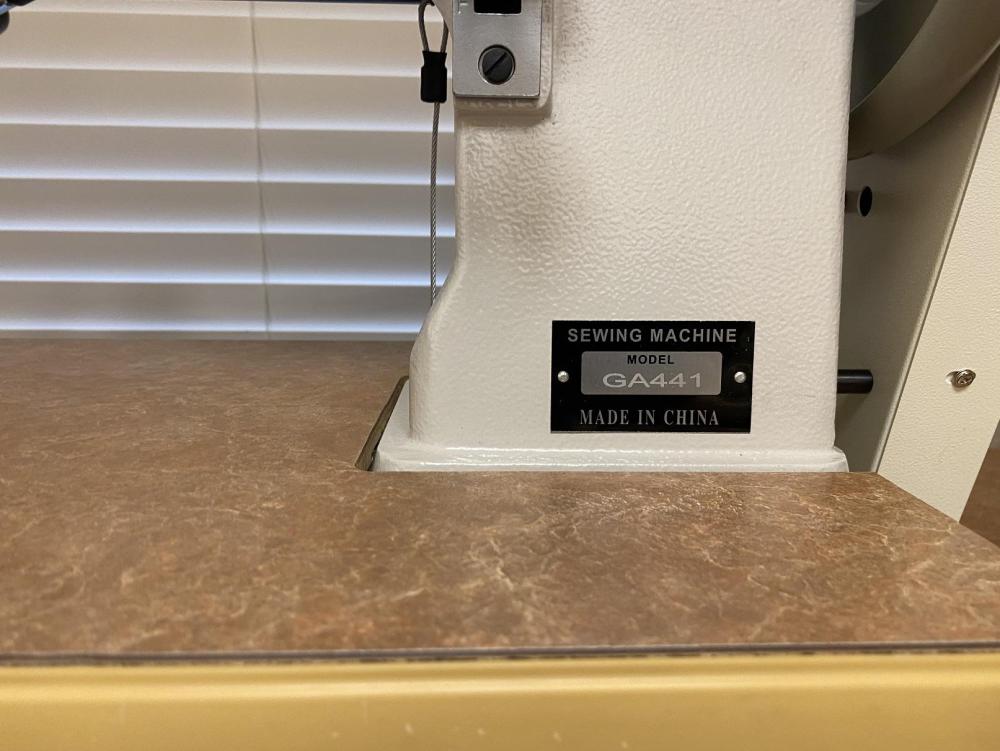
New Sewing Machine GA441 Sewing Machine
Tim Schroeder replied to Tim Schroeder's topic in Leather Sewing Machines
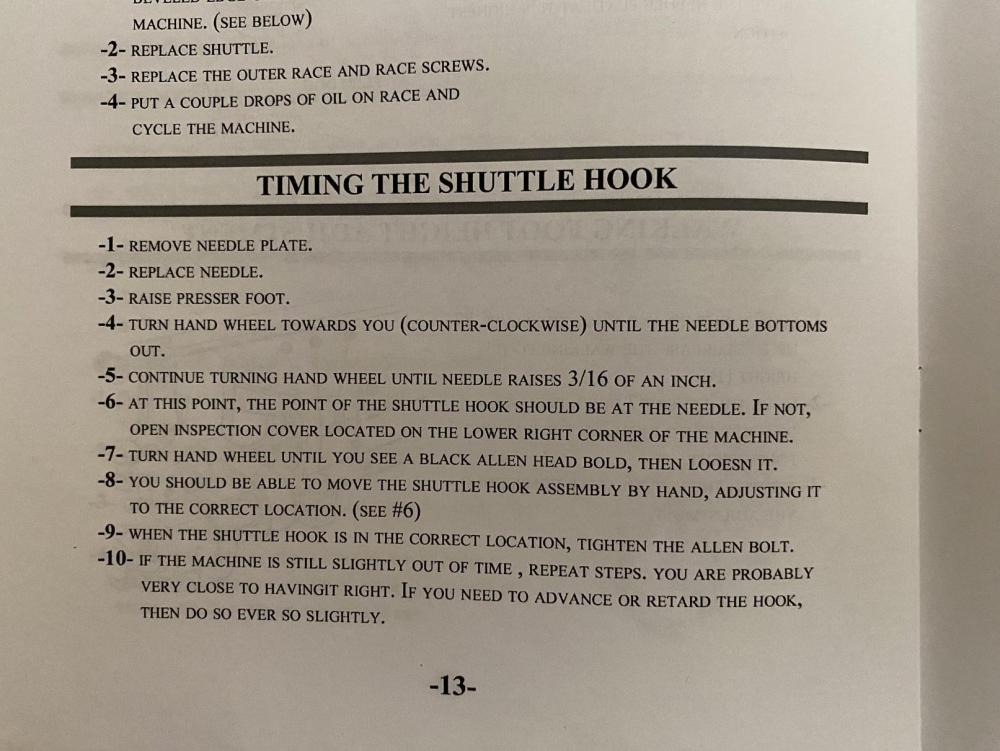
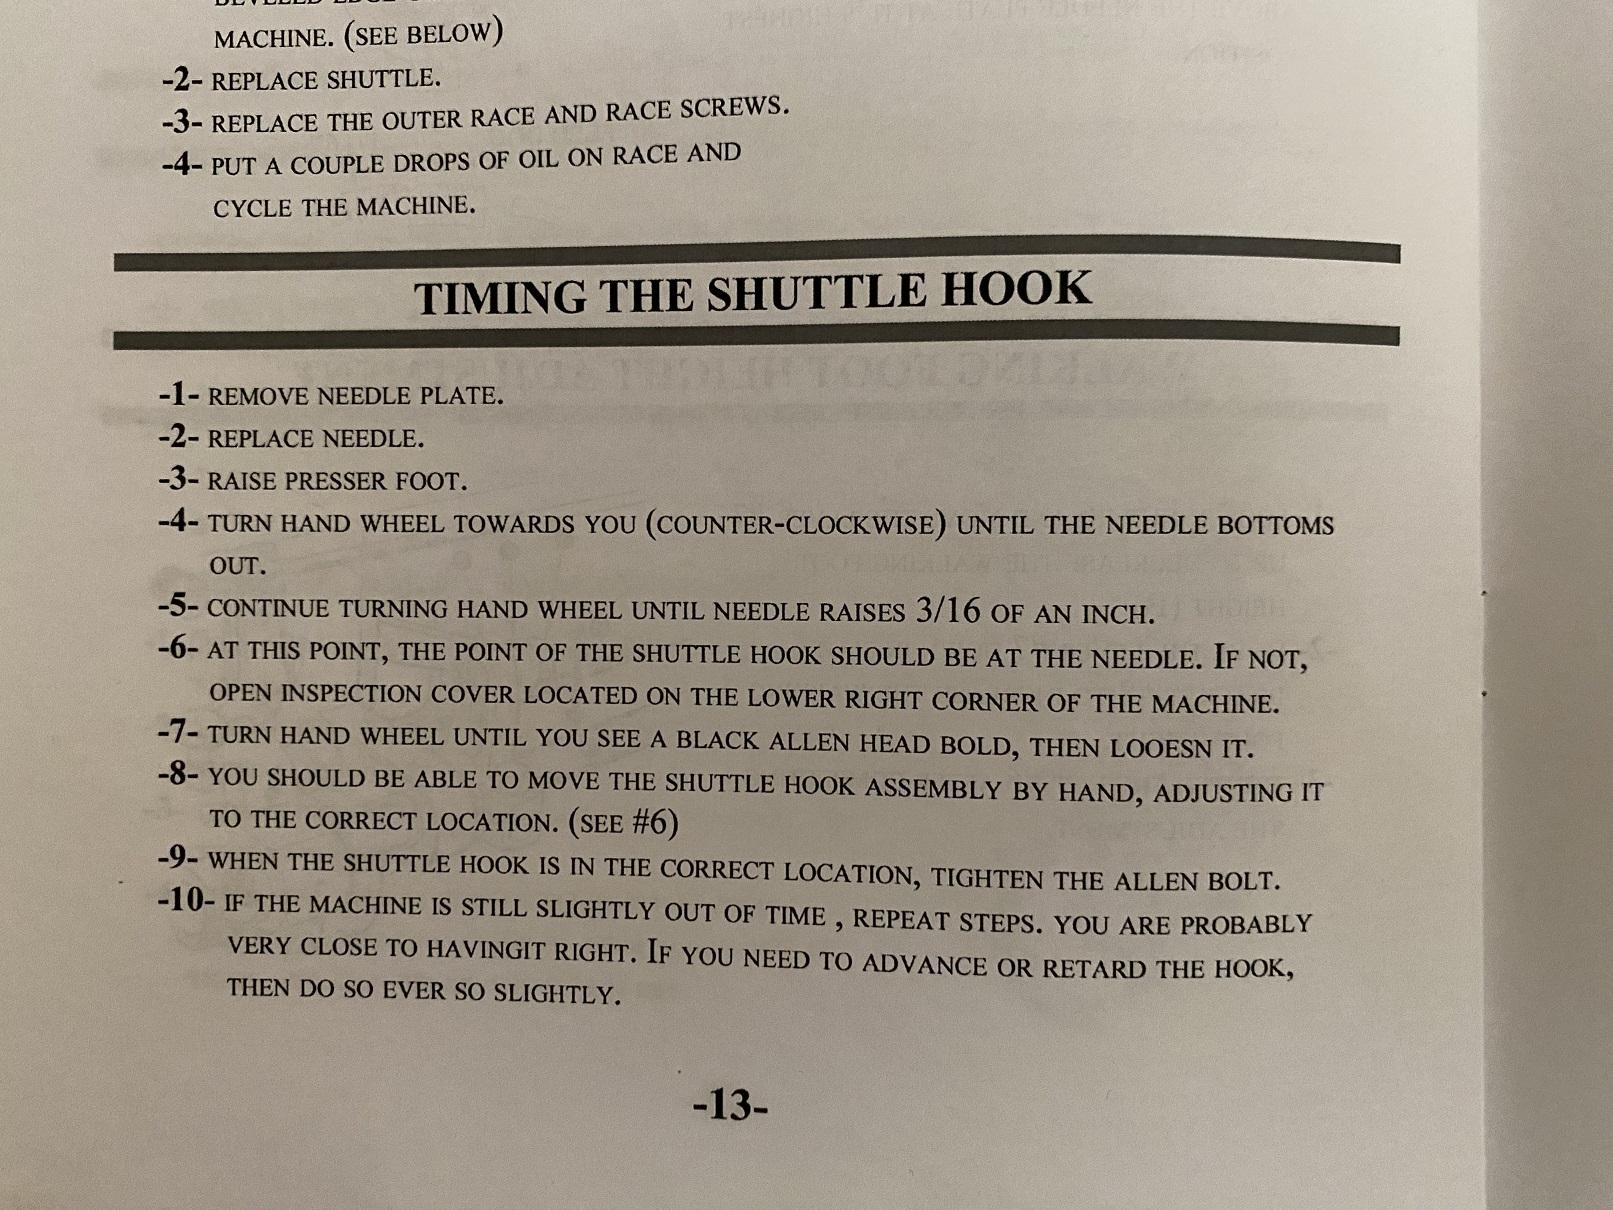
DO NOT TOUCH THIS!!! This is where@Uwe is adjusting the timing of the hook in his video posted on this forum right now. When CowboyBob posted this, it was way to late, I had already done it just like Uwe told me to in the video. It's the same video I was using to set up my machine. The pointer and 2 dots on the handwheel make it much easier and faster to make the adjustments. It's where the Juki manual tells you to adjust the timing. Is that the engineer's manual everybody talks about. Cobra manual and the manual that came with my machine says do it in the front. Yet nobody who actually knows will come on here and clear this up. aaronthearcher"s machine got out of whack and needed adjusting. Anybody know what the Cowboy manual says. Probably says do it in the front since Bob posted this.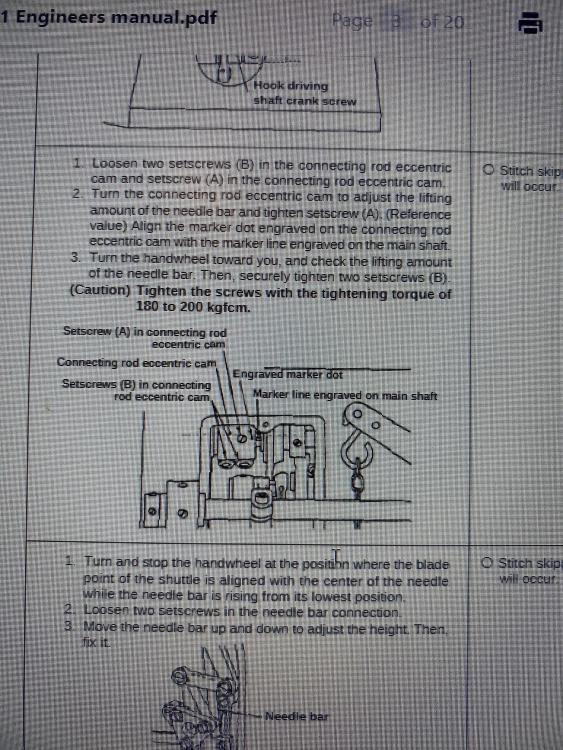
-
Anybody with a Cowboy 4500 care to post how the Cowboy manual tells you to adjust the hook timing.
-
I thought this was pretty interesting. I admit I'm not the sharpest tool in the shed. I make a lot of those ID 10T errors. This is kinda confusing.

-
Still trying to learn carving.
Tim Schroeder replied to gregintenn's topic in Gun Holsters, Rifle Slings and Knife Sheathes
Sorry about that @gregintenn I have contacted @Northmount and asked him to delete that post. Hopefully he will since it does actually contain misinformation. -
Still trying to learn carving.
Tim Schroeder replied to gregintenn's topic in Gun Holsters, Rifle Slings and Knife Sheathes
Yes, your correct, sorry about that. I apologize. No edit button. Can't fix it now. It was @Goldshot Ron that made that statement. It was just one of ID 10T computer errors. Sorry. -
Still trying to learn carving.
Tim Schroeder replied to gregintenn's topic in Gun Holsters, Rifle Slings and Knife Sheathes
@gregintennI think the leather was still too wet when you tooled it. I use Bob Parks way of casing and tend to get pretty results from his worthless method. I have been thru this discussion before was put in my place by somebody who uses the other method. I was TOLD here on this forum there is more than one way to skin a cat. (case leather) I'm not a master tooler like the guy who put me in my place who had been tooling saddles for 1000 yrs. So I tried the other way for myself and do not get the same results. If I could slap a little water on the leather and then let it dry a little while and go to tooling, I would use that method. I run my leather thru a sink or bathtub full of water until I quit hearing that noise. (if the bubbles quit coming out you might have gone too far, but it wouldn't make any difference anyway, just have to waite longer before starting) then lay it on my tooling bench and spray with a water bottle until it just starts to puddle, let it sit for 20 minutes then lay a piece of glass on it overnight. Piece of plastic works just as well because the water around the edge tends to seal off the edges. I let my leather dry until I can lay my paper tracing pattern on the leather and then put a piece of glass on it for a couple of minutes to keep the paper from wrinkling. I don't do a lot of tooling like a lot of people on this forum, just the occasional piece, but in 10 yrs since I started using Bob Parks method I have never gone thru the paper. If that's happening the leather is still too wet. Mushy with no color means the leather was still too wet. So, yes there is more than one way to case leather. My advice is based on my own experiences and not what somebody TOLD me. Just remember what all our OPINIONS are like. MINE is no different. You have to experiment for yourself to see what works for you.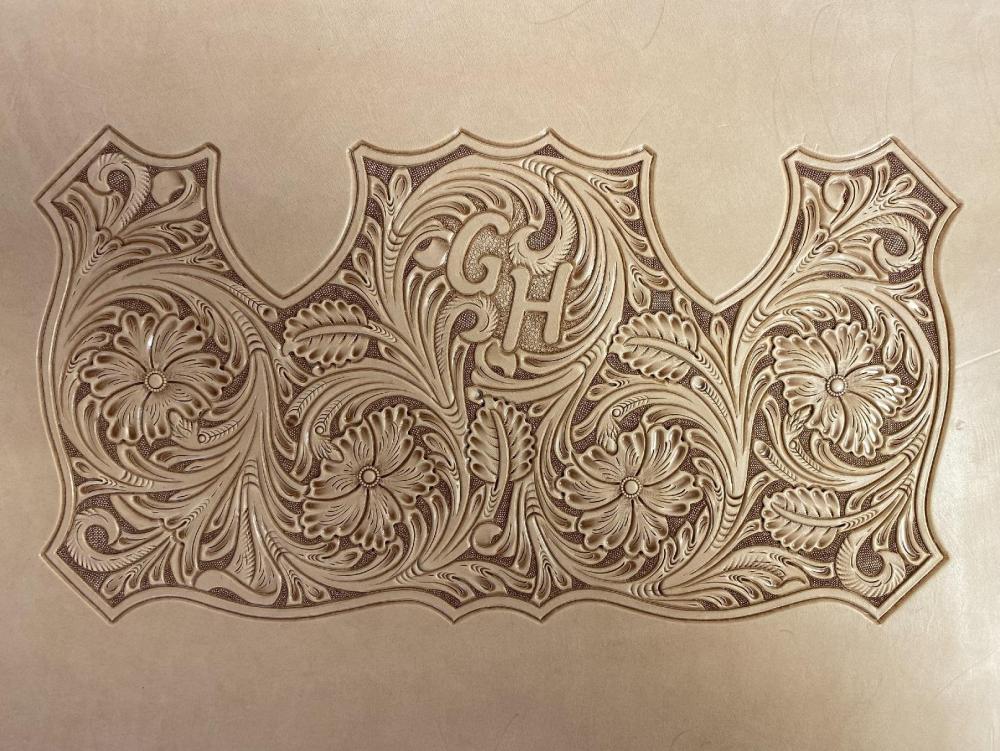
-
This thread is to inform people of their options. @Hildebrand if you don't like what I have to say don't read it. You have the same block option as everybody else. Learn to use it.
-
Thanks everybody. Yes @YinTx. If anybody ever wants a copy of a tooling pattern I drew just let me know. I have every original drawing and a copy or two. I'll mail you a copy. Drawings are the toughest part. The flowers and inside of the circles are easy. It's those big blank spots outside around the circles. I used the Sheridan Style Carving book from Tandy when I first started drawing and then found Hidepounder on this forum. I bought his pattern drawing book too. His work is as good as anybody in the world. I drew a wallet pattern and tooled one every day for 5 days looking at Hidepounders work trying to make it look like his. You eventually figure out how to make those tools do what your eyes see. There's still a couple of them in the scrap heap. Still can't tool like him but getting better every time. I spent at least 6 or 7 hrs on that drawing and tooled it in about 9 hrs.
-
Pastor Bob is a big boy. He doesn't need a huuuug or lil therapy dawg. He could sure use a narrow needle plate and feed dog though. Obviously from his post in another thread. Now he might have to hand sew a few projects to get himself a narrow needle plate and feed dog while he's looking at his big, beautiful Cobra Class 4 that sews ABSOLUTLEY beautiful like I've said I don't know how many times. I can't comment on how the Cowboy machine sews and never have because I have never sewed on one. I loved my Cobra Class 4. Of course, @PastorBob could go thru the process of dumbing down the machine like @Wizcrafts used to do BEFORE the narrow needle plates. Slotted plate with no feed dog sounds like a winner to me. I tried it when I had my Cobra Class 4 and I prefer the waste of time narrow needle plate. That's just my opinion. Remember my opinion is just like your rectum. I'm by no means am a sewing machine expert. Although now I could take THIS machine apart and put it back together and make it sew like the Cobra Class 4, I had. I know that if you are buying one of these machines to sew saddles or horse blankets or thick nylon webbing or thick harness material or anything that could NEVER get pushed down into the feed dog slot like @TomE posted a picture of in another thread, (and his work is Beautiful on his Cobra Class 4 with the waste of time narrow presser foot set from @Patrick1) then you probably won't, no you WON'T need ANYTHING from @RockyAussie or @Patrick1. By all means purchase the Premium Package because it's a great deal. How often do you get to spend $460 and get over $1100 worth of stuff. $460 dollars for over $1100 worth of accessories is a GREAT deal and a smart buy in anybody's book. @Burkhardt says it is. Of course, his opinion is just like his/our rectum. It really just depends on what you are doing with the machine. If your just sewing 277 and down maybe the narrow needle plate and feed dog might help. There's only one way to find out. Well, there is actually a lot of opinions on the internet, you just have to listen to them all and decide for yourself. But I know there are just as many people like Pastor Bob and myself and a lot of others on this forum who would like to use these machines for lighter work. Wallets belts bags. Maybe a narrow plate could help you out. No let me rephrase that. A narrow needle plate and feed dog will TOTALLY TRANSFORM your machine. Remember MY OPINION is like all ya'lls rectums. You have to do your own homework. I am not bashing Cobra machines or the Premium Package or The Leather Machine Co. I was trying to help the people who use these machines for lighter work. Just went about it the wrong way. Made a few mistakes, did some things I shouldn't have done. Sorry about that Cobra and Cowboy. I have said in almost every post how good the Cobra Class 4 machine I had would sew. I didn't quit working on my inferior Sewing Machine GA-441 until I had it SEWING LIKE A COBRA. Kinda looks like a Cowboy though. My advice is to DO YOUR HOMEWORK BEFORE BUYING ANY MACHINE. Just one more thing. I know you can contact a moderator and ask them to delete a post. If any of you fine people EVER think I'm spreading misinformation on this forum, then you just let me know and I will contact @Northmount or one of the other moderators and have them delete the post. We, excuse me, I do not ever want to spread misinformation over here.
-
Wish I had my Edit button. Here's the picture.
.thumb.JPG.9e664fee17519026e2f3170bee9ef2a1.JPG)
-
50th Anniversary Crafttool swivel knife. It has a Leathewrangler 1/4" blade that was ground down by Leatherwrangler to .043. Swivel Knife and blade only. I don't have the bag or case that come with these swivel knives. Located near Dallas Tx. $150 and I will put it in a small flat rate box to ship.
-
That's the reason for the post. People are buying these machines all the time and don't know about @Patrick1. It's the people like us that need one machine to do a lot. (Evrerything) Just the #25 needle plate and feed dog totally change the capability of these machines. I'm sewing 135 thru 2 layers of 3/4 oz. chrome tan. Put that blanket foot set on and see what happens. At least the presser foot won't be pushing what you are sewing down in the throat plate.
-
Pastor bought just bought a Cobra Class 4 (with premium pkg.) and doesn't want to spend another dime. Don't blame him a bit. If he had spent that $450 at @Patrick1's website, he would be 10x 100x 1000x better off. You decide. Guys over on Cobra Tips and Tricks say these aftermarket accessories are a waste of time. Just imagine the difference it would make in what your machine would do spending that $350 at @Patrick1's website instead of The Premium Package. Then you could buy any of the different tabletop attachments, even a Cobra table attach. and you would actually have ONE BADASS MACHINE. Then buy what you need as you need it. Of course, they are just a waste of time according to Cobra Tips and Tricks. He also tells you to thread the machine in a way that creates more tension on both tension disc. If you own a Cobra and thread their way you ought to try it Cowboy's way. Cobra is the ONLY seller of these machines who thread it this way. Wouldn't believe ANYTHING they say. Those clowns owe EVERYBODY who ever bought a Class 4 Premium Pkg an apology. I bought one, still have it. The only thing I use is the tabletop. Maybe joining Cobra Tips and Tricks is a waste of time. Certainly, Hope Pastor Bob didn't base his decision to spend the EXTRA $450 on the Premium Pkg. based on Cobra Tips and Tricks on fakebook. #25 Flat Plate and feed dog $140 #25 Round Plate $75 Narrow Foot Set or 111 size set. $120 He doesn't currently offer a 111 size set although I'm doing everything I can to get him to.
-
Cobra Class 4 - Which Presser Foot / Needle Plate?
Tim Schroeder replied to PastorBob's topic in Leather Sewing Machines
Take that blanket foot to a machinist and have him mill the neck out so you can move it over. Took .094 out of mine and use Pat's #25 needle plate and feed dog. You could probably get by even with the stock throat plate. Better yet start a petition to get Pat to build the 111 size presser feet. With the #25 needle plate you can sew up to 277. Works just as well with 92 or 135. Instead of grinding the teeth off, just use some tape to make a form around the bottom of the presser foot then fill it with 5 minute epoxy and sand back down to the teeth. I ground the teeth down and now it is shorter than the standard feet. Do you have the narrow center foot?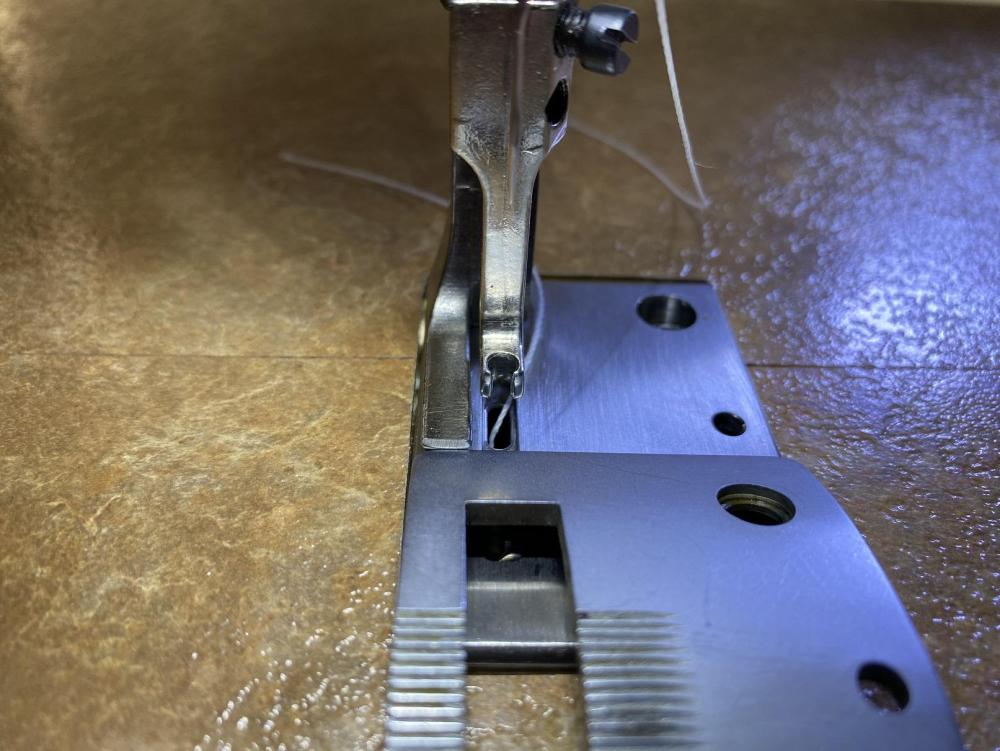


.JPG.0100da2256088506b77ef986ab9a3108.JPG)
