-
Posts
173 -
Joined
-
Last visited
Content Type
Profiles
Forums
Events
Blogs
Gallery
Store
Everything posted by ikewineb
-
From the album: Southbound Leather
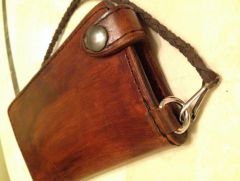
Made from 8oz veg tan for outside. Interior made from 4oz with 2oz card slots. Chain is braided lace. -
Beautiful Dog Collars!
ikewineb replied to Beachside Art's topic in Collars, Cuffs, Leashes and Leads
Those look good. I have a question though. Seriously, I know nothing about dog collars, but doesn't their hair not get caught on the rivet backs? I would think I liner of some kind would be a big plus.- 9 replies
-
- handmade collars
- small dog collars
- (and 7 more)
-
I picked up two softail seats this weekend. The HD dealer had a take off sale, selling used parts. I got them for $25 each. I picked out the roughest of the stack. I figured I'll try to learn/practice in steps. Start with a recover of an existing pan, then foam and cover, then pan foam and cover. Now, I need to find a source for seat tangs. The front ones seem simple enough. It's just a simple piece of bent bar stock. The rear fender tang needs to be dressed up a bit.
-
I'd love to try my hand at shoes...later, much later. There is a shoe section on the forum. I found this site for last when I was looking into it http://www.shoedo.com/newmoremenslasts.html.
-
I don't know, but...What about the fiberglass resin? Sorry for the off the wall thought.
-
I'm interested in the responses here. Are you going to be making the cover with pannels or just one piece? Where are you going to braid? I don't know if you would mold the leather over the seat, but I imagine it would have to be damp to stretch it and get the cover tight. I'm not sure how well the transition dye job would come out without the airbrush. I've seen some where it has been dry brushed with good results, but it's beyond me. I hope you get the answers you are looking for.
-
So, I've been doing quite a bit of research on this. There are some pans made from kydex, but not many at all. Most Thermoplastic pans are made from a laminated ABS. This is the same stuff that a factory pan is made from. I've decided I'm going to try to just make a mold with Kydex and then build a fiberglass pan on top of that. There are two big benfits I see. First, I could use it mutile times to build more than just one pan. I could even borrow a few friends bikes for a few hours to make the same molds for. Second, I wouldn't have to risk getting resin on my bike. The last thing I want is to make her mad at me. It will be a while before I can get to it, but I'll let everyone know how it turns out.
-

Medieval Joker Custom Leather Armor Completed
ikewineb replied to Prince's topic in Historical Reenactment
That is absolutly ridiclious. It's crazy good. I don't know how much you sell those for, but it's not enough. -
That's a nice looking seat. Don't you get color rub off with the oiled leather? Did you seal it?
-
Not argumentative at all. If I'm worng about something, I appreciate someone pointing it out. I've made kydex holsters before, and from my experience, they can get soft at surprisingly low temps. Not like the weapons going to fall out soft, but loose some detail in the forming. I've been doing some reading since your post and there appears to be grades of kydex. The thickeness of the kydex could be a factor too. Holster's typically use pretty thin stuff. Any idea how thick the kydex on your seat is? Could you lay fiberglass ontop of it to add strength? I mean, I know you can, but would it bond. Any info or ideas there would be helpful.
-
So, I've talked to Saddleman (still waiting on a final word there), corbin, drag specialties, biltwell, and a few others that never responded. It looks like to get anything close to what I want, I either have to find a stock seat or make my own pan. My concern with making a pan is laying the fiberglass on my bike, especially if I decide to make more than one. Uncle Fester's comment got me to thinking. I don't know if this would work, but...What if I made a mold on the bottom of my factory seat with kydex. basically, just lay Kydex in it and heat it until it conforms to the bottom of the factory pan. Then I could tape it up and lay the fiberglass ontop of the mold. Would that work? There has to be a problem with it, or smarter guys than me would of thought of it already. For that matter, you could about cast it in plaster. In my head, it would give you a workable mold to make multiple pans on. The biggest benefit is I could make them on my bench and not on my bike.
-
Kydex would not be nearly strong enough and becomes pliable when hot. Air cooled engine sitting under it on a 100 degree day...oh, it woudn't be good. Good Call on biltwell. I'm going to email them and see if they have anything two up or offer a pillion to match one of the solos. You are right, that is a bit pricy, but it would take a lot of the work out of it. I'm not really interested in shaping foam and the like. I just want to do the leatherwork.
-
Well, no one responded here... I've put super-shene on the flesh side before on bags and the like. It is going to change the look and feel of the flesh side. Try it on a scrap and see what you think. I would think anything that would do an adequate job of sealing will change to look and feel. If he likes the natural look, he may actually want the discoloration and used look that will happen overtime with untreated leather. I would suggest giving him the option.
-
I've checked Craigslist and the like. Most folks are looking at $150 - $200 for a stock seat. I have a feeling the people that have damaged and torn seats, probably don't sell them because they don't think anyone would be interested. An interesting twist, I got an email back from Saddlman (I emailed a lot of seat companies), and they said they would sell me just the pan and foam. I'm waiting to get a quote, to see if it is reasonable. I just can't imagine I'm the only one that has wanted to cover and make a standard style seat. I'll let you guys know what they say...in case you are interested.
-

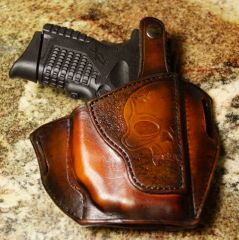
springfield XDS holster
ikewineb commented on adamlong93's gallery image in Gallery- Our Leatherwork
-
That is certainly an option. What I've found though is that people want quite a bit for their stock seats, which really surprised me. My local HD store is having a take off parts sale next month. I'm going to go snoop around. Who, knows, they might make me a decent deal if I took them all. If anyone in NC or southern VA has a seat that would fit a 12 FXDWG they would let go cheap, I'd be interested.
-
Yeah, I checked them out, they are making steel pans in a chopper style. I sent him an email just in case though. I've seen the videos on how to make the pans from fiberglass. The thing is, if i was going to build one for someone else, I'd have to have their bike for an extended period of time.
-
I've been wanting to try my hand a a seat. I'm confused a little about pans. The thing is, I don't want a bobber style seat and my girlfriend would get the wrong idea if I made a solo. Does anyone know anyone that offers factory styled pans that are reasonably priced? I'd like a two up or solo with pillion. I could make either of those choices work if someone knows of a source. Before everone jumpst on the obvious. I know I could make the pan from fiberglass myself. I have given some thought to that. For my own bike, I might would do that. I would eventaully like to make several for different bikes. If I could buy pans like that, it would be much quicker and easier. I also don't like the idea of using my bike as a tool... I asked the local HD dealer, and they said that HD doesn't offer just the pan, you've got to buy a complete seat. They told me to check out drag specialties...I could only find bobber style pans there though.
-
I have no idea, but I've seen it predyed http://www.zackwhite.com/8--9-oz-White-Dry-Chrome-Latigo-Sides_p_4897.html
- 10 replies
-
- white leather dye
- leather dye
-
(and 2 more)
Tagged with:
-
I often bursh it on with a foam brush. I've used it on several holsters. You obviously don't want anything treated with roon to touch a metal weapon. If I brush it on, and brush on the baking soda solution shortly after, it does not soak all the way through. A lot might depend on how thick the leather is. 2oz, it will be through in no time. 8oz, doesn't bleed through on my. I normally do two light coats. I'll let it sit like 1 minute and use the base solution. Try a few test pieces.
- 5 replies
-
- vinagaroon
- flesh side
-
(and 1 more)
Tagged with:
-
The tooling looks good. Have you rode with that bag on? I'd be really curious about how that single latch will fair once it's in the wind. As far as pricing, as much as you can get. :-) It's always easier to go down in price then go up.
-
I'm curous about the belt snap. Do you feel it is needed? I was also curious...I saw your strip on the paddle, to catch on the backside of the belt. Do you put anything on the back of the holster itself to accomplish the same?
-
From the album: Southbound Leather
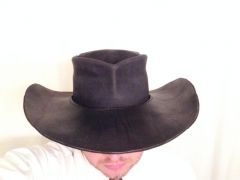
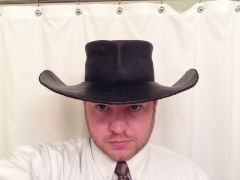
This is my first cowboy hat. The brim is made from 8oz veg tanned and the botton is unlined. The sides and top is made from 4-5oz veg. -
From the album: Southbound Leather
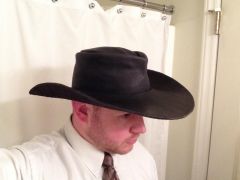
This is my first cowboy hat. The brim is made from 8oz veg tanned and the botton is unlined. The sides and top is made from 4-5oz veg. -
From the album: Southbound Leather
This is my first cowboy hat. The brim is made from 8oz veg tanned and the botton is unlined. The sides and top is made from 4-5oz veg.


