Boriqua
-
Posts
941 -
Joined
-
Last visited
Content Type
Profiles
Forums
Events
Blogs
Gallery
Store
Everything posted by Boriqua
-
I used mallets for years and I guess about 6 months ago bought a tapered 27 oz maul. For me it is a great all around weight. Actually a little light for basketweave but a good all around maul since you can get all the way up on the head and so some nice fine work all the way up to some heavy stamping. The weight is handled different since unlike the mallet you dont have a long handle so you do kind of choke up on the head. I use it for everything tooling. I use my mallets for punching holes. I bought mine here ... not the prettiest thing in the world but it was inexpensive and does what it is supposed to do. I can never go back to a mallet. http://www.wrising.com/index.php?main_page=product_info&cPath=12&products_id=54
-
Oh man! PERFECT!What have we here Laddie A secret Pouch a bit O leather work NO! A wallet no less, A wallet everyone The Laddie rekons himself a leather crafter I would soooo watch!!
-
Ok but now Jeff when you add the video and you get to the sewing part I think you need to start off in the calmest Psychologist, talk em off the edge voice ... "Now insert the needle in the hole followed by the second needle" Then quickly transition into the sickest DI you have ever seen "DO IT AGAIN" "AGAIN" "AGAIN" "DO IT!" "DO IT NOW!" "I WANT TO SEE YOUR FINGERS BLEED" I would watch But I have an odd sense of humor.
-
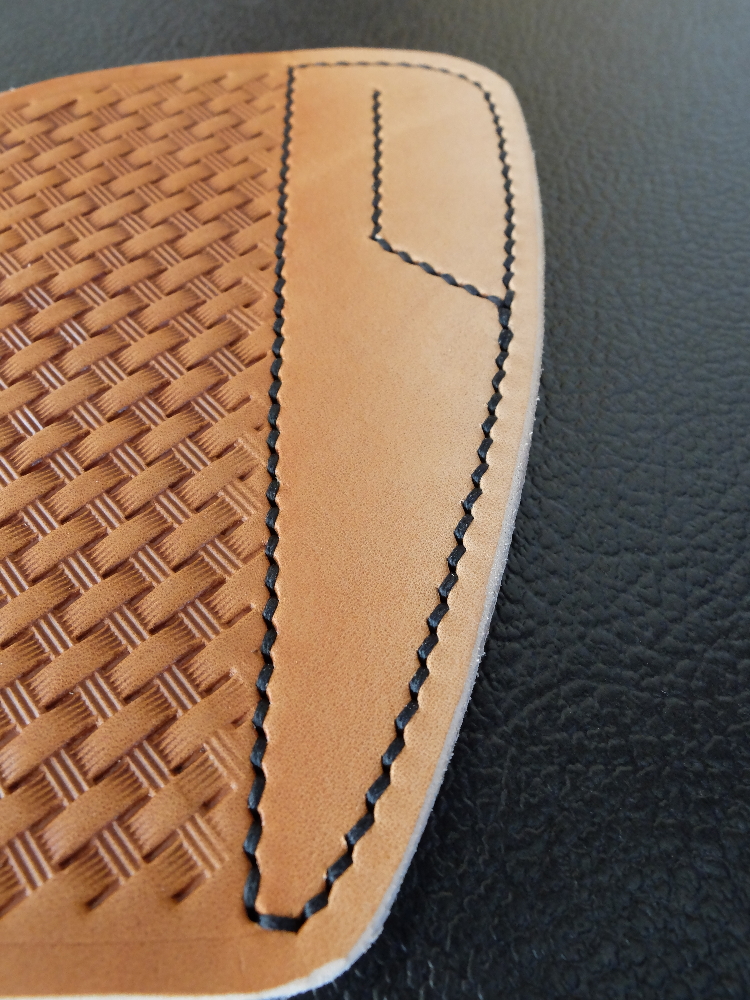
I too stop the liner before the buckle slot on double layer belts. I actually like to stop it before the keeper if I can.
-
It really depends on the material being presented, the presenter and the presentation. I have been at this off and on for over 25 yrs. Still I watched most of the ian Atkinson "leodis leather" videos from start to finish. Then .. there is a convenient way to fast forward to the juicy parts later. I worked in an industry where you got old quick. If you didn’t keep up with new ideas and methods you were gone or you managed an upper management spot so you could thrwart new ideas which wasnt me so I always keep an ear out for any new information and make it a point of pride not to assume I know everything. The 65 yr old and the 20 yr old may have something to show me and I want to remain open to it. Most important to me though is .. "this may be heavy so if you don’t feel it stop reading now" I think it is a travesty that in the USA we have removed most of the hands on classes. I was "lucky" in that I enjoyed school and excelled academically but my 2 brothers struggled. They were more hands on learners. Both of them went on to be wonderfully successful in the most common measures. One has his own business, is a licensed electrician and owns several rental properties and the other has been an electrical technician for 30 yrs. Both have wonderful homes, cars and families which is some measure of success? Formal education wasn’t for them .. they will both out work almost everyone else I have met but sitting in a classroom absorbing abstract information wasnt their thing. One was relegated to "special Education classes" and he now makes more money than most people I meet and deservedly so .... he knows his Sh*t. Somewhere we decided that working with your hands wasnt a wonderful life's work and that "shop" classes were unnecessary. If a 2 hr video is what some person needs to find his/her niche and become a productive member ... Im all for it. Mike Rowe is right ... Politics aside ... lets get more opportunities for the doers. For the rest of you .. there is fast forward!
-
well I wanted to report back in ... I am now three rolls deep or about $100+ invested in Twin eagle thread. Now make no mistake .. its a frigin bargain when compared to the cost of most other threads at some 900+ meters for $30 plus shipping. I spent years buying those little tiny rolls of waxed linen from tandy. More importantly if you are a hand sewer by choice your sewing should be pleasurable. It may be the same for other brands of thread that I havent tried yet but there is a wonderful tactile quality to this thread and just handling it and working with it and the sound of it zipping through the holes and the silkiness of it is pleasurable to use. Yea yea... I know no one ever talks to much about that touchy feely stuff but for the hand sewer who is going to spend a great many hours pulling and listening to the thread I think its important that you enjoy using it. Same as any other tool that makes you happy. If you are just rushing to the final product that is cool but that is not where I am at. I want to enjoy the process. Then you get the added bonus of it just looks really good. I have thought countless times about a machine but like leather braiding there is something wonderful about hand stitching. I spent most of my life around loud machines .. its nice to just listen and feel your work. While I have cut a forest worth of lumber on a table saw there is still something awesome about using a nice hand saw. Well maybe a bit heavy for a thread conversation but I am really having a ball with this stuff. I now have the Light brown, Dark Brown and black. I think a yellow is soon in my future. The wife .. bless her soul ... said just get all the colors and be done with it. I kinda scored in the wife department too.

-
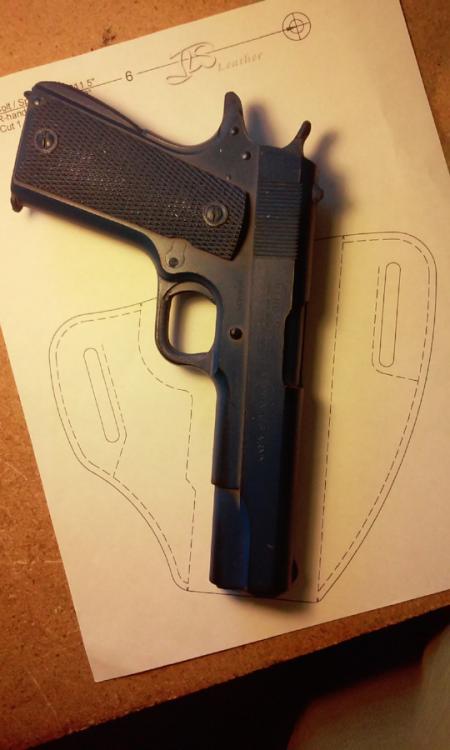
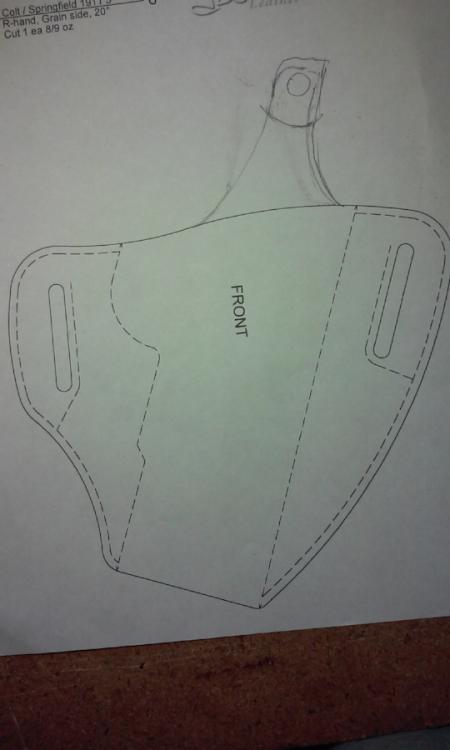
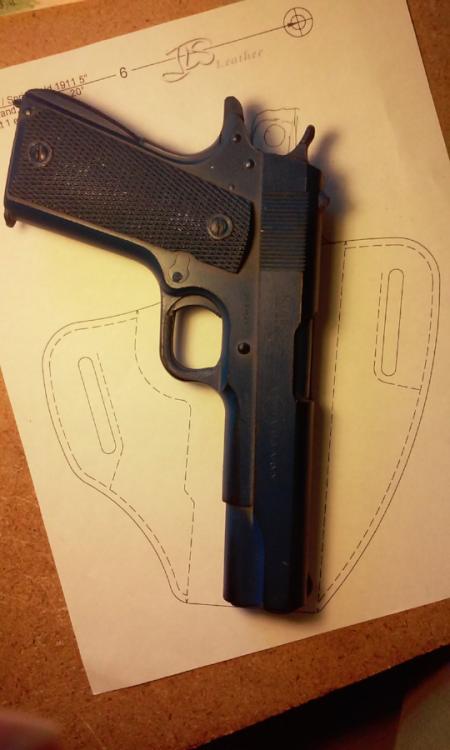
Ok this is quick and DIRTY! all my patterns are on tracing film so I used one of Jeff's since its printed on paper. So his pattern is open top with no break ... I lay my gun on the pattern and am careful to line up where the mag catch falls and where the rear sight lands and I make a mark where I ultimatly want the strap to go. Now like I said this is quick and dirty ... I dont know anyone that doesnt carry their 1911 cocked and locked so this would actually be too long but for illustration its fine. I then sweep my line up to that line above the hammer. I usually make my straps on thumb breaks around 24mm but it depends too on the gun. If I were doing this for real I might have swept my front line so it landed up falling where jeff has his stitch line because I would have sewn around the strap perimeter and would want a clean transition. Make note of how low I left the break. I used to make them all one length and it was dictated by the hardware I was purchasing. Stupid but I didnt know better. Custom is custom so I try and make the break for the application. If a guy is going to hid this under his shirt, jacket, tuck stuff in and around it then I make the break a little on the short side. I use one way snaps but still this keep the break out of the way. If its for a hunter guy and I know he is likely to have gloves on and such and will be wearing outside his cloths I make it about 1/2 inch taller. Its a little thing but it kind of matters. Hope that helps!
-
I will see if I can dig up one of my patterns with a strap and post it.
-
I tried the groover and didnt like it. It took all my nifty angle saddle stitch stitches and made it a straight line. I also dont dig cutting through the toughest part of the leather but some people love them. I have a wing divider but what I used for some 20+ years to mark my stitching line is this https://www.tandyleather.com/en/product/craftool-adjustable-creaser It does double duty in making nice crease lines as well and while you said you dont see yourself doing anything but badge holders its nice to have tools that can serve additional duties. The knife matt suggested should work fine. I have never used the tandy knife but have become unhappy with thier cutting tools. Some guys like the Carpet style utility knives but I cant get the damn thing to cut through heavy leather unless I polish the bejez out of them before I use them. I have recently started using a kiridashi but for years and years I used a plan ol box cutter. Works awesome and glides through 10 oz leather. Blades are cheap and I pass mine on my strop before each use and a blade lasts me for months. I bought a box of 25 blades maybe 10 years ago. Still have half. Since they are so cheap I keep one just for cutting file folder and paper and one only for leather. Still use them. http://www.amazon.com/Handy-Cutter-Open-Close-Assorted/dp/B00006IC0L You will want some type of edger. I dont know how thick a badge holder is but either a #2 or #3 tandy edger should do you. If its going to equal 8 oz or more than the #3 makes a nice edge. I bought these needles because of the reviews and have been using the same pair for the last 6 months. Nice needles! http://www.ebay.com/itm/321500247324 Matt ... nice idea on the bar of glycerin!
-
 WOW !! is that a nice set up. I love it all but the little possibles pouch is such an awesome sweet touch. Nice work! Thoroughly impressed.
 -
yea what jeff said ... you can take any of the patterns you may already have and so long as you have the blue gun or your unloaded gun its easy enough to add the thumb break. If I had any words of caution it would be, be careful to still clear the mag catch when you extend your leather in the back for the actual break part of the thumb break. I also learned that if I am making a thumb break for something that is intended to be concealed I am extra careful about setting the break down as low as possible so it is less likely to get unsnapped with clothing and such.
-
Well it was long overdue anyway but I just went and kicked in my $25 donation to the forum. Worth much more than that. Thanks again Jeff and Thank you to leatherworkers forum. Now if I can offer up what little knowledge and help I have to others its all good Alex
-
well I am going to wait until morning to tell him I have an elegant solution... I have to digest taking that really nice belt I busted my "A" on and cutting it up and unthreading stitching. I am sure with this solution and me taking my time and making it right it will look like I was never there but ... grumble grumble, piss moan. But .. good karma out good karma in right? Certainly is wonderful to have people like him willing to share!!!!!!
-
I just just just might get away with removing just the 2. Thanks man!!!!!! Alex
-
You sir are a genius and I feel foolish for not having come to it. Once again I owe a big debt Friend!
-
I want to say about 3 inches because if memory serves it was 4 to the curve. Yes because center buckle to end was 3.5
-
This is all I got so far?? but I think I hate it
-
Hey Everyone .. so I made the western belt for the gentleman according to the measurement he gave me and I even undersized it by 1/2 inch but ... it landed up being a touch big as it doesnt work in the center hole but in the tightest one. So that leaves him a fair sized tail hanging out there. He asked if I could make him a keeper and of course I can but the belt tapers from 2.5 inches to 1.5. Where the keeper would go would be the 2.5 portion and he would slide in the 1.5 tail. So ... its my stuff and I want it to look good. Sure he paid for it but I made it. So I am looking for suggestions on the best way to handle this. I figure first thing I can do is trim the tip. I left 5.5 inches between the last hole and the tip so I can trim that some but what about the keeper. I thought maybe I could punch two parallel slots that run parallel to the belt that are about 1.75 inches apart and run a leather keeper through that. It would be back in the 2.5 portion. I think that would look cleaner than just stuffing the 1.5 tail under a 2.5 keeper but ... anyone with even the most remote idea I would love to hear it. Sometimes it just takes yanking on a thread to come up with something cool and I am all about group ideas. Bunch of pix here http://www.boriqualeather.com/Gallery/index.php/Leather-Holsters/Western-Belt-and-mag-pouch-for-Colt-1911
-
I have read of some of the fellows here printing directly onto Acetate? ? and then just using that to transfer their patterns. Check posts by "Dwight". I usually transfer my prints to transfer film with a pencil or I tape the printed patterns to file folder and then cut them out. Its alot easier to trace around the heavier stock of the file folder than paper but like I said .. there are some threads about transferring direct from the printer around and they sound intriguing. I am sighting them from memory but I think they were one use only so I shied away because printer ink being more expensive than whole blood I will stick with file folders.
-
yup .. use a little bit of contact cement to glue your pieces or edges together, depending on the project, and then take your awl, chisel, drill bit or hole punch and make your hole through both pieces. Be careful to hold whichever implement you are going to use at a tight right angle to your work so you can get a nice looking stitch on the inside of your work as well if it will be seen like on a wallet.
-
Yea when You have a master leatherworker put up a gif on how to sew up the holster ... your in the right place! Oh and I dig the belt strap idea. I will have to try that on the next one.
-
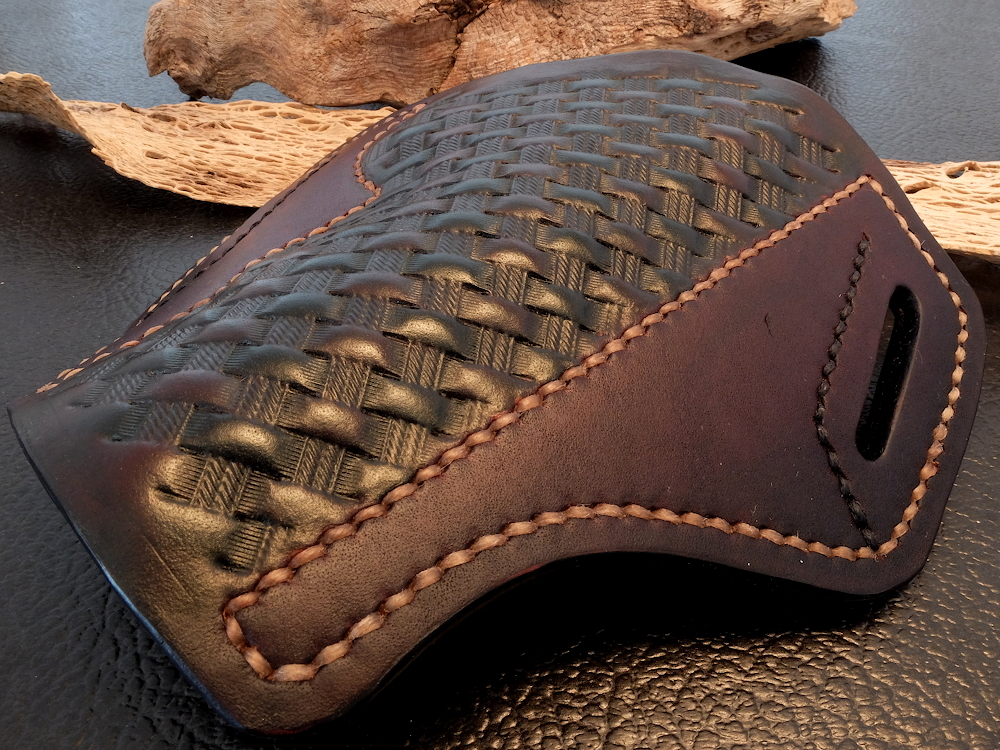
jeff broke out a gif!!!! Dude! Now it doesn’t get better than that. I usually go with the one thread all the way around like in Jeff's gif but I end just under. The only reason I used two pieces on the holster above is I wanted different color thread. I didnt love the biege thread in on the body and wanted it just at the edges and considered just not doing the stitch to the inside of the belt loop. Just a shmancy thing and I dont know if I like it any better but ??.
-
hmmm add a little beveler action and that could be pretty hot! Thank you for your input.
-
Yea I had a fairly cheap camera and a much better one both bug out when I tried to photograph on top of that cutting board if the frame is filled with nothing else. seems the camera sees all that green and wants to make everything else red. When I bend mine I do it slightly and I do it right at the the sew lines. Just a wee bit .. here is an example