.jpg.d60258221c476480a6e073a8805645bb.jpg)

rdl123
-
Posts
366 -
Joined
-
Last visited
Content Type
Profiles
Forums
Events
Blogs
Gallery
Store
Everything posted by rdl123
-

From the album: Leather Splitter
-
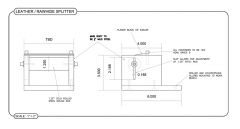
From the album: Leather Splitter
-
I noticed that Al Stolhman's encyclopedia says that they are important to keep dirt and grit from working its way between the tree and the skirts - This agrees with what JAM has said and I think it makes sense. Also, I think it would be pretty hard to make the rigging plates that attach to the rear bars look pretty and still be strong - Also, all of the skirt tugs would wind up being exposed. If the saddle was inskirt rigged and a large pocket was created at the rear bars I can see it working - However the pocket would be more or less a jockey again - Just a structural one. R.
-
Thanks cowboy7: I measured my good wool pads last night and one is 32" and the other is 33" - The Navajos I use over them are just a bit shorter. So should be OK. This saddle will get used on a bunch of horses so I want to make sure it doesn't get too long - Especially if I'm riding younger horses.
-
Thanks for the comments everyone - I am going to try to get the finished, blocked skirts to measure @ 28" - 28.5" - I'll lace them about half way @ back. Randy - The cantle back is tooled - Not a very good picture though - I'll try to get a better one. When it came time to actually install the cantle back I had some fun with it - Profile of tree at the cantle is quite 'bubbled' and I had a hard time convincing the leather to actually stick in all areas - Ended up pounding it down several times with a hammer over a leather pad - However - It didn't make cantle back any prettier... Oltoot - I agree - Flow and balance is what is really important to me - I think that some of the best looking saddles out there are the plain ones that are really well proportioned...I've looked at Steve Masons work a fair bit - I like his lines and how his rigs look. How important is it to slick out my rigging leathers? R
-
Hello: Here is the latest progress: Final ground seat piece installed, cantle back installed, rigging pattern drawn. I took it and put it on a horse yesterday and the rigging pattern seems to line up like I'd wanted it to. Comments / input will be valued as usual! The other question I have is skirt length - I was taught to go 2" ahead of front bar tip, and 3" beyond rear bar tip. However this would give me a finished skirt length of 29.5" which I think may be long - Can someone comment on this - I have tried to research this but haven't come up with a lot of info.
-
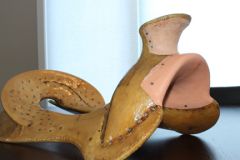
Thanks Oltoot: I took my tree and threw it on a horse yesterday - seemed to work out - Here is picture with the pattern attached:
-

From the album: first saddle project
-
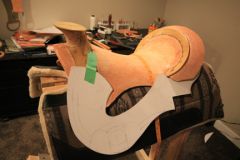
From the album: first saddle project
-
Using rigging plates - How far down from bottom of front bar pad do you set your plates? I have heard of 6.5" - 7". Is this measurement to where the latigo would ride or to the actual bottom of the plate? In process of drawing my rigging pattern and would like to make sure im on right track...
-
Randy - That is great - Really looks good for a first time - If I can get mine to look that decent off the hop I will be pumped! I am surprised you were able to build it that quick in spare time. I have a full time job and when I do have spare time I always seem to put going out and riding ahead of working on this saddle...However I really do want to have er done for spring. Anyhow - Your saddle looks great and is very motivating for me! Did you hand sew skirts to fleece or did you have access to sewing machine? Do you have any advice on getting the drop plate rigging true from side to side? That is what I am about to tackle next. Thanks, Ron L
-
Hello RK: That's what i am looking forward to - actually riding this thing... Be interested to hear what style of saddle you built/time it took etc. rdl
-
here is the start of Cheyenne roll...
-
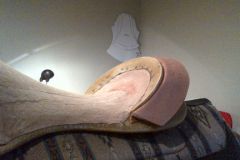
From the album: first saddle project
-
From the album: first saddle project
-
No feedback yet? I was hoping the experienced saddle makers would give some feedback on ground seat shape. I am happy with criticism - If any fatal flaws I'd rather tear out mistakes and do it right. Critiques appreciated.
-
Here is a profile picture...
-
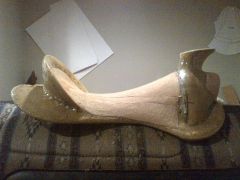
From the album: first saddle project
-
So this weekend I put in most of my all leather ground seat - Following Steve Brewers tutorial...Still have my final cover piece to put in. However, wanted to wait for everything to dry up so I could actually sit in it and make sure I was happy with the shape before I put my last piece in...Last night it was dry enough and so far I am pretty happy with the feel - Although I'm sure you never really know until you can put a couple long days in the finished saddle. here are some pics: Your comments and critiques will be appreciated as I really am just feeling my way on this project. Steve told me he nails his ground seat in before he puts the cover piece in so that is my plan as there are no nails in here yet. I realise I don't have a good profile picture up yet...So will try to take one tonight. I want a 'balanced ride' seat - Want to sit straight up with heels, hip and shoulder all lined up - Don't want the armchair style seat position. Next task once ground seat is wrapped up is to get my skirt pattern drawn up and my rigging pattern drawn so I can make sure all of that flows and looks like it belongs. If anyone has advice on that I sure would like to hear it. Plan is for round skirts, maybe even slightly butterfly style. 7/8th flat plate rigging.
-
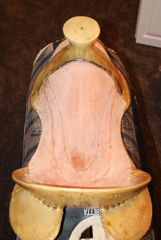
From the album: first saddle project
-

From the album: first saddle project
-
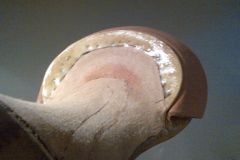
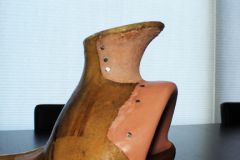
Here are pics of horn and gullet:
-
From the album: first saddle project
-
From the album: first saddle project
-
The seller has both Harwood's & Jeremiah's sets - I am going to ask if I can swap the order as they are the same price - Will see what they say. Just placed order this am so maybe there is a small chance they can.