rdl123
-
Posts
366 -
Joined
-
Last visited
Content Type
Profiles
Forums
Events
Blogs
Gallery
Store
Everything posted by rdl123
-
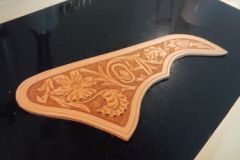
From the album: Second Saddle Project
-
From the album: Second Saddle Project
-
Corrected Link: Click Here Corrected Link - Click here
-
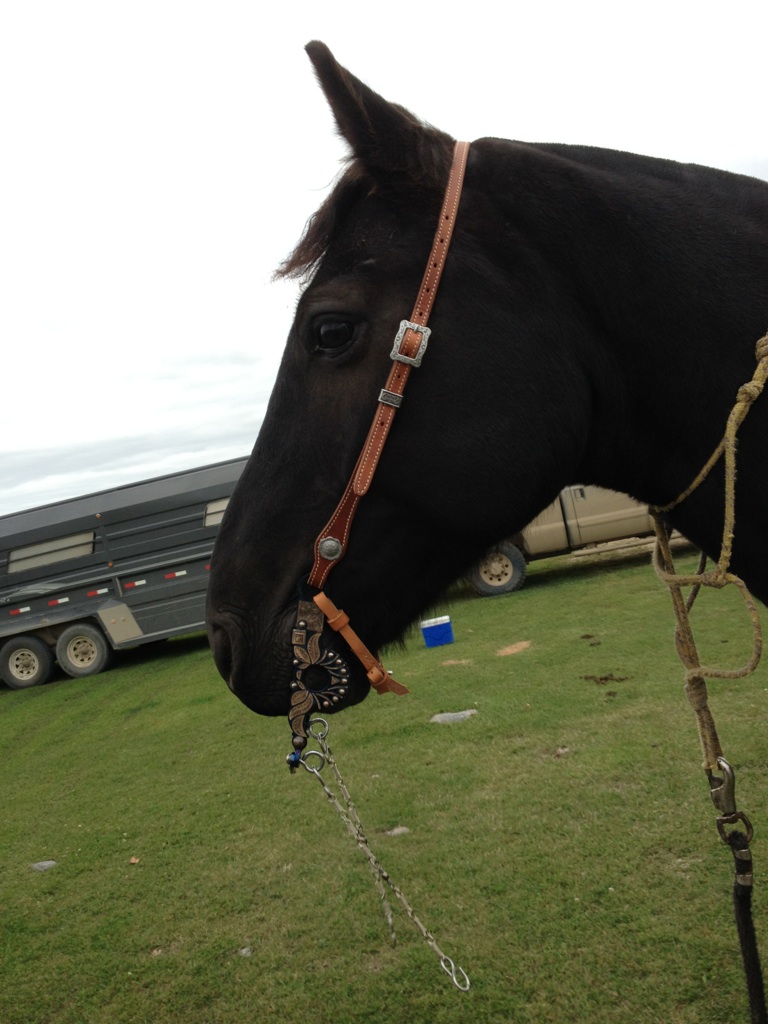
So in view of getting back into the groove of leather work (I spend all summer riding / doing outdoor stuff) I have decided to do some practice work first - Meaning building a pair of chinks for a friend. These will be square bottomed, 'buckaroo' style out of a glove tan leather in a tan color. My biggest challenge with leather work is floral tooling. I'm reasonably artistic, however, I have never drawn a floral pattern I really liked. With that being in mind I purchased Cary Schwarz's floral layout and carving DVD's. They are very good and help to understand how to achieve flow etc. I find that its not to hard to draw a flower or a leaf but to get it all to flow in a cohesive pattern is a nightmare...These DVD's have helped quite a bit. For the yokes on these chinks I created a floral pattern - I have one side carved - The design incorporates my friends brand - The '04'. I'm still not very happy with the pattern but it is probably one of the better ones I have come up with to date. Clearly still need practice though. Here is the yoke for the right side. The other reason for building these chinks first is to get the hang of my new Cobra Class 4 Sewing machine a little better - This machine works great - However I have never used sewing machines prior to this - So there is a definite learning curve. R
-
From the album: Second Saddle Project
Trying to get the hang of floral tooling. Still struggling! -
Hello There, To any interested - I am building two more saddles this winter. So far I am just getting everything set-up. Will start construction soon. To avoid cluttering this forum I have created a blog on this website. If you are interested you can follow my progress there. Once again I am looking for critiques and comments as I go along. Here is a link to the blog - Click Here Ron
-
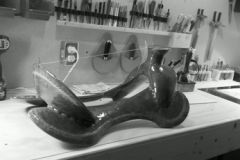
From the album: Second Saddle Project
-
Hello There, I am a very green saddle maker - Have built one saddle so far and am about to start saddles #2 and saddle #3. This blog will allow you to follow my progress and also, will help some of you who are contemplating jumping into addle making understand what is involved. Saddle #2 is going to be a wade. Tree is from Quality Mfg and showed up and fits the horses it will be used on - It is going to have a 15.5" finished seat, inlaid, padded seat and buckrolls. 7/8" flatplate rigging, 2.5" stirrup leathers, guadalajara horn, finished at about 4". Cantle is 12.5" with 1" dish x 4.5" high - I'm planning on going with a cheyenne roll. Saddle #3 is a 3B with a small dia wood post horn. Once again this will be a 15.5" finished seat but it will be a hard seat and a pencil roll. Cantle specs are same as above. It will be 7/8ths flat plate rigged. The tree for this saddle is coming from Glenn Christman. It hasn't showed up yet. I t will be set-up with 2.5" stirrup leathers on the outside of fenders. Trying to get somewhat 'old timey' look. Skirts on both of these saddles will be round and somewhat 'butterfly' styled. Leather is all grade 'A' Hermann oak. 1" bark tanned shearlings. Both saddles will get 3" monel stirrups. My goal is to make both of these rigs look nice - Serpentine border & floral tooling. This is the Quality tree. I am very happy with this tree - It is very symetrical and square.Anyhow, I have all the leather and hardware in now. I have set-up a small saddle shop that is heated and am pretty much ready to get building. As I make progress on these rigs I will post pictures and info. I also am open to critiques and comments on these saddles I am building so please feel free to comment. Ron
-
I just picked up some of this stuff: http://www.sheridanleather.com/Seat_Foam_p/seat-foam.htm Seems pretty firm - Looks like it should work real good - Only 1/4" thick. R
-
From the album: Second Saddle Project
-
Hello CW, Appreciate the info - I actually called Panhandle Friday afternoon and the guy there seemed real decent / very helpful. Price is good on their latigo as well as their Hermann Oak. Have you experience buying Hermann Oak sides from them? Was it good? I might buy all the skirting sides and the latigo from them for my next two rigs. Up here in Canada it's hard to get this stuff now that Caledon Leather is closed. So I've been buying out of the US for the last year anyhow...Shipping is expensive but not much worse than it was from Caledon. Thanks for the help CW - Its appreciated. Regards, Ron L
-
Hello All, I am wondering if anyone can steer me in the right direction to get good quality latigo sides. I have worked with a few hides lately that I really am not comfortable actually using for saddle strings or tie latigos...it was all quite stiff and prone to bleeding color...I ended up using it all for lining breast collars / rear cinches etc. What I am after is something with a waxy feel that is quite pliable... Any tips would be valued... Ron L
-
Hello Slickhorn, I have been through this myself. Last fall I started my first saddle and am now happily using it. I have used the saddle pretty hard. Pasture roping bulls, mother cows and calves and lots of long rides. I spent 12 hours straight in it yesterday. It is on a timberline tree and it hasn't registered any complaints. I am happy with the saddle. It fits me and fits most of the horses I ride very well. That said it is plain, and is definitely not up to professional makers standards. I have a thread on this forum showing my progress on this saddle. That being said I completely agree with Keith Seidel. Building a saddle is expensive if you want to get half decent results, You will need a lot of pricey little tools, leather, and dvd's to guide you. I'll bet you'll burn through 4 sides of Hermann Oak what with mistakes / learning curve to get one saddle, cinch, breast collar etc. For a starter tree - Bear in mind you will have a ton of time into this first saddle...in my mind that means buy the best tree you can afford. If it meant delaying the project one year to get a better tree id say do it - Gives extra time to study and think out things. If I was doing a first time saddle again i'd buy the best hand made tree money can buy. Anyhow, I could have bought a base price saddle from a well known maker for what I have in mine. However all in all I can say I am happy to have made one saddle and will be making two more this winter. Saddle making is extremely satisfying. I don't find it as fun as riding colts and roping but when it is -40 out it's a pretty good way to pass time. If you decide to pursue it my advice is: (if you dont have time for an actual saddle making school which i didn't) Buy both Jeremiah Watt and Dale Harwoods dvd's Read everything you can find on here and elsewhere (Steve Brewers ground seat tutorial I found to be invaluable) buy Al Stohlmans saddle making encyclopaedia set Practice hand sewing a lot if you don't have a sewing machine. get very handy with a round knife learn not to get in a rush!! Look up all the pros posts on here - There are lots of them. The insight they provide is invaluable. Anyhow, this is my opinion which is free and is worth what it costs! Regards, Ron L
-
Association Saddle With Wade Horn? Opinions?
rdl123 replied to Slickhorn's topic in Saddle Construction
Slickhorn. I like the idea of a swell fork with the larger wood horn too. I'm not an experienced maker, however I can't really see a difficulty with constructing this type of saddle - If anything, the larger wood horn should allow your tree maker to get the horn closer to the wither - Making life easier for your horse...by decreasing the leverage on it. Here is a real nice saddle on this forum: http://leatherworker.net/forum/index.php?showtopic=40989 And an example of another Will James tree on Rod & Denise's website: http://www.rodnikkel.com/content/saddle-tree-blog-from-shop-and-desk/wood-post-will-james-saddle-tree/ As well as: http://leatherworker.net/forum/index.php?app=galleryℑ=1766 I sure can't see anything 'wrong' with this style - Looks to me like the ultimate set-up for riding green horses yet still having the ability to slip rope while out in the pasture... I am building two more slick forks this winter but maybe I'll get one of these wood post swell fork trees on order...I think it would be a neat project. Regards, Ron L -
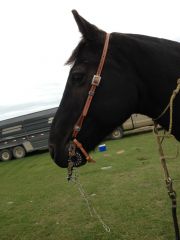
From the album: Cobra Class 4 Projects
Simple spade bit hanger sewn on my new Cobra Class 4. *oz. Herman Oak lined with 3oz latigo that i split down from some 8oz stuff I had around. -
Hello, To all aspiring saddle and tack makers - This is a quick review of the machine I just bought which is a Cobras Class 4- I am writing this strictly to help you make a major decision - I know it took me hours and days of sifting though information and reviews online as well as calling the various 441 clone makers to decide on a machine - I hope this simplifies the process for you. I personally found that the decision was a hard one to make - It's a big investment, and there are many conflicting opinions online which confuse a rookie like myself. My goal was to buy a machine which would be: A) easy to use for a newbie, Sew as heavy as skirts to fleece for saddles, C) Sew as light as making a pair of armitas, D) be fairly fool proof. My decision to purchase the Class 4 was based on: 01 - A saddle maker who owns this machine highly recommended it and Steve as well - He told me it was the easiest machine to use he's ever encountered. 02 - I believe that this machine will hold it's value relatively well. 03 - It is fairly versatile 04 - Controlability of sewing speed 05 - Steve and Cobra are well regarded Prior to receiving this machine I had used a home owners grade machine maybe once so I am a complete rookie in the sewing world. However, the Cobra set-up very easily. I might have spent an hour or so setting it up. I then probably spent three+ hours sewing scrap material - It definitely takes some getting used to if you aren't familiar with running a sewing machine. I would highly recommend to any new sewing machine owner to spend as much time as you need to feel completely comfortable sewing and making tension adjustments before starting into an actual project. If not, I can guarantee you will wreck a piece or two. Anyhow, it probably took me about 4 hours to get the hang of this machine - I have now completed a couple of items - A simple spade bit hanger (pic attached), a pulling style breast collar and some rear billets for my saddle. The machine is very easy to use. Once you get the hang of it really works well - The speed control is amazing. I can literally sew as slow as I want to (Very slow at times for this rookie) and I find the tension adjustments between leather thicknesses and thread sizes fairly easy and intuitive. The bottom line is I am very happy with my purchase, The machine works well - I have sewn two layers of light chap leather together with ease and as heavy as 3/4" skirting with ease as well. I will post some pictures of projects I complete over the next while. My hope is that this will help the rest of you aspiring sewing machine owners out there make a simple informed decision. Regards, Ron L
-
Randy, Bear in mind that I'm completely green at saddle making but one reason i like the idea of putting rigging plates on first is I can feather them down to nothing and get them higher up the fork on a slick fork - I feel this is stronger. Then, once my swell cover is on it covers it up really nice. I feel i get more strength by securing the rigging plate to the fork rather than just the actual bars. I had the opportunity to rope a bull the other day and am pleased to report that the first saddle i made held up well - No creaks, groans or complaints! Just my 2 cents! Regards, Ron L
-
Randy, What Keith has explained is what I did on my rig - I cut the pattern almost flat across the bottom and then stretched (with awls) the cantle back into place - This put huge tension on the top edge and it literally 'snapped' into place. Dale Harwood talks about it taking a bit to get your pattern for this piece to work just how you want... I definitely had that experience - Thankfully I'd cut my piece big and this gave me room to keep making my bottom cut flatter and flatter until I got enough tension on the top edge. Looking forward to seeing this completed rig! Ron L
-
Hello There, Is this machine still available? Thanks, Ron
-
Oltoot: Thanks for commenting on this for me! #2 & #6 - Rivet Doming - Yes,I am going to quit using the domer I have - Douglas Tools makes one that just eases the lip over a little but leaves the rivet largely flat. I may purchase one of those. #3 - I like the idea of thinning it down - I figured I was sewing through about 1.25" - 1.5" of leather when I sewed that cover on...my awl is a Douglas tools awl from Sheridan Leather - Seems pretty rigid to me. I think the deviation was me not having the hang of it...I would have to say that sewing the Cheyenne roll was probably the hardest physical work on this project - Pushing an awl at 5 spi through that much leather isn't my idea of a party! #5 - Point taken and I agree - I don't care for saddles that pinch at the cantle corners. #7 - My theory was that the my rope (while tied on and bouncing around) would wear through tooled leather swell cover faster than just smooth leather - I would like to hear if this is actually a concern there. #8 - That front lip at the top of the gullet is probably one of the things that bugs me the most. Next time I will scribe a line 3/8"+ from my initial scribed line. #9 - I am not sure what to think here. My reasoning is that if a horn cap gets trashed it's an easier job to fix. However I can see your side of the debate too...so now I don't know what to think #10 - I agree now that you point it out...Next time I want an off round cap I will order a guadalajara horn cap #11 - Yep - Block in place, cut after is my new guideline until I create a pattern I really like. Anyhow, thanks again Oltoot and everyone else who has commented - It sure helps to get experienced eyes on this. Next saddle looks like it will be a Weatherly tree - However the guy wants a wood post style horn but wants the cap real small - Like 3" finished and then the neck to taper down. So It will have t have a metal horn - We're having a hard time sourcing a metal horn with that exact shape... Hopefully do some roping on the new rig this weekend! Regards, Ron
-
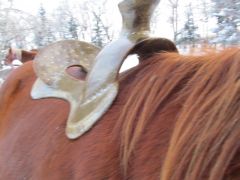
Well - Put about 11-12 miles on the new rig on Saturday - I'm pleased to report that it sat good on the horses I rode and sweated both of them up real even. Noticed it really seems to sit where it's put...Didn't have to cinch it up nearly as tight as my old saddle to keep it from rolling. Anyhow, it also seamed to fit my rear end good too...Biggest challenge for me on this project was to order a tree that would the majority of canadian ranch horses...I don;t own my own horses - I ride for other people and it was important to me that this rig would fit your average horse. Obviously I'll need a lot more time on this thing to really determine how well it fits but s far so good. Never had a chance to rope anything off it on sat but that will happen soon... Bottom line is so far so good and I am pretty happy with how it feels for me but more importantly how it sat on the horses... R
-
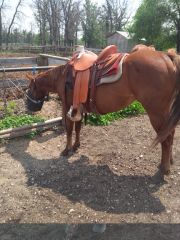
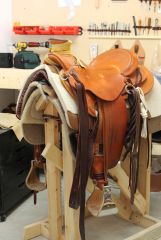
From the album: first saddle project
-
From the album: first saddle project
-
Hello All: Thanks for the kind words and the critiques!! CWR: You had me sweating on the screw location, Luckily I am tall and skinny and like to ride with my legs hanging fairly straight down! In this position the screw is about 2" away from my leg even when I swing my stirrups as far forward as I can! However, going forward the screw location will be up and forward!! Grampa Joel: I will have to try that trick - The worst problem I had was trying to aim the dang awl...I would do good for seven stitches and then get off track...hard to correct once you have a hole where you don't want one. Big Sioux: Thanks for the compliments but thanks even more for catching issues! Can't hardly believe I had that one Blevins sleeve on backwards - Not sure what I was smoking when I put that on... I agree on the Nevada twist - I noticed it didn't sit like I wanted it to but I wasn't sure what to change...Any advice on what to do there? This morning I tried to squeeze some twist into the entire fender length...I will also try to get some more twist on the actual Blevins buckle area...Any tips you have to do this better will be appreciated. Regarding the fleece - I used a pair of $30.00 walmart electric hair clippers - Worked good actually - However I will go over again and clean up the edges...And regarding the fuzzies - Burnishing is not my favorite activity - However about the time you must have been typing this I was going over the saddle edges with canvas, a bit of moisture and beeswax...I'll keep at it until they stay down forever...Seems like I would get the edge looking great, then, a few days later they would re-appear...The fork cover - I agree on this too - I wish that lip was about 3/16" to 1/4" farther forward..When I test fitted it, it looked good -When I actually glued it up and stretched it in the dang thing refused to work forward - I'll bet I spent an hour and half trying to coax that thing forward...However, next time I will know to make the fold about a 1/4" forward of where I did last time... Anyhow - Thanks for catching these issues, really helps to get another viewpoint and a more experienced eye on it - I've got a second tree on order with Glenn Christman... See if I can't resolve some of these things on saddle #2. Anyhow, likely take this thing out on Saturday and see if we can't get some rope grooves worked into the horn wrap and pack that fleece down a bit...I just hope the seat I put in proves comfortable... Keep the critiques coming! Regards, Ron L
-
To any who are interested - Saddle is more or les done - I have started a new topic in saddle makers gallery... To all who helped me on this project - Many thanks for your advice and help... R