rdl123
-
Posts
366 -
Joined
-
Last visited
Content Type
Profiles
Forums
Events
Blogs
Gallery
Store
Everything posted by rdl123
-
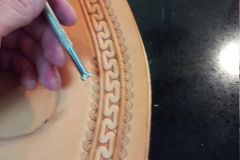
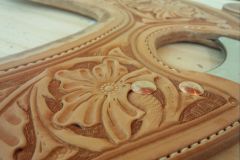
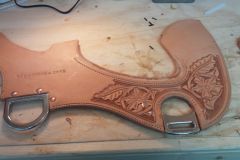
From the album: Second Saddle Project
-
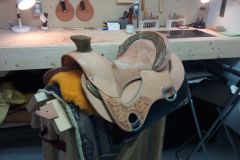
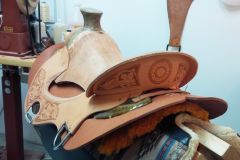
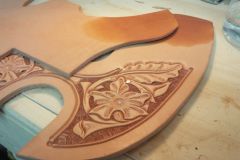
From the album: Second Saddle Project
-
Hello CourtneyLynn, I like a smooth seat - Its all I have ever ridden and like you I prefer the ability to shift around. I've ridden some very rough roughouts and didn't care for them at all - That said I have a friend who rides for the PFRA and he rides a wade roughout - He's put a lot of miles in that rig and its so burnished its like riding a smoothout - I've ridden that saddle and sure didn't mind it. Keep in mind that not all roughouts are created equal - Some makers will really buff that flesh side of the hide and get it pretty smooth - I've also seen some that were left pretty raggy. One thing about a roughout - They're probably more versatile...If you want 'grip' leave it pretty rough and maintain it with a wire brush - If you decide smoothout is the way you want it to ride just let it burnish up with time and miles... If you have the opportunity do like Reid says and ride both types. That'll be the best way to determine what you like. Roughouts can look really nice - Especially the 'half breed' styles - Checkout: http://www.oxranch.net/saddles/group_03/026_26.jpg http://www.sagecreeksaddles.com/image/obj106geo117pg6p1.jpg http://www.stevemasonsaddles.com/images/saddle1.jpg Ron
-
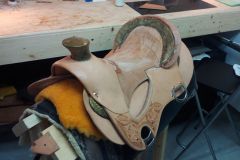
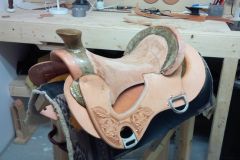
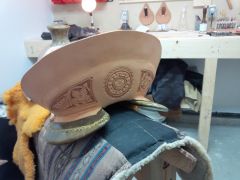
From the album: Second Saddle Project
-
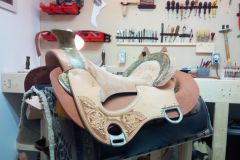
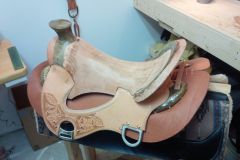
From the album: Second Saddle Project
-
 Hey Ramblinrovers, I haven't heard of him... Is he a saddle maker? I;d be interested to hear more! Ron
 -
 Thanks Thor - The back-grounding - Yes, I agree - It could use work - I need more practice/stamping time. I'll burnish above the hardware - I believe it is necessary to seal the leather edge.
 -
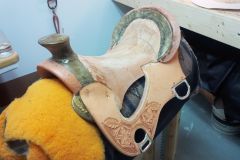
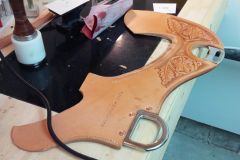
Dang - Just typed up a whole entire update and the thing deleted somehow. This post is going to contain a lot less detail! Anyhow - Life has been busy so haven't put in much time in on this thing, but here is progress from Saturday and last night. Rigging plates installed saturday. I like to glue mine in as well as fasten mechanically. Last night I blocked on my skirts and cut them to the bottom profile I wanted: Also, this time i'm not lacing my skirts all the way to the back tip. I;ve noticed a lot of guys end up cutting their lacing as they are wearing the loin hair off a horse. I figure this time i'll just lace to within about 2" - 2.5" of the skirt tips and see how I like that...the lacing will be hidden by the rear jockeys - So instead of using a shield to connect the jockeys i think i might lace the ones on this rig together. So far so good - Managed to not wreck these skirts - As some of you may recall I wrecked my first pair on saddle #1. Expensive mistake! Next step is cantle filler to help stiffen cheyenne roll and then swell cover - Last time my swell cover wasn't that great - Front lip was too thick and was also set back about 5/16" too far back...we'll see how it goes this time! Also, last time i used a full 14oz piece for my cheyenne roll stiffener - Made for tough sewing when I put my cantle binding on...this time i'm gonna experiment and try a nice piece of 9oz. Help keep that cheyenne roll from getting so thick. R March 03, 2015 So over the weekend I cut, fitted and stretched the swell cover in. I'm not 100% sure why but i seemed to really have to fight this one. It didn't want to stretch in tight on the front lip. Anyhow, i got it in more or less to my satisfaction - However it seemed like I had to fight it way too much - If anyone has tips / advice on how to make this go a little smoother / easier I'd sure be up to hear them . Here are a couple of pictures - The saddle is just sitting on the skirts - They haven't been fastened - For tooling on the skirts I am going to do a serpentine border... The border around my makers mark is what i'm going to do on the skirts... If anyone has comments / advice on things i should be doing different i'm very happy to hear from them! Many Thanks, Ron L
-
From the album: Second Saddle Project
-
From the album: Second Saddle Project
-
From the album: Second Saddle Project
-
From the album: Second Saddle Project
-
From the album: Second Saddle Project
-
Bill, Yes, it sure is enjoyable - I don't consider saddle making 'fun' like I do riding colts or roping but it is very satisfying! If you do not have time in your schedule to attend an actual school I would highly recommend Dale Harwood & Jeremiah Watts saddle making DVD's - I find them very helpful - I'm sure they don't replace hands on, one-on-one teaching but for someone like me who can't get away from my real job they sure are handy. Let us know how your wife likes the saddle! From the pics your seat profile looks like it should be nice to sit in! Regards, Ron
-
Very nice Job Wrangler B... I like the clean look! Now for the fun part of actually riding it & enjoying all that hard work! R
-
Hello Archer 55, I believe you will be best served following Keith's advice of going with a solid used rig from a reputable maker. However, in the event that funds are just not available for that expense I could recommend Corriente saddles. I spent a few days in a couple of their wades on a ranch in SW Saskatchewan. They sweated up the quarter horses he had good, were pretty comfortable and the guy who owned those saddles routinely ropes yearlings so I know the hold up all right. They are fairly inexpensive. That is the route I personally went - I purchased a lower end but pretty well built rig and rode it for a couple years until I could afford to build my own 'custom' rig. The lower end saddle kept me riding and it actually fit horses pretty well. It wasn't something I would have wanted to rope anything big off of. I did hock some calves at brandings off it a few times and it held up fine. The bottom line is it kept me riding horses - After I had built my 'custom' rig i sold it for just a little less than what I paid for it to a trail rider. Now having a saddle that really fits horses well and really fits me well I'd never ride anything less than a custom rig. Anyhow, just some ramblings. Ron L
-
From the album: Second Saddle Project
-
From the album: Second Saddle Project
-
 Good catch Randy! I actually included one more zero than I had planned on I seriously doubt I'll ever make more than 9999 saddles!! At this rate i'd be 10027 years old before I got that done. Anyhow - Thanks for the compliments - Cary Schwarz DVD's have been helpful - However when you look at his work a guy like me starts to feel like I have no right touching a piece of Hermann Oak! Cary does some absolutely awesome tooling - Love his stuff. He really gets some nice flow and stem work going. Check his website out: http://www.caryschwarz.com/ R
 -
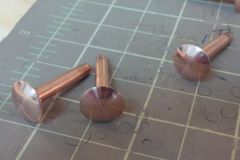
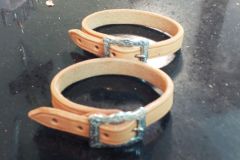
Here is the latest progress: Rigging plates are all tooled up and have one sewn and riveted, the next is ready to sew and rivet. While I waited for glue to dry I built some stirrup hobbles - These are 1/2"w and set-up for 2.5" stirrup leathers. Jeremiah Watt buckles. Used 1/8" beader to create edge detail. For my rivets - I know there is a lot of debate surrounding 'doming' rivets. I certainly agree that too heavy of a dome is undesirable - However, I purchased the domers from Sheridan Leather and am pretty happy with them. They just ease the rivet enough to keep the sharp outside edge down and when you polish them up they look great. As you can see I sewed up the off side rigging plate first - Mainly because I'm still trying to get handy with my Cobras Class 4 - It works good that machine. Sewed up that first plate like it was butter. Really happy with it. I'd still say though that hand stitching does that most accurate clean job...but for those of us who do this as a hobby and don't have lots of spare time, A cobra machine is a great investment - Does a very good job, easy to use and save hours. One thing I'm doing on this project - I'm trying to get ahead of all the little stuff - Stirrup hobbles, rope straps and latigo carriers etc. That way at the end you can save some serious time by not having to mess around with all that little junk...Anyhow, next step is to install these plates, the swell cover and then black the skirts on! 30/01/15 - So last night I glued up the last 'on-side' rigging plate and while I was waiting for that to set-up I polished up 7 rivets - I personally like a polished rivet and I also like them to have a light dome to them. For those who have never 'domed and polished' a rivet I will explain how I do it. Doming & Polishing Rivets: Tools Needed: Hammer, Domers (Sheridan Leather), Mini Anvil (Tandy), sand paper (200 & 400 Grit), and leather scrap with stropping compound. I have modified one of the little mini anvils from tandy. I have drilled holes in the top - These are sized just larger than the two rivet sizes I use - #9's and #12's, The holes are drilled far enough down into the anvil that the rivet sticks out of the top of the anvil by only about and 1/8" or so. This gives me a secure way to hold the rivet when I 'pre dome' it. I grab a rivet, stick it in the hole in the anvil and then pre-dome it using my Sheridan Leather domers - A few good shots with a hammer is all it takes. I then chuck the rivet into a cheapo 3/8" electric drill I keep handy - I have the drill rigidly mounted and this allows me to use a fine sandpaper (200 - 400 grit) to sand the nicks and abrasions that seem to come with typical copper rivets. The drill spins the rivet and all I have to do is work the sandpaper till the rivet smooths out and all the nicks and ridges are gone. I then take a piece of heavy hermann oak that is loaded with stropping compound and do the same thing. This polishes the rivet till it really shines. If stropping compound remains on the rivet I buff it off with a cloth. This is the result: I'll try to get better pictures of this on the weekend. Anyhow - basically I think it makes the end product look better and it also keeps the sharp outside edge of the rivet tucked down so it won;t catch on clothes/other leather etc. rdl
-
From the album: Second Saddle Project
-
From the album: Second Saddle Project
-
From the album: Second Saddle Project
-
From the album: Second Saddle Project
-
From the album: Second Saddle Project
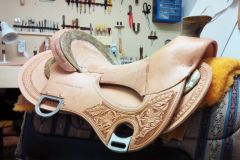
Still need to fold down Cheyenne roll.