

rdl123
-
Posts
366 -
Joined
-
Last visited
Content Type
Profiles
Forums
Events
Blogs
Gallery
Store
Everything posted by rdl123
-
I ended up building the face of the horn out a bit over the weekend, got a slope that I am happy with now - Also threw the gullet cover in. I'll try to get some pictures posted of this. The other thing I have decided to do is purchase Dale Harwoods saddle making DVD's - So hoping this will also help me / help prevent wasting skirting leather.
-
Hello All: Thanks for the responses - Makes it simple for me - I will rig my saddle the way I have been taught - No nylon webbing! This old timer is someone I respect, very good horseman, has taught me a lot but this is the one piece of advice I wondered about... Thanks again for the info, rdl
-
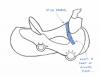
Quick question on flat plate rigging - Had an old timer tell me that all properly built, heavy ranch saddles will have a piece of nylon webbing material riveted to the 7/8ths rigging at the front. The webbing runs over the ground seat just behind the horn, creating a continuous rigging is what he tells me - Anyone ever heard of this? Seems to me like you could run the risk of crushing your ground seat... He says just screwing the rigging up front isn't strong enough? I've understood that that was all that was necessary...Can someone please comment? I have attached a rough sketch of what he is talking about...I am making myself a saddle for roping and want to ensure it is strong enough to handle anything I might latch onto so wondering if this nylon is necessary. Many Thanks, rdl
-
Thanks Barbiesdude: I'll make sure to keep the horn tapered. My current saddle actually has a fairly cylindrical shaped horn and I have had issues with the dallies getting jammed when ponying colts...Can make for some interesting times!
-
Thanks for all of the advice everyone! Really appreciate it - Sounds like my best bet is to experiment with the horn - Might take a couple shots to get the result I want. https://www.freckerssaddlery.com/the_buck_brannaman.php (this is what I want my finished horn to look like... Regards, rdl
-
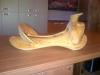
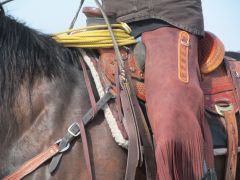
I am just starting my first saddle project... Tree: Timberline Wade - 15.5" finished seat, 13" cantle, 1.5" dish, Horn 3" x 4.25" cap @ 1.25" tilt - Bars set-up for typical Canadian ranch horse... Leather - Herman Oak Hardware - Stainless Steel from Sheridan leather I have attached a pic of the tree - What I would like to know for starters: I am trying to achieve the look / feel of the saddles you see Buck Brannaman riding - Really like how his horns are set-up - Sloping top, lots of diameter. This tree - Seems like there is a lot of undercut under the front of the top cap, a little more than I hoped for...Would there be anything wrong with cutting and skiving a piece in that woudld wrap around the front face of the horn post only to build it out? Nailed and glued of course? Would this be a bad idea? Basically it would reduce the undercut by 1/4" or so... How much undercut will dissapear once I finish this - wrapped in leather and then wrapped in 'mulehide'? Also, have read that some don't finish their horn posts in leather - They just use donut cap and proceed to finish wiith the horn wrap? Any comments on this? I'm inclined to think I want my horn post finished in leather and then wrapped in mule hide... On a horn this size - Cap and wrap or donut & filler - How to finish post with donut & filler? Any advice and comments will be appreciated! Also, a bit of background - Fairly new to leather work - Have built several pairs of tooled chaps / chinks, built rear cinches etc. Have all of Al Atohlmans saddle making books as well as Harry Adams, However, going to be using Steve Brewers ground seat techniques as they seem like a better way to go... My goal is to build a plain, smooth out working saddle - Be nice to have it ready for branding season.
-
From the album: Latest Chinks
-
From the album: Latest Chinks
-
From the album: Latest Chinks
-
From the album: Latest Chinks
-
From the album: Latest Chinks
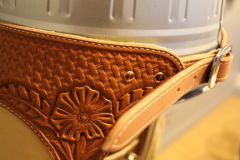
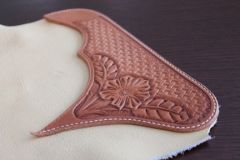
These yokes I made from some real heavy skirting leather - roughed out the shape and skived them down to about 9oz. They have been oiled with neatsfoot about 3 times. -
From the album: Latest Chinks
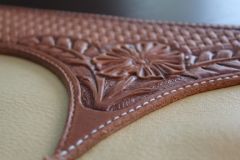
Here's a close up of the yoke - My floral tooling is mediocre at best - Really need to study floral layout and technique before I try something with full floral tooling. -
From the album: Latest Chinks
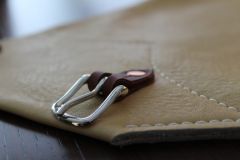
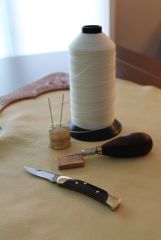
Here are some of the tools I use for hand sewing - Barry King awl handle with Douglas tools awls - Makes sewing a lot easier. I think the needles are Osborne #1. Keep a real sharp knife handy too. Sure makes a difference to use good tools - From now on I will use only quality tools from either Barry King or Vandy @ Douglas. -
From the album: Working Chinks
-
From the album: Working Chinks
-
Why Is Woolskin Put On The Underside Of A Western Saddle?
rdl123 replied to GrampaJoel's topic in Saddle Construction
I know of a saddle maker up here in Saskatchewan who uses no sheepskin...The skirts are made up with the bottom side piece rough out...He runs the grain like you do sheepskin to keep the pad in place...And this guy was a PFRA manager for years and rode his own saddles so it obviously worked for him...He just roughs up the bottom rough out side every once in a while and had no issues with balankets or pads slipping...A friend rides one of his saddles on his own ranch and says it sits really well on a horse...specially for roping....Wonder if maybe the lack of the sheepskin layer helps there...

