rdl123
-
Posts
366 -
Joined
-
Last visited
Content Type
Profiles
Forums
Events
Blogs
Gallery
Store
Everything posted by rdl123
-
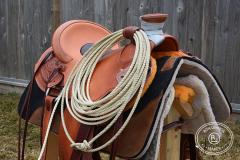
From the album: Second Saddle Project
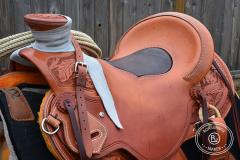
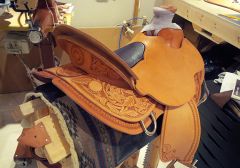
Second saddle finally done. Oil still needs to even out. It was spitting a little when I took these pics - Hence the dark spots here and there... -
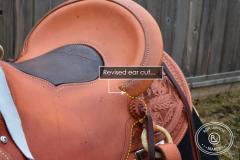
Hello Keith, Thanks for taking the time to put this all down for me! I really appreciate the insights. I knew there was something not 100% on the overall balance and look on this saddle but I couldn't put my finger on it...It was just a sense that something was off visually. On the horn cap - My problem there is compounded by the fact that I cut the horn cap so close to my stitch line on the bottom. I wanted a small as possible horn cap on this rig and I made a poor decision to trim the horn about 3/16" away from the stitch line under the cap. I angled my stitches so I got proper clearance up top but I didn't leave myself enough room to get it properly edged on the underside. Lesson learned there. Burnishing - I will have to give the hardwood stick a try - Also I had forgotten about using bar type glycerin soap - I have some and will incorporate it into my burnishing. In terms of design - I'm glad for the insight on this. It never crossed my mind to consider the fender length/skirt depth ratio previously - This does make sense though. I do create all of my own patterns so I will keep this in mind on saddle #3. In terms of the rear rigging dee - I agree with you and CWR - I wish it was about 3/4" higher - Do you think that would be enough? My theory with rear rigging dees is that I do not want my rear billet to sit on top of the skirts as a good horseman once told me he'd seen skirts deform from pressure there and then sore up horses. What are your thoughts on that? What do you like to see there? On skirt length behind cantle - What is a good overall skirt length? Part of the reason I tried to keep this one shorter is that we do ride some younger horses. However I am wondering if maybe I am misguided in this? I will measure my length there as now that you have pointed it out it does look short! Padded seat - I will make sure to modify my pattern for the next rig and get it wider. Tooling on the cantle dish - I had actually planned to tool this one - However at the last minute I chickened out as I was worried I'd wreck my seat piece! I'm still not very confident with tooling. I'd never thought to tool the cheyenne roll - However looking at your website I see how nice it does look. Guess I need to practice my tooling and build confidence. On the Cheyenne roll - Yes - I tried to get it flatter by working at it and skiving material off the back edge - But I guess I should have got it pulled in tighter which would have helped to fold it down. Out of curiosity - In your view is it acceptable practice to cut a wedge piece out of the cantle back where it creates the foundation of the cheyenne roll to help get it sloped down more? I'm not 100% sure I understand what you mean on the earcuts - I will post a picture to see if I have interpreted what you are suggesting correctly. In terms of the horn wrap - I will use this technique and re wrap the horn on this saddle and the one on my own rig - I do find it annoying to have to pull out slack - Your comments make sense and I will use this method from now on. I have a chinaman - Just haven't been casing my horn wrap at all. And in closing - I find your comments very helpful and not discouraging in any way. My goal is to make good saddles - Not mediocre ones! Your comments will help me build a better balanced, more functional saddle with improved aesthetics on round #3! I'd like to thank you and all others who have taken the time to comment and suggest improvements - This forum has been invaluable to me - I am up in Saskatchewan Canada and there are not a lot of saddle makers nearby to get help from so this forum has made a big difference for me. Ron L
-
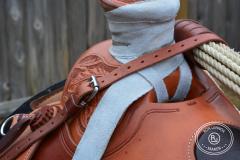
All - I appreciate the kind words! Randy - I do think you are qualified to comment! Yes the latigo hangers are lined - With a 5oz latigo. They were kinda light so I wanted to beef them up. BondoBob - Good idea! I sure like all the information available on this site! That tip you provided will definitely be put to use on the next saddle. It's an area I really need help in. Billy H - For previous experience I have built one saddle and about 8 pairs of chinks. I'm real slow though! This saddle almost took two years. (Big problem is being busy with other stuff). Goldshot - On the horn edging - I agree - I am going to see what I can do to get this looking better! Didn't really notice it until you pointed it out - I'll try and get it smoothed out! The horn wrap - This saddle will be used for roping - We dally and as rope is run the horn wrap tightens up - I leave the tail loose so I can jerk the excess tight. I'd like to have it tucked away somewhere but after roping a few critters there would be slack put into the tail if it was fixed. I like to wrap over the front lip for the simple reason that it helps keep the swell cover from getting so worn out by rope running over it. It doesn't eliminate it but it does help. In terms of the fenders - I totally agree on this too. I wish they were about 2" longer - However this saddle is for my wife and she isn't real tall - The saddle as you see it is set-up for her leg length. If we ever go to sell this thing we may have to provide longer fenders. However I didn't want to make it with longer fenders and have a bunch of bulk under the seat jockey for my wife though... Once again - Thanks for all the tips & input - It is valued! R
-
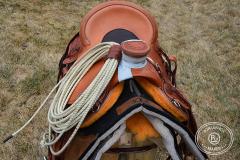
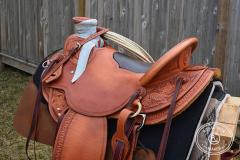
 Hello Dwight, The reason I use wood post horns and a leather wrap is for the purpose of actual ranch roping. We rope and dally. The bigger wood post horn means there is a larger surface area to help slow the rope down. The wrap is called 'Mule Hide' - Its usually a split of some type. I use 5oz chap leather. This provides a wear layer as a lot of friction is created by 'running rope'. Running rope is the process of dallying and letting the rope 'run' around the horn. The more wraps the less the rope will run. Four wraps on a horn like this will stop a big critter. The large diameter horn allows us to use the horn like a clutch on our rope - Slowly bringing everything to a stop when we have something large roped. Also, it allows us to slip rope if we are pulling something heavy like a bull. This frees up our horses feet. It just a practical thing for saddles that are used in ranch situations where roping will happen. R
 -
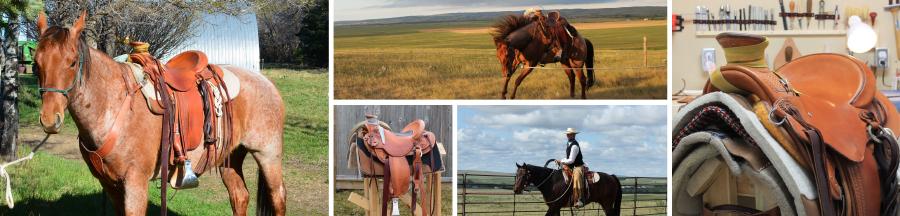
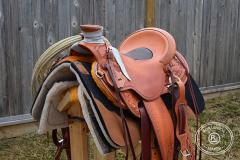
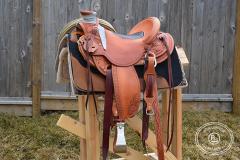
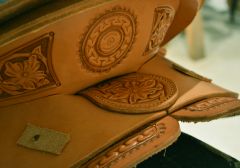
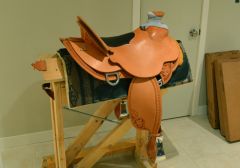
Hello All, I have finally finished saddle number 2 - This has been a long project as we moved house twice in the space of time this was built in (Joy of being a house fixer upper type). I would appreciate comments on this saddle - Specifically I am looking for things that I have done in ignorance that are not up to scratch. Helpful criticism is looked for and will be valued! This saddle was built on a Sonny Felkins tree (Quality MFG.), all Hermann Oak leather, Jeremiah Watt hardware, Amish stirrups, and all stainless steel buckles, nails and screws. The seat is an all leather ground seat. Rigging is placed about 7/8 and is flat plate type. Skirts are butterfly with 1" bark tanned shearling. Sewed this up on a Cobra Class 4 sewing machine. Cantle and horn are stitched by hand with an awl and two needles at 6 spi. Not shown is a 40" x 6" rear cinch I built for it too. Glue used was Barge. Hermann Oak leather seemed to have a few 'vein' type markings. Tried to eliminate them but there are a couple on left seat jockey. I still need to get better at burnishing edges. Don't much care for that task. Thanks for viewing these - I look forward to suggestions for improvement. Ron L
-
From the album: Second Saddle Project
-
From the album: Second Saddle Project
-
From the album: Second Saddle Project
-
From the album: Second Saddle Project
-
From the album: Second Saddle Project
-
From the album: Second Saddle Project
-
From the album: Second Saddle Project
-
From the album: Second Saddle Project
Second saddle finally done. Oil still needs to even out. It was spitting a little when I took these pics - Hence the dark spots here and there... -
Hello Randy, I'm with Oltoot - I really enjoy slick forks and they can be made a little more secure with buck rolls as needed - Also, I've always liked the looks of this saddle by Steve Mason: I think it's been referred to as a 'swade' - Might be a neat consideration. http://leatherworker.net/forum/index.php?showtopic=27756&hl=swade#entry174515 Regards, R
-
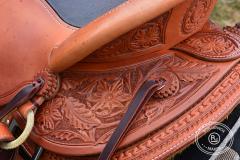
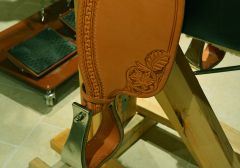
Got one side of my rear jockeys tooled up last night. Here is a fuzzy blackberry picture: Tooling is still amateurish but I am slowly getting more comfortable with it. I would appreciate feedback on what I can do to make it better. Thanks, Ron L
-
From the album: Second Saddle Project
-
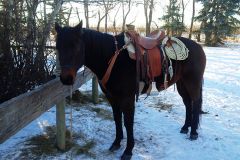 Got the pattern from Cow Camp Saddlery - Works real good. Has fit every horse I've put it on. I use the cross over strap over the neck to fine tune fit. The one I built off my own pattern was no good!
 -
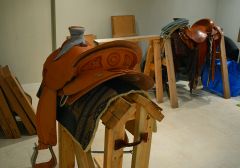
Have been working a little on this second rig. Starting to feel like I'm getting some traction. Here it is with Fenders & Stirrup leather assemblies in as well as rear jockeys fitted. The rear jockeys will be filled with floral tooling. The seat has yet to get a 1/8" bead border. Next Step is to tool both seat & jockeys. Ron L
-
From the album: Second Saddle Project
-
From the album: Second Saddle Project
-
From the album: Second Saddle Project
-
From the album: Second Saddle Project
-
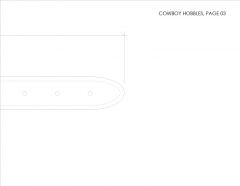
Hello Chris, Sorry for delay in getting this up. Here are a couple pics of the hobbles I built. I changed the pattern after I got these ones made and the final pattern is what I will upload next. The patterns are here: There are two versions - One is a complete pattern - You'll have to have it printed at a professional print shop to be accurate. The others ones are split to print on 8.5" x 11" paper. The buckles I use are these: http://www.longviewleather.com/150-buckle-stainless-steel/ - I buy the 1.5" size. I use 8oz - 10oz Hermann Oak for my hobbles and line them with 6oz - 7oz latigo. I figure that's strong enough. But am open for opinions on that. Any questions let me know. This pattern is something you can tweak to suit your own preference. It should accommodate your typical ranch horse. If you want the proper PDF file of these patterns pm me and I will email it to you. R
-

From the album: Hobbles
Set-up to print at 8.5" x 33" - Ensure file prints at 100%. -
From the album: Hobbles
Set-up to print at 8.5" x 11" - Ensure file prints at 100%.