-
Posts
143 -
Joined
-
Last visited
Content Type
Profiles
Forums
Events
Blogs
Gallery
Store
Everything posted by David Bruce
-

Custom Dual Strap Satchel
David Bruce replied to David Bruce's topic in Satchels, Luggage and Briefcases
The lining is stitched to the bag so there is no chance of it coming loose.- 15 replies
-
- satchel
- leather bag
-
(and 4 more)
Tagged with:
-
This is my take on a traditional dual strap satchel. I used Horween's Chromexcel, Bucanneer and Casco horse front. The bag is hand stitched with brass and copper rivets and the straps were sewn on my CB3200. It has a removable pouch that can fit small items or a small tablet.
- 15 replies
-
- satchel
- leather bag
-
(and 4 more)
Tagged with:
-
Thanks for the kind words. I'm glad that folks like my work. The customer requested a "western style" design so I thought that this would be a good time to try out this type of look that I'd been wanting to do for a while. I think they were surprised at how intricate it was but, that's what happens when you take pride in your work right? I only use Hermann Oak leather for tooling so that may be why the color comes out as it does and why it molds well. I haven't tried other veg tan leather to know either way. For molding, I made a simple last out of pine and used a modeling tool to smooth out the edges prior to clamping. I wet the leather completely before molding. I didn't even use an upper frame like some do. For the dye, I used an airbrush set at 30 psi and lightly sprayed the dye until I got the tone that I was after. I sealed it with one coat of RTC, applied fiebings mahogany antique paste and finished with Angelus Matte.
- 15 replies
-
- hand tooling
- multi tool
-
(and 5 more)
Tagged with:
-
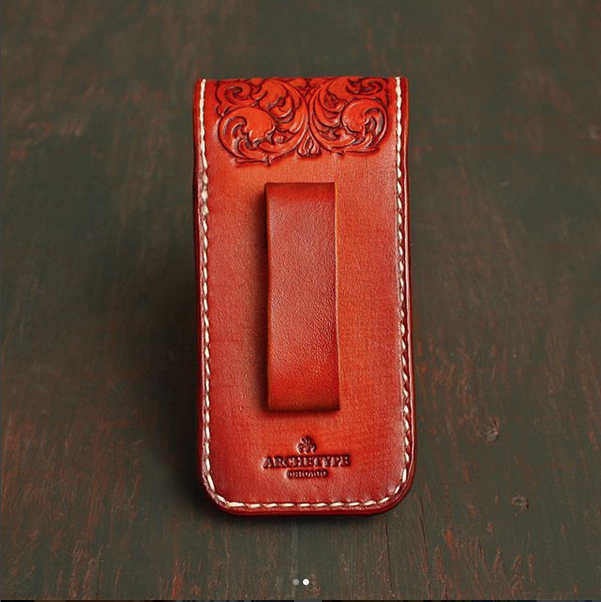
Thanks, I used a few different Barry King tools for this along with a modeling tool. The belt loop is attached with brass rivets that are flattened so as to not interfere with the tool.
- 15 replies
-
- hand tooling
- multi tool
-
(and 5 more)
Tagged with:
-
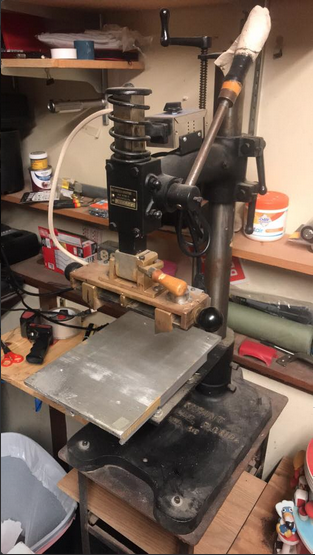
A friend from out of state has offered to sell me an old kwikprint press that he picked up years ago but never used. He says that it heats up fine but that's all he knows about it. I looked into parts for it and they are expensive. Can anyone tell from the photo if this machine is complete and what would be a fair price for it? Any insight would be appreciated.
-
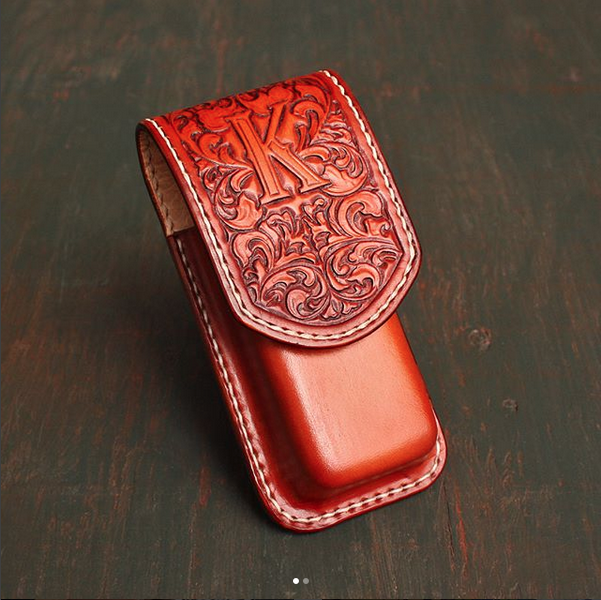
This is a custom case for a leatherman tool that I did recently. It's 5 oz. Hermann Oak that I wet molded on a wooden last that I made. It' has a hand tooled floral/engraving style design and initial. I used Fiebing's Medium Brown dye and Angelus Matte Finish. I also used a hidden magnetic closure to show off the tooling. It's lined with calfskin and hand stitched.
- 15 replies
-
- hand tooling
- multi tool
-
(and 5 more)
Tagged with:
-
Ferg, did you get my message?
-
Ferg, I sent you a pm.
-
In the off chance that someone is looking to sell. I'm looking for a top and bottom feed skiver in good working order. Fortuna or Cobra are brands that I've been looking at. I'm located in Chicago and willing to drive if in the midwest. Please include shipping costs in message if elsewhere. Thanks in advance.
-
Thanks! I discovered this while monkeying around with it after I created the post.
-
I have the 8 in dmt diamond stones in various grits. Would I risk damaging the blade with these?
-
So, an oil or diamond stone won't work on this...I was afraid of that. I contacted a forum member who sharpens these and will also look into Pilgrim. Thanks for the input. Any idea when these were made?
-
Picked up this little beast today and have a few questions for those of you that are familiar with them. First, when were these made? I've read that they made two versions this being the later one. Second, how do I sharpen the blade? It seems to work ok but I'm sure that it needs sharpening. I love old tools and am excited to start using it!
-

Estate Sale Tool Collection Find
David Bruce replied to David Bruce's topic in Floral and Sheridan Carving
Yeah, those tools are happy in my workshop. I have been looking for an old collection like this for awhile. I use Barry King tools for the majority of my work but they are pricey and the new craft tool stuff is very poor quality. I'm excited to have more options on my designs and the nostalgia factor is very cool. I know that it looked like there were more tools than this but all of the tools from that sale are in this photo. They spaced them out on the holders and put some in that tackle box to make it look like more and to charge separately. There were only two duplicate craft tools. I passed on the small mallets since I use mauls. -
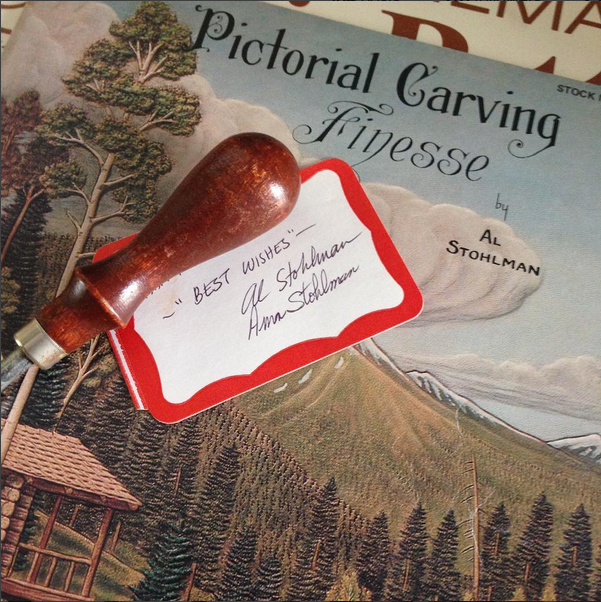
This weekend I picked up this collection of leather working tools and books. It was obvious that the previous owner took pride in his tools. I was glad that I could give them a good home and keep them together. I also found an unexpected bonus inside one of the books!
-
I figured it out. Basically, you have to finesse the stitch length selector. Definitely old school tech, reminds me of working on old motorcycles.
-
Thanks Constabulary, I just read that thread and it was helpful. I tried adjusting the length again this morning after removing the belt from the hand wheel. When I press the plunger it doesn't go down until I rotate the wheel towards me a about a half of a revolution then it clicks and the handwheel sticks. I removed the plate on the top of the machine and see that the check screw is missing. Would this be the problem or part of it? Do I need the check scew? It looks like the threads are pretty shot. Here's a photo:
-
I'm hoping that someone can help me with my new 111w 155 machine. It's cleaned, oiled and sews great but I'm having issues with the stitch length. I'm trying to change the stitch length and wonder if I'm doing something wrong. I installed a servo motor on it and when I try to adjust the stitch length I get a lot of resistance from the hand wheel and it feels like I have to force it. When I go to adjust the stitch length I start by pressing the left button/plunger then turn the hand wheel towards me. This causes the numbers to move but also causes the belt to move. Is this ok for the servo or do I need to remove the belt when I change the stitch length? Also, the stitch setting changes on it's own once I get sewing. I guess I need to know the correct procedure first, then determine if it's a mechanical problem. Any help is appreciated.
-

Singer 111W155 Set-Up Question, Thoughts
David Bruce replied to David Bruce's topic in Leather Sewing Machines
Talk about customer service! I ordered the servo motor and some little items on Friday. I called Bob @ Toledo Sewing just to make sure that he received my order on Monday. It was on my porch 30 min. later. If you read this Bob, thanks again! Now I just need to learn to use this old gal. -

Singer 111W155 Set-Up Question, Thoughts
David Bruce replied to David Bruce's topic in Leather Sewing Machines
Thanks for the replies, I spoke with Bob over at Toledo sewing and he confirmed that it's a straight forward motor swap. I decided to order the servo he sells since he's on the forum and caters to leather workers. It also seems to have the shortest learning curve. I'm not sure of the age of my machine and doubt that it's on the original table. Hopefully, it's a three vs. four bolt model. The local sewing repair shop said that they refurbished the machine and it appeared to have some new parts and ran well from what I could tell. I did bring along several different weights of both veg and chrome tanned leathers that I use and it blazed through them. Hopefully, I will get the servo in a few days, have the shop do the motor swap and be working by this time next week. -
I've read through the different posts on the forum about these old machines and still have some questions regarding setting them up for leather work. I will be using this for the usual suspects, belts, guitar straps, wallets and hopefully some bags and back packs. This is my first industrial sewing machine and I have limited experience sewing with machines in general. I'm buying this from a local dealer here in Chicago and when I tested the machine out it was very difficult for me to control. The guy at the shop was able to work it smoothly so I know it's my lack of experience and lead foot. I've read that many folks like to use the servo motors that Bob at Toledo carries with the 2" pulley. So here are my questions: What size pulley do you need on the head of the 111W itself? Are there any timing or other adjustments that you have to make when swapping the motors or is it plug and play? This machine comes with a basic presser foot, 5 bobbins, a magnetic edge guide, winder, spool holder and a well used table. What additional feet and or accessories are necessities for the work that I need to do? The guys at the shop were adamant that I just need practice and that a servo is an unnecessary expense. My fear is that I will ruin projects, injure myself and get turned off from using a machine if I don't slow this beast down. I nearly took the sales guys finger off when he told me to feather it while putting his hand on the wheel! Blood was drawn and he was none too happy. They had a servo that they could install which was an Eagle KM400. Has anyone used these or are the one's form Toledo better? Any help or insight is greatly appreciated.
-
Yeah, they are pricey but good tools usually are. I looked around for a used one for some time but never found one of these with the handle. I read good things about Campbell Randall's and decided that the extra $ was worth it for quality, USA made and piece of mind. It did take about a month to get it after ordering. Their site lists the price.
-
I just received two new tools that are already saving me so much time and producing cleaner work. A Keystone Splitter/Skiver and an Italian Twist Press (both from Campbell-Randall). I split and skived some belts last night and what usually takes me an hour or so was done in minutes! I recently started to produce my pieces for sale vs. pure enjoyment and have found it difficult to produce items in a time frame that keeps the cost in the realm of an everyday middle-class buyer. I would love to eventually be able to do custom-only work but until I get to that point I would like to build a business from leatherwork. I'm not trying to compete with mass produced or cheap imports so my price is still substantial but quality and hand made costs. Anyway, here's a photo of them. If you are thinking about getting a splitter I highly recommend the Keystone.
-

First Sheridan Style Flask
David Bruce replied to David Bruce's topic in Floral and Sheridan Carving
Thank you for the kind words. As I said on my post of the Koi flask, I enjoy this art immensely. I find it strange that it's seen as a "craft" vs. art since it is just as creative and challenging as any art medium that I know of. Bob, I just checked out your gallery. Beautiful work sir!


