


superpacker
-
Posts
137 -
Joined
-
Last visited
Content Type
Profiles
Forums
Events
Blogs
Gallery
Store
Everything posted by superpacker
-
Does anyone else do this? I don't have a rounded edge beveler. Just a #2 and#3 flat so far. So when doing belts in the 10 oz range (+ or -) I do one pass on each side, to make a clean 45 degree angle, on either then repeat by knocking down the new edges that were created by the first pass, and so on, working my way towards the middle. Seems to get me a nice round edge with no sharp angles. but haven't seen any online videos of anyone else doing this. So wasn't sure if I was missing something. I think I've read of some people just doing one pass and rounding the edge with coarse grit sanding.
-
I understand that when used as a finish on hair/grain side of leather that Resolene should be diluted to about 50/50. HOWEVER, I always like to treat/seal the backs of belts to create a strong moisture barrier, especially for belts that will be used in workwear/outdoors settings. In that instance, is there any benefit/determent to used undiluted resolene on the back / flesh side? Or should this too be diluted?
-
Anyone have one Or seen one they recommend for a door hanger with sleighbells for Christmas decoration?
-
For belt edges, Black and Chocolate Brown are easy - that dark and you just have to make sure you get good saturation. But when doing a medium dark edge color, like a mid brown, I've found that it can get uneven and blotchy. Any tips for an even application? I've been using an edge marker, and daubers make me nervous due to less control, but I wonder if that would work better here? Any thoughts are appreciated. Thanks!
-
I'm working on some belts in the 9-10 oz range, various US veg tanned leathers, and after I bevel, I normally go straight to burnishing when doing small leather goods. But on these straps I feel like I'm not getting a fantastic burnish and I wonder if it's because the edge is to scraggly after beveling and needs some sanding. Is it recommended to sand after beveling and before burnishing? If so, can you recommend a sanding process?
-
I’m going to look for better snaps and focus on post length going forward. And the conical path tip from plinkercase has also been helpful. These two thinks should get me there. Thanks!
-
I don’t think I’m doing anything wrong, but when I use a hand setter, the two parts of my top snaps always end up off center from each other. Especially on thin leathers. I’ve tried small constant hammer hits, one heavy hit, same results. Is there a key to perfectly setting snaps without having a press?
-
Fredk, great comments. So it sounds like it’s possible to condition a leather item post resolene finish? Is there any benefits? Also, if I use neats foot oil after dye (not beeswax), to condition and even dye spreading, then use resolene on top, will that still allow for a conditioner to go on top? Say something like Skidmores which is a beeswax based with a lotion consistency?
-
that’s good to hear because I’ve thought of trying a layer of waxed based conditioner before laying down an acrylic finisher but wasn’t sure how well it would adhere
-
Good point. Doesn’t appear that I can edit the poll now. Bummer. Thgouhts are still welcome!
-
Been reading anything I can get my hands on about the dyeing process, and working on improving my own dyeing abilities, but the finishing step (pun intended), has me curious. There seems to be two clear camps - acrylic versus non-acrylic. The acrylic camp says that crocking and dye rub off is just a fact - it will happen, so an acrylic finish is necessary as most non-acrylic finishes are only partial waterproof. So if the item will see any moisture, e.g., holsters and tack, a permanent moisture barrier is needed, and that means acrylic, plain and simple. The non-acrylic camp asserts that dyes today are much more color fast, so only a temporary or wax-based finish is needed, and acrylic finishes either ruin the look and feel of the leather up front, or will eventually crack and ruin the leather later by taking some of the top layer with it. I know this is certainly a "to each his own" thing, but I'd love to hear thoughts and opinions and experiences. If anything as a repository of anecdotes for those new to dying.
-
Streaky Dye
superpacker replied to superpacker's topic in Dyes, Antiques, Stains, Glues, Waxes, Finishes and Conditioners.
Do any other oils or conditioners have the same effect? E.g. min oil or carnuba cream?.thumb.jpeg.69d040c0515c4b6bb7aac8ae87714824.jpeg)
-
Streaky Dye
superpacker replied to superpacker's topic in Dyes, Antiques, Stains, Glues, Waxes, Finishes and Conditioners.
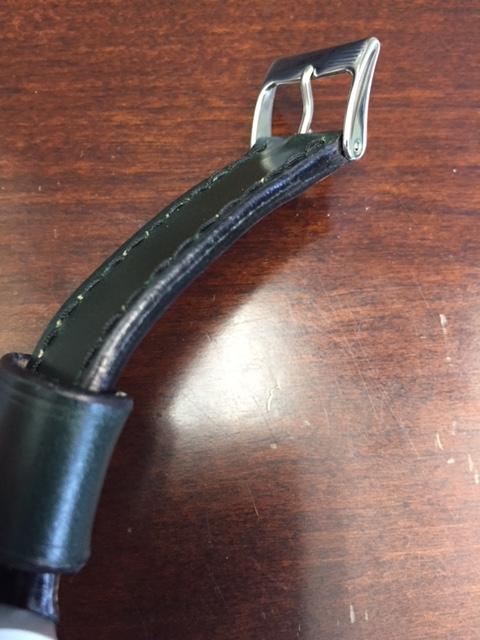
Alpha, thanks for the response. I was curious if that might be the case. I've included a picture and would love to hear any comments you have. I was hoping some type of conditioner would sort of move the dye around a little.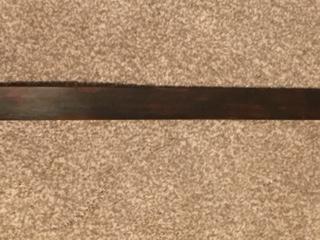
-
My first time working with dyed leather - a natural veg tan horse strap dyed to dark brown. A wool dauber was used, and while pretty well covered, once dyed I noticed that there are streaks and patches that are lighter or medium in color than the dark brown. Should I either: 1) do a second full coat? 2) Go back with a dauber over the lighter areas? 3) just give a good rub and buff with a cream conditioner which will redistribute/darken the piece? For reference, wouldn't mind subtle highlights and lowlights in the color, but don't want it blotchy. One thing I wasn't certain about is whether if I leave it as is if a good cream with redistributes the dye to give the subtle high lights and low lights, or whether more dye should be added.
-
Sorry, I misspoke in my post - After dyeing, I plan to add an initial softer/conditioner (e.g. carnauba or Skidmore's leather cream), an acrylic finish, and waterproof (blend of neats foot and beeswax) but not sure which order to use. Thanks!
-
I have a natural belt strap that has since been dyed to the desired dark brown. My next steps are to add conditioner (a blend of carnauba and beeswax) and a finish (resolene or tan kote) - the only thing is I'm sure which goes first, do you condition then finish, or finish then condition? Thanks!
-
I've read some mention that a special setter is needed to set stainless snaps. Is that true, or just an attempt to have you buy another snap setting tool? Or can I use the normal Line 20 tool I already have for standard brass/base metal snaps? If not, can a press be used? Thanks!
-
Heating the tool or the leather?
-
I'v only used Horween CXL here and there, it's a great leather, just it's softness is usually not suitable for the projects I'm working on. But I had an idea for a small piece wallet, and thought it would look great with a stamped boarder. But before I get a hold of both some CXL and some boarder stamps, neither of which I have, I wanted to see if CXL stamps well, or, due to it's softness, and stamped patterned will eventually fade out, unlike with a veg tan. Thanks!
-
I'd like to make a briefcase and need help finding a pattern. I'm not trying to make something big and overbuild like a Saddleback bag, rather, I'm looking for something really minimal and slim, just enough to to carry maybe a note pad and an ipad, maybe a few other little odds and ends. Maybe either a zipper closure or a single buckle or lock, not multiple straps and buckles. I've seen patterns online for the Saddleback style bags, but nothing online like this. If anyone has anything like this, or has seen one, can you please share the pattern or a link to purchase the pattern? Thanks!
-
They are glued. But to avoid it spilling over onto the edge when clamped I try not to take it to the end of the edge
-
When I've sew two pieces together, and after going through beveling, sanding, burnishing, dyeing (and some re-burnishing) I am getting nice slick edges. However, my one concern is that it seems like no matter what I do, you can see a faint line down the center of my dyed edges where two pieces are sewn together. Is there anyone way to better eliminate this line and more fully make it look like a single, uniform edge?
-
I understand the unique properties of Latigo, and why it's properties make it an ideal leather for things like certain horse tack and saddle bags, etc. But I feel like it's (relatively) uncommon to see belts made out of latigo (compared to harness, bridle, saddle, tooling leather, CXL, etc.) is there a reason for that which I'm missing? Seems like it would be similar to a belt made from chromexecel, maybe a little less stretch. Any way, wanted to know if that was just my perception, or if there is something I should learn here, or if anyone has had any experience making latigo belts.
-
Saddle Stitching - Looks Good on the Backside
superpacker replied to superpacker's topic in Sewing Leather
Such helpful and insightful comments. To clarify, I'm not using a groover, I did learn a while a go that that deep channel does force the stitching to lay straight (not always a bad thing, a channeled stitching is certianly helpful in some instances). I'm gonna try some of the suggestions regarding the "front" on the right side, and see how that works. The other thing I think could be causing this is the hold being too deep an wide on the "front" side, and smaller on the back, and the smaller hole forcing the stitch to "S", whereas the deeper holes allow more "elbow room" for the stitch to lay straight. Going to try and just mark the holes with a pricking iron, as opposed to punching them all the way with a chisel, then poke holes by hand with a awl - I think smaller tighter holes will make a difference. I'll makes some observations over the course of this week and possibly the next, and try and report back what I've learned. Thank you! -
Saddle Stitching - Looks Good on the Backside
superpacker replied to superpacker's topic in Sewing Leather
DJole, normally I’d say your spot on, but I’m meticulous at making sure I’m casting over the first thread. Alpha 2, in my mind this seems like a possible solution, so I’m gonna give this a go.
.jpeg.8010cf4d7df3693176abe3d16206803c.jpeg)