


Skipknives
-
Posts
103 -
Joined
-
Last visited
Content Type
Profiles
Forums
Events
Blogs
Gallery
Store
Everything posted by Skipknives
-
i learned something new,,well new to me,,thank you
-
it looks like a "skip-stitch" pattern.
-
holsters are press fitted/formed
Skipknives replied to Regis's topic in Gun Holsters, Rifle Slings and Knife Sheathes
yes the patterns do suffer some what when forming in a vacuum(sheath expearence) holsters should be the same; if it is a free hand pattern you can touch it up after shaping,,,tooling: im not sure -
holsters with a thumb-brake
Skipknives replied to Skipknives's topic in Gun Holsters, Rifle Slings and Knife Sheathes
thanks guys,,i'm planing my first holster and i don't want to make a bunch of scrap,,its for me so i can take my time. "think twice cut once" lol i plan to form a lefty holster and attach the right side of the pistol shell to a panel of leather,, this panel will be the back(inside) of a "posable-bag" for camping trips (my grandson loves guns a little too much) this way it is out of sight but at my finger tips if needed. so i will also be making the bag out of leather as well,,but its gotta look cool not like grandpa is wearing a purse lol -
holsters with a thumb-brake
Skipknives replied to Skipknives's topic in Gun Holsters, Rifle Slings and Knife Sheathes
guess i better go buy a pack and not tell anyone what ther'e for (he clears his throat and checks the door) -
howdie
-
holsters with a thumb-brake
Skipknives replied to Skipknives's topic in Gun Holsters, Rifle Slings and Knife Sheathes
hey,,they also have thin belt clips,,, less altering,,,whee haw -
holsters with a thumb-brake
Skipknives replied to Skipknives's topic in Gun Holsters, Rifle Slings and Knife Sheathes
cool,,so most of the time it is a steel incert?? maybe one of those belt clips from tandy can be altered to do the trick,, it would already have the hole i need already drilled,,,hmmmm thank you -
On holsters with a thumb-brake: is there an insert between the layers to add stiffness?
-
it does the same thing on mine,,
-
billsotx,,howdie, thank you I went to your web site and saw your work,, do you use a vacuum table?? or do you do it by hand??
-
whee haw glade you can use it if you die with your secrets they go too,,lol
-
Regis,,dont use a vacuum bag for most sheaths or holsters cus the bag will contract and a wrinkle contacting the leather leaves a mark. the table will remain flat and easyer to control the wrinkles.
-
ok here are 5 pictures of my dusty vacuum table. note the inline moisture catcher to protect the pump from water droplets. pardon my spelling it was never my strong point. http://i196.photobucket.com/albums/aa55/skipknives/v1.jpg http://i196.photobucket.com/albums/aa55/skipknives/v2.jpg http://i196.photobucket.com/albums/aa55/skipknives/v3.jpg http://i196.photobucket.com/albums/aa55/skipknives/v4.jpg http://i196.photobucket.com/albums/aa55/skipknives/v5.jpg
-
How i made my vacuum table: 3' X 2' (ft) piece of 3/4" inch ply-wood 3' X 2' (ft) piece of 1/8" inch lexan I drew a 14" X 16" rectangle on the ply-wood inside that area cut parralel lines about an inch wide and one inch spaced apart with a router. only cut in half the thickness of the board (set the depth shallow) then go back over the same area doing the same thing on the lateral,,forming a grid that resimbles a checker board. but all the cuts join forming a grid,,the one inch spacing between lines now is transformed into 1" X 1" areas that will suport the clear lexan cover over this area. Note*cut this rectangle to the left or right of center because the final product will sit on a bench top and a vacuum pump will sit on the other end. at the corner of the grid that is clossest to the center of the board cut a connecting channle three to four inches long that extends out side of the grid but is connected. seal the cuts in the board with a water sealant paint so while under a vacuum air won't be sucked in through the pores of the wood. when that is dry place the clear lexan over the board and with a marker map out a grid of dots spaced 1/2" apart within the grid. at the other end of that channel that extends out side of the grid mark one dot. these dots will need to be drilled for air to pass through. Drill a hole at each corner for screws as well (inset about 1" inch in from the edge) when all the holes are drilled lift off the lexan and clean up your mess lol in that one stray hole that was drilled out side of the grid a air fitting will need to be attached. (vacuum bag supplies have thies fittings that come with rubber washers) the fitting will have threads cut in the end for a hose to attach. get a tube of sillacone and squish a bead on the board around the grid and include the stray hole and channel where the fitting will be. make sure it is one compleat circle without any gaps,,set the lexan on the board squashing that bead of silicone and secure the edges with the screws. (have that air fitting on the lexan first cuz there is no going back after the silicone is dry. you have formed your vacuum chamber. go to the art store and buy a 16" X 18" canvas on a frame. from the back poke a hole in the canvas and cut away all the cloth that is not covered by the frame this will be the lid of your vacuum table. on the e-net buy two or three yards of streach-membrain from aero-space composits it has a 400+ % stretch memory used comomly on vacuum tables to do odd shapes when applying vernieer to wood. the cost is under $20 for several yards,,it is transparent green and looks like shrink-wrap,,but mush tougher. wood supplies might also have it. loosly cover the frame with the membrain and staple it to the frame (save the rest of it for the future) place the covered frame on your table over the holes and square it up. (only the air-fitting hole won't be covered) using a marker draw around the frame,,then set the lid to the side. go to the hardware store and buy a roll of weather striping with adheasive back. and apply a strip to the table inside the rectangle you drew on the lexan. at the corners instead of cutting the strip apart,,cut a "V" notch and change directions forming the rectangle on the lexan. at each corner use some of the left over silicone and dab it into the "V" notch and the start/finishing point and let it dry. when the vacuum pump is turned on set the lid on and press slightly on the frame until the vacuum catches up. Now go to the sewing store and buy a yard or two of "batting" it is 50% cotton and 50% nylon and only an 1/8" to 1/4" inch thick. cut a section of it and place over the holes on the table (inside the weather stripping) this will form a small passage for all the air to be vacuumed out. without it the membrain might trap pockets of air. I'll go out to my shop and snap a couple of pictures and add to this,,give me a few minits to come back.
-
Phoenix Arizona here guys,,most of the year I can pull leather out of a 30 minit bath,,10 minits in the vacuum table to shape over a knife,,on the table for two hours and its dry and ready for trimming, stitching, ect. by the way,,if i let it dry then dunk it in water for 20 more minits and let it dry a second time,,its like armor ,,no sun light involved and age isn't a factor. I'm learning so much from you guys/gals PS. i use 8-9 oz leather
-
I don't know all the pains it is to make a saddle but i figure its a bear. I have been saving photos of stuff for the past week to study. totaly awsome.
-
Hay Lars,,lookin good I just found this site a cupple of days ago so i'll be haunting these pages too
-
the number of gun and knife accessories
Skipknives replied to leatheroo's topic in Leatherwork Conversation
Three holes center mass in somone that broke into my house will convence then not to do it again but i refuse to eat them after,,thats where i draw the line. -
Brandon do you know the name of that video,,my latch is different from his isn't it,,Bob never made concave bolsters. but i would like to learn more about it.
-
as far as buying a knife,,i'm not taking orders yet,,still a part-time newbie.
-
Knife Sheath
Skipknives replied to Skipknives's topic in Gun Holsters, Rifle Slings and Knife Sheathes
Thank you,, so i should smooth out the leather out side of the stitching?? I'll try it. yes the knives are mine too from ATS-34 stainless bar stock. I have several pictures on how i make stuff where it asks for a web-site,, i don't have one so i put a link to my photo bucket page,,it shows some pics of my shop and tools. and yes i would like to learn diferent crafts,,leather inncluded. -
Knife Sheath
Skipknives replied to Skipknives's topic in Gun Holsters, Rifle Slings and Knife Sheathes
yes,, i drew the design on typing paper,,placed it on the PVC plate,,then used an exact-o knife to scratch the out-line onto the plate. then used several drimel bits to carve it into the PVC. -
Knife Sheath
Skipknives replied to Skipknives's topic in Gun Holsters, Rifle Slings and Knife Sheathes
here is a second sheath using the same design plate to emboss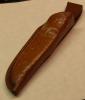
-
Knife Sheath
Skipknives replied to Skipknives's topic in Gun Holsters, Rifle Slings and Knife Sheathes
no I bought a 17 squ ft. side of 7-8 oz. I carved the design on a 1/4" inch thick peice of PVC plate,, drilled 1/16" inch holes in the deepest parts of the carving,, soaked a peice of the leather in warm water for about 25 minutes,, layed it "smooth side down on the plate and placed it in a vacuum table for another 20min while under vacuum i tapped the flesh side with a ball pean hammer(small) re-wet the panel and case-formed it over the knife,, I used a crochet needle and a jewlers screw driver to marked the background textures.
