Jump to content

AlexOstacchini

Members
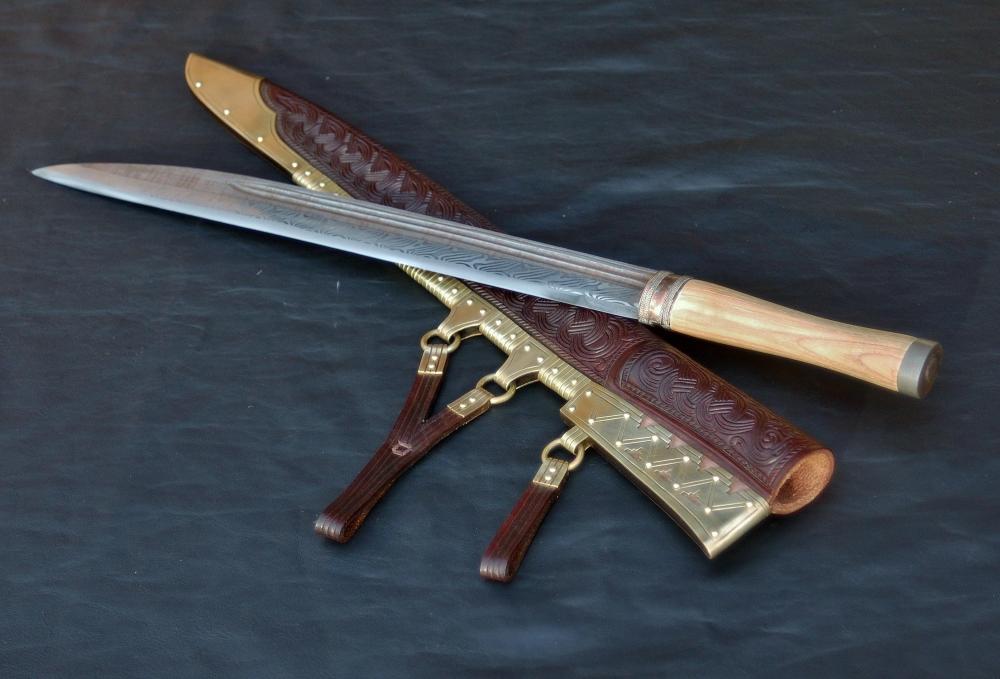
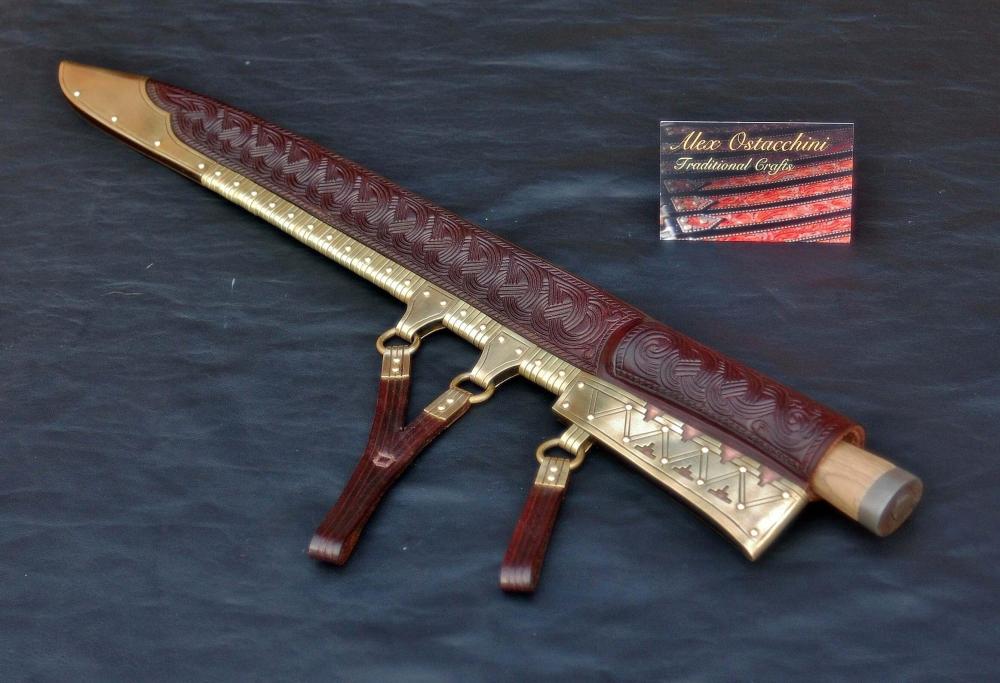
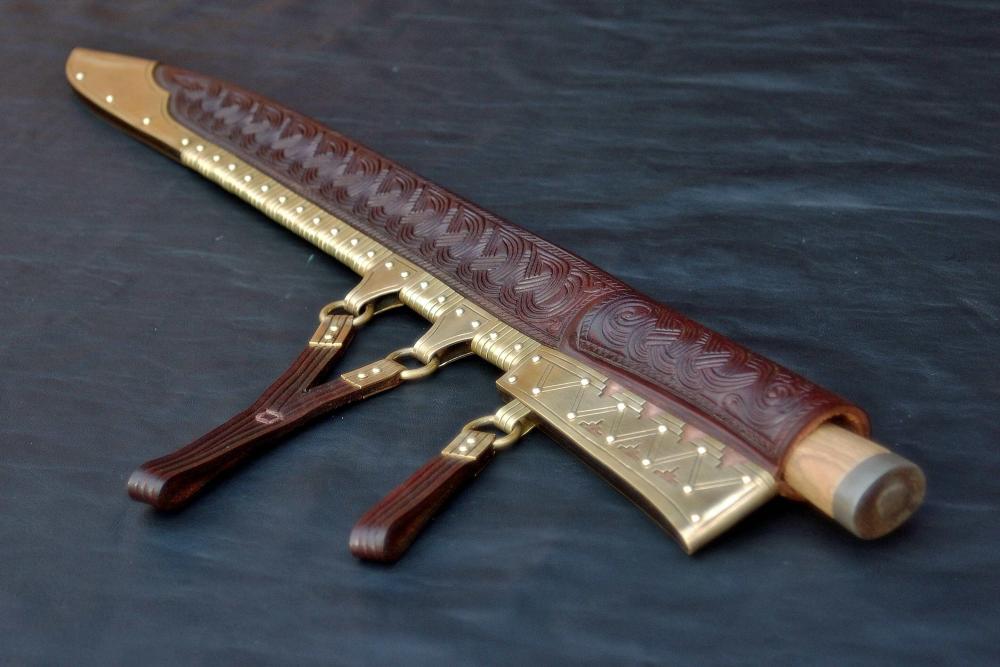
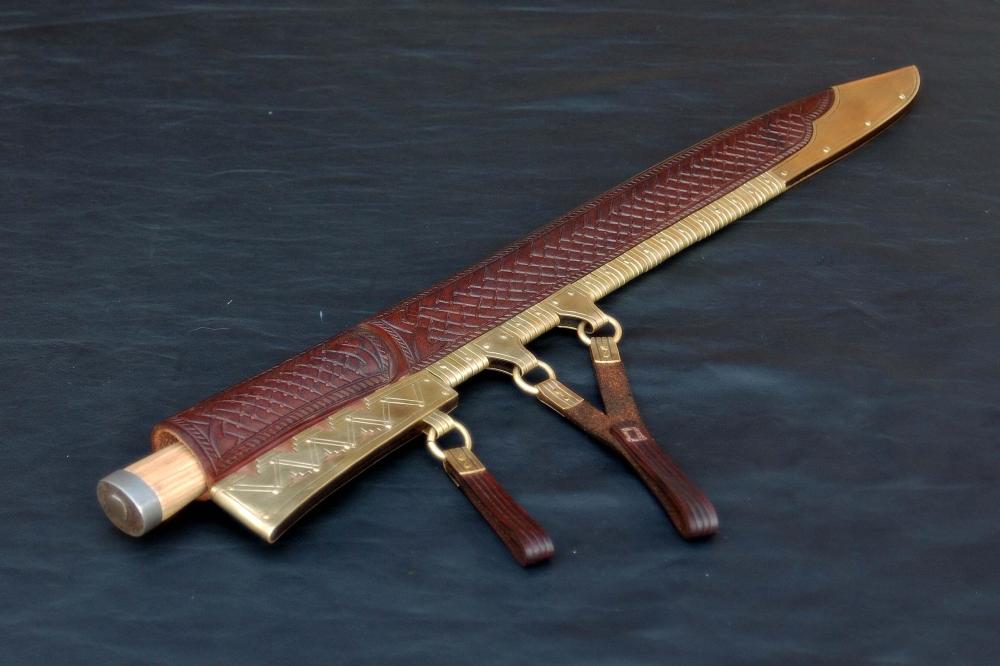
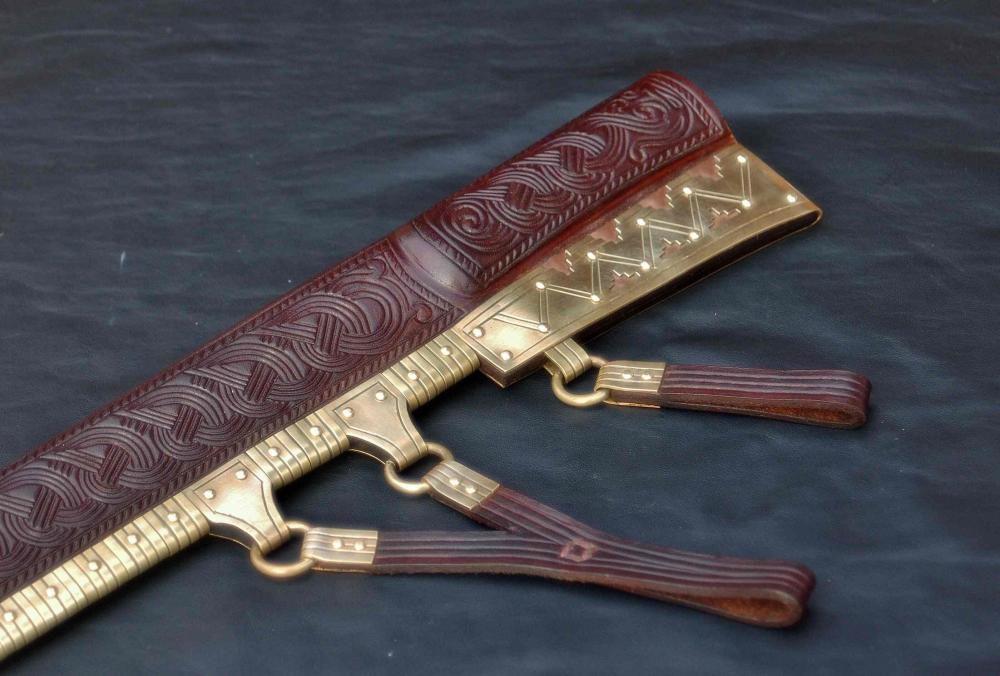
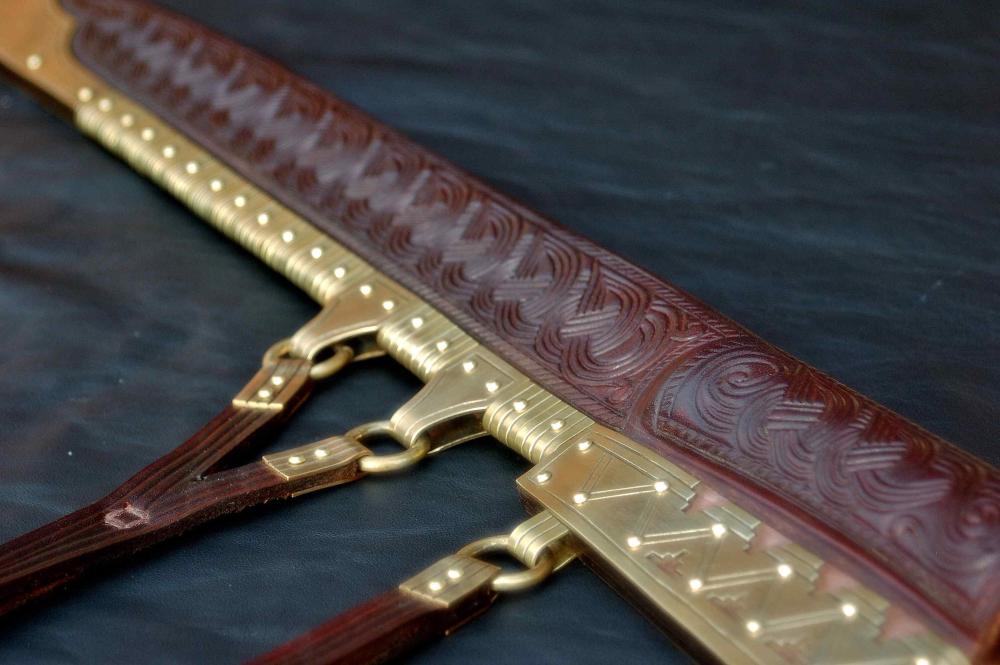
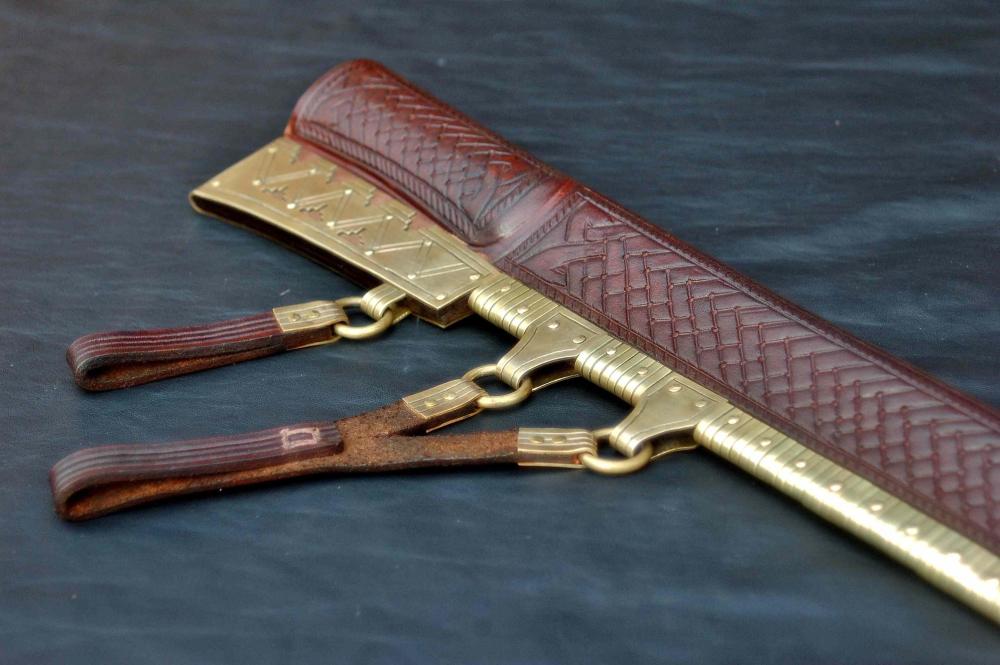
  • Content Count

    158
  • Joined

  • Last visited

Everything posted by AlexOstacchini

  1. Thanks everyone Here you go, A lovely pattern welded piece by my friend.
  2. Super neat. Looks like you've managed to get a lot of depth in that front piece, did you make a former or mould directly around the shears?
  3. Hi all, here is a recently completed order which was a bit of a first for me. This is a 10th Century Baltic style sheath for a Viking seax. The knife itself is not one of mine, but made by my friend at pitstone forge who specialises in pattern welded stuff from this era. For the sheath the main reference was an original from the Valsgarde graves in Sweden, with tooling patterns adapted from another in Norway from the same period. The one I copied has different designs on both sides, with the fancier stuff on the front. I am a little ignorant about very early medieval knives so there was a big research phase involved, in which it turns out that tooling was done purely by impressing into the leather and not by cutting and bevelling like you see on later medieval and modern stuff. The patterns were therefore made using a scribe and defined with modelling tools, but the swivel knife stayed in its drawer for this one! The sheath is formed from 3mm veg tan, and is held together only by the riveted brass clasps along the edge. The metalwork on this actually took a lot longer than the leather did, with lots of punched/chiselled decoration and little stepped cut-outs. The straps are speculative as I couldn't find much on how they were worn, but is functional and makes use of the three hanging points that the original had. I hope you like it! Alex
  4. Good work, tidy stamping on the basket weave and looks like a nice edge as well. Definitely better than a cloth piece of junk! To my mind 6-7 ounces is about right for this sort of thing and should hold its shape nicely.
  5. Thanks, much the same as you describe really. My process is as follows- 1. dye the base colours. For most of my background texturing I will paint the dye in with a paintbrush. 2. Neetsfoot oil, applied over the whole piece with a sponge, but focusing mainly on the natural areas. Be aware though that this darkens colours quite a lot. 3. Resist- I use fiebings tan kote for this. Quite often now I will give it a second coat after the first has dried. 4. Antique. Fiebings antique finish in this case, worked into the recesses with a sponge, then wipe off excess. 5. Once this has dried I give it a final polish with tan kote, which cleans off any antique that is still on the raised areas. I always try and give each stage a day of drying time. Maybe not necessary but it works for me and when I have tried to rush through things it never seems to come out very well. What product are you using for the antique? I used to use the eco flo gels and couldn't get the results I wanted, then switched to the fiebings finishes and it was problem solved. Hope this helps! Thanks, yes a very slow process, I certainly undercharged for how long it took, but I will know for next time!
  6. Cheers YinTx, I admit I was a little thrown by the suggestion that it was not tooled but hopefully all cleared up now. To be fair though I may have added to the confusion by misunderstanding the initial embossing question.. In any case I have done my best now to clarify. Thanks for the kind words and well spotted on the pic, all of course traced from the same drawing but lots of small variations between these pieces. Alex
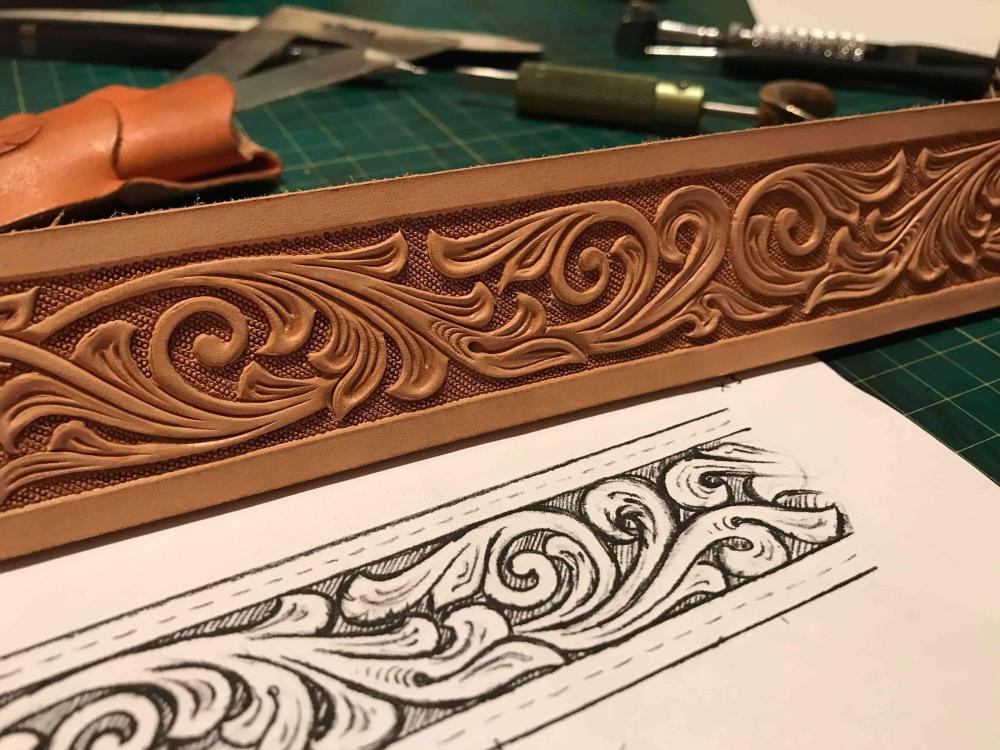
  7. Many thanks and no worries, it was my own bad wording! I'm not sure if I have entirely convinced you, but I have dug up some WIP pics to hopefully alleviate any doubts about the process. So here you can see the initial swivel cuts on some of the pouches, and the scrollwork tooling on a belt, next to it's initial drawing. This was based on a design sent over by the client, so there is certainly no embossing plate involved! So yes, all hand tooled
  8. Sorry this is just a semantic misunderstanding on my part, I just read embossed as tooled. No there is no embossing in the sense of a big plate to do repeated designs or press in an outline, and no laser cutter etc to lay out patterns. I thought the original question was if everything I made was tooled. The 'tooled to some degree' comment I realise now implies vagueness in the context you desrcibe, but not trying to hide anything, I simply meant that I mostly make tooled items as opposed to plain/untooled! Everything here is 100% hand carved. I draw out all my tooling patterns either directly onto the leather, or for anything where I need repeats (ie the coasters or swiss army knife cases above) it is done on paper first so it can be traced on. So no, no embossing. Just swivel knife and bevelling stamps. You will see slight differences between all of the pieces above. I know what you mean, it is most telling on belts which use a rolling press, as the strap end can never be finished properly and the border and pattern will not taper down into the point. But yes a mirrored version of anything here would be no problem, and aside from the repeated items (which I sell frequently so keep a stock of), many of the items pictures are exactly the one off client designs you mention. Hope that clears things up! Alex
  9. Thanks for the compliments all, glad you like it Yes, exactly that. The black dye tends to bleed but will naturally stop at the cuts as long as the brush isn't loaded up too heavily, so I always paint a few mm away from the carved lines and it will bleed up to them. Most of the stuff I make tends to be tooled to some degree, though not always and I often get asked for plain things too. As a process I really enjoy it but the look isn't for everyone. I'm sure you can! The tool upgrades for me made a big difference, but the bread and butter tooling techniques, eg bevelling and decorative cuts was picked up from youtube tutorials and lots of practice. Still plenty out there better than me! Thanks, that is a Barry King bar grounder, it's become my default pretty much. I've looked at lots of ways people orient these stamps and experimented a bit when I first got them, but quite liked the look of angled even rows so that's what I do most of the time now. Alex
  10. Love the colour on this, and also ditto about the neat design around the lock
  11. Hi all, A bit of a photo dump as I haven't posted anything here in a while. I've had to compress the pics to pretty lousy quality to get them all in but you get the idea. Here is a load of stuff from the past year or so, some of it stock things and some of it custom work built to client specs. One of my bestsellers since I started making them has been cases for vernier and digital callipers, so lots of those, as well as cases for scalpels. Then various belts, pouches, knives and sheaths. I upgraded my tandy swivel knife to one from leather wranglers, quite a big investment once you add UK customs fees but it is a big improvement, stays sharp for much longer. Ditto for Barry King stamps, I am a little jealous of the US for leather tools as shipping etc has cost me a fortune, but oh well, I doubt I'll have to buy them again. Stitching here is all by hand with waxed linen, and edge lacing is with kangaroo lace. I had never double loop edged a belt before the one here, did not realise quite how long that would take... My real interest and most of my day job is making historical things, and so there is also a replica here of a Tudor archer's bracer from the British Museum. I made quite a bad version of this years ago when I was just getting started so it was nice to give it a revisit with better tools and experience. It was asked for with a lining, which the original does not have, and mine has no gilding where the original probably did, but otherwise a fairly close copy. Hopefully more stuff like this to come. Anyway thanks for looking, any queries about particular pieces or tips for me to improve then fire away Cheers, Alex
  12. Many Thanks Fiebings dyes for this. I pretty much always dilute them now with a little IPA which I find helps give an even coat. The border for this is mahogany, and the background is pro black, which is much much much better than the standard black. The tooled elements are just neetsfoot oil and the antique is fiebings dark brown with tan kote as the resist.
  13. Thanks again all! Cheers! I am lucky enough to have a full time job in film, often as a leatherworker, so independent stuff like this is for evenings and weekends and thankfully I am not relying on it as my sole income! But it is nice to think that it could grow into something more further down the line. The brief for this project was include lots of gypsy imagery,- The scrollwork pattern, while virtually identical in style to Western stuff (but more scrolls, less flowers), was taken from a painted design on a vardo wagon, and the framed animal heads all have links as well.
  14. Thanks all! Glad you like it Cheers! This was not for someone I knew, and while I have made enough belts to have a reasonable idea of how much work is involved for price quotes, I always manage to underestimate how long it takes to design and sketch out tooling patterns. In this case I was not happy with my initial design and decided to start over, so several unchargeable hours from the offset. It is always a tricky balance I find as on the one hand it is easy to set a nice hourly rate, but there are definite established price brackets for this sort of product and at the end of the day I can't charge extra for being slow and getting things wrong. But with experience I will hopefully get better at this! Alex
  15. Hi all, Here is an order just finished for a gypsy themed tooled belt. The brief for this was scrollwork patterns with some animals incorporated somehow and initials tooled in. The design I went for ended up being a repeating scrollwork section based off a painted vardo wagon exterior, broken up by three framed figures of a horse, goldfinch, and game chicken. Colours were chosen by the client. This is 3.5mm veg tan with a 1-1.5mm liner, which I find makes for a nice sturdy belt without being too chunky for everyday wear. Stitching is by hand and the buckle and keeper are held in place with chicago screws so removeable/interchangeable if needed. Thanks for looking and I hope you like it! Alex
  16. Thanks for the compliments all Cheers, if it's Celtic stuff you're after then you certainly won't be stuck for ideas! Some of the patterns are really quite mind boggling and for me at least there would be no chance of replicating them in leather, but there are some real gems in the details that look like they would translate perfectly. Here is the reference I used for the belt
  17. Hi all, Here is a fairly unusual custom piece- this is a knitting belt. This was new territory for me and I had never heard of one before, but the idea is that it allows the user to knit while standing/walking. They date back hundreds of years and I'm not sure where exactly they originate but seems to be lots of ties to Scotland, particularly Shetland and the Hebrides. This set was built to the client's specs and includes a belt, pad, and pouch. The belt in this case is essentially a regular belt and has been designed as such- normally the pad would be integrated but having them as separate items allows more adjustment and the option of wearing the belt on its own. The tooling pattern on this is taken straight from the Book of Kells and features abstract interlocking medieval birds of some kind. A nice change from the Western things I normally do. It is 3.5mm veg tan with chicago screws to hold the buckle/keeper in place, so removable if necessary. The pad is stuffed with horsehair and has a series of holes for anchoring double pointed knitting needles. It has three wide belt loops on the back and is a nice tight fit on the belt, this is to create as much friction as possible to prevent it sliding around when being used. Finally the pouch has been sized to fit a ball of wool, and has an antler closing button and a tooled pattern taken from the same manuscript page as the belt design. It has deliberate gaps between the top of the gusset and the flap so that thread can pass through when it is closed. The pouch and belt are both lined and stitching is by hand for all three pieces. This is one of those jobs that in my head was simple but ended up taking far longer than anticipated to get everything worked out, so happy to see it finished. Off to it's new home tomorrow! Alex
  18. Yup, all eating knives other than the big ones, though I suspect general utility pieces also. Certainly not weapons in any case, or at least not designed to be. I believe Fred is right on this, this is called a pricker and I think the general consensus is it was a multi functional fork/awl/sharpening steel. While it does go to a diamond cross section, the edges are not sharp, only the point. Here is a better image of that set. My process for these was to form them first, then unfold them and do the tooling while the leather is flat. It can't lie completely flat of course as it is stretched and distorted from the forming, but enough to carve in the designs, and in fact I find the stretch marks help for marking out the borders. Then dye, then stitch. There are probably better ways of doing this and I'm sure this will change as I make more, so open to ideas for improvement! Alex
  19. Thanks for the nice comments all I can certainly relate to this! Visited the museum of London not too long ago purely to look at whatever rusty old knives and sheaths were on display- not very many it turns out but still a very interesting trip for me. In terms of the steel I am feeling my way a bit and don't have the skills to pull off a forge welded laminated blade but hopefully one day, so it's nice uniform monosteel in the meantime! Yes fairly unusual to modern eyes, I suppose it is one method to protect the stitching from being sliced without the inclusion of a welt layer. There are some originals with side seams but a lot less common I think. Other than the the two large knives these are all unlined, which I believe was the norm. Cheers, me too! I enjoy projects which involve a few different skills, though I sometimes worry i'll end up as a bit of a jack of all trades master of none..! Alex
  20. Thanks all Woops, not sure how I missed this out, here you go. Thanks for the kind words, that wasn't the Girona by any chance? I only ask I as see you are from Northern Ireland- I was working in Belfast for a time last year and managed to visit the Ulster Museum while I was there, so may have seen some of the exact pieces you mean. Interesting about the depth of the tooling. With these I cut in the designs and opened them out with a modelling spoon, but I think with a lot of the real ones the patterns are simply drawn on with some blunt pointed tool without cutting into the surface of the leather. I have tried this but never with good results, so need a bit more practice I think. Early days for me with knife making and In retrospect they are a little broad bladed for eating knives of this period, so the proportions will be tweaked for the next lot. cheers! Alex
  21. Hi all Something a bit different to the Western stuff I normally post here, and quite photo intensive i'm afraid... This is a batch of late medieval knives and sheaths, which as a very general outline date between 1300-1500 depending on the piece. The sheaths for these are all 2mm veg tan, with a back central seam and tooling inspired by originals. The main source of reference was 'knives and scabbards', which catalogues pieces found in the Thames. The two larger knives have double layered scabbards, which is a necessity as the hunting set is multi pocketed with effectively three sheaths bundled together, and the larger messer has an integrated belt. None of them have belt loops in the modern sense, but are instead suspended by hanging thongs, which are laced through slits in the back and seems to be the universal carrying method for this kind of knife. I had to go against all of my instincts with the tooling on these in an attempt for authenticity, so nothing is measured or plotted out in the way I would do a modern belt, and likewise the dyeing is much more straightforward, without the antiquing effects that would be used now. I have focused mainly on the sheaths here as this is a leatherwork forum afterall, but for anyone interested in the knives themselves they are all hand forged from 1080 or 1075 carbon steel, with either brass or steel bolsters and handles made from various native woods, which include yew, laburnum, walnut and apple. I hope you like them! Alex
  22. Thanks, that makes at least two people who have found that website haha! I know what you mean, and have always refrained from lining belts or larger stuff this way for that reason, and normally use pre finished upholstery leather for linings. Natural will certainly patina with age, and show marks more easily than darker colours, but for small pouches I think this is fine. The finish in this case is a couple of layers of the fiebings atom wax, buffed between each coat. I suspect this could be also used to get the worst out of any marks- actually I might take a scrap and get it deliberately grubby to test this. It won't stay looking new forever but I suppose neither will the outside really. May make some changes when batch number 3 happens. I have tried with and without! I suspect it is just the snaps I am using,and just need to find the right brand. I've always found it quite tricky to find any with long enough stems which limits the options somewhat, but they must exist somewhere, I think I just need to buy samples from a few more places and experiment. Thanks! Alex
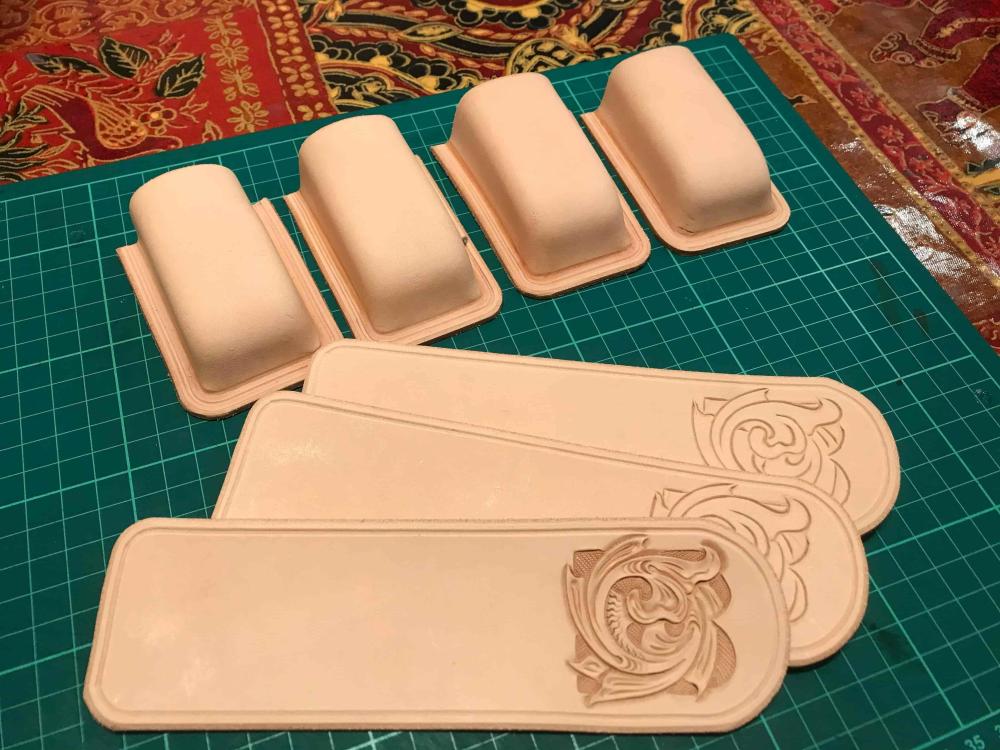
  23. Hi all, Here is a jumble of small pieces completed over the past few months. I have posted variants of all these products in some form before so refrained from posting them individually, but all of them have at least small alterations compared to the first batches. In all cases these are hand stitched with waxed linen, hand tooled, and dyed with fiebings pro colours. The pouches are for swiss army knives, I made a trial batch earlier this year which were all sold, and were all formed directly around the knife. To make a tidier and more consistent product this time round I made a custom two part wooden former, and boy did it make life easier. Just clamp it together after a small amount of hand moulding and then leave it overnight. These are all lined with milled veg tan, and closed with press studs, though I have yet to find any that don't flatten the centre to some degree when they are set, no matter how carefully done. As long as it is central and even this doesn't bother me too much but it would be nice to find a solution, all ears if anyone knows a UK supplier for slightly thicker ones. The coaster set was for a 90th birthday present and so I could spend a bit more time than usual making them nice. For stock pieces I do not back them or stitch the borders because this would basically double the price, but that was not an issue here so I finally got to make them how I wanted. The final batch are cases for Swann Morton scalpels, only simple little things but in my industry everyone uses them and they have proven my most popular product by far. It's the first time really I have played around with dyes that aren't some variant of brown, so that was exciting. These have a thick welt layer to protect the stitching and the tip of the sheath. All in all a bit of a random mixture of things but I have had much better luck on the business side with smaller products than big expensive ones, which makes sense I guess. I hope you like this stuff! cheers, Alex
×
×
  • Create New...