AlexOstacchini
-
Posts
159 -
Joined
-
Last visited
Content Type
Profiles
Forums
Events
Blogs
Gallery
Store
Everything posted by AlexOstacchini
-
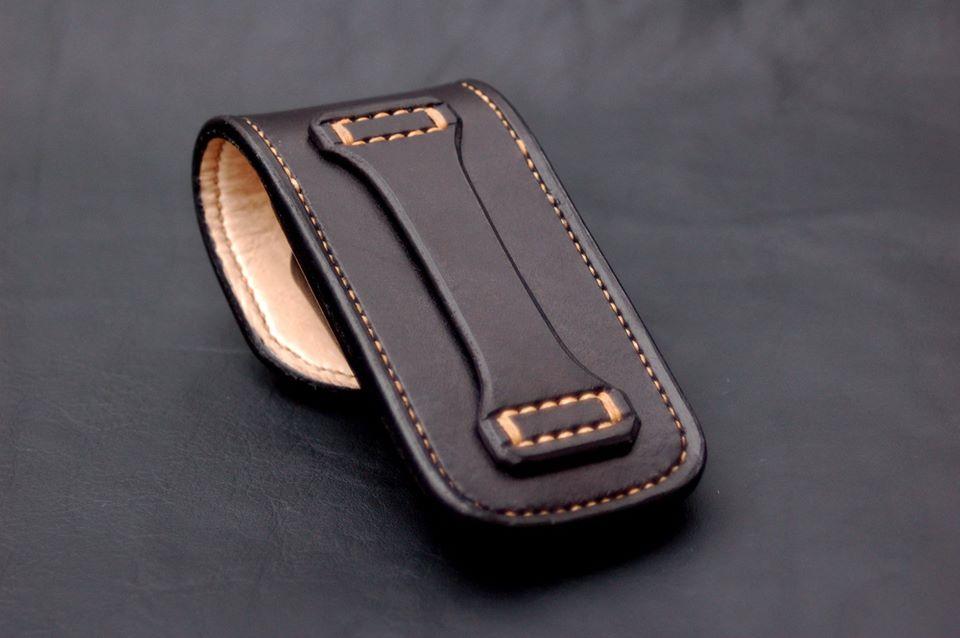
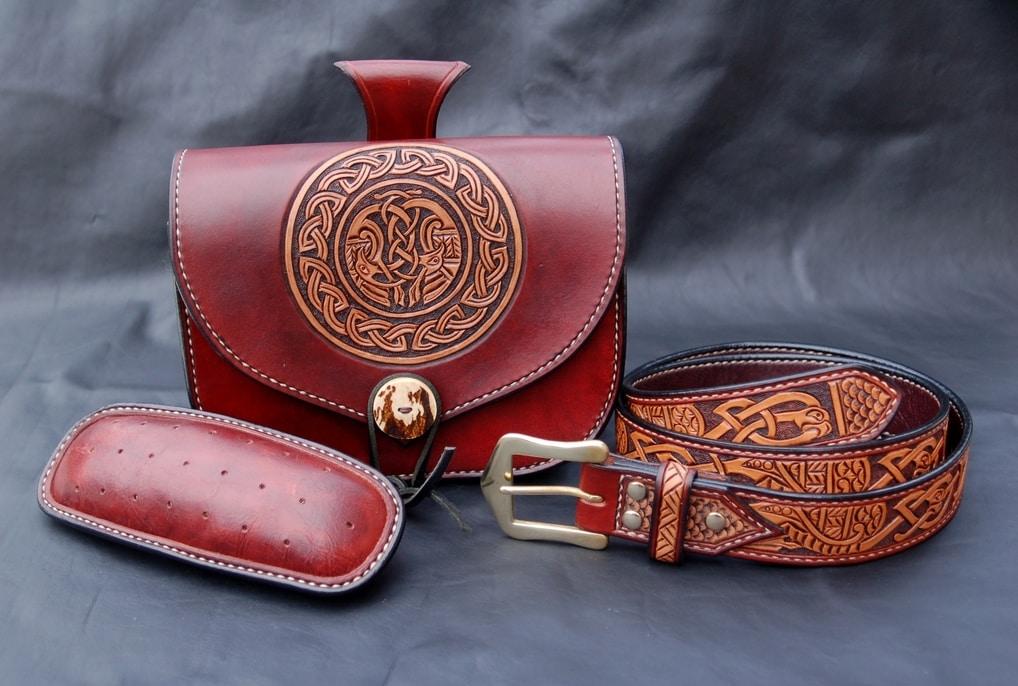
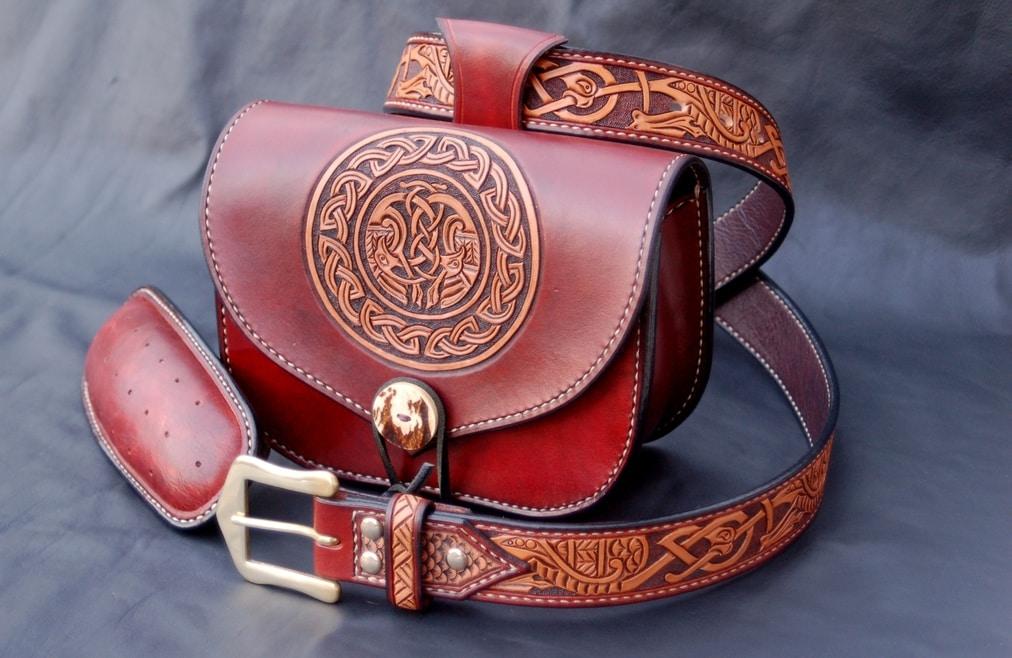
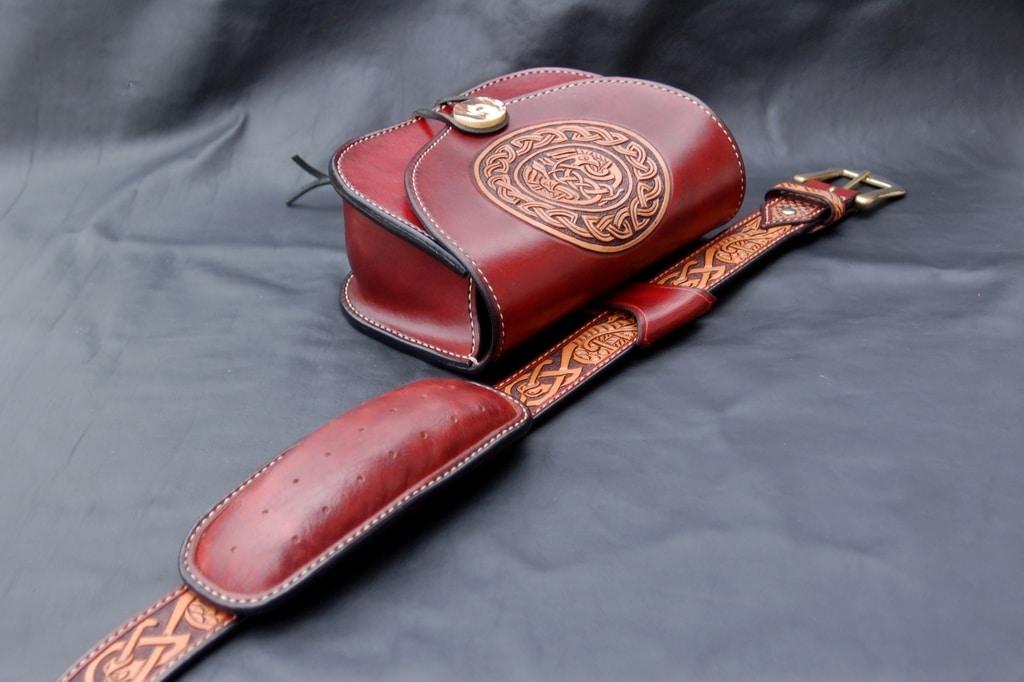
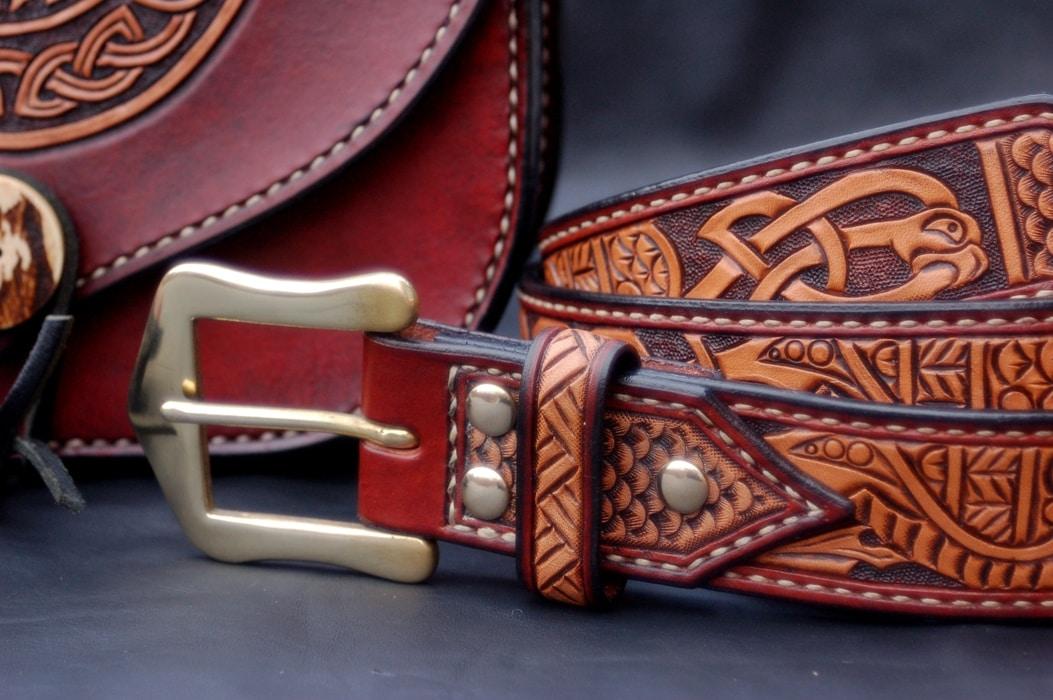
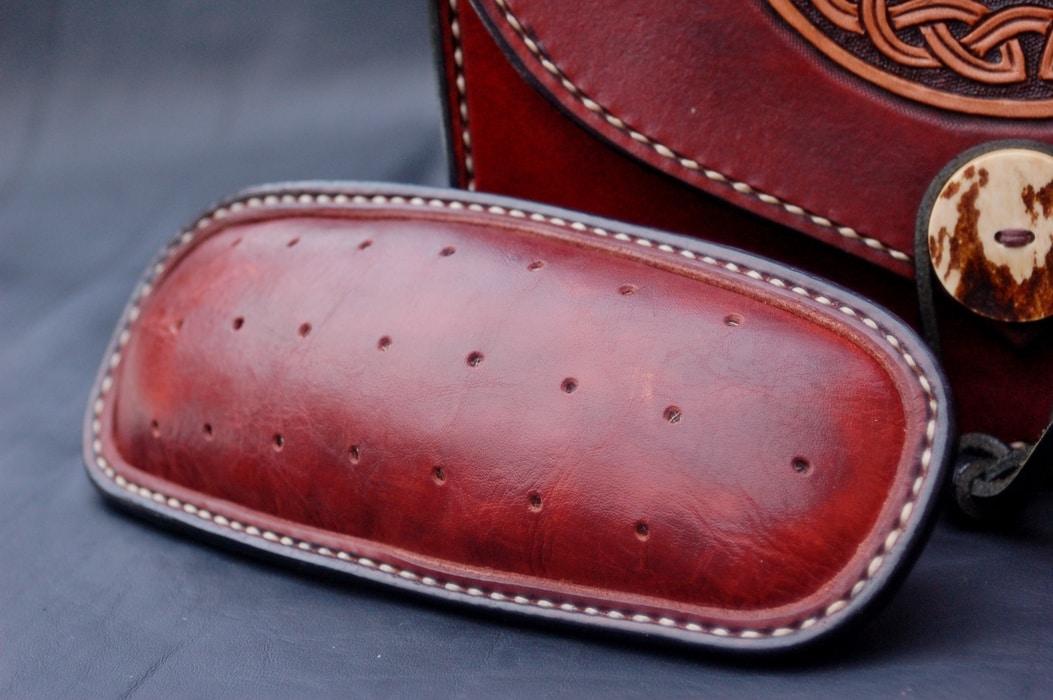
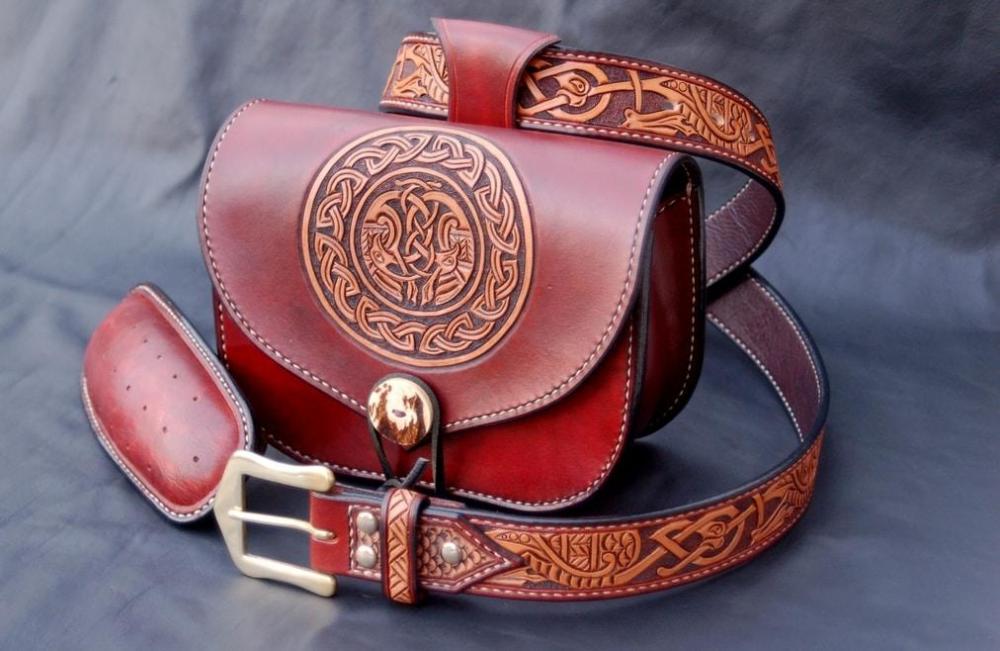
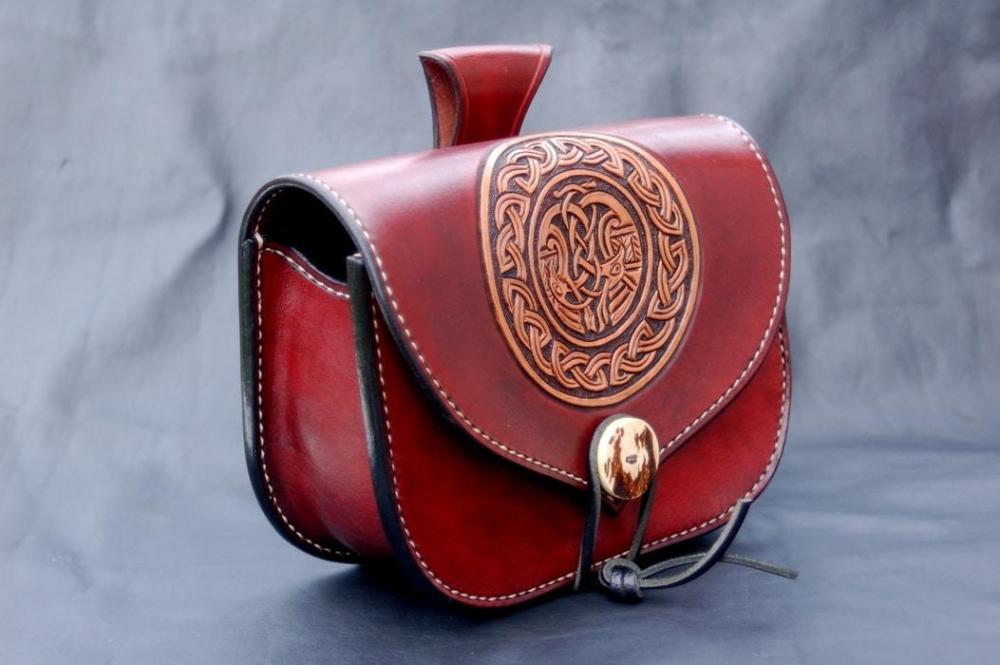
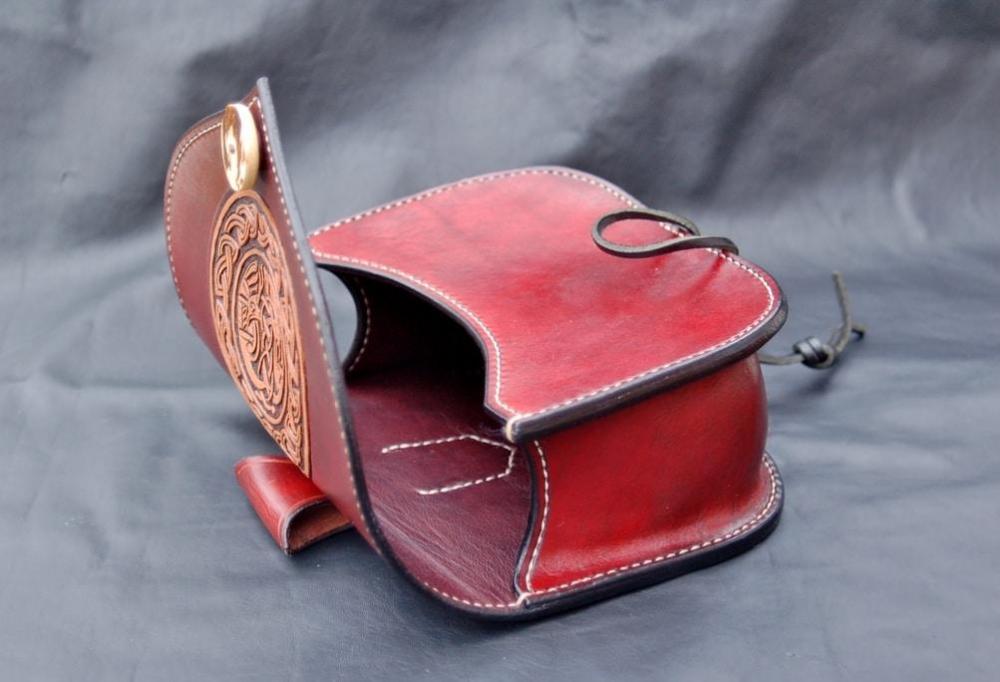
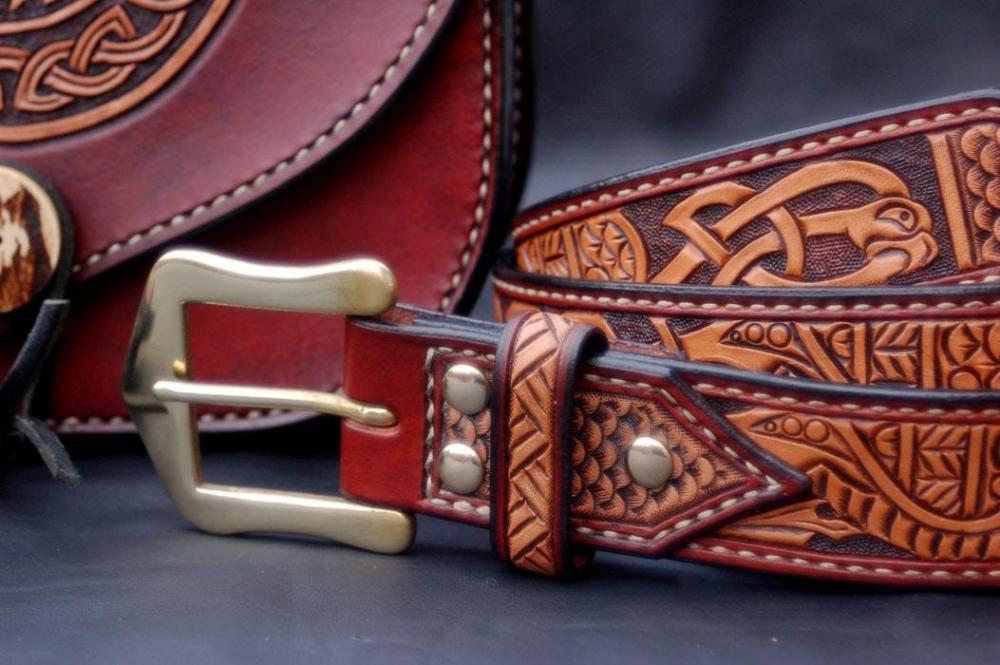
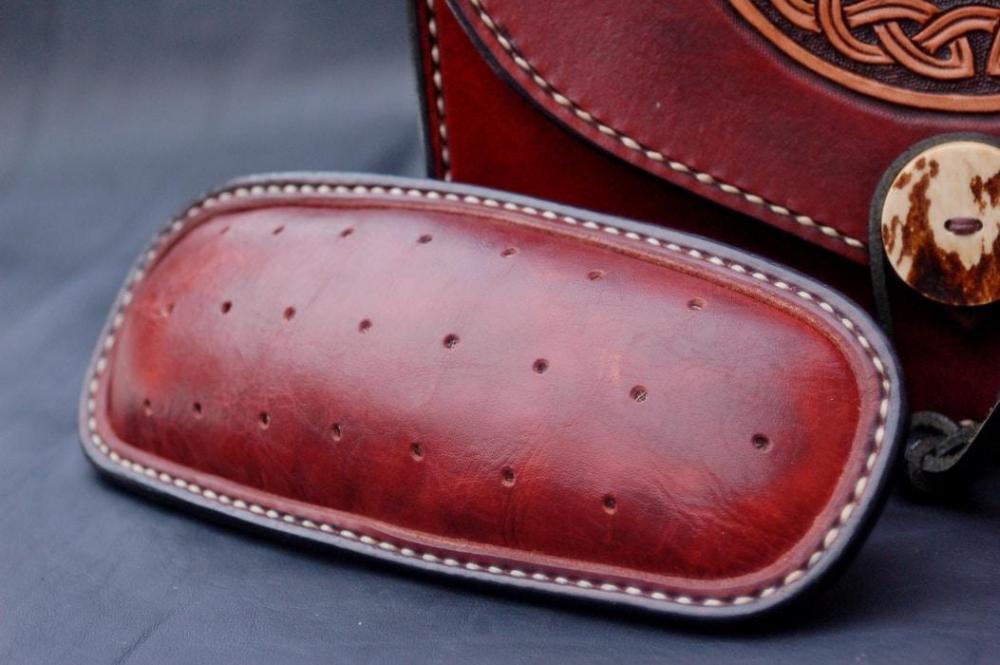
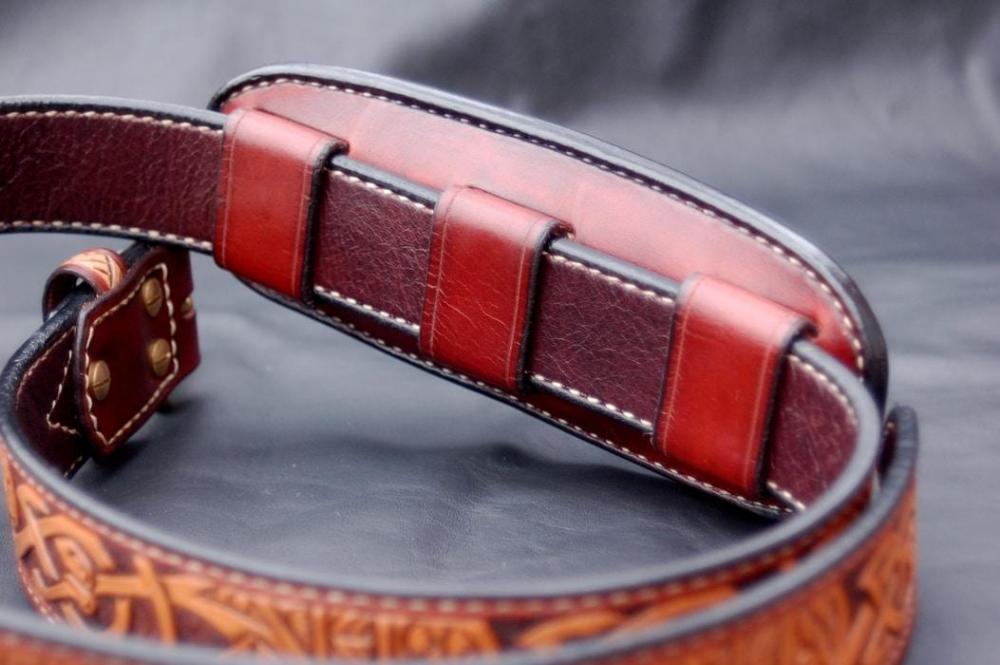
 Hi all, Here is a fairly unusual custom piece- this is a knitting belt. This was new territory for me and I had never heard of one before, but the idea is that it allows the user to knit while standing/walking. They date back hundreds of years and I'm not sure where exactly they originate but seems to be lots of ties to Scotland, particularly Shetland and the Hebrides. This set was built to the client's specs and includes a belt, pad, and pouch. The belt in this case is essentially a regular belt and has been designed as such- normally the pad would be integrated but having them as separate items allows more adjustment and the option of wearing the belt on its own. The tooling pattern on this is taken straight from the Book of Kells and features abstract interlocking medieval birds of some kind. A nice change from the Western things I normally do. It is 3.5mm veg tan with chicago screws to hold the buckle/keeper in place, so removable if necessary. The pad is stuffed with horsehair and has a series of holes for anchoring double pointed knitting needles. It has three wide belt loops on the back and is a nice tight fit on the belt, this is to create as much friction as possible to prevent it sliding around when being used. Finally the pouch has been sized to fit a ball of wool, and has an antler closing button and a tooled pattern taken from the same manuscript page as the belt design. It has deliberate gaps between the top of the gusset and the flap so that thread can pass through when it is closed. The pouch and belt are both lined and stitching is by hand for all three pieces. This is one of those jobs that in my head was simple but ended up taking far longer than anticipated to get everything worked out, so happy to see it finished. Off to it's new home tomorrow! Alex

-
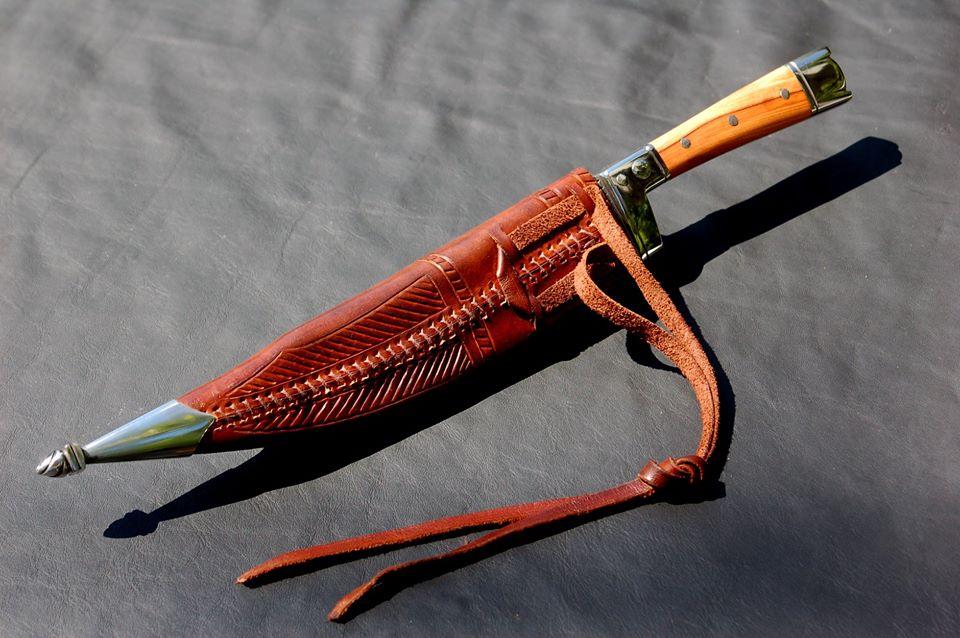
Yup, all eating knives other than the big ones, though I suspect general utility pieces also. Certainly not weapons in any case, or at least not designed to be. I believe Fred is right on this, this is called a pricker and I think the general consensus is it was a multi functional fork/awl/sharpening steel. While it does go to a diamond cross section, the edges are not sharp, only the point. Here is a better image of that set. My process for these was to form them first, then unfold them and do the tooling while the leather is flat. It can't lie completely flat of course as it is stretched and distorted from the forming, but enough to carve in the designs, and in fact I find the stretch marks help for marking out the borders. Then dye, then stitch. There are probably better ways of doing this and I'm sure this will change as I make more, so open to ideas for improvement! Alex
-
Thanks for the nice comments all I can certainly relate to this! Visited the museum of London not too long ago purely to look at whatever rusty old knives and sheaths were on display- not very many it turns out but still a very interesting trip for me. In terms of the steel I am feeling my way a bit and don't have the skills to pull off a forge welded laminated blade but hopefully one day, so it's nice uniform monosteel in the meantime! Yes fairly unusual to modern eyes, I suppose it is one method to protect the stitching from being sliced without the inclusion of a welt layer. There are some originals with side seams but a lot less common I think. Other than the the two large knives these are all unlined, which I believe was the norm. Cheers, me too! I enjoy projects which involve a few different skills, though I sometimes worry i'll end up as a bit of a jack of all trades master of none..! Alex
-
Thanks all Woops, not sure how I missed this out, here you go. Thanks for the kind words, that wasn't the Girona by any chance? I only ask I as see you are from Northern Ireland- I was working in Belfast for a time last year and managed to visit the Ulster Museum while I was there, so may have seen some of the exact pieces you mean. Interesting about the depth of the tooling. With these I cut in the designs and opened them out with a modelling spoon, but I think with a lot of the real ones the patterns are simply drawn on with some blunt pointed tool without cutting into the surface of the leather. I have tried this but never with good results, so need a bit more practice I think. Early days for me with knife making and In retrospect they are a little broad bladed for eating knives of this period, so the proportions will be tweaked for the next lot. cheers! Alex
-
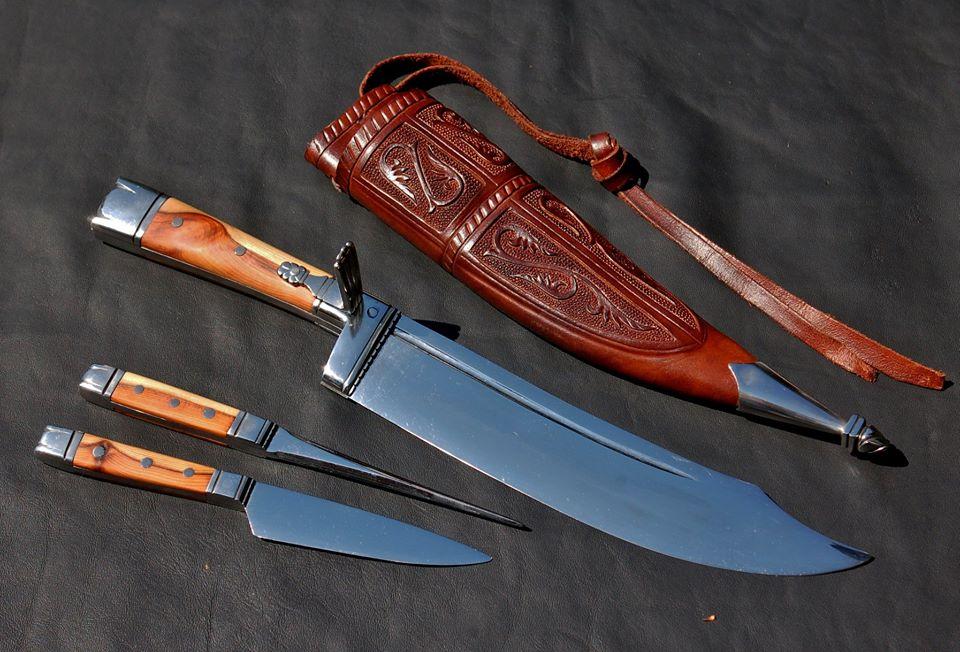
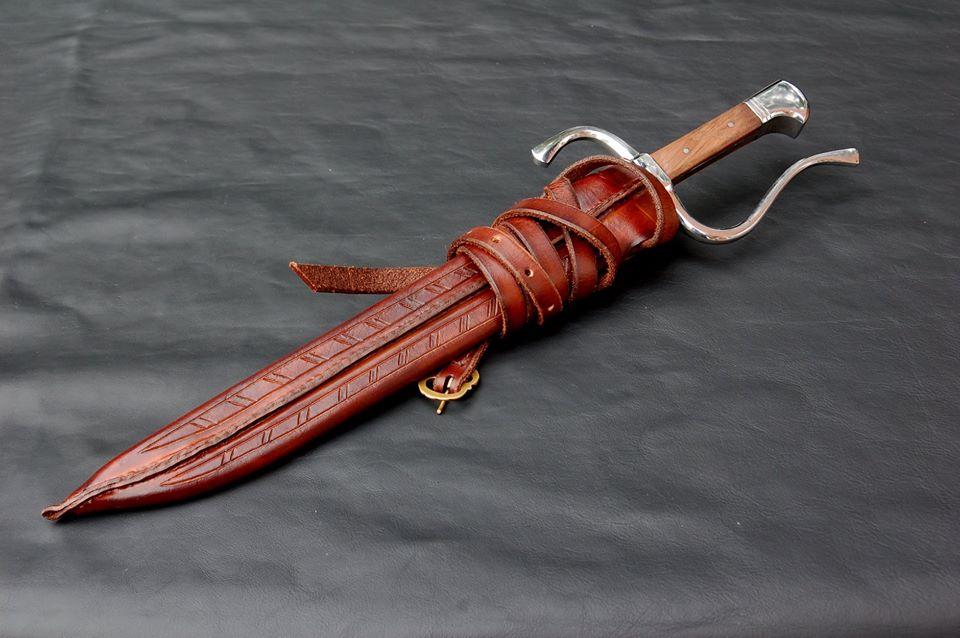
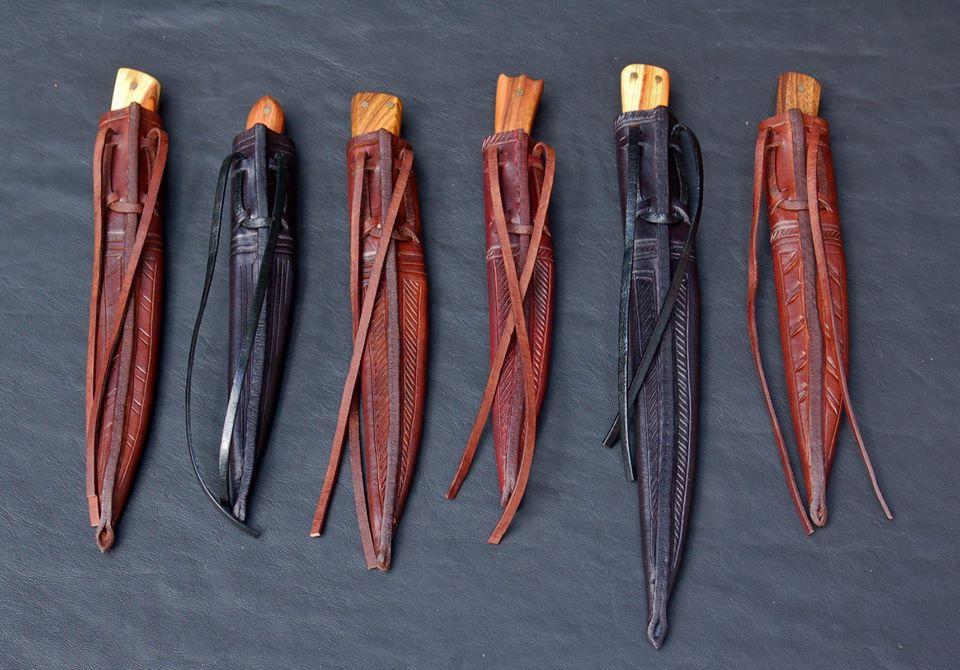
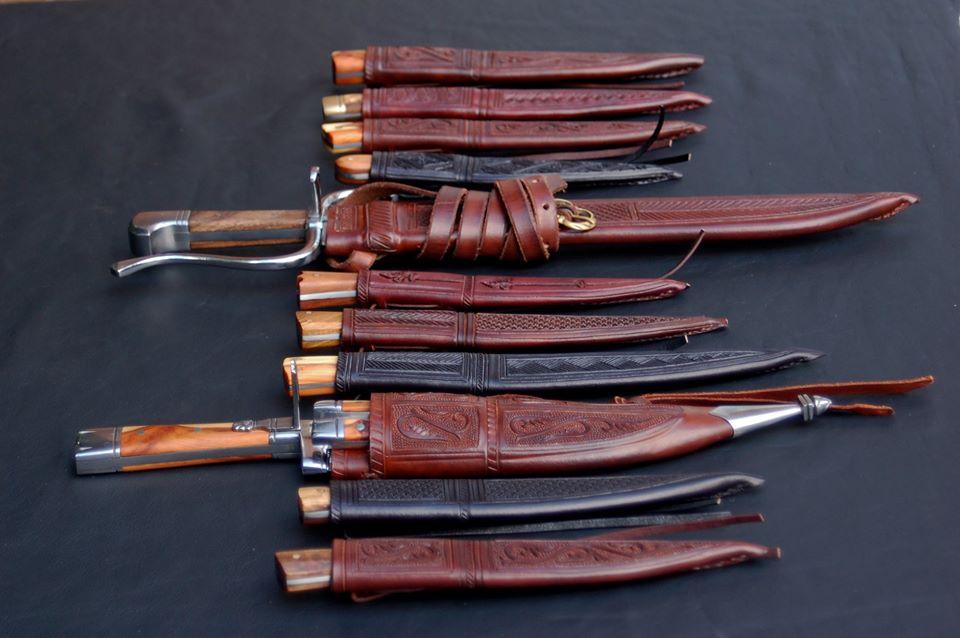
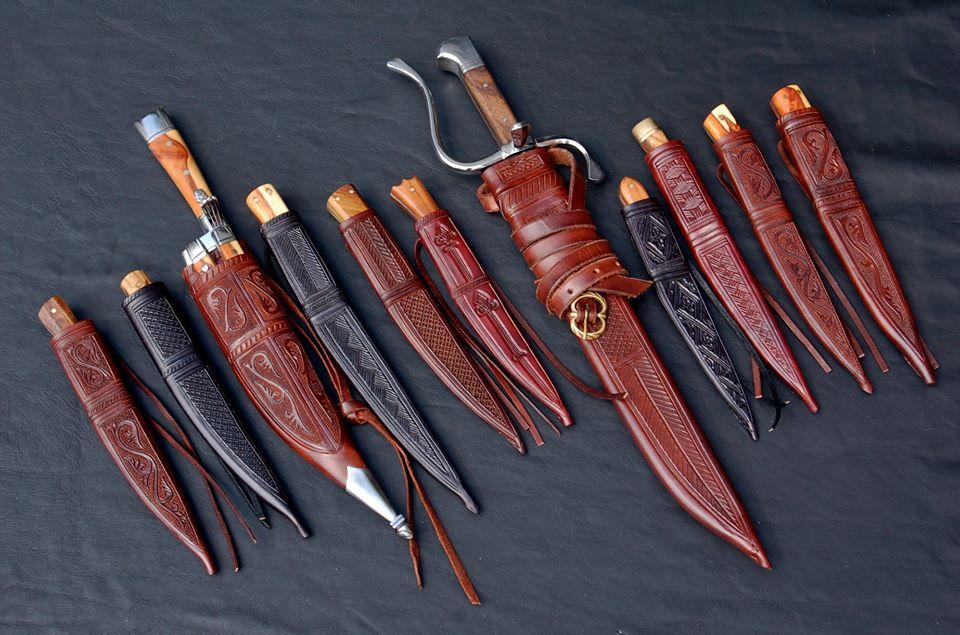
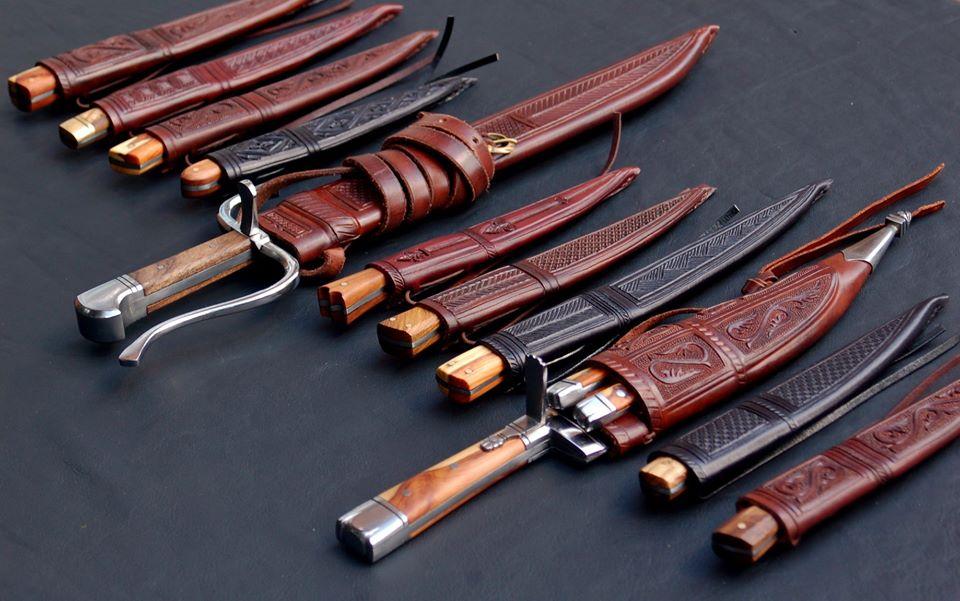
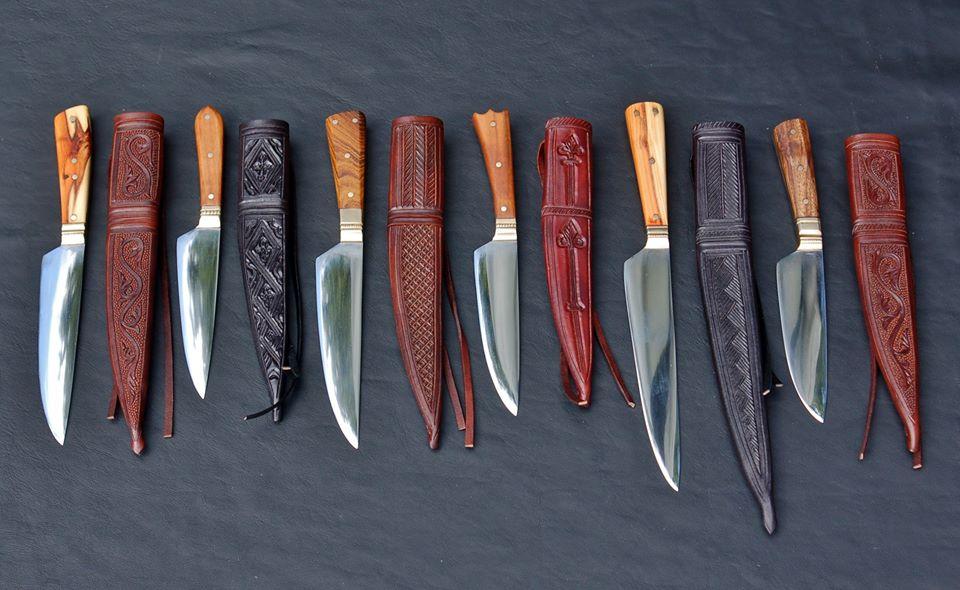
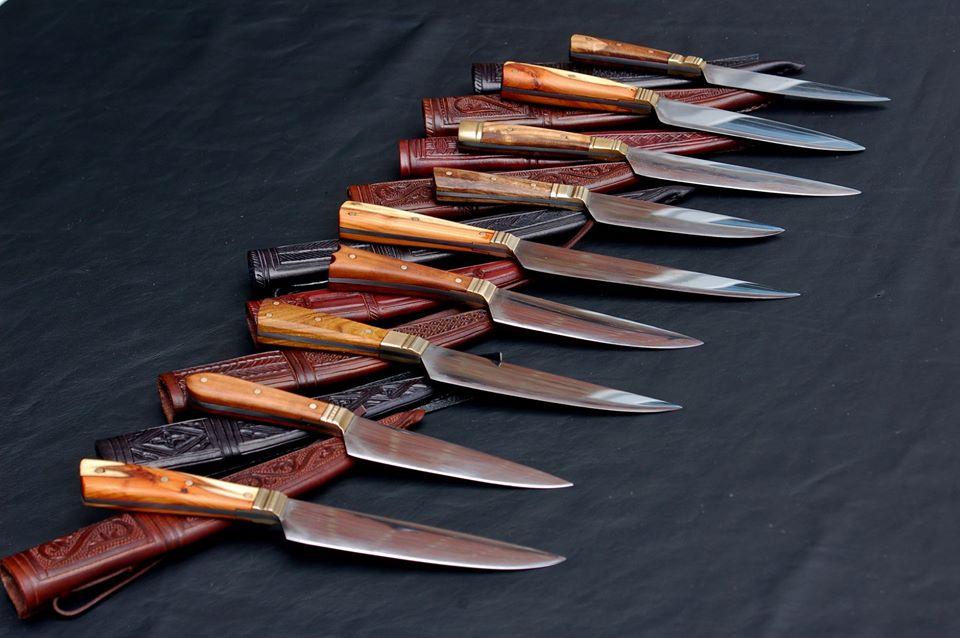
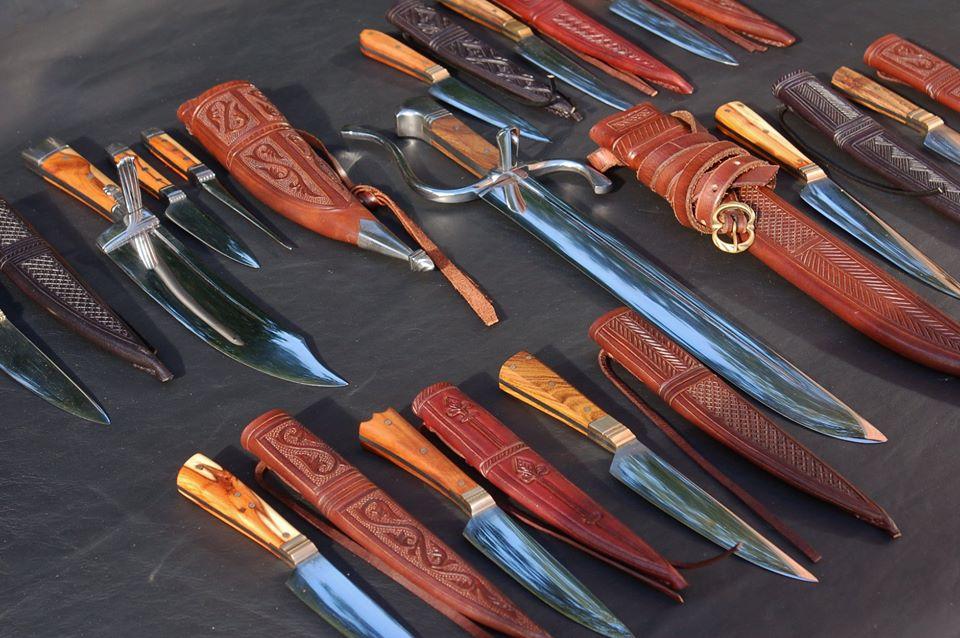
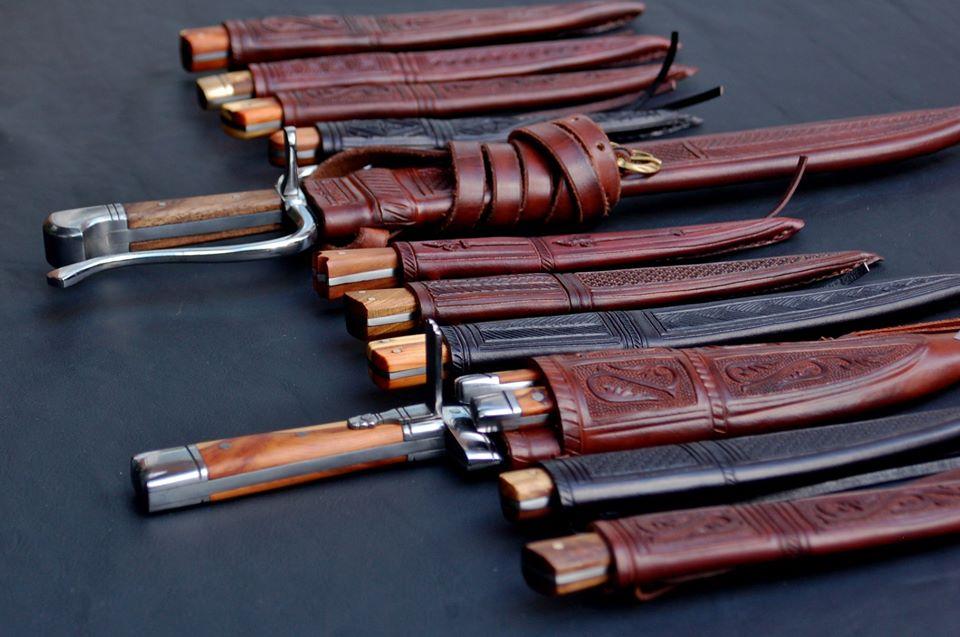
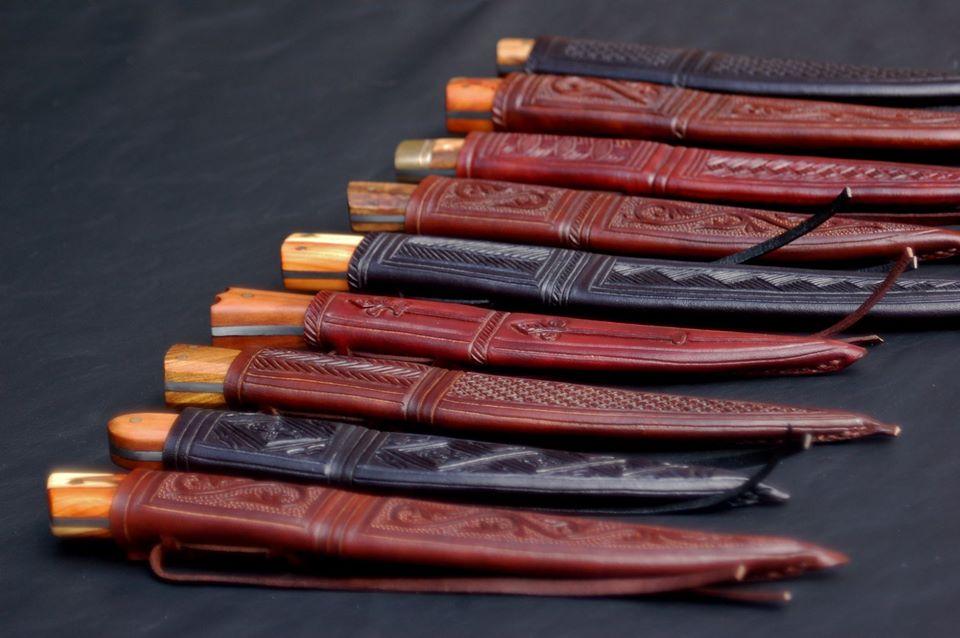
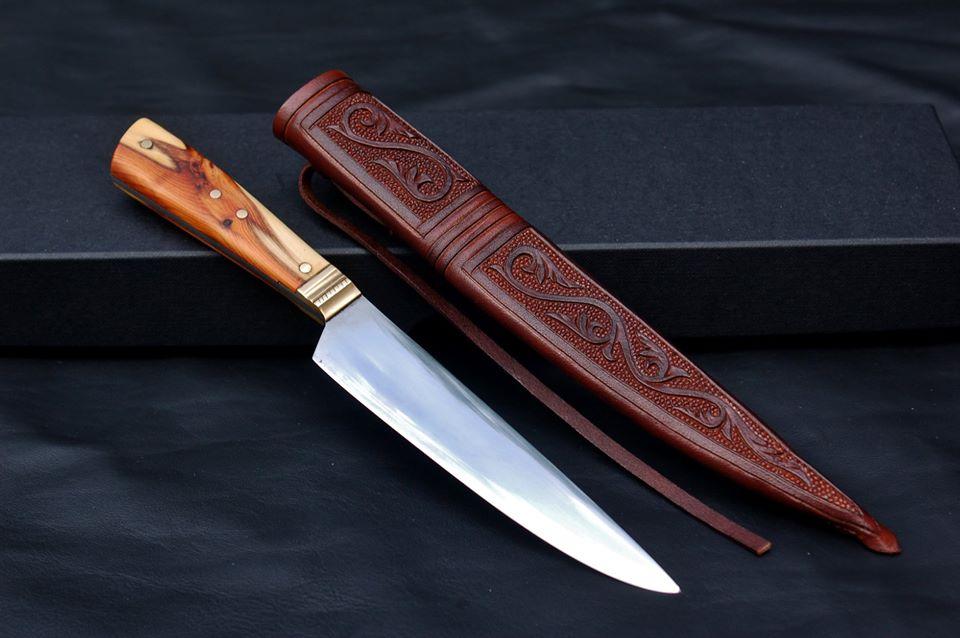
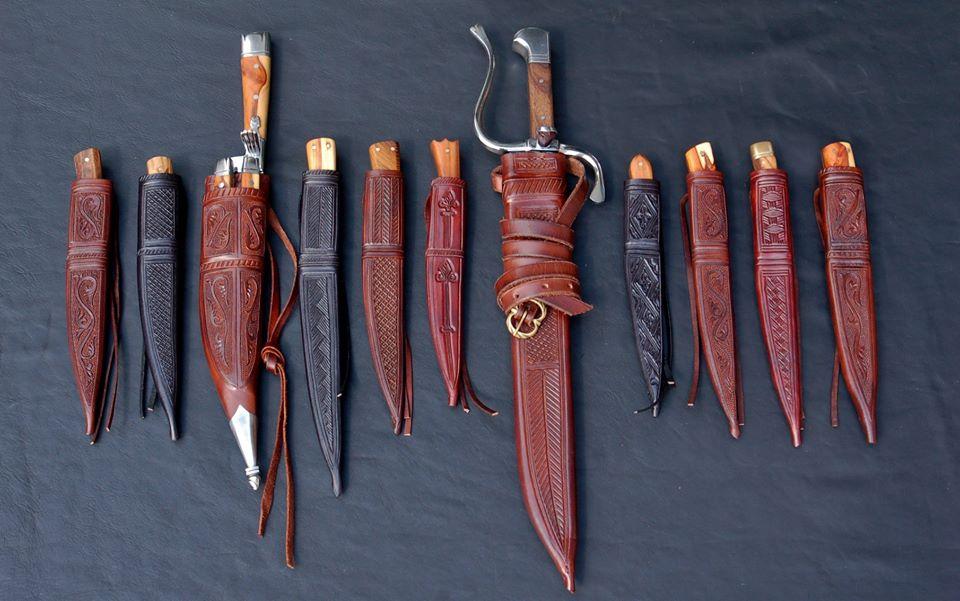
Hi all Something a bit different to the Western stuff I normally post here, and quite photo intensive i'm afraid... This is a batch of late medieval knives and sheaths, which as a very general outline date between 1300-1500 depending on the piece. The sheaths for these are all 2mm veg tan, with a back central seam and tooling inspired by originals. The main source of reference was 'knives and scabbards', which catalogues pieces found in the Thames. The two larger knives have double layered scabbards, which is a necessity as the hunting set is multi pocketed with effectively three sheaths bundled together, and the larger messer has an integrated belt. None of them have belt loops in the modern sense, but are instead suspended by hanging thongs, which are laced through slits in the back and seems to be the universal carrying method for this kind of knife. I had to go against all of my instincts with the tooling on these in an attempt for authenticity, so nothing is measured or plotted out in the way I would do a modern belt, and likewise the dyeing is much more straightforward, without the antiquing effects that would be used now. I have focused mainly on the sheaths here as this is a leatherwork forum afterall, but for anyone interested in the knives themselves they are all hand forged from 1080 or 1075 carbon steel, with either brass or steel bolsters and handles made from various native woods, which include yew, laburnum, walnut and apple. I hope you like them! Alex

-
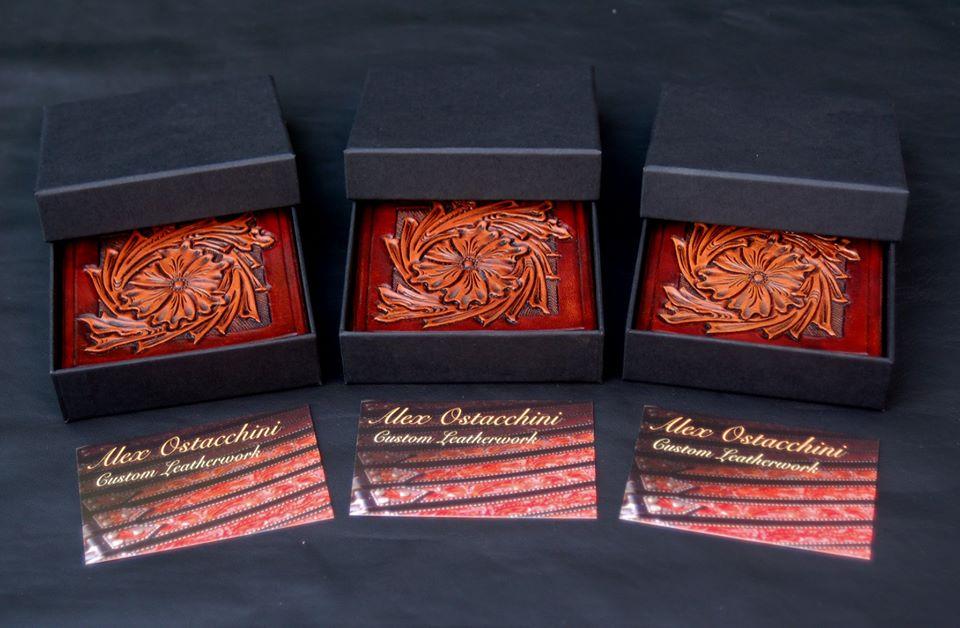
Pouches, Coasters, Cases... Lots of small items.
AlexOstacchini replied to AlexOstacchini's topic in Art
Thanks, that makes at least two people who have found that website haha! I know what you mean, and have always refrained from lining belts or larger stuff this way for that reason, and normally use pre finished upholstery leather for linings. Natural will certainly patina with age, and show marks more easily than darker colours, but for small pouches I think this is fine. The finish in this case is a couple of layers of the fiebings atom wax, buffed between each coat. I suspect this could be also used to get the worst out of any marks- actually I might take a scrap and get it deliberately grubby to test this. It won't stay looking new forever but I suppose neither will the outside really. May make some changes when batch number 3 happens. I have tried with and without! I suspect it is just the snaps I am using,and just need to find the right brand. I've always found it quite tricky to find any with long enough stems which limits the options somewhat, but they must exist somewhere, I think I just need to buy samples from a few more places and experiment. Thanks! Alex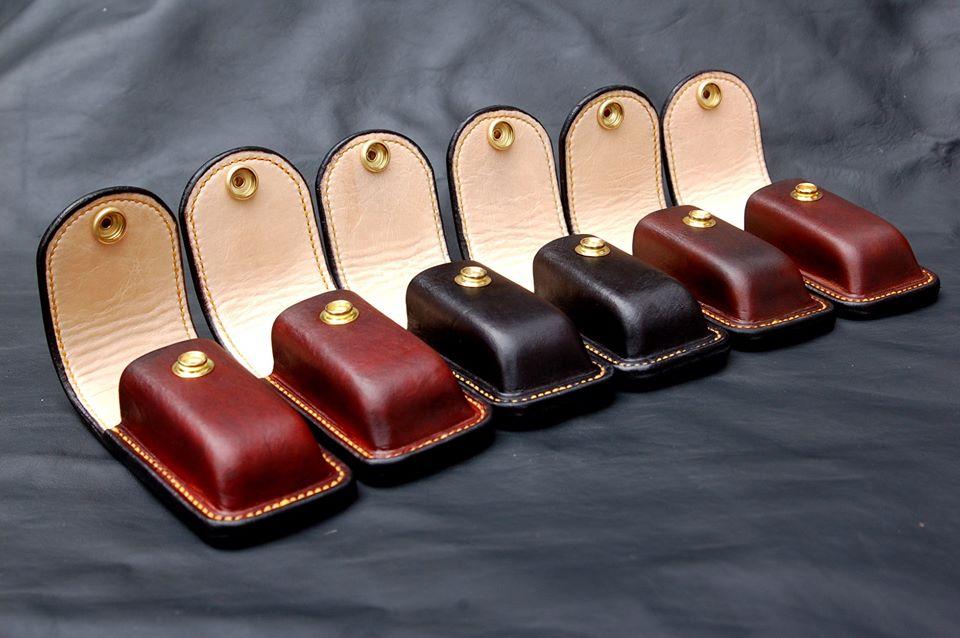
-
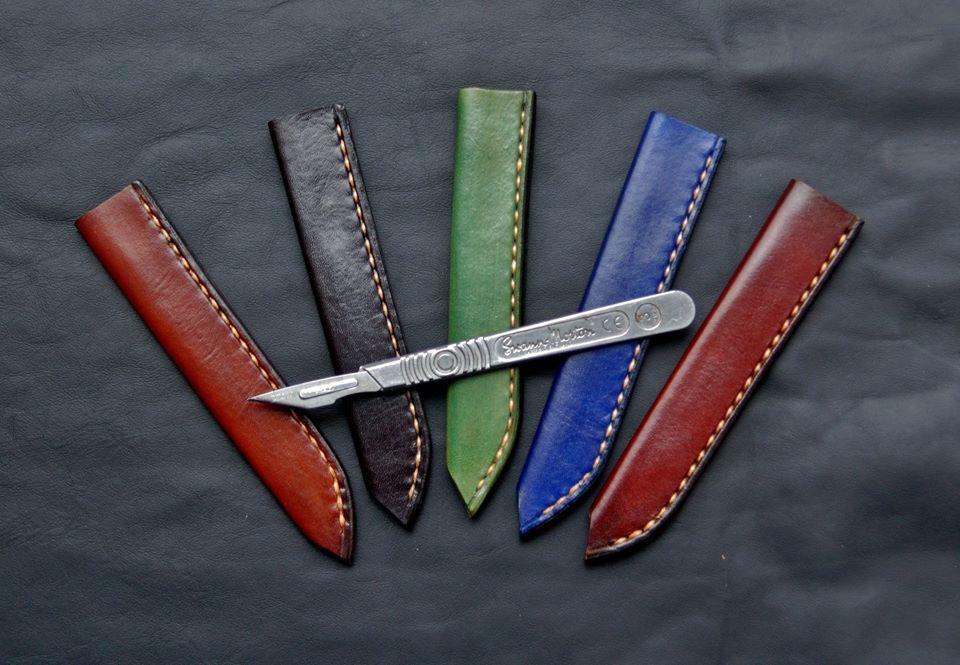
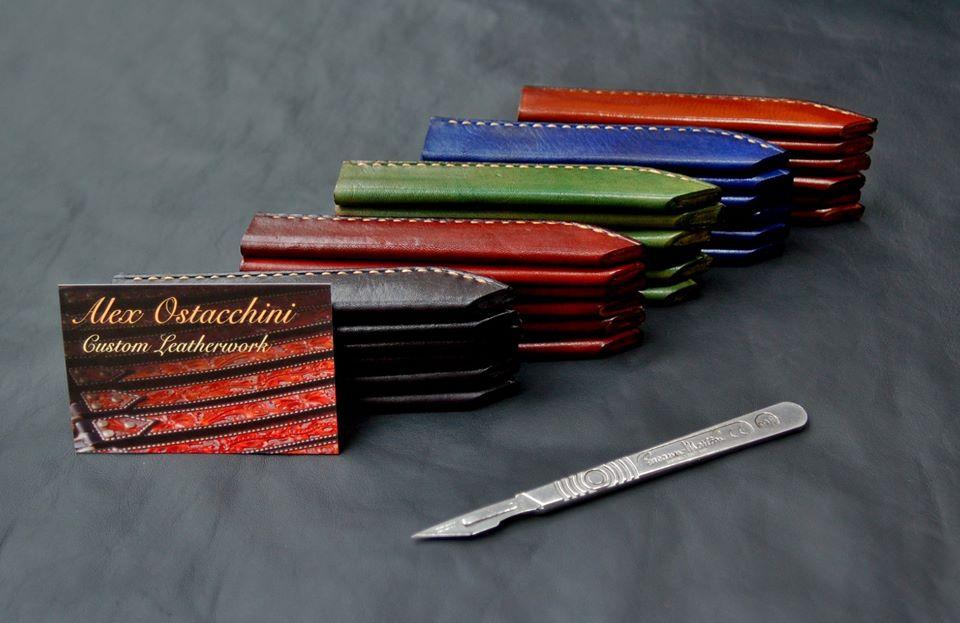
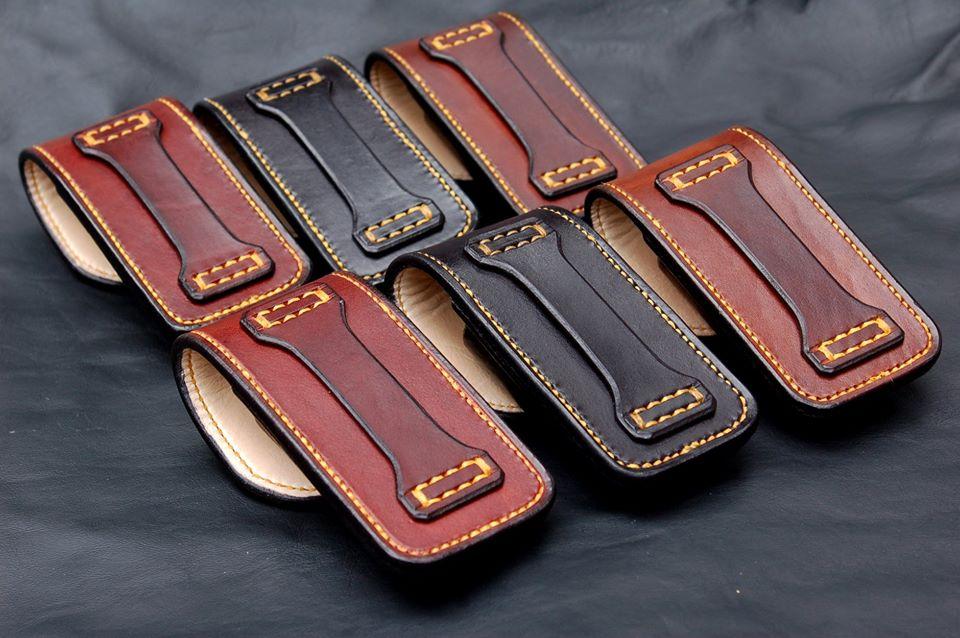
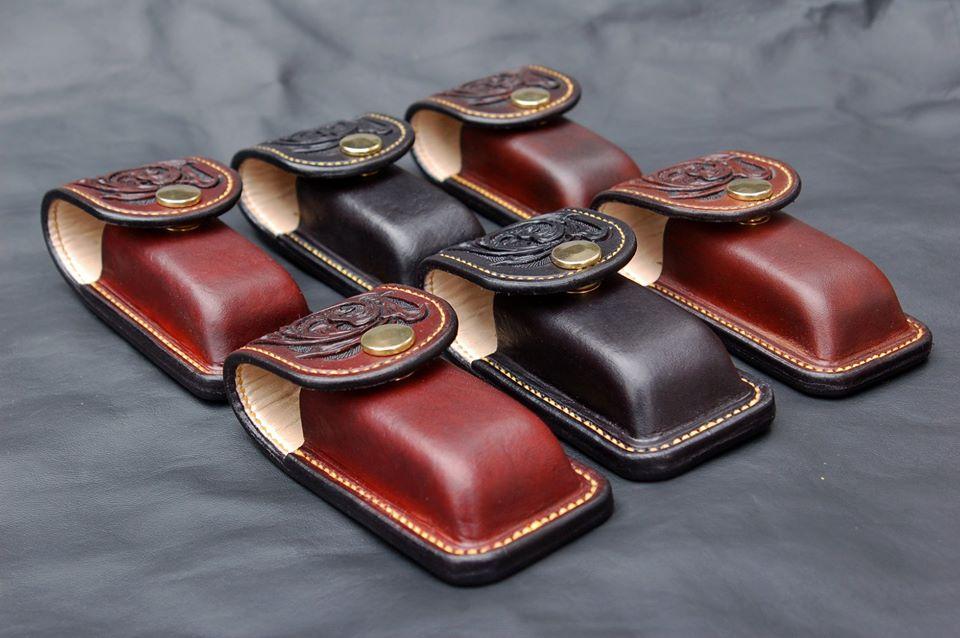
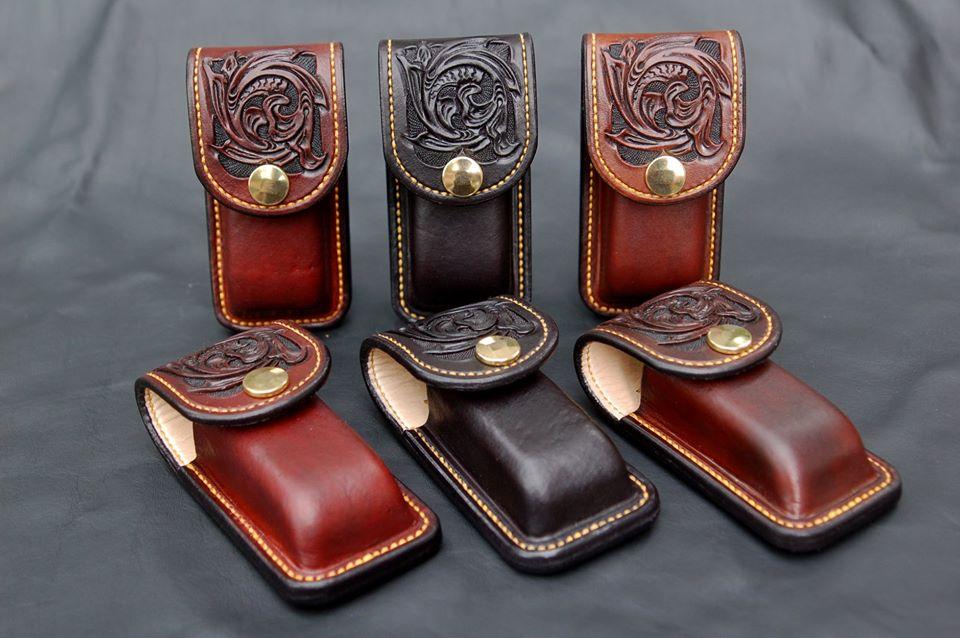
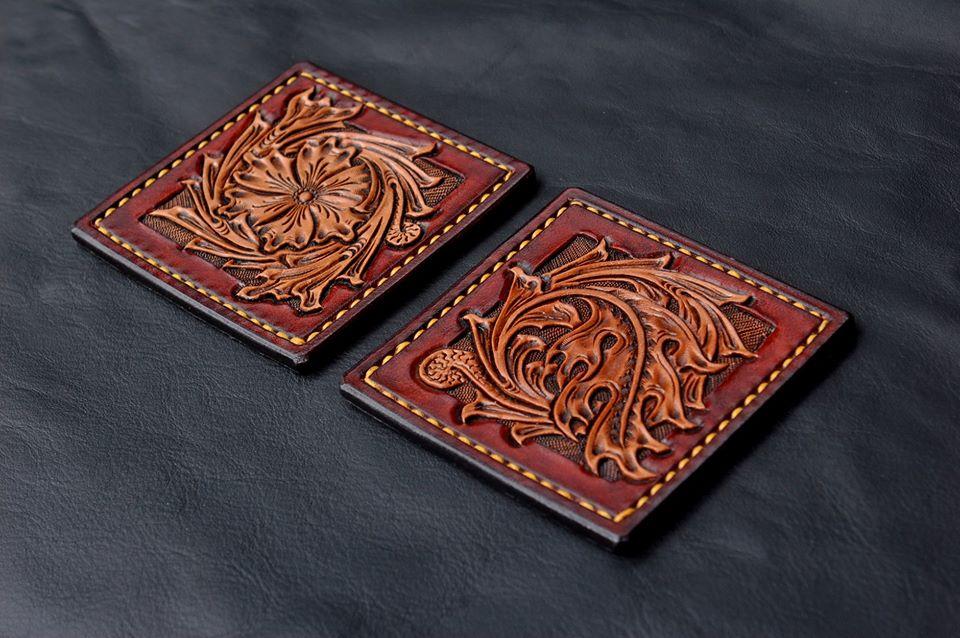
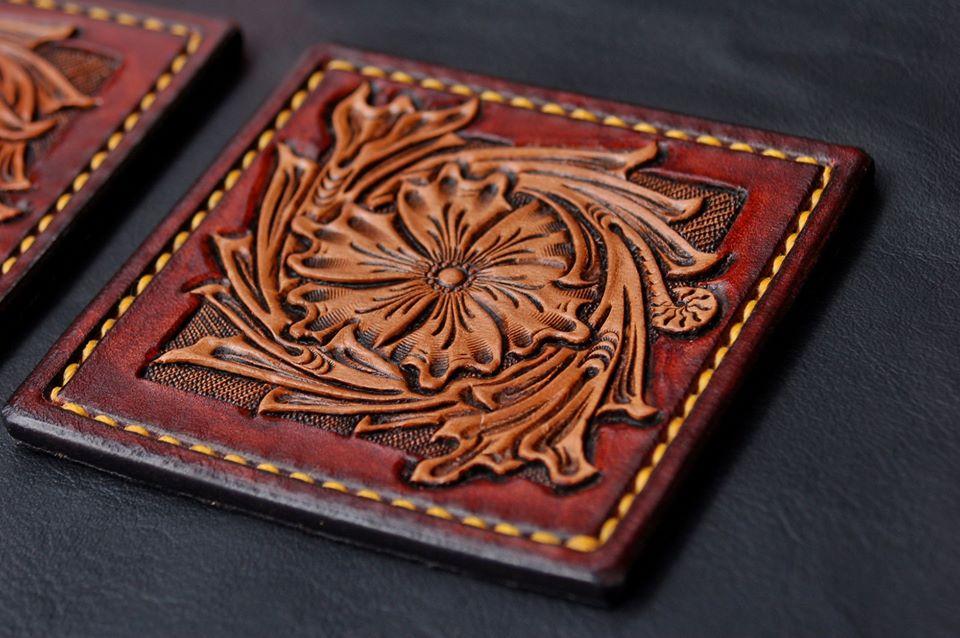
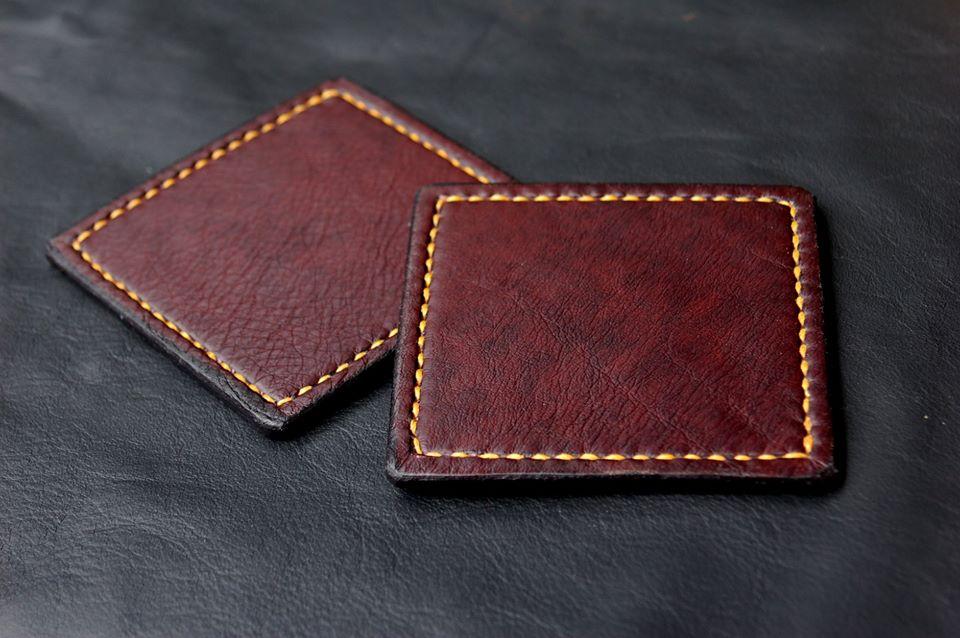
Hi all, Here is a jumble of small pieces completed over the past few months. I have posted variants of all these products in some form before so refrained from posting them individually, but all of them have at least small alterations compared to the first batches. In all cases these are hand stitched with waxed linen, hand tooled, and dyed with fiebings pro colours. The pouches are for swiss army knives, I made a trial batch earlier this year which were all sold, and were all formed directly around the knife. To make a tidier and more consistent product this time round I made a custom two part wooden former, and boy did it make life easier. Just clamp it together after a small amount of hand moulding and then leave it overnight. These are all lined with milled veg tan, and closed with press studs, though I have yet to find any that don't flatten the centre to some degree when they are set, no matter how carefully done. As long as it is central and even this doesn't bother me too much but it would be nice to find a solution, all ears if anyone knows a UK supplier for slightly thicker ones. The coaster set was for a 90th birthday present and so I could spend a bit more time than usual making them nice. For stock pieces I do not back them or stitch the borders because this would basically double the price, but that was not an issue here so I finally got to make them how I wanted. The final batch are cases for Swann Morton scalpels, only simple little things but in my industry everyone uses them and they have proven my most popular product by far. It's the first time really I have played around with dyes that aren't some variant of brown, so that was exciting. These have a thick welt layer to protect the stitching and the tip of the sheath. All in all a bit of a random mixture of things but I have had much better luck on the business side with smaller products than big expensive ones, which makes sense I guess. I hope you like this stuff! cheers, Alex

-
Looks like a nice piece of wet forming to me
-
Very tidy work. I always think clean designs like this are very unforgiving, in that mistakes really stick out, but this is excellent. Fourth project you say? Wow. Great Stuff
-
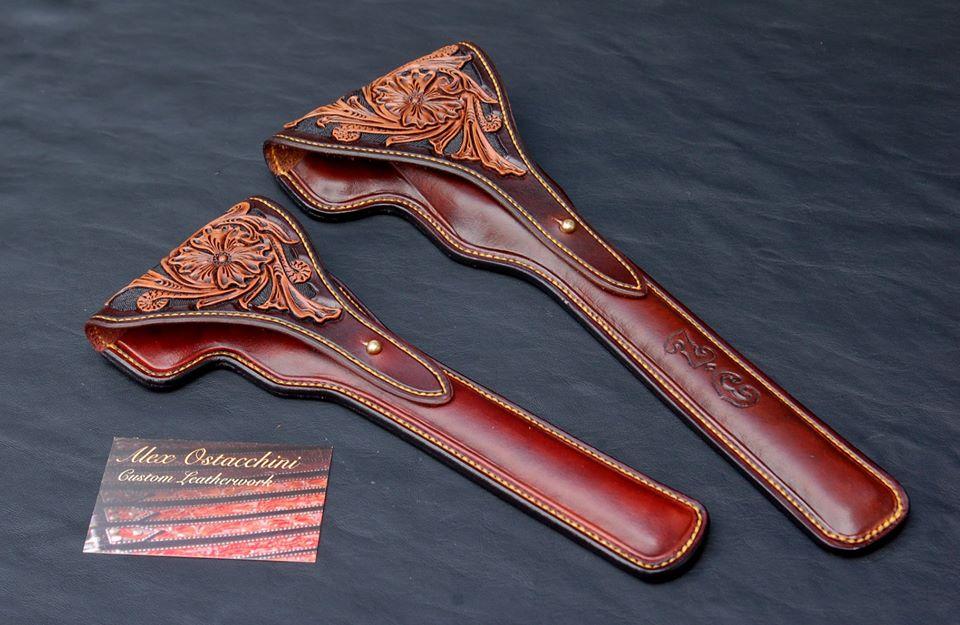
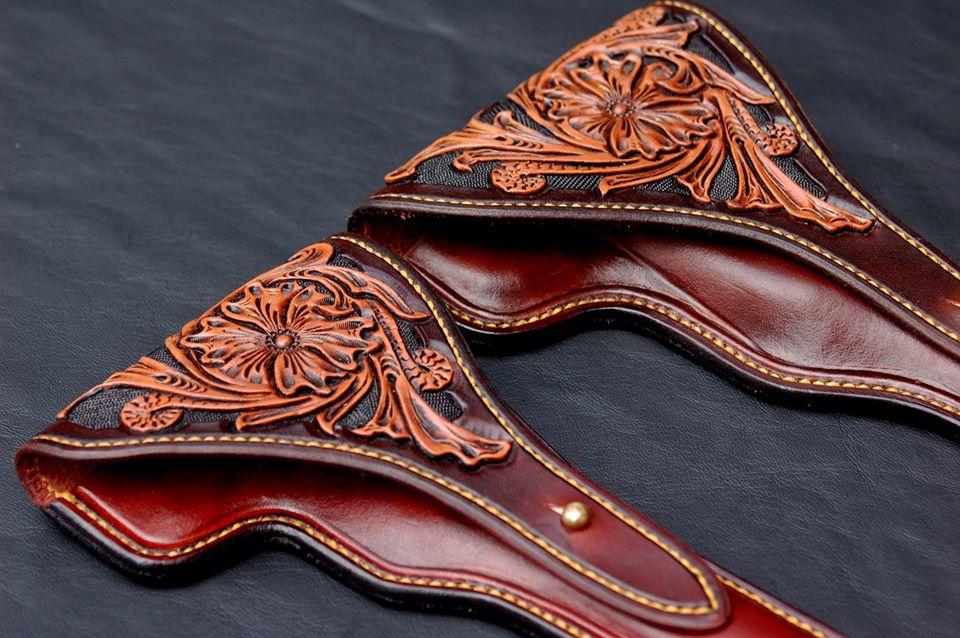
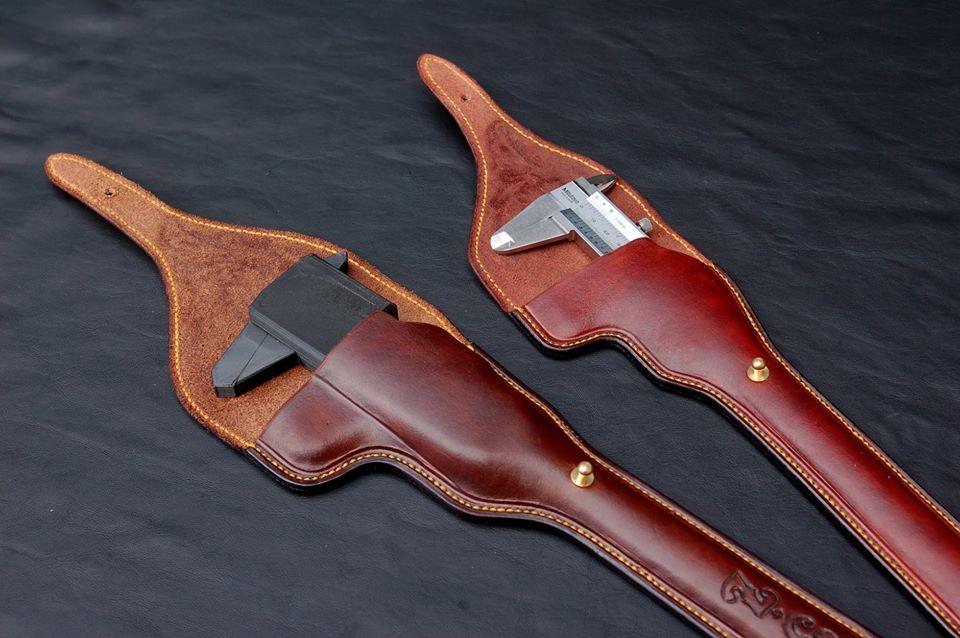
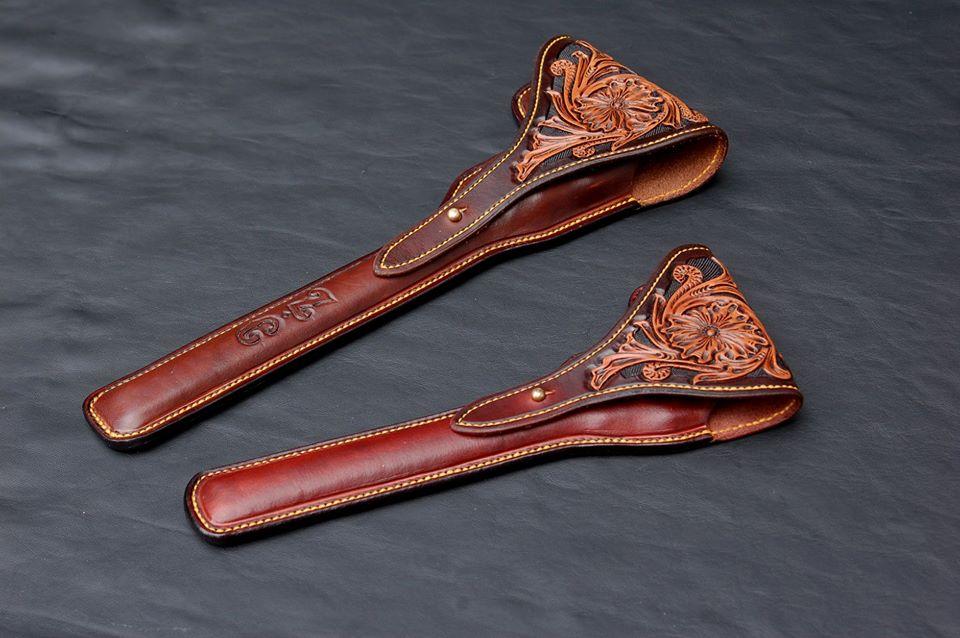
Hi all, Here are a couple of commissioned pieces ready to be sent off to their new homes on opposite sides of the world. These are custom cases for vernier and digital callipers. I didn't own a digital pair the correct size so initially turned the job down, but it turned out the client worked in 3D printing and was able to create a mock up, which was then sent to my friend and printed locally. Bam, it could now be made. I am normally a bit of a luddite and carve formers out of wood when I need them but this is an application I had never really considered and has got me wondering about other projects. It certainly did the job. Technical rundown: These are both 2.5mm veg tan, hand tooled and stitched, and closed with sam browne buttons. Initials were requested along the gauge on the larger case and so these have been taken from a Western style alphabet and carved in. I hope you like them! Alex

-
Great stuff as usual
-
Just watched the video, really good stuff. The close focusing on the work is excellent, nice and clear at every stage. Just personal preference but I also find craft videos like yours much better without music (particularly ukulele- sorry anyone who plays!). All round neat work too. I can't think of anything to critique Alex
-
Thanks again Cheers, I'm at the beginner stage of making knives and judging by your forge looking profile picture I assume you know much more about this than me. To be honest the main reason I started leatherwork 7 years ago was so I could eventually do scabbards and quivers and medieval things, I mostly post Western stuff here but that has never been my main interest. Finally set up my forge last year so playing catch up in terms of skills and it will be a while before I feel as comfortable making knives as I am with leather! I'm certainly no blacksmith at the moment. Alex
-
By charging a fortune! Only joking, to be brutally honest I didn't really make any money on it, I underestimated both time and materials and my quote was way off. Not sure what my hourly rate worked out as but below minimum wage for sure. Live and learn I suppose, though with this particular project as long as it hit the deadline and the customer was happy I wasn't really too fussed. Cheers! Alex
-
Some very flattering comments, thanks everyone. This was my first big commissioned piece really and I was a little apprehensive going into it, so this is all very nice to read Cheers! Alex
-
Thanks for the compliments all, happy that it is finally finished and I'm glad you like it! Nothing wrong with plain! All just personal preference really, but thanks Alex
-
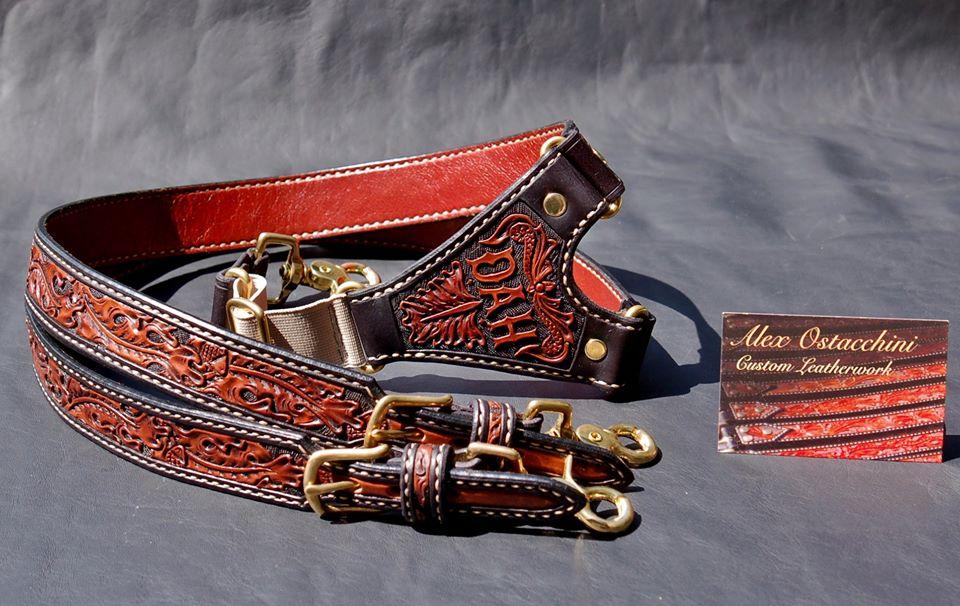
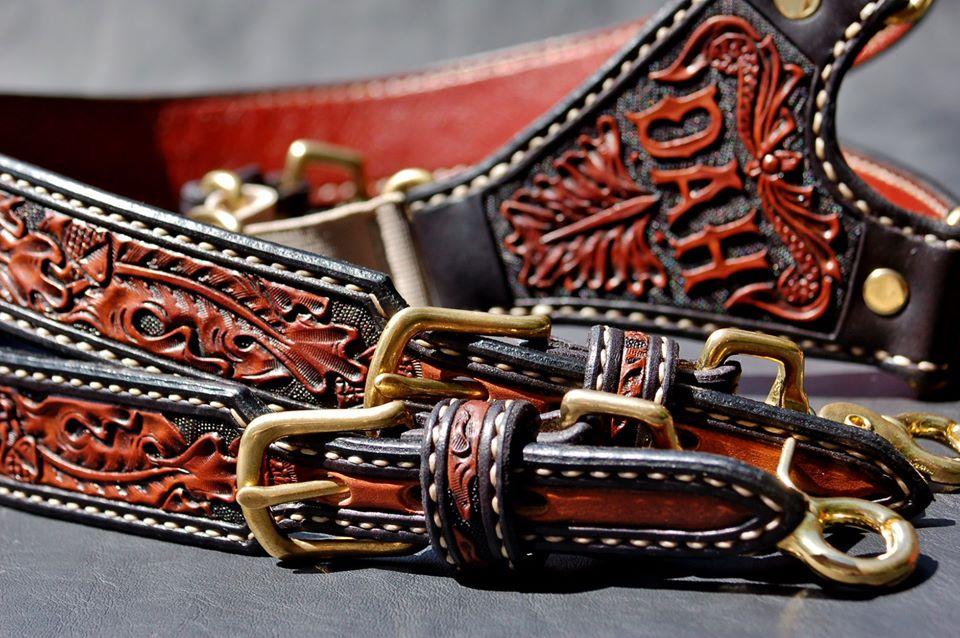
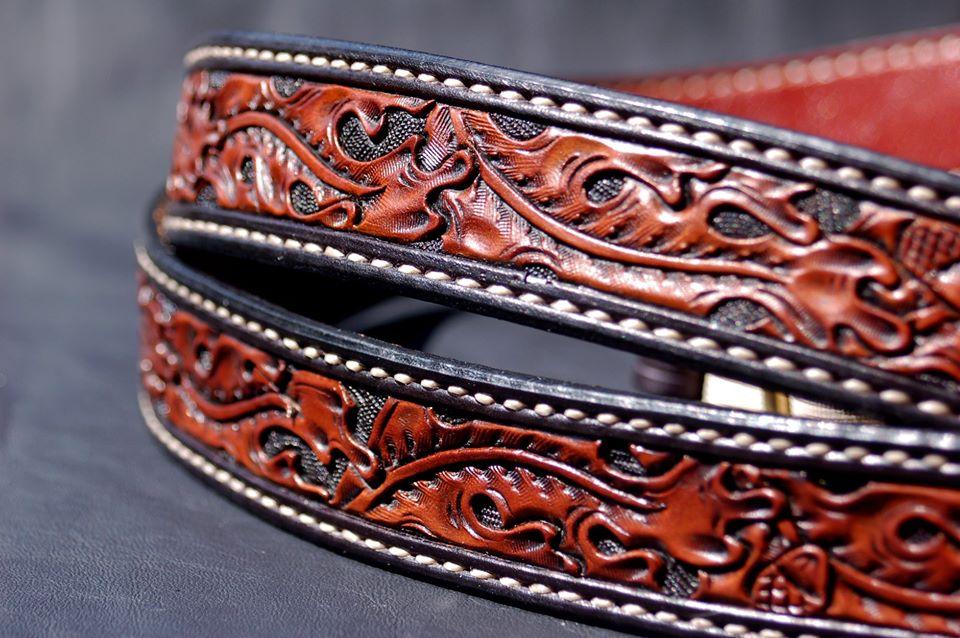
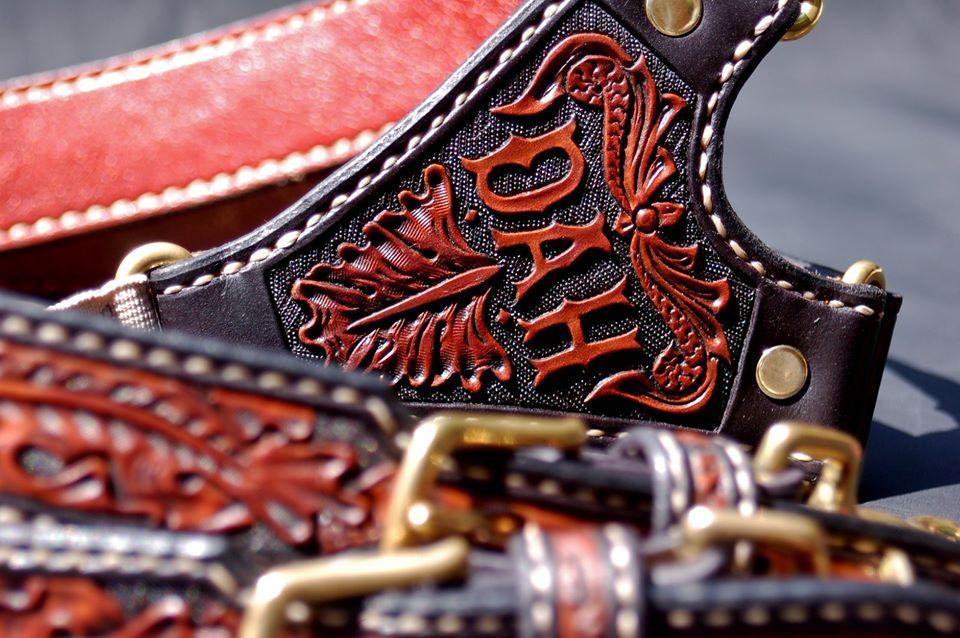
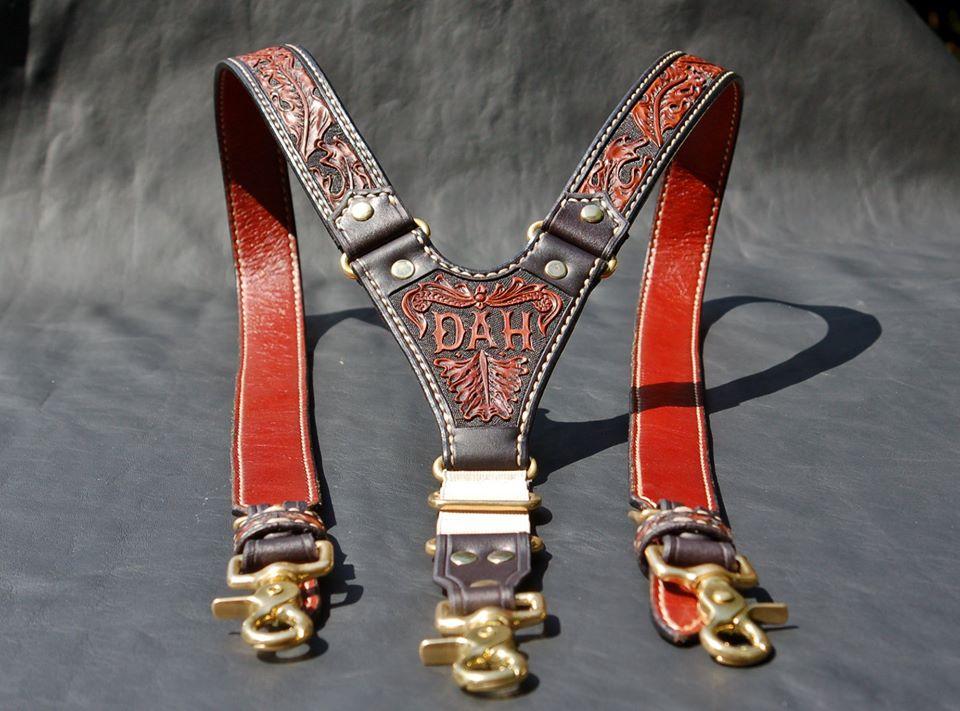
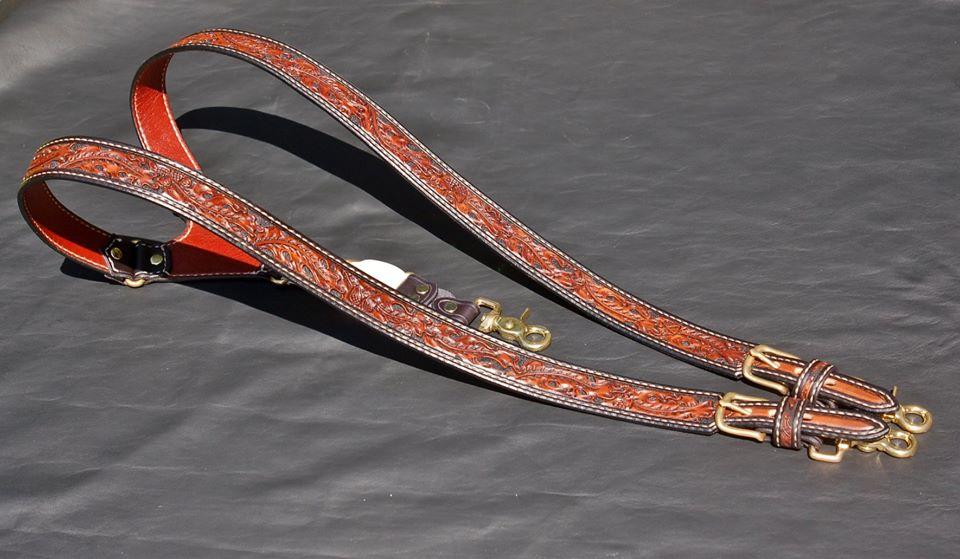
Hi all Just completed a commission for a personalised set of braces (or suspenders if you are American I believe), so thought I would share. I have done lots of belts before but never these, so took a little working out to get right. These were built to the clients specifications, and have a tooled oak leaf pattern, carved initals on the strap connector, brass fittings, and an elastic adjuster at the back.. The straps are lined and all stitching has been done by hand. Hours of fun I'm sure you'll all agree. Any comments welcome and I hope you like it! Cheers Alex
-
Custom Laptop Bag
AlexOstacchini replied to AndyL1's topic in Purses, Wallets, Belts and Miscellaneous Pocket Items
Excellent piece of work, colours look great and i'll echo everyone else about the crest tooling -
Thanks for the comments all, very nice to read. Thanks for these suggestions- I have never used mink oil before but have both resolene and beeswax in my big box of bottles so will give these a try. Your anecdote has given me some confidence Yintx, how is the poor coaster looking today? Cheers Alex
-
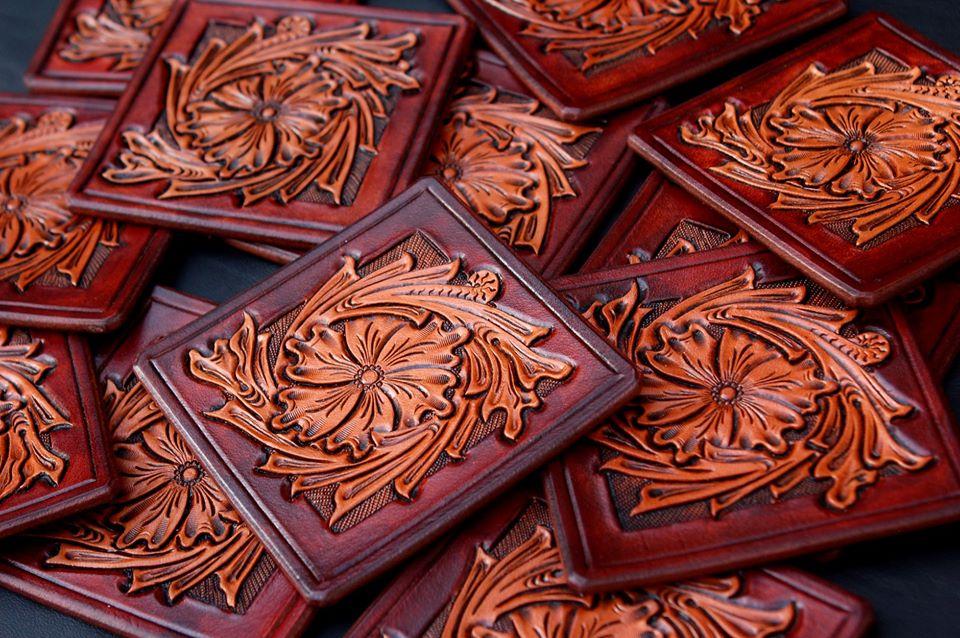
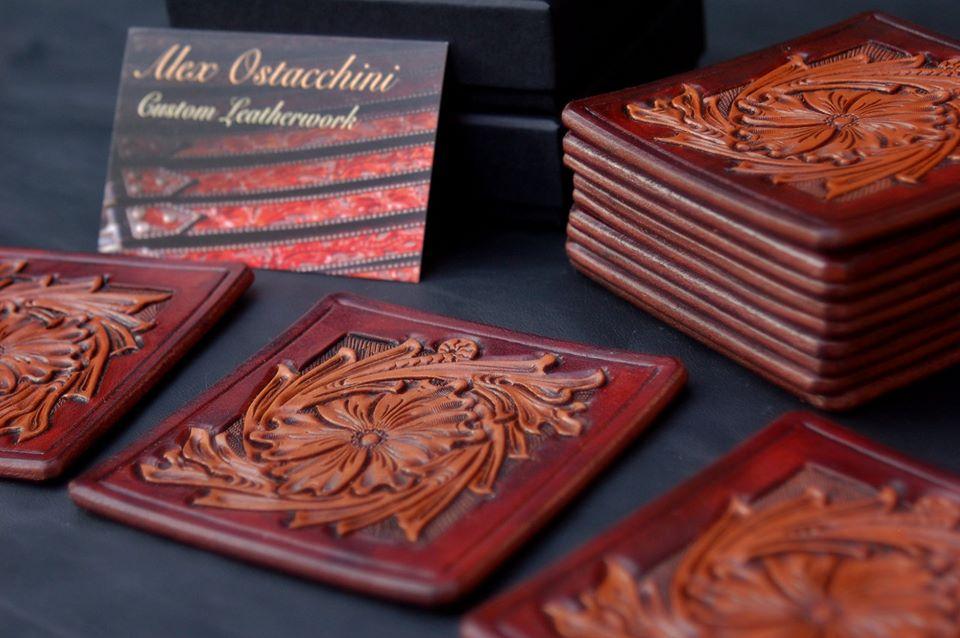
Hi all Have spent most of quarantine making non leather stuff but have tried in the evenings now and then to keep up practice, so here is a batch of tooled coasters. These are all just a single square of 3.5mm veg tan, so a good way to use up thicker offcuts. I wanted to have them backed and with a stitched border but as I do not have a sewing machine this would simply take too long and the extra time and material would have made the prices a bit ludicrous for coasters I think. I hope you like them anyway, it was a good exercice in consistant batch production as far as tooling goes. I have posted these in a few craft groups I am in on facebook and someone brought up finish for coasters. My go to standard is two layers of tan kote for tooled stuff, so I just did the same for these without thinking about it and am pretty sure all will be fine, But does anyone have any thoughts/advice on this? Would perhaps a spray of lacquer be better? Always a bit hesitant with finishes on tooling as it is very easy to clog up the recesses and make a mess. I have never had problems with tan kote but happy to learn something new if anyone has experince with coaster finishes. Cheers Alex


-
Tooled Floral Belt
AlexOstacchini commented on AlexOstacchini's gallery image in Gallery- Our Leatherwork
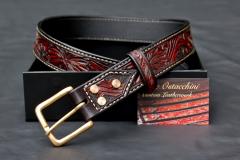 Not at all, I'm not a fan of keeping secrets, though am very much still at the learning stage myself. If you haven't already I would suggest looking at Don Gonzale's youtube channel for tooling tips- helped me a great deal. I did exactly the same and upgraded from rawhide mallet to a tapered maul, they are excellent tools and I'm sure you will get on well with them. That's a lovely looking piece so far- hope to see some pictures when it is finished. Based on the background I think I am jealous of your workspace haha I do not have a sewing machine, and have actually never used one for leather. If yours can punch through then I suspect that would be the way to go, it would certainly be much quicker. I started out using diamond stitching chisels but although these looked neat on the front, they never turned out quite so nice on the back for me. I think that unless they are hit perfectly square to the leather the line ends up a little wobbly, especially with thicker pieces. I now use stitching pliers that punch from both sides at once. Google 'leather stitching nippers' and you will find them, i got mine from Goods Japan and they fixed the line on the back straight away. The only reason my stitch lines are straight rather than angled is because i pretty much always recess them into a line carved with a stitch groover. Personal preference really, although i think in theory it should also be less susceptible to wear and tear this way. Then once the stitching is done I run an overstitch wheel over the top and that really helps to neaten everything up. Hope this helps Alex
 -
Tooled Floral Belt
AlexOstacchini commented on AlexOstacchini's gallery image in Gallery- Our Leatherwork
I am still using the same cheapo tandy swivel knife i started with 7 years ago, needs a lot of sharpening/stropping but works for me, can't suggest anything else because it's all i've tried! I'm sure there are plenty on here more skilled than me who could give a better answer. For stamps Barry King has an excellent reputation and are well worth it, I am in the UK and had to pay huge shipping/customs charges but do not regret the purchase at all. Instantly improved my work over the tandy stamps. -
Tooled Floral Belt
AlexOstacchini commented on AlexOstacchini's gallery image in Gallery- Our Leatherwork
Lovely stuff, very clean, that looks like a lot of work right there. I pretty much exclusively use 4 ply waxed linen now, but as you say it does need re waxing now and then with longer pieces. This particular belt may have been polyester though -
Swiss Army knife Cases
AlexOstacchini commented on AlexOstacchini's gallery image in Gallery- Our Leatherwork
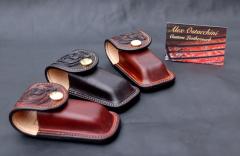 Thanks, no mould on these, they were all formed straight over the penknife, though If I was doing any great quantity I'd make a two part wooden former. Cheers! Alex
 -
Swiss Army Knife cases
AlexOstacchini replied to AlexOstacchini's topic in Gun Holsters, Rifle Slings and Knife Sheathes
Thanks, 2.5mm for all pieces, and the flaps have a 1.2ish milled veg tan liner I thought so too but turns out I have no group photos of the other sides... whoops. I do however have them for each individually, so here you go. the loop looks too tight but a nice chunky double layered belt fits through no problem Cheers, Alex