TwinOaks
-
Posts
4,513 -
Joined
-
Last visited
Content Type
Profiles
Forums
Events
Blogs
Gallery
Store
Everything posted by TwinOaks
-
The pedal is connected to the motor via some kind of linkage. All you'd be doing is moving the linkage from one motor to another when the motor gets replaced. You may have to adjust the length of the chain, depending on the positioning of the motor's switch, but the pedal should be the same.
-
YES! It is entirely possible to slow down the machine to more manageable levels. That is one of the main things to take into consideration when setting up a machine to sew leather. It is commonly accomplished by the addition of a speed reducing pulley, and swapping to a DC servo motor instead of the existing AC clutch motor. The clutch motors get their torque from higher rpm (usually wide open throttle), while the DC motor is able to supply the torque at crawling speeds. The pulley installation further reduces the speed and increases torque. Click on the sewing machine supplier ads at the top of the page, then look for them on their websites. Another way to reduce the speed is with a larger fly wheel/balance wheel.
-
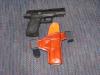
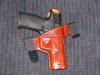
Good looking design, and nice work on the tooling/inlay. I'd like to raise a caution flag to you about the S.O.B style holsters. While functional and durn good at concealment, it should not lay across the spine. This is in case of accidents such as falling, car wreck, getting pushed down/tackled, etc. Any significant impact would be like getting hit in the spine with a chunk of steel, risking possible spinal injury.
-
Dip Dyeing
TwinOaks replied to Windom Leather's topic in Dyes, Antiques, Stains, Glues, Waxes, Finishes and Conditioners.
Even though it's alcohol based, the dye will more than likely 'wet' the leather enough to affect the molding. -
Mega score indeed. I'd say that friend deserves some custom leather....and make it with his grandfather's tools.
-
Most Popular Fiebings Dye Colors?
TwinOaks replied to Randall Leather's topic in Leatherwork Conversation
I've been using mostly tan and british tan, with sidetracks into (vinegaroon) black. Instead of the faded edge, I've taken a liking to the sharp edge color. I like the contrast. -
Hi Jim, welcome to Leatherworker.net! As you see, we're a helpful lot, so keep the questions coming...We also LOVE pics. Now, to the question of edges: I humbly refer you Mr. Bob Park's (aka Hidepounder) tutorial on edges HERE. I'd also like to mention that you may need a different edger to cut the corners down more, and possibly need to leave more leather on the 'outside' of the seam to allow for sanding the edge down. I still get the split-edge from time to time, and it's almost always when I neglect to glue all the way to edge...or when I don't have the edges cut long enough to allow for proper sanding.
-
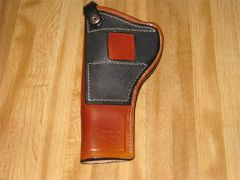
From the album: D.M.DeLoach Custom Leather
© © leatherworker.net
-
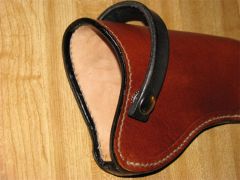
From the album: D.M.DeLoach Custom Leather
© © leatherworker.net
-
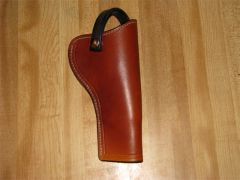
From the album: D.M.DeLoach Custom Leather
© D.M.DeLoach
-
You can try deglazer (fiebings) but it's usually used to strip the whole piece. Another option I discovered- go down to hobby lobby or Michael's stores and get some liquid latex in the model train section. It isn't cheap, but if you've invested a lot of time in the piece..... I discovered it by accident when I tried to use it to mask a carved and dyed area from airbrushing. Worked like a charm, but when I peeled the latex off of the tooled area, I also peeled off the dye. It went all the way back to bare leather. YMMV.
-
Truth be told, there's a lot you can do to carve that doesn't involve a mallet. Sounds like you have a superb opportunity to perfect your modeling tool skills.
-
Help! Blue Guns Needed
TwinOaks replied to bigo5552000's topic in Gun Holsters, Rifle Slings and Knife Sheathes
If you don't have the guns to work from, stop in at Larry's (Pistol and pawn) and see if he'll let you pattern off one if he has it. -
Don't buy into hype from ebay either. The advertisers at the top of the page sell machines set up to sew leather. There are no 'table top' machines (old singers, pfaff, etc.) that will do what you want. You'll want a needle feed (with jump foot), or a unison feed (walking foot w/ feed dogs, and needle feed) to handle the materials, and it will help to have it set up with a speed reducer for increased torque.
-
A little more info might get more interest. Most of our holster makers equipped for large scale production are already in business, so you might look into contracting with one of their shops.
-
Looks like a handmade holster that somebody added the Colt name and logo to. The stitching looks like hand sewing not production line, so I doubt Colt offered this as part of their line. Exhibition shooting was pretty popular in those days, and since it's a pretty fancy SAA, I'd have to guess that it's a custom job for an exhibition shooter, not a customized production model. Nice find on the SAA, it's a beauty.
-
The Osborne awls are certainly not 'top shelf', but I've had good luck with mine. One of them broke because of user error- it's worth getting one of the Poundo-pads, or some other soft surface to back your leather. I reprofiled the blade and turned it into a bridle awl. The other one is full sized (still) and will go through 3/4" leather and a finger tip with no qualms. It sounds like you may have one that wasn't hardened. Call it a QC problem. There's a thread around here somewhere that specifically addresses sharpening an awl, but here it is in a nutshell. The side edges of the blade shouldn't be all that sharp, only the point. You accomplish this by using a 'stabbing' motion on the sharpening stones. Be sure to turn the blade to maintain the diamond cross section. Then, strop, strop, strop. Your awl point should be 'scary sharp', to the degree that you will draw blood from a finger and wonder how it happened. Really. If I can't get more than halfway through a finger tip before it hurts, it's time to strop. As to your specific problem- a non hardened awl blade, you have some options. Return it and hope the replacement is better, or fix it. To fix it, first have your blade profile where you want it. Don't try to sharpen it, just get the shape. Now, briefly heat the blade with a lighter to soften the epoxy/glue. Use a pair of pliers to remove the blade from the haft. Hold the blade with pliers by the butt and heat to beautiful cherry red. If you have a magnet handy, so much the better! You'll heat the blade to the point that it won't stick to the magnet. When you reach that point quench it in old motor oil, olive oil, vegetable oil, whatever oil you have handy. NOTE: DO THIS OUTSIDE OR YOUR WIFE WILL GET YOU!!!!!!!!!! The oil will catch fire when you put 900 degree steel in it....but should extinguish quickly. Take a file and run it across the edge lightly. If the file bites, the steel's still soft....get it hotter. If it just skates across without biting into the steel..... you have now hardened the steel. It will hold an edge very well and will snap in half at the first opportunity it has. When the blade is cool enough to handle (call it 15 minutes, but carefully check the temp) WASH the blade in warm soapy water to remove all the oil. Next, set a toaster oven to 400, and heat the blade for about 10 minutes and let it cool in the oven. Repeat. This tempers the steel and removes the brittleness. NOTE: If you bake the blade without removing the oil......YOUR WIFE WILL GET YOU! You should now be able to do the file check again with the same result of the file just skating across the steel. Once you've fixed the steel, use an epoxy to re-insert the awl blade into the haft, and then follow the sharpening steps. BIG IMPORTANT THING TO REMEMBER: EVEN WITH A PROPERLY HARDENED AND TEMPERED AWL, IF YOU SHOVE THE TIP INTO A HARD SURFACE ITS LIKELY TO BEND AT THE TIP. THIS WILL GIVE YOU A FLAT POINT THAT WON'T PENETRATE WET TOILET PAPER. If you happen to bend the tip, you can wear it down to a useable point again without having to redo the whole steel thing. I prefer a 'diamond' stone for blade profiling because it cuts quickly while still having a pretty fine grit to it. Always after sharpening, strop your blades. It polishes the steel and removes minor imperfections, resulting in a smoother puncture, or cut. Clean up and rack all the tools, and call it a good day of home remedies.
-
Recent Holster
TwinOaks replied to TwinOaks's topic in Gun Holsters, Rifle Slings and Knife Sheathes
First time I've made them, Max. I'm having a QC issue with some snaps (I know, I need to order DOT snaps), so I decided to try some kydex. Customer may still decide he wants leather, but I haven't heard from him yet. They ARE pretty easy to make, and with some thicker kydex (these are .08), I think I'll like them. And it's a whole lot cheaper than cutting strips of leather. I'll probably end up making a jig so I can make them with consistancy. -
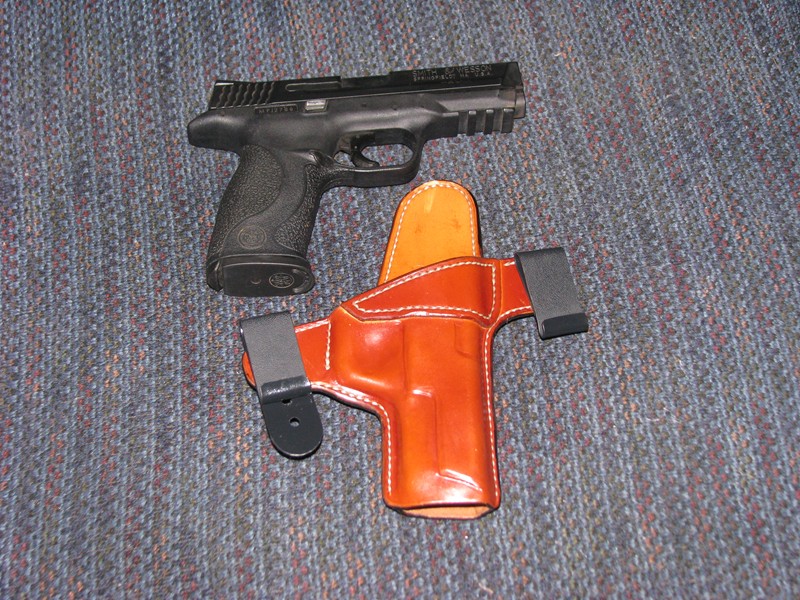
Since I'm always telling folks that we love pics, I figured I should get some posted. M&P Full size, IWB, with adjustable clips.
-
Sounds fair for private lessons. I'm the suspicious type (As Reagan said:"Trust but Verify") so I'd recommend a background check before inviting anyone into your home.
-
My Latest Holster
TwinOaks replied to Ironwood's topic in Gun Holsters, Rifle Slings and Knife Sheathes
Yeah, what Eric said. Very clean presentation. Ya done good! One question for you though.....hammer thong? It may not be needed, I was just curious. -
Anyone Give You The Look Of Horror...
TwinOaks replied to Shorts's topic in Gun Holsters, Rifle Slings and Knife Sheathes
Interesting topic, Shorts, and I've got my own little anecdote that pairs nicely with it.....but I won't hijack your thread! I guess I'm just lucky in that my job has me away from home so much that I don't have a lot of really close friends. Anyway, when I'm home and my wife gets tired of me being in the way, she sends me down to the gun shop/range. It's my hangout, as well as my 'selling ground'. I've been introduced to quite a few judges, LEOs, and others. So, almost all my friends and acquaintances are part of the 'gun crowd'. When folks find out I make holsters, the next question is "Can you make one for _________", followed by, "How much?". I don't deal a lot with people that DON'T own guns.....like I said, lucky. And the neatest part about it is that in a gun store, where most people are carrying (concealed or otherwise), EVERYBODY IS NICE! Also, since I am a firearm enthusiast, my political views, which shall not upon be ranted, tend to make me an unwelcome participant to the conversations of the non-enthusiasts. They generally just migrate away from me. :D..............either that or my deodorant gave out early -
Has Anyone Heard Of A Ringel Head Knife?
TwinOaks replied to RawhideLeather's topic in Leather Tools
If you're able to sharpen it yourself, there's a tutorial on sharpening head knives here on this forum. If you send it out, have the tinker check the temper of the edge. Max is right, if it was overheated on a power tool, the temper may be ruined. If that's the case, it'll need to be rehardened, and retempered. -
You should make up a 31st book, and absolutely BUTHCER it- Bad carving, uneven and splotchy color, wavy stitchlines, completely unfinished edges and a crooked clip. Just plain ugly. Take it to them as a freebie, to show what happens after you drink their whiskey. Remember, you're supposed to only get milk or sasparilla.
-
Here's the link to the one SmilinJim did: http://leatherworker.net/forum/index.php?showtopic=787&st=0&p=28154&hl="splitter"&fromsearch=1entry28154