TwinOaks
-
Posts
4,513 -
Joined
-
Last visited
Content Type
Profiles
Forums
Events
Blogs
Gallery
Store
Everything posted by TwinOaks
-
Help for green horn
TwinOaks replied to drof99's topic in Gun Holsters, Rifle Slings and Knife Sheathes
AHHH I forgot to mention something!!! You might try adding a stitch line around the belt slots, too. That will help reinforce the leather at the slots, so that it doesn't separate. Having the pieces glued helps of course, but that stitch will really improve the life of the holster. Thanks, Randy, but as you noticed I pasted your instructions. I'm just passin' on what I've learned here, my friends. -
Help for green horn
TwinOaks replied to drof99's topic in Gun Holsters, Rifle Slings and Knife Sheathes
I use Barge contact cement, but others also recommend using rubber cement, as it is moveable once set. Barge can be repositioned, it just takes little convincing. And recoating once you've peeled it apart. The thing about using a contact cement between layers is that it keeps the leather in place for stitching/lacing, and keeps the leather from 'creaking' later on. The trick to a rounded edge is to bevel with the edger, then use a rounded boning tool or something with a curve for burnishing. You can also make multiple very light passes along the same edge to give a 3 angle bevel that very closely resembles round. Tandy sells some nylon edge slickers that work pretty well, but personally I like wood. Don't laugh too hard at this, but one of my best burnishers is the peg off a coat rack. I don't have a piece of antler/bone, but I hear that it works very well, and was one of the 'original' designs. If you'd like to take a look at one I did, follow this link, post #60: http://leatherworker.net/forum/index.php?s...40&start=40 -
Regrets to inform that all photo evidence of previous leather work is on my recently deceased hard drive (laptop). If'n anybody knows an easy way to retrieve it, I'd love to hear about it. Johanna, Kate, any word on recovery of old files from November-ish of last year?
-
Hi, and welcome! Something to consider is that many knife sheaths have a welt on at least the edge side. The welt prevents the blade from cutting the thread. So not only do you have the thickness of the leather, but also the welt to deal with. For forming...try glueing some pretty stiff foam (seat cushion stiff) to a plywood backer, then use the foam to press the leather into shape. Use some weights on top of the plywood to hold it there. This will get the general shape for you, but for really crisp lines, you'll have to use a 'bone folder/creaser' of some kind to trace the contours. Modeling tools work well for this, too.
-
Help for green horn
TwinOaks replied to drof99's topic in Gun Holsters, Rifle Slings and Knife Sheathes
Okay, I understand the question a little better now. For the body of the holster- that which isn't formed to the gun's shape- you just have to arbitrarily decide a shape. You can trace the pistol and just draw shapes to see what you like, and use the gray matter to think about how the body of the holster will effect concealment (i.e. a pancake style will pull the holster closer to the body, and for IWB, especially, a bit more leather 'under' the muzzle of the gun will help to flatten the shape by pressing the clothing out just a little). Use a ruler or other straight edge to line up where the belt line will be, and mark the holster with a light scribe line top and bottom of the straight edge in the approximate belt slot areas. You'll want to consider and allow for placement of retainment straps, rake (cant of the holster), and general comfort issues like sweat shields. For the assembly, it works well to use contact/rubber cement to hold the pieces together. Once you have glued the front and back together, use a overstitch wheel to lay out your holes. If you have a stitching groover, use it before the wheel. This makes a nice little channel for the stitch to lay in and avoid abrasion. Having the leather glued really helps keep it in line for hole punching. If you're set on using the awl, go for it, but I've started using a 1/16 drill bit to make the stitch holes. You should adjust the drill bit size to you're thread, of course. For the edge, let the piece dry a good bit, and double check your alignment. Little bitty variations might be covered by burnishing, but if it's a lot, you should dress the edge with a skiver, dremel with sanding drum, regular sand paper (600 grit, I think), or a file. Once you've got an even edge, remoisten run the edge beveler (Unless you rounded the edges with the sand paper) and start burnishing. Having the glue right to the edge will help keep the layers together here as well, and the seam should disappear. If you're going to lace it instead of sew it, do the same thing, but use a lacing chisel in place of drilling the holes. Hope this clears up the process a little (at least my version of it). Mike -
Help for green horn
TwinOaks replied to drof99's topic in Gun Holsters, Rifle Slings and Knife Sheathes
I hope Randy doesn't mind me doing this... Now number 8 is a little ambiguous, and here's how I do it: Once the leather is cased, I start working it by hand, and pressing it along every ridge and valley. Then as it's drying, I'll take various things - mallet, blunt end of stamps, modeling tools, bone folder/creaser, and really push the leather to the pistol. You can get some nicely burnished effects this way. It won't be as pretty as something from horseshoe leather, but it's the same idea. For the pattern, use a file folder. The fold crease makes a nice center line. (also credit to Randyc) Lay the pistol upside down, on it's sights on the center line then carefully pivot to either side for outline tracing. Then pivot to opposite side and repeat.....Randy laid all this out, but I can't find where he put it so I could quote him on this part. -
Glue for leather
TwinOaks replied to MarkS's topic in Dyes, Antiques, Stains, Glues, Waxes, Finishes and Conditioners.
You need some "TwinOaks Magic Glue" it does everyting you asked and is really cheap at $20 for a 4 oz bottle. Send cash, and don't worry about it seeming to be the same stuff that Beave'r is talking about.....ummm I licensed them to use my magic glue....and they changed the label....yeah..but it's the same stuff. -
Concealed Carry/Off Duty Platform Belt
TwinOaks replied to rdb's topic in Gun Holsters, Rifle Slings and Knife Sheathes
Very nice work, I'm sure it will literally be able to hand down a few generations. Although I haven't used the same leather as you, I think the results (long lived leather) are obtainable with regular veg tan. Christmas for Dad was a triple triweave stamped belt. We put nearly 2/3 bottle of carnuba on the belt and worked it in by hand (after dying) then finished with neat-lac. My dad did the same thing to a belt he made for his dad 35 years ago, and that belt is still strong yet pliable. It's even held its floral/sheridan carving, without significant 'fading'. -
I'm glad others have chimed in with suggestions for storing the leather. I have a much simpler solution- Work at break-neck speed, develop insomnia, and just work the piece until you're done...straight through, with naught but a smoke break here and there :D It's what I do (although I think I may have just given away the secret to the one day turn around on the monthly figure carving...) and it certainly allays the problems with storing leather. Good luck, Mike P.S. Don't leave leather laying out if you own cats.:angry:
-
It appears that I have a fatal crash on my laptop HDD. I have a replacement drive on the way, but all the goodies are still on the old one. Does anyone have a suggestion for data retrieval from the old disk? There's some personal info I don't want to distribute (tax returns, etc.) when I send the old HDD back for warranty swap out, so I also need to do a complete DOD wipe. Any suggestions for how to do this if the drive is bad? TIA, Mike
-
swivel knife pouch et deux
TwinOaks replied to howardb's topic in Gun Holsters, Rifle Slings and Knife Sheathes
Nice work Brent! I like the idea, and might just have to do one of those too. I think the term you were looking for was faites pivoter le couteau fourreau double -
Tandy Cell Phone Case...
TwinOaks replied to SCOUTER's topic in Purses, Wallets, Belts and Miscellaneous Pocket Items
I don't know exactly what solvent Sharpie uses, but it is permanent on leather. Add to that the myriad color and tip choices that Sharpie already offers. So, I think a Fiebing's pen might be reinventing the wheel. A nice idea IMO, would be to make one with the 'brush' tip, so one could vary the line thickness more easily. -
No, no, go ahead and post now. The best way to improve is to get critiques of your work that will help you know how you can improve. We won't poke fun of you, scout's honor. It's how we all learned, and how many more after you will learn. You might even find that there's a wide variety of suggestions, as we all tend to do things just a little differently.
-
Hi, welcome to leather heaven, or at least pretty close to it. Glad to have you with us.
-
I agree with Drac, get what you need, then expand your tools with your skills. Also, a limited number of tools will help to teach you to be creative with them, and fully use each one- like using a (tandy model) b200 beveler to 'draw' with. It's another use for the same tool, and in a limited way, it can be used as a modelling tool. Actually, there's lots of tools that you can multi-task with. On a side note, speaking to the only Tandy rep I know, he told me that the stamp metal is a softer compound than it used to be, and thus is more easily damaged (dent, nick, scratch, etc.) I noticed this when I found a bit of the chrome flaked off of a newer tool. The 'old' tools I got from my dad are better formed, and appear to be significantly harder. For really high quality tools, expect to pay $30-$60 per stamp, as many are hand made from solid stainless steel. The Tandy tools currently average about $8 apiece, and are available in sets, though they are made from a lesser steel that's been chrome plated. For just starting- I say go with Tandy. They also sell craft kits, which are precut. They don't have the best leather in them, but you can always use the kit as a template, and they are useful to teach you construction methods. Welcome to the leatherland,
-
Monthly Figure carving challenge (March)
TwinOaks replied to ClayB's topic in Special Events, Contests and Classes
Is this sorta what you had in mind Clay? If so, lemme know, and I'll PM you the line drawing.
-
Holster Patterns
TwinOaks replied to emsnut's topic in Gun Holsters, Rifle Slings and Knife Sheathes
Absolutely! And silly me, I forgot something....Welcome to the forum! -
Holster Patterns
TwinOaks replied to emsnut's topic in Gun Holsters, Rifle Slings and Knife Sheathes
First off, you're not going to like the baby eagle inside your waistband with any of the clothing you wear regularly. It's just too thick. I suggest at least one size larger at the waist for whatever you're wearing. As to patterns....make one. File folders are great, as they already have a 'center line' ( the fold crease). Center the pistol, then lay on either side and trace. -
I'll second the notion that a convex edge is harder for the layperson to maintain. Now, for the engineers here.....what in hades does driving a train have to do with figurin' out how to sharpen a knife????????
-
Monthly Figure carving challenge (March)
TwinOaks replied to ClayB's topic in Special Events, Contests and Classes
Clay, Kathy, both of your work is terrific! I learned a lot from your pieces. The detail carving at the muzzle, and the shading really give me something to work on. Thanks so much. I guess it's time to re-carve it with some touch ups!!! This idea of a monthly carving is wonderful- there's just no way I'd have ever thought to carve (and paint) a Zebra otherwise. I guess that's the genius of it, huh? We all get introduced to things that we'd never have done otherwise. Keep 'em coming, everybody! Mike -
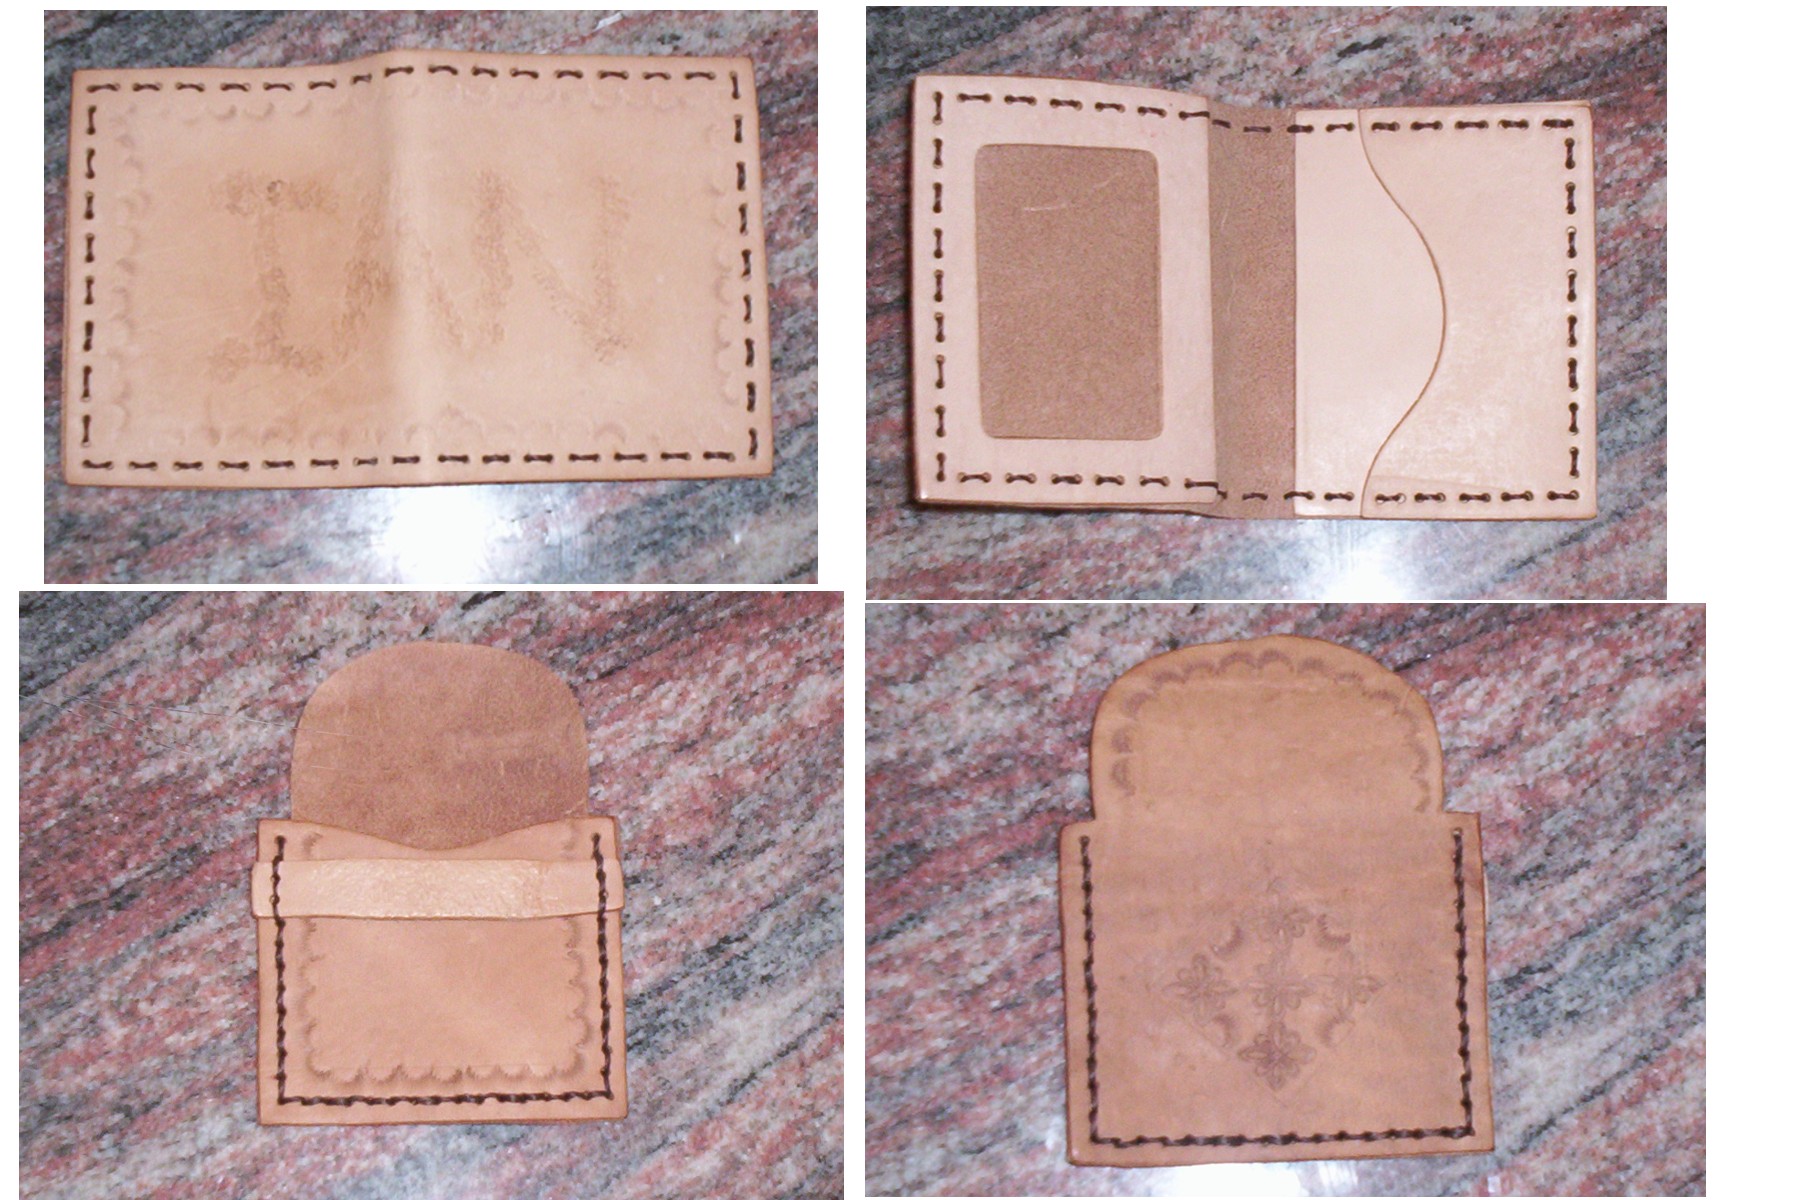
Here we are folks, my kids' first leather working projects. My input was limited to scribe lines, starting the stitches between layers, and tying off the knots. The kids are 5 and 7 years old. After they dried, they both got coated in Eco 'all in one'.
-
Looking for a pattern
TwinOaks replied to Knifeknut's topic in Gun Holsters, Rifle Slings and Knife Sheathes
Randy, thanks for chiming in. I'm just wondering if you have that entire list of directions cut and pasted off in a file somewhere... -
Neat conicidence, Scouter, I just recieved a request for several Racoon pictures.
-
Really nice work, there. I hope you get 6 figures for it.
-
Looking for a pattern
TwinOaks replied to Knifeknut's topic in Gun Holsters, Rifle Slings and Knife Sheathes
You can make your own pattern using card stock file folders. Use the fold crease of the flolder as your center line. Use a ruler as a belt slot placement guide.