RawhideLeather
-
Posts
99 -
Joined
-
Last visited
Content Type
Profiles
Forums
Events
Blogs
Gallery
Store
Everything posted by RawhideLeather
-
Thanks Anne, PM sent. I am still very interested in hearing from anyone else out there. I would love to get some different opinions, suggestions, etc. The right input may actually help me avoid making a poor decision based on lack of information that could potentially amount to thousands of dollars not to mention lots of wasted time and effort and besides, everyone has their own opinions/ideas about things - so the more input I can get the better... Richard
-
Howdy! I'm thinkin' of moving back out west again (yea, I'm a tumbleweed) and since I - like many others here - am fortunate enough to now be able to make a modest living off of my leatherwork (through my website and feebay), I can pretty much head off to any part of the country that I choose to. I currently am living is S.C. but my heart has always been in the mountains out west. I think I would like the Sheridan, Wyoming area for obvious reasons but have never been up there (though I've been pretty close). I really only have 2 real "must haves": 1) High speed internet (go back to printing Paypal shipping labels and managing a website on dial-up?) 2) Affordable housing. As far as #1 goes, I think if I lived near a decent sized town that would probably be doable. I do know about Satellite Internet but from all I've read (and I've researched it a lot) it pretty much stinks. Unfortunately to find a decent price on a home or small piece of land I may have to live way outside of town and therefore may have to consider that option. For #2 - anywhere within say a 50 mile radius would be nice but I could go out further from Sheridan if necessary to find affordable housing. From what I've seen on the real estate MLS search - homes in and around the Sheridan area are pretty high. I would prefer to buy something very modest but would consider renting if I had to. I'm single, 58, with no kids and my needs and lifestyle are pretty simple. I have a small nest egg saved up and would prefer to pay cash for something modest. When I say modest I mean as in not over about $60K and I realize that's not much to work with but then I am talking cash. How 'bout it? Anyone familiar with the area? Is it possible to find affordable housing in that area or even an affordable rental or is the market there just way over-inflated? Any advice or input would be great! Thanks, Richard
-
Hello all, There's a good possibility that this simple tip may be on the forum already (I did do a quick search but didn't see it) anyways here is something I recently stumbled upon while playing around with my end stitching. To preface this, I normally just make knife sheaths and so I'm stitching pretty thick material but it should work on most everything but the thinner stuff I would think. I wanted to try to improve the appearance of the thread that I cut off after backstitching several stitches and have tried everything from cutting very close with slightly rounded toe-nail clippers (works pretty good) - to burnin' with a lighter (works ok) - to using that battery operated thread burner (forget the name but works pretty good) - to trying to stuff the end down into the hole with the round end of a modeling tool (doesn't work very well), etc., etc. blah, blah. No matter what I did the end result wasn't quite what I wanted. Well, I finally got smart (now how'd that happen?) and tried pulling the top thread upwards from the finished - or "top" side of the sheath if you will - until I could see a bit of the lockstitch showing. I then cut the top thread off flush and pulled very carefully on the bottom bobbin thread until the cut-off thread and lockstich on the top disappeared completely. I then finished by cutting off the bobbin thread as close as possible. No more tufts of thread or burned ends showing on the front side of your project! Or maybe everyone already does this and I'm just the last one to figure it out??? This last is a bit off topic but I for one think it would be nice to have something like a Machine Stitching Tips forum since it seems to be a never ending learning process... anybody else? Hope this helps a few fellow machine stitchers in their quest for that perfect stitch! Richard
-
I also use the French curve a lot as suggested by Badger and find it quite easy and fast to use. It works better than a piece of leather because it holds the curve for you. I find the method that okie44 uses intriguing though and may give that a shot. Richard
-
Update - I only have 500 of these left to sell and to avoid any confusion from my earlier post (above), the shipping price for Priority Mail Flat Rate is only $4.75. That makes for a grand total of $29.75 shipped. BTW - when this last lot is gone there won't be anymore! Thanks, Richard
-
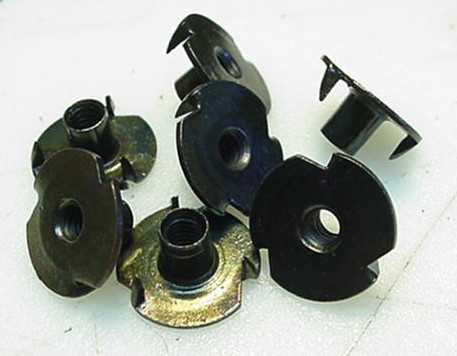
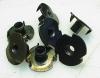
BLACK 8-32 SCREWS FOR SALE - MATES WITH T-NUTS POSTED HERE
RawhideLeather posted a topic in Old/Sold
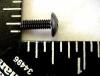
I now have a large supply of Truss head screws (which are the closest in head style to a Chicago screw that I could find at a reasonable cost) that are 8-32 threads x 1/2" long that mate perfectly with the T-nuts I have posted on this forum. They also mate perfectly with Chicago screw posts & screw style conchos. They are Phillips Head - Black Oxide over plain steel - full thread screws. The Truss head is 3/8" in diameter. I prefer to use these when I can instead of Chicago screws because they are cheaper and I don't have to break up my Chicago screw sets. BTW - I just use a wire crimper/stripper tool that can also cut screws to quickly shorten them up for different thicknesses if I need to. It cuts cleanly which means there's no need to chamfer the end of the screw. The screws are sold in lots of 500 each for $20/lot plus $4.75 for Flat Rate Priority Mail shipping. I can fit up to 4 lots in one flat rate envelope/box. This is an excellent price for this kind of hard to find screw at only $.04 a screw and I am basically selling at my cost because I have more than I will ever use. I can combine with the T-nut order for a total shipping charge of $4.75 (only one lot of 500 t-nuts left!) (The spots on the screw head are just reflections.) Thanks, Richard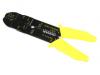
-
Just wanted to add that I recently purchased a burnisher from Scott as well that was made to my specs. I am very happy with the excellent craftsmanship and performance of this tool. Spins very true! It definitely makes for a nicer end product with less effort and should last for many years to come. I highly recommend this burnisher to anyone looking for nicer edges. Also, Scott is a great guy to work with and his customer service is excellent! Richard
-
How many leatherworkers are also musicians?
RawhideLeather replied to UKRay's topic in All About Us and Off Topic
Well, I've been playing the guitar for around 45 years. You'd think I would have learned which side has the strings on it by now... Richard -
I agree with most who think Ebay has gotten greedy. Just a quick thought. JohnBarton just said what I was thinking which was: "I think a good way to look at Ebay is to think of it as cheap marketing and to set your prices so that the fee is built in." Another similar approach for those who many be using Feebay primarily for marketing is to mark you goods up higher than you anticipate most anyone would be willing to pay and use the good till cancelled option. Hopefully some interested lookers would then check out your website (assuming you have one) to see why your work deserves such a high price and see that your prices there are actually within reason. If someone actually did buy something on Feebay at the inflated price then... well you probably wouldn't mind that too much! Just a thought... Richard
-
I find the talk about different speeds for a wood burnisher very interesting. I do realize that the larger the diam. the faster the actual surface speed (used to be a machinist ). However, I've been using a 1 3/4" diameter disc type hardwood burnisher I made in my drill press for a couple of years now and have found through trying different speeds that I get the best results going with the slowest speed I have which is 570 rpm! Seems like most folks here are using much higher speeds like 1750 or higher! I believe that if I were using a burnisher with half the diameter I could go twice as fast and get the same results but that would still be only 1140 rpm. Just for comparison purposes - I first lightly dampen the edges and then apply Gum Tragacanth before I burnish. I then burnish - then go over it again after a few minutes after it dries out a bit to get the results I want which are usually glassy - but not always. I've found that the moisture content has to be just right for the best results. It also seems some leather burnishes better than others even if it's all veg-tan from the same tannery. I started out with the higher speeds and was actually disappointed that I had to go slower as the faster speeds did the edges faster just not as shiny and too fast would burn it. I'm not saying that slower is better - just that it works better for me. Maybe others are using a wax instead and that makes the difference (though I have tried beeswax and didn't care for the result). Anyone else care to chime in on the speed thing and what they're using on the edges? Richard
-
Tipping point finally reached
RawhideLeather replied to Jordan's topic in All About Us and Off Topic
Hey Jordan, I've read a lot of your posts and you strike me as a real nice guy - witty too! I sure hope your "adventure" turns out to be a great one! I'm sure your obvious sense of humor will help during any rough times. Just remember, there are a lot of folks in your situation and worse these days. I have to agree that we as a nation are waaay to materialistic. The way I try to look at is the more things you have the more time and work is involved maintaining them or getting rid of them. Wishing all the best to you and yours. Happy Trails, Richard -
Cartridge Belt and Holster
RawhideLeather replied to Warren's topic in Gun Holsters, Rifle Slings and Knife Sheathes
Very nice! One of the nicest examples of the Mexican double-loop style I've seen! I especially like the flare between the loops. Looks unique to me and could only add to locking the holster in place I would think. Richard -
devils advocate
RawhideLeather replied to Kevin King's topic in Purses, Wallets, Belts and Miscellaneous Pocket Items
Beautiful work and the stitching is amazing! You must have the patience of a saint! Richard -
Art, Thanks for taking the time to give us such a comprehensive report of the show! This is the next best thing to actually being there! Great information and an interesting read to boot! Just curious... having never been to a show myself - how does this one compare to the one held in Sheridan or is it the same show? Richard
-
Just thought I would let others know that I have received excellent customer service from Richard Poindexter who is the manager at the West Columbia, SC Tandy Leather Factory. He really does his best to make sure his customers are satisfied which is getting harder and harder to find these days! I was really impressed by him after a problem arose from a recent purchase and I'm not that easily impressed. Real nice guy too! As a consumer, I believe it is my duty to complain if the situation calls for it and give accolades when deserved as well. I would not hesitate to buy from Richard again should I want something from Tandy.
-
Hi John, Not a problem. The T-nuts are all black because they are all black zinc plated. I can accept Paypal for payment or you could mail a money order. Please PM me to let me know your preference and we can wrap up the details. Thanks, Richard
-
I don't get requests for double stitching but I do it anyhow sometimes. I mostly do sheaths and if the knife is on the small side I agree that a single stitch is sufficient. On the other hand if the knife is medium to large sized then a double stitch can give the sheath a more durable look and also impart a longer lifespan to the stitching. It probably gives the buyer more confidence in the products durability as well. Kinda the same reason they triple-stitch that tough Carhartt workwear. Richard
-
If anyone is still interested - I just found out that I can fit up to 2000 pcs. or 4 packs of 500 in a Priority Mail Flat Rate Envelope! Shipping cost for up to 2000 pcs. would only be $4.75! My apologies for not doing my homework on that...
-
Hi, do you still have these? Thanks, Richard
-
Thanks for that Bruce - now I think I'll go burn my shop down and start over!
-
This guide is not meant to be all encompassing but merely to add to the wealth of information readily available in books and on this forum. I very highly recommend the book "The Art of Hand Sewing Leather" by Al Stohlman. Al's wife Ann probably hand stitched more items in her lifetime than most of us will ever dream of so why try to reinvent the wheel? I stitch mostly knife sheaths that are approx. 1/2" thick and there are a few hard earned tricks and tips that I'm happy to pass along to my fellow leathercrafters. Since about all I make right now is knife sheaths, this guide may be slanted slightly towards stitching them. Please note that these are merely my own opinions and observations and are not meant to disparage anyone else's methodology by any means. The way I have learned to stitch works well for me but I don't want to imply that it is the absolute best for everyone else. We are all entitled to own opinions. First off, I highly recommend you buy or make yourself a stitching horse. I made the stitching pony that is detailed in the book mentioned above. It was a lot of work to be sure, but it was also a challenging fun project and the end result was worth it to me. If you decide to go this route feel free to email me for a couple of time saving suggestions. I haven't seen one of these in person but the one in the Weaver catalog appears to be well made and at a decent price. They only sell wholesale to licensed businesses though (by the way, a retail license isn't expensive or difficult to come by - do some research online for the state you live in if you're interested in getting one). I'm sure there are some other good stitching horses out there as well. They show up on Ebay occasionally. The stitching horse will free up both your hands for double needle stitching and hold the work securely and at the proper level for comfortable stitching. I have read how some folks like to use a drill or punch or such for the stitching holes. This method could result in a hole that is too big, is difficult to keep aligned correctly on the backside of the project and may not look professional as a result. It also can allow for a looser thread fit which is not very desirable especially if the thread becomes broken somewhere down the road. A diamond shaped awl is the proper tool for the job in my humble opinion and when done correctly will be almost invisible giving a much neater appearance and more secure stitch. I use a saddler's harness awl for the job but make sure you get a good one a dull awl will make it very difficult to punch through thick leather. After roughing up the welt area on the flesh side of the sheath as well as the welt itself on both sides with a hand leather rougher that's made for the job, I then apply the glue (Barge's rubber cement works for me) and allow it to dry for a minimum of 10 minutes. I then assemble the sheath and use spring clamps around the edge with a piece of doubled buckskin underneath the clamps to protect the leather from clamp marks and allow the glue to dry. Then I sand the edge even on a belt sander which makes for a nice smooth even edge. The even edge makes it easier to get a nice uniform channel gouge and also makes it easier to burnish later. I use a 4" x 36" belt sander with a well worn 120 grit belt for this. You can finish sand with a finer grit if you desire. Now, back to stitching! I prefer to gouge a stitching channel on both sides of my sheaths with a stitch groover so that the thread sits just below the surface of the leather. This will protect the stitching from abrasion and will make your work last much longer. It also gives you a guide on the backside when pushing the awl through. Of course to do this the leather must be thick enough so as not to weaken it. I would be careful when using the gouge on leather under 8 oz. Alternatively, you can dampen the stitch area and merely depress the channel with an edge creaser or similar tool if preferred though this will make stabbing the holes more difficult. After gouging a channel I dampen it and run an appropriate sized stitching space marker in the channel to keep the stitches evenly spaced. I prefer a spacer that has 6 or 7 stitches per inch for my sheaths. I also run the spacer over the stitches when I have completed the sheath. This evens out the stitches and gives it a more finished look. It also helps to make white thread white again, at least with Nyltex it does. I have found that the textured rubber palmed gloves that you can buy at Harbor Freight and elsewhere work much better for me than leather gloves or just my bare fingers as they offer a much better grip to pull the needles through with less effort, plus they last for a good long while. Since I use the double needle method I use both gloves. I also very highly recommend buying 2 sewing palms - one for each hand. It is basically a piece of leather that fits over your thumb and wraps around your palm which has a vinyl bound iron thimble sewed to it just below the thumb. The palms make pushing the needles through much, much easier as well as safer! I use the large blunt tip egg-eye harness needles size 4 or 5. These help avoid the needle piercing the previous thread when pushing the 2nd needle through which would create a bit of a problem. I prefer the awl haft with the chuck on it rather than the handle with a needle shoved in it which can become loose over time. Make sure your awl haft fits comfortably in the palm of your hand. Mine didn't so I cut some off the end and sanded it to a slight roundness. You may also want to drill a small hole through the handle near the end and thread a piece or stout thread or cord through it as well as through the sewing palm. Why do this? Well after I dropped mine on concrete for the 2nd time (strangely they ALWAYS seem to land on the blade tip!) and had to spend a couple of hours each time re-sharpening the awl blade I finally got smart - at least temporarily :-). I like to use Nyltex thread. It is good and strong and there is no need for any thread preparation except maybe to cut an angle at the ends to make threading the needles easier, but thread of course is a personal choice. OK, we should be about ready to clamp the sheath in the horse and start stitching! I prefer to have my work extending above the jaws by about a half inch or so, that way I can support the work on the back side with my thumb and forefinger as I stab with the awl and it also gives me room to angle the awl up or down if I miss the center of the channel. Watch those fingers! I also make sure I keep the stitching line parallel to the top of the stitching horse jaws so that my awl stabs are always at the correct angle. You should backstitch at least a couple of threads at the beginning and end of the sewing depending on the thickness of the leather. I usually start by stabbing 3 holes and start my first stitch in the 3rd hole and stitch backwards to the 1st hole and then proceed forward. A pair of linesman's pliers helps to pull the last needle through the double stitched holes. You should always start your first stitch from the back side of the project by the way to be sure you get the needle in the correct hole in case you had to make an adjustment. When I get to the 3rd hole again I only stab one hole at a time from then on. One of the best tips I can give you is this one: don't just stab the awl all the way through and hope for the best as you will certainly be disappointed with the results! I use my index finger on my awl hand as a depth stop (keep this in mind if you have to shorten your awl haft) so that the awl is just barely peeking out of the other side. I take a quick look at it dead-on and if it isn't in the center of the channel but is close I merely push or pull the awl handle up or down to compensate and then push it through (this is why I find it helps to wear a bright headlamp so that I can clearly see what I am doing on both sides of the work, it also helps when I'm cutting leather). This forces the awl back towards the center and works well. If its nearer the edge of the channel or out of the channel entirely just pull the awl back about half way, adjust the angle and try again! With practice you will soon be able to get it in the center most of the time on the first try. Using this method your missed awl stabs won't be visible and your stitching should be pretty uniform. This is one of the big advantages of stitching with an awl - you can't do that type of correction with a drill bit. Once drilled, it's there for good. Of course when pushing the awl through it is very important to look down directly over the awl so that you can keep it perpendicular to the work. When I am finished backstitching at the end of the project I simply cut the thread flush to the surface. There is no need to tie a knot as the backstitching will hold the thread tight. To cut the thread, I have found that nothing beats a toe nail clipper with a slightly concave head for quickly cutting the thread flush with the surface with no fear of damaging the leather or nearby threads as is quite possible with a knife. Since the awl blade must be consistently stabbed at the correct angle (about 45 degrees) in relationship to the channel (please refer to Al Stohlman's book), I sanded a small flat spot on my awl haft (handle) as a quick visual reference point once I got the angle where it should be. I have found that a very sharp awl blade is a must - buy the best you can find. I believe Bob Douglas at Sheridan Leather Outfitters in Sheridan, Wy. has some very good ones. I have also found that even with a sharp blade stabbing through thick leather can be tough sometimes especially with harder leather so what I discovered is that if the awl is first stabbed a short distance into a cake of beeswax it lubricates the awl blade allowing it to pierce the leather easier. If it's still hard to punch the awl through then you need to sharpen or maybe just hone your blade which is an art form unto itself. I made a large tapered hole near the top of my stitching horse's right clamp that is the same size and taper as a new cake of beeswax and just shoved a new cake in there. Since the hole was tapered to a smaller diameter as it goes in, the cake won't fall out when pushed against with the awl even though the hole goes completely through the wood. One cake has lasted for several months with plenty of wax to go. I can just do a quick jab into the cake without letting go of the awl or needles before I stab each hole. I only stab one hole at a time as the holes seem to close back up fairly quickly. I find it's also easier to establish a rhythm this way. I takes me about half an hour to stitch up 9" of completed work with the double needle method and that's taking my time and stitching 1/2" thick leather. Since I stitch a lot of the same items I prefer to cut my thread to the length I will be needing so that I don't have hardly any left over when I'm done rather than using a length that is way too long and harder to work with. It is easy to figure out how much thread you use per inch for different thicknesses of leather if you make notes of how long the thread is when you start and how much you have left when you've finished. Just try to make sure you have enough thread so that you don't run out of it before you're done or you will waste time trying to get going again. You can figure to use about 7 times your stitching length for your thread length (that's for stitching about 1/2" thickness). Thread is cheap compared to your time. Well, I guess that's about it. The rest is covered better than I possibly could in the book and it has illustrations to boot. I strongly urge you to learn how to stitch as suggested in Al's book. By not setting down the awl or dropping the needles you will become much more productive in time. I can't say I do everything exactly as suggested in the book (such as exactly how to hold the awl and needles) but I have adopted most of it. Find what works best for you by experimenting. It does take a while to get comfortable with this method and it will feel awkward at first but I have tried others and have found this to be the fastest as well as the most ergonomic method and one which produces the most professional looking stitches as well. Just start out slowly and methodically while practicing on scrap and have patience - it will come to be second nature in time. I hope this guide has helped in some small way to those of you that are striving to learn this style of hand stitching. Good luck and Happy Stitching!
-
Discgolfer, Thanks for the input. I always try to keep the shipping cost as low as I can and will use the flat rate box if it is cheaper. Sometimes the flat rate box is cheaper - sometimes it's not. Usually the difference is only a couple of dollars when shipping just a few pounds. Also, using Priority Mail can be less than Parcel Post sometimes - go figure! Richard
-
Can Anyone Help With Hand Press Snap Die Problems?
RawhideLeather replied to RawhideLeather's topic in Leather Tools
Art, Thanks for the info. I am thinking I would like to just keep the hand press since it was on sale for a good price but will probably have to buy different dies for it if I can find some that will work with the Dot Durable snap. I guess there's not that many people who have tried using those snaps with the Tandy/LF die set since no one has posted replying to that particular question... Ian, Have you compared the quality of the Dot Durable snaps to the OTB snaps? Thanks, Richard -
Can Anyone Help With Hand Press Snap Die Problems?
RawhideLeather replied to RawhideLeather's topic in Leather Tools
Thanks for the advice Sharpshooter but I since I already have a bunch of the Dot Durable snaps I would prefer to use them since they were rather costly - at least for now. BTW - have you compared the quality of the line 24 snaps between those 2 suppliers by any chance? Thanks, Richard -
I just recently purchased the Craftool Hand Press (#3990-00) & Line 24 Die set because I'm setting enough line 24 snaps now to justify the expense (plus they are on sale!). I prefer the Dot Durable snaps because they are a better snap. I thought this would make life a little easier but nooooo! I ran into the following 2 issues: 1) The die set that compresses the stud and post has a 'compressor nub' or whatever you want to call it (the part of the die that actually compresses the post) that is too short. The end of the die is bottoming out on the flange of the stud and no matter how hard you want to try pressing the stud is so loose that it rattles when you shake it. :wtf: I tried several thicknesses of leather thinking that may be it but it wasn't. Also tried the Tandy/LF snap as well as the Dot Durable to no avail. Of course I can fix it by using the hand setter and a hammer but that is what I was trying to avoid having to do in the first place. This is definitely a defect but I was wondering if anybody else has had that particular problem? If there's a bad one out there it will find it's way to my door somehow. 2) I found out today that the Dot Durable caps (I use the black ones) are too big for the concave anvil part of the die set. When I set a cap I almost ruined the piece I was working on trying to get it to come back out! Once I finally got it out I measured the OD of the Dot cap with my dial calipers and found that they measure .602". The die anvil ID measured .598"! Bummer - that's worse than a press fit. That's like trying to fit 5 quarts in a gallon container...not good. The Tandy/LF caps measure .592 so there's enough leeway there. Does this mean I either have to use the inferior Tandy/LF snaps or maybe try to rework the die to make it big enough (I hope it's not hardened steel - just thought of that) or maybe I just got a bad set (who me?) or what? Sure there's a couple of things I can do to jerry rig the setup to make it work but I shouldn't have to I don't think at the price they charge for these dies. The dealer I bought it from would be glad to exchange it but I'm thinking it will probably be the same story. Anybody else run across this issue? Maybe they made the dies this way on purpose so you almost have to buy the Tandy/Lf snaps? Wish I had kept my metal lathe now, dang! It seems that quality is rapidly becoming a thing of the past... Thanks, Richard