

llucas
-
Content Count
188 -
Joined
-
Last visited
Everything posted by llucas
-
These look like ordinary craft style "pipe cleaners" that children in schools use for craft projects. The wicks I purchased from Weaver Leather for my Adler were different in size, density, and composition. Some of the original wicks on my machine are still functioning fine. It looks like the manufacturer of your machine (Chinese?) used an obviously inferior product that was never intended for use in machinery. As I noted in a post above, I replaced most of my tubing and wicks with Adler replacements for about $9.00 USD. That is inexpensive relative to other Adler parts, for what it is worth.
-

Something I haven't seen before -- how to clean it up?
llucas replied to llucas's topic in Leather Sewing Machines
Does anyone know what the main solvent in Barge thinner is? The proprietary thinner is kind of pricey. -
Something I haven't seen before -- how to clean it up?
llucas replied to llucas's topic in Leather Sewing Machines
At first I thought it was wax coming up on the first belt -- until I tried to remove it and found it had a stretchy quality to it, lol. This is indeed a head scratcher. Brian's observation that it might be the waxy leather contaminating the Barge is interesting as well as suggesting that the Barge be thinned some. I am open to all informed suggestions at this point. It is starting to get expensive and I have four or five belt samples I need to put together for a gun store. -
Something I haven't seen before -- how to clean it up?
llucas replied to llucas's topic in Leather Sewing Machines
Brian, thanks for the suggestions. Yes, the Barge seems to be quite a bit thicker than the Weldwood I was previously using. I'll try to thin it down and see if that helps. Do you happen to know what the solvent is for thinning? The English bridle is indeed a little waxy and as I understand it it also has tallows in it. That may be part of the problem. This is only my third attempt at using the English bridle for belts and Barge is also a new item for me. The English bridle looks fantastic -- if I can get beyond this glue issue. After reading your post I thought of a contamination solution from woodworking: using shellac as a sealer. I may try that on a scrap and see if it makes a difference. I did wax the leather before stitching (kiwi neutral shoe wax) but the silicone might be better. In many ways hand stitching was easier, if also very slow. -
Something I haven't seen before -- how to clean it up?
llucas replied to llucas's topic in Leather Sewing Machines
And . . . it happened again! I put together a belt using 8 oz. English bridle with a 2/3 oz. natural veg tan liner. I stirred the can and applied one thin coat of Barge on each piece, gave it an hour to set up, and joined the pieces. I rolled the piece with a j-roller and set it aside for two full days to cure. Then, I turned on the Beast (Adler 205-374) and proceeded to stitch it. It pulled up cement on the stitches that could not be removed with a dried glob of Barge. Not as bad as the first belt, but still unacceptable. Even worse, the needle lifted the work piece up three times (I assume due to the cement gripping the needle) and created a longer stitch in those places. If this is normal for Barge, it is now time to throw it in the trash and use another cement. Weldwood failed (at least the can I used failed -- but only on one belt) and now Barge even more so. Is Duall 88 really better? I need a solution quick as this is getting expensive trying to fill orders for customers. I can't let these blemished belts out the door. Any of you other belt and holster makers had to deal with this issue? Heading to the local leather supply tomorrow as they have a crepe rubber eraser in stock. -
Something I haven't seen before -- how to clean it up?
llucas replied to llucas's topic in Leather Sewing Machines
Unfortunately, I need a tight seam on the belts with no separation of any kind. But this sounds like a good idea for some other projects. -
Something I haven't seen before -- how to clean it up?
llucas replied to llucas's topic in Leather Sewing Machines
Thanks for all the replies. Very helpful. I switched to Barge based on reviews on this forum. I used Weldwood before, but the last time I used it a belt delaminated in a few places. So, I changed product. If I continue to have problems with Barge I will definitely try the Duall 88. Thanks everyone. And I will be pouring a little of the Barge onto wax paper to form an "eraser". Thanks again. -
Something I haven't seen before -- how to clean it up?
llucas replied to llucas's topic in Leather Sewing Machines
I sewed the second belt where there were two coats of Barge cement. Much better, since there were a few more days of dry time. A little cement was pulled up by the needle and stitches, but not much. The excess cement that was pulled up was easily cleaned off. Lesson? One coat of Barge on each surface. -
Something I haven't seen before -- how to clean it up?
llucas replied to llucas's topic in Leather Sewing Machines
Great idea! Thanks. -
Something I haven't seen before -- how to clean it up?
llucas replied to llucas's topic in Leather Sewing Machines
What I did was use a splinter tweezer (pointed on the end) to pull away the most obvious mini globs. I had a sample of the glue-up that I used to test the finish for the English bridle. I simply buffed the leather and then used Kiwi neutral wax shoe polish. I noticed that this sample -- which also had the pulled up glue problem since it was the cutoff from the belt -- looked much better after waxing and polishing. So I did the best I could with the tweezer; waxed it with neutral polish and brushed it out and polished it. Looked MUCH better and the client loved it. Problem solved (sort of). I have another belt done this way that I need to stitch and I will have the crepe rubber eraser from Tandy on hand at that point. If the same issue surfaces and is solved by the eraser I will post it here. Thanks for all the suggestions. -
Something I haven't seen before -- how to clean it up?
llucas replied to llucas's topic in Leather Sewing Machines
I dried it for an hour before bonding, and used a hair dryer set on heat to speed it up a bit. The belt cured for 24 hours after bonding. I guess I used too much Barge to cure in that time. Learned a hard lesson. I did check the Tandy website as you noted and they do indeed have the crepe rubber eraser. I will pick one up as I have another belt to stitch that was glued up the same way at the same time. Thanks for the heads-up. -
Something I haven't seen before -- how to clean it up?
llucas replied to llucas's topic in Leather Sewing Machines
I tried this one also. No go. It seems Barge (and probably Weldwood or rubber cement) needs an eraser that is made of the same substance as the cement itself. -
Something I haven't seen before -- how to clean it up?
llucas replied to llucas's topic in Leather Sewing Machines
Unfortunately, none of the art supply places had the crepe rubber erasers. I bought several other options, but none of them worked well. Tandy and Campbell-Randel have them and I will order one as I have another of these belts to stitch. I appreciate this suggestion and my wife had one, so I tried it. It was too abrasive for this leather and did not remove any of the cement. -
Something I haven't seen before -- how to clean it up?
llucas replied to llucas's topic in Leather Sewing Machines
This is supposed to go to the client tomorrow evening, so I will be at Hobby Lobby, Michael's, or some art supply in the morning to pick up a crepe rubber cement eraser to try out. I'll let you know if it works. Hopefully, someone on the forum has some experience with this kind of thing and can offer advice. -
Something I haven't seen before -- how to clean it up?
llucas replied to llucas's topic in Leather Sewing Machines
Have any of you used this kind of thing to deal with this kind of problem? http://www.amazon.com/Rubber-Eraser-Adhesive-Caoutchouc-Leathercraft/dp/B00MSW02GK/ref=sr_1_14?s=arts-crafts&ie=UTF8&qid=1461293637&sr=1-14&keywords=rubber+cement+eraser -
I just stitched my first belt for a client using my recently repaired Adler 205-374. English bridle on the face, natural veg tan on the back. I also just switched to Barge cement. When I used Weldwood I always used two coats, so I did the same thing with Barge. It took longer to dry and was obviously thicker. But, it worked great when the belt straps were bonded together. However, when I started stitching the belt on the sewing machine, I noticed tiny little yellowish/white-ish debris forming around many of the stitches as the needle lifted. I checked the thread path (it is new thread) to see if there was excess thread lube (nope) and for a few minutes assumed that waxy lube was buffing off in tiny balls and that I could brush away when I was finished stitching the belt. Nope. It was little tiny bits of Barge coming up with the needle and stitches. None on the bottom; only on the top. Learned a valuable lesson: only one coat of Barge on each piece to be joined, not two. Most of it brushed off, but some is left. Anyone dealt with this before? I am assuming I can pick up a gum rubber eraser and use an edge on the stitch line to remove the remaining cement, but not sure. How have you handled cleaning up this kind of thing? This is not a good photo, but you can see the Barge on the stitches: little white bits.
-
Herman Oak or W&C English bridle re post from supplier
llucas replied to greystoneleatherllc's topic in All About Leather
I ordered some "English Bridle" belt straps from Weaver (made in Mexico) so I could try it out on a smaller scale than a whole skin. While not "English" it is very good and not as dry as the W&C that I have. I plan to buy some full hides from Weaver and have them cut into straps for me ($11.00 charge to cut into straps -- very good deal). For what it is worth. Others may have different perspectives, but that is where I am at the moment. -
I am far from an expert -- I am a newbie to sewing machines and machine stitching of leather. On the repair of my old Adler 205-374 several sections of tubing and wicking was missing. I bought all the factory tubing and wicking I needed to replace everything for $9.00. For what its worth.
-
Stitches on repaired machine: ready to rock-n-roll?
llucas replied to llucas's topic in Leather Sewing Machines
Critique or criticism of the finished product is welcomed. Personally, I am not sure I would offer this for sale -- so I decided to wear it myself. Cosmetically, what do you think? Any suggestions to make it better? To me, things seem to be in good adjustment on the Adler 205-374, but the center foot still needs polishing on the bottom and perhaps a little less pressure? Looking at the finished product, what are your observations? -
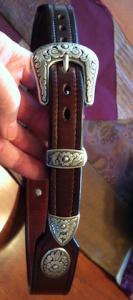
I make gun belts for paddle holsters and concealed carry. They are 1/4" thick, made up of two 8/9 oz straps laminated with Barge cement. Some of my clients like the Western style buckle sets which include buckle, metal belt keeper, and metal belt tip fitted onto a tapered belt design. Problem: most of the belt tips are made for a single belt strap, not a double layer belt. Same problem with the belt keeper. I have been carving/skiving the leather tip and letting it into the belt tip. Scalloped edges on the belt tip offer another complication. This works, but introduces an inherent weakness into the tip of the belt. Does anyone have a source for metal belt tips that are made to accommodate +/- 16 oz of leather? I have looked everywhere; quizzed my current sources but have drawn a blank. It is a lot of work fitting a belt tip designed for a single strap onto a double layer belt. Here are two examples of what I have done to make this work:
-
Stitches on repaired machine: ready to rock-n-roll?
llucas replied to llucas's topic in Leather Sewing Machines
A few more for perspective. -
Stitches on repaired machine: ready to rock-n-roll?
llucas replied to llucas's topic in Leather Sewing Machines
Ok, here is the first complete belt stitched on the Beast. What do you think? -
Stitches on repaired machine: ready to rock-n-roll?
llucas replied to llucas's topic in Leather Sewing Machines
Thanks, Colt. I am almost done with the belt and I post a few pics in a day or two. It definitely looks better now. -
Stitches on repaired machine: ready to rock-n-roll?
llucas replied to llucas's topic in Leather Sewing Machines
I'll put up a photo or two when the belt is finished. Thanks for your feedback. I will definitely use that edge guide next time, lol. -
Stitches on repaired machine: ready to rock-n-roll?
llucas replied to llucas's topic in Leather Sewing Machines
Based on the comments here, I nervously sewed my first belt on the Beast today. Since I did not like the stitches on the back when I did the finished sample posted above, I decided I would sew first (since the belt will be dyed black) and do edges and apply finishes after stitching. The Beast chugged along about one stitch per second -- slow compared to the skills of others, but much, much faster than my hand stitching. I also reduced the number of stitches per inch to five instead of the seven pictured in the above post. The top thread is 277 and the bottom thread is 207. Here is the front stitch: Here is the back stitch: I did not use the edge guide; free handed it instead. I should have used the edge guide, lol. Comments/criticisms are welcome.