ericluther
-
Posts
202 -
Joined
-
Last visited
Content Type
Profiles
Forums
Events
Blogs
Gallery
Store
Everything posted by ericluther
-
very cool! looks very well done
-
Thank you Luke!
-
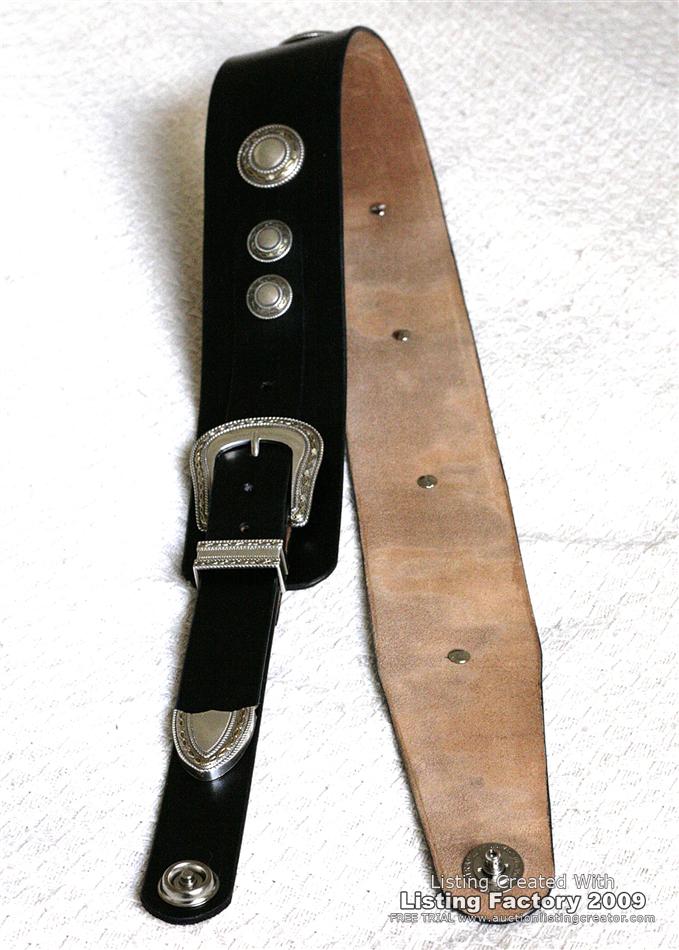
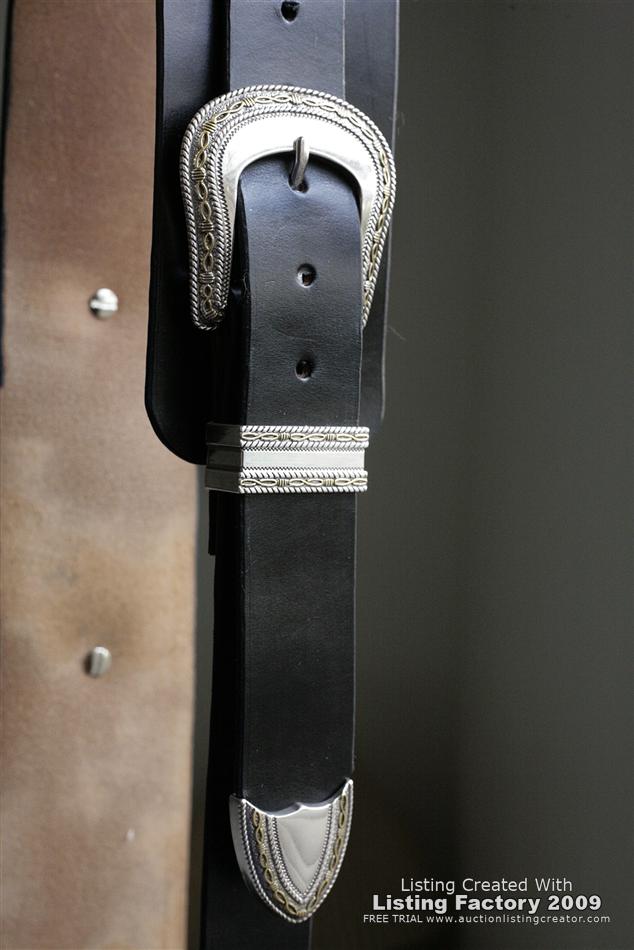
My first guitar strap, well bass strap lol critiques and comments welcome! Eric

-

New Laptop/messenger Bag
ericluther replied to AndyL1's topic in Purses, Wallets, Belts and Miscellaneous Pocket Items
another kick ass job brotha!!! if ya dont mind me asking what do you charge for these, my friend wanted me to make him one in a steampunk style -
love em brotha!!! cool conchos too!!
-
I was making my first biker wallet with snaps and didnt realize you needed an adapter for screw on conchos to attach line 24 snaps so I used JB Weld to attach the snap to the screw head, so far its rock solid!!! Its for my personal wallet so if it fails I wll update this but so far so good!!
-
wow, super nice man! love it
-
Prepping a tool bag for a Life Outsidfe
ericluther replied to badLoveLeather's topic in Motorcycles and Biker Gear
Looks great brotha!! good to see ya on here -
Roller Foot Install problem Singer 31-15
ericluther replied to ericluther's topic in Leather Sewing Machines
Hey guys I did get the correct plate and feed dog with it and the roller if anything has too much pressure not sure how tolessen it, I also found out last night its the top thread getting stuck when it goes down to pick up the bottom thread, so not sure if that info helps -
Roller Foot Install problem Singer 31-15
ericluther replied to ericluther's topic in Leather Sewing Machines
Thanks Tim after messing with it for a few hours I think I'm gonna take it down to the sewing place and have them set it up, before I take an axe to it lol -
I dig this!! I want to do the Pacal carving that was found in his tomb that looks like hes in a spaceship, good stuff man!! Eric
-
Man I love this! great work man!! I vote antique it, no color, if your askin lol
-
I got a singer 31-15 and want to use it for sewing leather, it didnt have a roller foot and I just got one installed however, when it picks up the bobbin thread it seems bound up and wont pull any out. It worked fine before changing it out. Wondering if anyone might know how to remedy this. Thanks! Eric
-
Hey Mad that's good to hear I just ordered some myself, since I'm doing more tooling and running out of the Tandy stuff I started with, can't wait to try it!! Eric
-
https://tlf.live.acumium.com/home/8039-01.aspx there ya go bud just for the record I would love to see a good tutorial on using a modeling spoon, I'm not sure I'm using mine the correct way. Thanks!! Eric
-
I got two with my first batch of tools and they were glued to the grain side flesh side up.
-
Hey Maeve, I could cut lace from this? also Im in Ft Myers, Florida where are you in Fla?? Thanks!! Eric
-
I live in Ft Myers, and I have to say if you did carry Wickett Craig or Ostrich Market exotics, I would definitely make the drive to pick stuff out! just and FYI
-
Thank you so much! that clears up all my questions, a friend of mine does glass work and is making me a slicker cant wait to try it out!! Eric
-
when slicking the leather whats the best procedure? how much pressure, direction, etc? also can slicking it make it stretch out of shape? thank you, Eric
-
Heres a few links to help you out http://www.shanewhitlock.com/photo/v/leath...G_3531.jpg.html (using an awl instead of drilling will make for a tighter stitch fyi) http://leatherworker.net/edging.htm Hope these help I'm new and have only made 2 holsters but these helped me alot so good luck!!! Eric
-
another good question is what are you interested in making or doing??
-
Looks great!!! just one suggestion, change the page title of the home page from page 1 to your business name like the store pages. makes it easier for bookmarking and whens it tabbed etc. But very professional and well made site!!! Eric
-
You know I must have transposed it in my brain, the one thing I did know is that if the bottom thread is loose then the tension needs to increase, so it must be backwards right? I will edit it.
-
I had trouble setting the tension on my 31-15 and found this and it helped me ALOT, so I thought I'd share. Step One: If there are loops on top reduce your tension two dial marks. If there are loops on the bottom increase the tension two dial marks If there are no loops go to the next step Step Two: If it looks like sewing on the bottom, and just a straight thread on top, decrease your tension one mark. If it looks like sewing on top, and just a straight thread on bottom increase your tension one mark. If it looks like sewing on both sides go to the next step. Step Three: Look very carefully at the stitching, If it looks loose on the bottom increase the tension ½ the amount you changed it the last time. If it looks loose on the top reduce the tension ½ the amount you changed it the last time. Repeat until you can not tell any difference in the two threads. You programmer types will recognize that we and using a binary search to find the correct tension setting. For others what that means is we are moving the setting past what it needs to be and then back half way. We are reducing the error 50% or more each time we do that. Going from loopy to good enough only takes five steps; 2, 1, ½, ¼, 1/8. A couple of steps more and you are moving the dial only a hair and have it about as close at a really well set up machine will do because there is some slop in the train and it will wobble that much. You will also notice that correct tension is only about 1/8 a dial marking from incorrect. Make notes of what is correct with each needle/thread combination you use, and you will be able to set the dial close next time you use that combination. From there it only takes one or two steps to get it just right. link to full article http://tomrit.com/sewing/?p=40 Hope this helps someone! Eric