-
Posts
1,216 -
Joined
-
Last visited
Content Type
Profiles
Forums
Events
Blogs
Gallery
Store
Everything posted by David
-
-

a checkbook for a family friend
David replied to sheridanman's topic in Purses, Wallets, Belts and Miscellaneous Pocket Items
Ritch, Don't be shy everyone always enjoys looking at others work. Yours is looking really good...but that's to be expected when you have a mentor like Ron Ross. Keep working because your work is really promising and going to be that show quality that you're talking about in pretty short order. Nicely done, Dave -
Glad you all enjoyed it. Thanks, Dave
-
You're the first to notice the wood tooling board..... It is a butcher block made of various woods. It had been in our kitchen for a long time but my wife didn't like it because it is so heavy. The thing is about 1 1/2" thick very flat and just the right size for bike seats. Heavy but lighter than granite. Dave
-
Not sure of the pan you mentioned, That (F-T-W) usually means something entirely different to bikers. West Eagle calls this pan their "narrow" pan. I hope that helps. I buy them through a local bike shop about a dozen at a time. That helps with cost. As for your other questions. 1. I always dye after assembly. The leather becomes much too rigid after dying and doesn't lay correctly or lace properly. I know that is counter to what is done on belts and wallets, but it is what works for seats. 2. I use Fiebings alcohol based dyes. I order directly from Fiebings. The new eco stuff is worthless for a high wear item like a bike seat. It is too fragile and ends up on the riders pants instead of staying on the seat. I spray everything on with an airbrush. I use neatsfoot oil on my entire seat a couple days before spraying the dye. My last step is adding the antiquing, again I use Fiebings ordered through them. I spray a bit of water on the seat before beginning to rub the antiquing paste on by hand. After applying to the entire front or back, it is immediately wiped off and cleaned up before starting on the remaining side. Final buff is with a terry cloth hand towel, I purchase them about 100 at a time from Lowes Home Improvement, paint section. For a final coat I use Aussie Conditioner.... not sure of the manufacturer, probably Fiebings also. I hope this helps. Thanks for taking a look at this post Dave
-
Once again, thanks to all who took time to follow this thread and for the kind words. They really do mean a lot. The 1/8" inch holes are about 3/8" on center on the front....very slightly more on the rear leather because it is larger. Dave
-
It is finally finished. Thanks to all who stopped by this thread to check it out. I hope I covered some things that were not covered before. Also thanks for all the encouragement. Dave
-
Kate and Storm, Thanks for the nice comments. The seat took a bit longer than I expected but I'll blame it on Thanksgiving.... it couldn't be the lazy seat maker. Dave
-
Mike, if it has dryed completly, I'll re-wet the whole thing (to keep from getting water spots), but concentrate on the area to be reworked. Hope that makes sense, Dave Thanks Doc, I appreciate the atta-boys, they really mean a lot. Makes me want to start another right away. Dave
-
I'm confused, can we see one in use? Dave
-
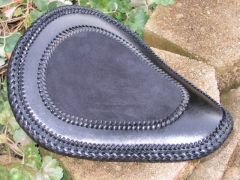
The seat back is now riveted to the pan. With the back in place the front is tied on to the pan using artificial sinue from Tandy. I put a tie-down about every three holes to hold it as tight as possible. When starting to tie the seat together, put a tie-down at the front of the seat and then one at the rear, then one on the right side at the lowest point in the seat bend, then one on the left side at the lowest point in the seat bend. Then keep adding more tie-downs first in the front, then the back, then the right, then the left. This method will prevent the seat front from pulling in any one direction as you tie it down. It is starting to look like a seat now and I can begin to lace the front leather to the back. I've pretty well covered that before. I use 1/4" lace through the 1/8" holes. This gives a tightly packed appearance to the lace. I use only kangaroo lace, because I like to pull it very tight and calf skin breaks way too easy. My source is Jim Downey in Skull Valley, Arizona. When the lacing is finished, don't forget to tap the lace all the way around with a mallet.....this will smooth everything out and prevent a "lumpy" looking edge to the seat, which ruins a seat in my opinion. It is ready to add your finish now. Dave
-
Sorry for the delay on this, Thanksgiving was a wonderful holiday, but took a lot of time away from the leather shop. The seat tooling is complete for the front and rear leathers. It is time to put the seat together. The rivet holes in my seat are a bit too large for the rivets that I use so I'm putting a washer over the hole to decrease the size. These washers are just super glued on the pan. Once the rivet is through them, the super glue is no longer needed to hold them. Also if your pan has a badge or advertising riveted to it that will be covered by the leather, take it off. It will leave a lump under the leather that will be seen and it will create a wear spot on the leather. With the washers in place the padding is attached oversize and trimmed down to size. I use a 40 year old electric knife that has been banished from the kitchen. I also put a bevel on the edge of the padding to facilitate forming the leather over the edge of the padding. Dave
-
Just to let you know, I am officially jealous! Very nice place. Dave
-
Hey Matt, I guess the broadest defination of casing is dampening the leather to get it soft enough to begin transfering the design and also begin tooling. I do it with several applications of casing solution. I've applied the solution with everything from a sponge to a spray bottle. I have used plain water to case for years, on this seat I added some Lexol to the water to help with conditioning the leather. It worked fine so far, I like the way the leather carved with this solution but, I'll withhold final judgement until it is completed. I hope this helps Dave WOW, coming from someone like Bobby, this is a tremendous boost for me. Thank you so much, I'm sure I've said about a hundred times, how much I admire your work. Thanks again, David Theobald
-
Hey Tim, I never case by submerging the leather. I spray my casing solution on, seems to work fine for me. Thanks for taking a look. Dave
-
-
Odin, Good question, there is no reference line, since I use this seat pan frequently, I have a pattern that locates all the holes, so they are traced onto the leathers individually. Dave
-
Thanks Storm, I'm glad you are enjoying the progress. Dave
-
The tooling on the seat front is now finished and im ready to do a bit of artwork on the seat back. Let me know if you have questions or critiques. Always love hearing from everyone. Dave
-
The leather is 7-8 oz. From Wickett and Craig Dave
-
I'm glad this provides information and inspiration to people. That is why it is here. I hope you continue to enjoy it. Thanks for looking at it. Dave Theobald
-
Today I finished the Phoenix and one of the koi fish and all of the remaining flowers. So I hope to finish the carving tomorrow. That could be pretty ambitious as I know that Thanksgiving company arrives tomorrow. Let me know what you think and feel free to ask questions. David Theobald
-
Hey Troy, Standard.......1/2" padding with fast basket weave lacing holding it together. Deluxe .........3/4' padding with real full mexican basket weave holding it together. Extra lacing and/or stitching around the edge on the front and back. About 10-12 extra hours for me. But it looks SO much better. Dave
-
The vast majority of my seats use the same seat pan. It is a West Eagle pan and a favorite of the the chopper builders. So I have a set of seat patterns for it... a pattern for the top and a separate one for the back. I usually cut them out about 20 at a time. As I've done seats using other pans, I've created and saved patterns for them as well. Thanks for looking at my project. Dave Theobald
-
Kate and Troy, Thanks for taking a look. I'm glad you are enjoying it. Today is a work day (at my regular job) so tooling won't get started until late. Inside my head eh? So THAT'S where the voices are coming from....... I thought I needed to increase my meds..... lol Take care Dave Theobald


