

Crystal
-
Content Count
1,054 -
Joined
-
Last visited
Posts posted by Crystal
-
-
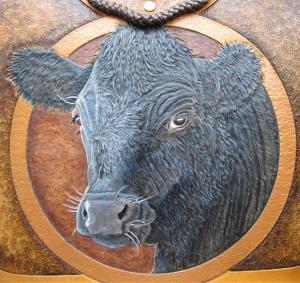
Another cool mask!
 Is it all out of one piece of leather? I'm wondering how you did the eyelashes/eyebrows.
 Crystal
-
Hi Holly- I used Fiebing's deglazer on my last project - had alot of finger prints and tape stickies on it. Cleaned up well and the Fiebing's dye went on pretty even. I had a class with Jeff Mosby and he said he uses Naptha for cleaning. I haven't tried that.
Crystal
-
That's just pretty cool! Love old maps and tall ships. Great job on all the detail on the largest ship - couldn't have been easy keeping track of all those rigging lines behind the sails!
Crystal
-
Cool... what did you put it on?This is my one try with it so far.
http://leatherworker.net/forum/index.php?s...amp;#entry61201
Crystal
-
Hi Tasha-
I have only tried gold leaf once. I used Mona Lisa Metal Leaf Adhesive Size. Everything seemed to stick pretty good - just let it dry about an hour before putting the leaf down. And I am sure you already know that it will stick everywhere the glue gets accidentally put...
 . I put gel antique over top to tone down the brightness and had a problem with flakes coming off and ending up everywhere they shouldn't be. I ended up painting over them - they wouldn't clean up. This was on a bargrounded background, so if you are doing a smooth area you may not have the same trouble. I just painted on TanKote as a finish. Don't have a wear report, so don't know how it is holding up.
Crystal
-
Thank you Karl and Ray!
Crystal
-
Badger, I'm going to jump in on your topic here and ask a few more questions:
Is creasing done for a decorative purpose or does it have a functional aspect?
If you are stitching do you crease and put your stitches in the crease line (like when using a groover) or do you stitch and add a crease to the outside?
Thanks-
Crystal
-
Hey, Tom. That looks like me...

Crystal
-
Nice collection of "Stuff" BB! The slippers look really comfy and 'tis the season for the ornament show off. I like the plane on the wallet, too.
Crystal
-
Beautiful, HP! I am also a fan of the knife work on the inside. I think that is a very nice way to compliment the great work on the outside. Thanks for taking the time to explain how you put everything together!
Crystal
-
Nicely done, Spider! I am extremely impressed with the "toss the paper" technique. I would not have been that brave.
Crystal
-
No apologies necessary! I learned what a thief knot and a reef are - never knew there were such things! Thanks so much for the links!CrystalWe seem to be verging away from your showing off, so this is the last thing I say on the topic of knots.When it comes to knot and braiding talk, you will often come across the term ABOK followed by a number, This is a reference to one of the most comprehensive knot books ever written.Ashley book of knots.If your developing an interest in knots you can always buy any old knot book, But ashley's is the vade mecum of them, and if your interest developed you would eventually end up getting this book I am sure, so really buying the cheaper and smaller ones becomes a waste of money.Anyway heres a couple of links if your interested.Bookhttp://www.amazon.com/Ashley-Book-Knots-Cl...591&sr=8-10CDhttp://cgi.ebay.com/Ashley-Book-Of-Knots-A...1QQcmdZViewItemI had never heard of the cd before, But it makes it easier to carry around. It's a heavy book.Sorry again to take the topic in a different direction.
Thanks so much, Linda!CrystalElegant !!!!!! -
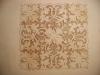
Wow! That is absolutely stunning. I just keep staring at it. I really appreciate floral work that steps a bit outside of the traditional style. Well done!I'm going to hunt down that backgrounder. It's perfect! What's the ID on it?
Thanks for the kudos, Schno! I got this backgrounder at the IFoLG show from Barry King. Oh my, all the pretty tools. I looked at his catalog and it is the size 1 Checkered Teardrop Backgrounder. Now - he lists in the catalog a medium and a fine... I don't know which this is. I only got one backgrounder and I was looking for overall size (wanted small) and I don't think I even noticed there were 2 grades on the checks. If I were to guess, I would say that I have the medium check. Oh- I love his bevelers, also. They have a very nice steep slope and do very well in tight spots. (I used all smooth bevelers.)
Crystal
-
Stunning work! That is really really nice. Not an artistic bone in my body so i think i will probably stick to braiding for now and leave the carving to the experts!Re: thief knot vs reef knot. I think i remember reading somewhere (probably the Ashley book of knots) that sailors used the thief knot to detect if someone had been in thier bag. The thief would usually do his work in the dark and would think the knot used was a reef knot and therefore re-tie it as such.
On a reef the the short working ends leave the knot on the same side.... the thief knot's short working ends would leave the knot above the stnading end on one side and below the standing end on the other. (see pic below)
Not sure if that helps or makes any sense.. but hey ho!
enjoy!
Thanks, Merrik!
The history and the explaination along with the pics was helpful. This is turning into an interesting subject.
Now you and 8thsinner have me pondering things to do with knots other than cuss at them when I end up getting them in my thread. Appreciate the extra info!
Crystal
-
Beautiful Crystal,I love the look and I can see the pattern is not an easy to make. I'm sure the Album will be admired for years to come:-)
Thank you, Tina. Inspiration seems to strike me after seeing your work, so keep posting so I keep working!
Crystal
-
Thanks so much Darryl and Kathy. This is my biggest project so far and am glad that it turned out better than I thought it was going to.
Crystal
-
Very nice! That lacing is great. I didn't think about how hard that would be until I read Luke's comments. Great job!
Crystal
-
Thank you, Clay. And thanks for the advice. As you see - I still haven't committed to a finish. I have a few products ordered and will maybe line them up and flip a coin to see what to use. Hey - don't knock the 12 spi until you try it! Wasn't that bad - a little blood - some sore fingers and wrists and hands.... I thought it would be faster than lacing - it wasn't.Hi Crystal,I think this turned out great! The carving is really nice. I'm impressed that complecated patterns dont intimidate you. The accident with the color ended up being a good thing. Wish my accidents would turn out that way. I still think you are nuts for even trying 12 spi, but it sure looks good. The pearls and brads are a great touch too. It's gonna be a great present! Crystal
Thanks, Tom! I glued the little pearls down with Loctite gel superglue. I hope they stay stuck.CrystalHeeey Crystal!! That is a beatuiful cover Nice touch with the pearls!!Tom
 -
A reef knot is just a (bend) used to tie two cords together, you have probably tied hundreds. It's also called a square knot.If you yank one side it will become a sliding knot, and a (Thief) knot is a knot visually designed to look like a reef knot but not tied the same way, A granny knot is a wrongly tied reef knot.The reef is tied by wrapping left over right and tucking followed by right over left and tucking.The granny is a left over right followed by another left over right.Sorry you asked?I can understand what you mean though, carving is an art as much as a craft, I have had little interest in drawing in my younger years but had an interest in knots, I guess we simply understand what we want to.The closest I have come is to take a digitally enhanced dragon image, stencil it on to leather and solder the shape in with it, It worked well enough I suppose but it's two dimensional. I used a solder cause it was thin leather like.I can never get round how you guys take a flat image and give it depth and life... Not sorry I asked at all. Now you have me wondering how do you tie a theif knot? I am still trying to figure this carving business out. When I first started I got so frustrated that everything I tried to do seemed so flat looking - read alot here and tried to study everything and am slowly getting better at visualizing where you can actually get some depth and where you just need to create an illusion of depth. I've never thought I was much of an artist. I can usually follow directions and do repetitive things (quilting and crossstitch and such) so this has been and will be very challenging to me. Thanks for the knot lesson!Crystal
Thank you, Caroline. I think that coloring is the hardest part. I got lucky with this one.Crystalthis is a beautiful piece of art, i love the color combos you have used. -
Beautiful work Crystal - if you do another I hear Marmite makes an excellent antiquing compound LOLThank you, Ray. If I used the marmite then everyone would be snacking on it.
Crystal
-
Crystal, your very talented, love this cover.Some of you carvers make braiding look like a reef knot, I hate you all.
Thank you!
May I say the feeling is mutual - I can't even decypher braider speak let alone actually make something! Ahh - what is a reef knot? (See what I mean??)
Crystal
-
Thanks, Hilly! I started this around the first of October. Been sewing for the last week. One of these days I will track hours - I am very slow and can't get large blocks of time to work.CrystalBeautiful Job, Crystal! It looked perfect to me! An inspiration for sure, thanks for sharing!How long did it take you to do all that carving and tooling?Hilly
Thanks, Will!Crystal -
Thank you, Art!CrystalBeautiful job Crystal!! I really like it a lot.ArtCrystal,That is one good looking album cover! I really like the synthetic rivets.Did you mat the background or just stain it? and is plate #58 next on the list?JohnnyI used my new Barry King Backgrounder - love it!
lol on plate #58... I was looking at that. What do you think of no. 52??? I used 1/2 pearls and brads I found at a scrapbooking supplier online.
Thanks!Crystal
-
Hi All!
This is a wedding present for a cousin and was supposed to have been done last week...oops.
I am almost done- have to put a finish on it and assemble. Seemed like a good day to try to use the lighting outside, so I snapped a pic quick.
The body is dyed Fiebing's chocolate - the inside is an interesting accident of pearlescent light green acrylic and tan gel antique with a dark brown acrylic background.

There are a couple of boo boo's and a thing or two I will pay more attention to next time, but overall, I think it looks okay. Hand stitched 12 spi. Comments and critiques welcome!
Crystal


Latest Wallets
in Purses, Wallets, Belts and Miscellaneous Pocket Items
Posted · Report reply
Yeah - looking good! I'm partial to the bag that is hanging in your last pic. Free hand???
  Nice job!
Crystal