


LumpenDoodle2
-
Posts
807 -
Joined
-
Last visited
Content Type
Profiles
Forums
Events
Blogs
Gallery
Store
Everything posted by LumpenDoodle2
-
No artist, just a busy bunny who keeps forgetting she has a camera. :-)Never tried mimicking gold, as I've never had the time to play about with the medium, and I just have a bog standard A3 printer. The ink medium has advanced a lot even in the last year or two, so the potential for mimicking gold foil on leather via a printer is feasable. I do what I can to try out stuff, and if someone buys it. One up for me. :-()
-
Neccessity is the mother of invention, as the story goes. I do metal detecting, and hit on the idea of making little A5 books of the history of the farms, and finds made for my farmers. Not having the skill or all the tools at the start for gold foil work on the covers, I decided to try out my printer. To my surprise, it worked. I've done maybe 1/2 dozen book covers over the past 2 years, and never thought to take any photos of the front of the books. Never occurred to me that no-one else was doing this. Possibly if you googled Detecting Goodies you might have more success ;-)
-
I do a bit of bookbinding, and have decorated several book covers by feeding the leather through my inkjet printer. I've only ever printed on very fine leather or book fabric. The results have been quite nice. I have painted on some button polish on top of the print to seal it. Don't know how neccessary that is, but it seems to work.
-

Bench Grinder (1725 Rpm) - Making It Useful For Leather Work?
LumpenDoodle2 replied to CustomDoug's topic in Leather Tools
I bought a very cheap bench grinder and 2 of those Spindle adaptors. My husband turned down a 3inch burnisher on his lathe for me for one side. The other side I use a buffing wheel. It all works pretty well for me. YouTube was very handy for helping with the ideas. -
Now, that's a 'proper' press. I sometimes use the husband's 10 ton hydraulic press, but it has no soul. If you get fed up with it, just post it over to Scotland, I'll find a use for it. Postage might be a bit on the high side, though..........
-
You can't beat a vintage Singer for quality, and they are all great workhorses (I have about 6 various models, and no space for more, sadly). Certainly, moving from fabric sewing to leather is, surprisingly, a bit of a new ball game. Have you had a look around the ismacs.net website? It lists the main uses of the old Singers, and is a handy buying guide. The problem is that the price of a decent industrial Singer is creeping up as their quality is more appreciated. The other 'problem' is that they are such a pleasure to use, they are almost addictive. I only have a fraction of the experience of leatherwork and machines that the majority of folk here have, but here's my tuppenceworth. Buy a machine that will sew the thickness of leather you want, and then a bit heavier. Otherwise to my way of thinking, you will always be using the machine at the top end of it's tolerances/abilities, and there's no 'wiggle' room for the odd thicker leather project which may pop up.
-
I have one of those cheap and chearful hot foil machines, which I picked up in good second hand condition. It will hot foils leather key-rings ok, but I wouldn't ask it to do much more than that. I was very fortunate to pick up an old Dut 21 hot foil machine for £10 about a month ago, but haven't had too much free time to really set it up. Usual story, too much work, not enough time. Really want it up and running by July though. Just to add, I've been practicing using photopolymer plate to make dies. They a not too bad for a short run of imprints, but obvioysly don't have the durability of the metal dies.
-
Very Old Singer "patcher". Help...
LumpenDoodle2 replied to Skaukraft's topic in Leather Sewing Machines
You could always try www.helenhowes-sewingmachines.co.uk, she mainly covers used parts for domestic machines, but is a great source for vintage Singer parts. She also has a lot of machine experience so may be able to point you in the right direction. -
Very Old Singer "patcher". Help...
LumpenDoodle2 replied to Skaukraft's topic in Leather Sewing Machines
I visited the Singer sewing machine Exhibition in Glasgow, Scotland, and definately got the impression that the resulting 'specialist' machines were solely dependant on what machine carcasses were on hand at the time. -
Very Old Singer "patcher". Help...
LumpenDoodle2 replied to Skaukraft's topic in Leather Sewing Machines
Right, thought it looked bigger than a 17K, but I'm probibly wrong. Ok, google 17K, and at least you'll have a basic manual for the threading, stitch, etc -
Very Old Singer "patcher". Help...
LumpenDoodle2 replied to Skaukraft's topic in Leather Sewing Machines
First of all, check out a site called ISMACS, that will give you more info based on the serial number. Except in this case, I see it doesn't. Have a read through that site anyway, it is the vintage Singer machine collector's font of all knowledge. Singer, especially in the late 1800's happily made low run and one off machines, and your looks as if it could be based on a 45 body. Do another google, but type in Singer 45K, there are a number of sites out there that can provide every Singer owner's manual to download for free. It's probibly worth a bit of a search, as the basics such as threading, etc is fairly standard. Sorry I can't be more specific. I'll have a little look for you later today. -
I use an arbor press whenever possible, as I am just not too good setting these things using a hammer. Certainly, the quality of snaps does also make a big difference. I have a small box of unusable cheap snaps that go on great, but also have no 'snap' to them
-
Bird Design Journal.
LumpenDoodle2 replied to Manypawz's topic in Purses, Wallets, Belts and Miscellaneous Pocket Items
Or just move the two end branches so that they flow either side of the strap? -
i've not long started marking out my patterns with a marker, then going over them with a scratch awl. It really does make a difference when cutting out, especially on curves. Another thing I did was to cover the underside of my metal straight edge with a length of non slip matting that you get for kitchen shelves (the clear stuff). It cuts down the chances of the ruler moving off the line.
-
New Journal
LumpenDoodle2 replied to firestormhcg's topic in Purses, Wallets, Belts and Miscellaneous Pocket Items
The inlay is very good. -
Agree about the cutting. If you've got the parts badly cut out, you can very seldom, if ever, really pull things back into shape. You either have to think on your feet and adapt the item you're making, or start again. I have a book, and when I start a project (either out of material, or leather) I list the order I made it. Saves that moment when you haven't made something in a while, and you can't remember the order of work. Also, making a toile (as it's called in sewing) or mock-up of the project out of paper/cardboard is a good idea.
-
Have you checked www.siruba.co.uk they have a good slection of operating and service manuals.
-
Shoulder Holster/hunting Rig
LumpenDoodle2 replied to Otto6294's topic in Gun Holsters, Rifle Slings and Knife Sheathes
The knife sheath and holster front look vety good. -
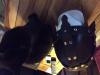
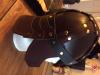
Many thanks folks, and I see what you mean about the washers for the top cap. i want to make another one, but without the neck and cheek pieces. This would give it a way more Viking/Norman look. I felt this type of project would be a fun way to get to grip with how to manipulate heavy leather in the small sections needed to build a helmet. Oh, and sorry for the first picture being upside down, I'll try to remedy that.
-
Now, I always like trying out the unusual, so I decided to tackle a pattern I had downloaded from The Armour Archive. It's a leather helm based on one by Baron Sir Gerhard Kendal (apparently). It's made out of chrome tan and saddle leather, and lots of rivets. The leather is basically part of a job lot of fleabay that I bought. I would love to use decent veg tan, and play with some wet forming of parts, but on practice projects like this, I just can't afford it. Being me, I read the instructions, did a model out of cardboard, then jumped in there with changes. Some worked, some really didn't, but I had fun making it, and it only took 2 short evenings. I really need advice regarding keeping the leather I am rivetting under control. As you can see, the main top strapping came out a bit 'rumpled', and although it was great fun to make, and I rather like it looking down on me in my little workshop, I'm sure the next one will be better. I changed the shape of the cheek pads, and dropped the leather peak in favour of a nose guard. I felt it suited the style better. I still have a bit finishing to do, and some lacing for the cheek pads to sort out, but that's it. By the way, the black cat is Jasper, and he seems to really like the helm too.
-
How Do I Smooth Down 2Mm Thick Leather Edges Without Burnishing?
LumpenDoodle2 replied to HC009's topic in How Do I Do That?
I was having the same problem with some 'fluffy' edged leather last night. I've probibly gone about it all wrong, but I finally smoothed it out by using some Edge Cote, I gave it a bit of a buff, then tried some Tragacanth on top. After another buff/burnish, it looked fairly good, well at least as goood as I knew I could get it. -
Thanks for the info on this thread, you really know what are doing, and you obviously care about your work. Sadly, not everyone does. I was fortunate to pick up a Consew 210 for £30, and getting the timing, etc right, and knowing what parts to replace, was a very steep learning curve for me. It now runs well, and will only be replaced when I'm in a position to afford a decent walking foot machine. I look forward to the next instalment.

