Sheilajeanne
-
Posts
2,752 -
Joined
-
Last visited
Content Type
Profiles
Forums
Events
Blogs
Gallery
Store
Everything posted by Sheilajeanne
-
Anyone know what these are or want to buy them?
Sheilajeanne replied to grayeagleleather's topic in Old/Sold
I was just looking at that page! :D -
Anyone know what these are or want to buy them?
Sheilajeanne replied to grayeagleleather's topic in Old/Sold
Yes, see the link I posted above! Piece of history, and it looks to be in good shape. Maybe my offer won't be good enough! Their Bowie knives are much sought-after collectors items! -
Anyone know what these are or want to buy them?
Sheilajeanne replied to grayeagleleather's topic in Old/Sold
Anyone here know that brand? Edit: never mind - found it! Good stuff, a real piece of history! His business was taken over by Osborne Leather upon his death::... http://americansocietyofarmscollectors.org/wp-content/uploads/2015/05/Engish-and-Huber-knives-The-Sheffield-Works-B076_Stapleton.pdf -
Anyone know what these are or want to buy them?
Sheilajeanne replied to grayeagleleather's topic in Old/Sold
Grayeagle, what does it say on the blade - need to know the brand name! -
Anyone know what these are or want to buy them?
Sheilajeanne replied to grayeagleleather's topic in Old/Sold
I'll take the head knife. Give me a few minutes to get an idea what it's worth, then I will PM you an offer. -
My thoughts would be the patchiness might have been due to the leather not being completely dry. Parts of it were likely dryer than others, thus the patchiness. Anyway, glad you rescued it! Um, what is it, exactly??
-
ELWATS 2018, Arnhem Netherlands (Pic heavy)
Sheilajeanne replied to immiketoo's topic in Leatherwork Conversation
Thanks, battlemunky! Mike is younger than I thought, then! -
ELWATS 2018, Arnhem Netherlands (Pic heavy)
Sheilajeanne replied to immiketoo's topic in Leatherwork Conversation
Mike, 4th pic from the top, guy with the grey hair in a ponytail and the cigarette in his hand. Is that you? Because this guy is almost a twin for my leather craft mentor, Bill, who worked and taught classes at Tandy for so many years! As you may remember, he passed away suddenly in September. -
I used it for the first time recently, and it went on much more nicely and evenly than Resolene. I still haven't used it as a resist, just a top coat, but I sure hope it does a better job than Resolene, which totally ruined a dog collar I was doing recently, and also caused the antique on another project to get all streaky! It has a very shiny finish that looks like it would wear really well. Edit: I didn't bother diluting it.
-
Thanks! I just found out the urine isn't actually IN the leather. It was just the saddle was stored in the same room as the rats were kept (in cages.) They used the rats for the sport of barn hunting: seeing how fast a dog can sniff out rats that are hidden in a barn, under hay bales, etc!
-
Asking for a friend, who has just acquired a saddle that reeks of rat pee: anyone know how to get rid of the smell?
-
Aand they were sold before I could get there. Too bad, there was quite a good selection!
-
Thank you!
-
When did Tandy tools go south? Have a chance to buy some 30+ year old tools locally, and want to be sure it's worth it. Okay, 'locally' is rather a loose term. It's a 3 1/2 hour drive, but I have friends in the area, so will kill 2 birds with one stone, if I think the tools are worth the trip! Mostly stamps and several different swivel knives, plus some books, kits, etc.
-
I've got the answer to that...myyy precious!! [gollum, gollum!]
-
Sleighbell Door Hanger Template?
Sheilajeanne replied to superpacker's topic in Patterns and Templates
I don't think you really need a template for this. Just buy a veg tan strip from Tandy of whatever width you prefer - 1 1/2 inches would be about right. Get some sleigh bells from the local craft store (MIchaels would be my first choice here in Ontario) and maybe some red and green felt if you want to get fancy. Dye the strip whatever colour you want, and finish it with whatever top coat you normally use to make it weather resistant and nice and shiny. You'll need a D ring for hanging, or you could thread ribbon or twine through the top of the strip. Double the top of the strip over to hold the ring/twine, then either insert a rivet or sew the leather together to make a hanger. Measure carefully and place the bells at equal intervals, punch 2 holes for each bell, thread twine or lace through the hole and tie them in place. For a bit of colour, glue the felt to the back so about 1/4 inch of it peeks out around the edge of the strip. It will also cover over where you've attached the bells. You can also hang a bit of greenery at the top end of the strip for decoration. The sort of fake holly leaves, pine needles, pine cones, etc. used for decorating gifts would look nice. If you want to get fancy, get a narrow leather strip, cut slits in the strap slightly wider than the strip, 2 slits per bell, then thread the strip through the slits to hold your bells. The strip can hang down at the bottom, as an added bit of decoration, and you can attach it at the top when you make your hanger. Edit: If this sounds too compicated, Tandy does have a pattern for 99 cents: https://www.leathercraftlibrary.com/product/1419/door-hanger-pattern And they give assembly instructions, too! http://blog.leathercraftlibrary.com/2011/08/22/miniature-christmas-door-hanger/ A holly leaf pattern is available as well. https://www.leathercraftlibrary.com/product/1422/leather-holly-leaves-pattern -
That was MY first thought, too, Jazz! Very nice piece!
-
Re-dying finished and tooled leather products
Sheilajeanne replied to Bobadouba's topic in How Do I Do That?
LOL! Like they say, the United States and Great Britain are two countries separated by a common language! I had to think for a bit about meths, but eventually figured it out, as it is often called methylated spirits or methylated alcohol here in Canada. -
How do I properly use embossing plates?
Sheilajeanne replied to PleasureFace's topic in How Do I Do That?
battlemunky, Seems that Princess Auto and even Canadian Tire sell them. Of course, they cost more than in the States, and the price goes up approximately $100 a ton! -
How do I properly use embossing plates?
Sheilajeanne replied to PleasureFace's topic in How Do I Do That?
billybop, those Tandy presses are RIDICULOUSLY expensive! Only time I've ever bought something like that from Tandy was during there yearly "Seven Days of Christmas' sale, when it was being sold for a deep discount. Wondering what the Canadian equivalent of Harbor Freight would be... -
Well said, battlemunky!
-
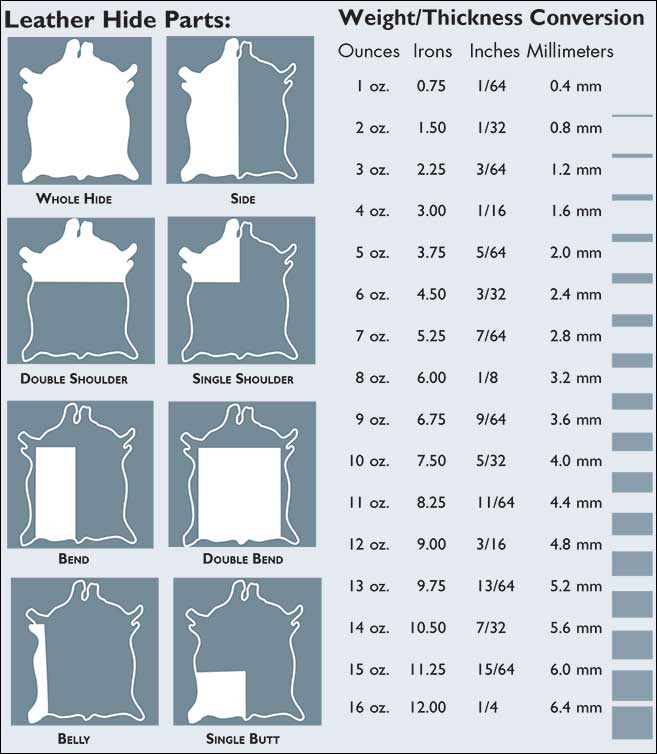
Here's the guide I use for deciding what sort of leather to use for a project:


-
How do I properly use embossing plates?
Sheilajeanne replied to PleasureFace's topic in How Do I Do That?
Fred, so what size are the largest plates you do, using this press? -
I saw 'How to measure for a padfolio' somewhere
Sheilajeanne replied to Rockoboy's topic in How Do I Do That?
Zulu, look at the top bar in the posting screen. To the left of the quotation marks, you will see what looks like a link in a chain. Just click on that, and paste your link into the box that pops up. Easy peasy... :D -
I saw 'How to measure for a padfolio' somewhere
Sheilajeanne replied to Rockoboy's topic in How Do I Do That?
Making the link live for you: https://www.youtube.com/watch?v=jNR8uT2kD7w