EdOdgers
Members-
Posts
91 -
Joined
-
Last visited
Content Type
Profiles
Forums
Events
Blogs
Gallery
Store
Everything posted by EdOdgers
-
Covering a saddle-maker's stand?
EdOdgers replied to Squilchuck's topic in Saddle Supplies, Tools & Trees
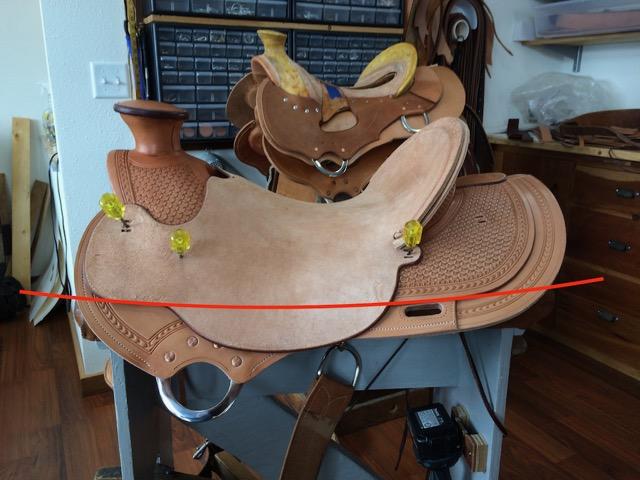
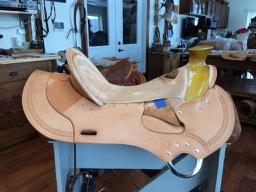
John, Before you consider the cover material, I strongly recommend that you modify your stand to duplicate a horse's back. You need to modify the surface that will support the tree bars to "fit" the saddle tree and help hold it in place. You are going to do a lot of pushing, pulling, pounding, etc. as you build a saddle and you can't have the tree rocking and bouncing around. Another important consideration is to create that horse-like stand such that the saddle tree will sit level on the stand exactly like it is on a horse. Without knowing what's level, you run the risk of cutting skirts, jockeys, and other design features out of level when its finally placed on a horse. More importantly you need to have the tree level to properly construct the gound-seat and ensure that the contour and rise of the seat will be appropriate for a good ride. If your stand doesn't ensure your tree is level, you are likely to build saddles that feel or appear tipped down-hill or uphill. My earliest saddle stands were not built to mirror a horse and it hurt my saddle making. There are probably a lot of ways to construct a contoured saddle stand to replicate the horse's back. The method I've used is to glue high density building styrofoam, 1 1/2" to 2" thick, to the boards then sculpt with a shoeing rasp and disc sander. The reference angle at the wither area is about 90 degrees and at the loin, under the cantle, about 130 degrees. Use a saddle tree as your model and to check your progress. It's a slow process but is more than worth it. Once you are satisfied that you have replicated a horse's back, cover with rough-out chap leather by stapling to the boards as if you are upholstering furniture. You'll probably replace the cover leather over time but the base should serve for years. To ensure that the tree sits on your stand level, place a typical tree on a good-backed horse with a typically thick pad. Make sure the horse is standing on level ground. Next, take a two foot carpenters level and strike a line from the top of the cantle to the back of the horn. Mark the "level line" on the back of the horn with a magic marker. You can now replicate the level tree as you modify you saddle stand. Another must-do for your saddle stand is to devise a "hold-down" strap. You'll be using the hold-down constantly so make sure it's handy and effective. Most use a foot operated hold down. Best of luck; Ed ps: I'll take a few photos of my stand and attach them tomorrow. -
Who makes trees from Dennis Lane measurements?
EdOdgers replied to Squilchuck's topic in Saddle Supplies, Tools & Trees
A lot of the handmade tree makers I've spoken with are familiar with the Lane cards and have used them to cross reference their trees. The two makers I work with can translate the Lane numbers to the various tree configurations they make. They don't build trees specifically to correspond to the many Lane card numbers and combinations that are possible, rather they understand the back type the cards have indicated. The Lane cards are an excellent tool to evaluate horses and communicate with a tree maker. The cards are also a good tool to educate clients, often times to convince them their horse falls into one of several typical back shapes. Next to having a few varied trees on hand to use for fitting, it's the best resource I've used. -
Kudos for using the Lane Cards on your mule. There's much to learn by taking a careful look at equine backs and experimenting with the Lane Card System is a great tool. I've used the cards on a lot of horses but only a few mules and mules will vary a lot. Thus, I only have a few general thought for you. The "rocker" of the tree bars is a critical consideration and the feature that is most often and most significantly different on a mule compared to a horse. Most mules have a flatter back (less rocker, front to back), inheriting that feature from their daddy Jack. The Lane cards have "rocker" choices to evaluate this. There are four cards for rocker, the R3 being the flattest. I'm not surprised that the C cards were wide for your mule. This is another common difference in mules. Their backs usually don't broaden as much as horses in the loin area where the C card is used. Mule bars typically have less rocker and less "twist." The twist refers to the change in bar angle as it proceeds from the wither pad (under the fork) to the rear or loin pad (under the cantle). Horse bars will typically start at about 90 degrees at the withers and broaden to about 130 degrees at the loin, depending on the maker. I don't build trees and don't know how much variation (less twist) is common for mule bars. I would consult with a reputable tree maker that has built mule trees and is familiar with the Lane cards. Better yet, try to get a hold of a tree to try on your mule. Nothing beats fitting an actual tree. A final note, my order of priorities for fitting the tree to your mule would be: 1, rocker; 2, wither angle and width; 3, loin angle. The rear bar pad (loin area) is relatively large and weight distribution there is important but less problematic than the withers. While it is best to evaluate backs at or near maturity, at 3 1/2 years old I don't think your mule will change dramatically or any more than it will seasonally. For example, most horses and mules that have had the winter off will require less pad than they will after a summer of work. That amount of variation doesn't warrant consideration for tree selection. Just my opinion, but I would look to some other makers for your tree. In particular, I would avoid "Arizona" bars. Arizona bars rely on "bridged fit" for stirrup leather clearance. I don't use Arizona bars for any trees but would particularly advise against them for a horse or mule with a flatter back. A final note: Any time you are building a saddle that is not likely to fit a typical horse, it should be clearly marked on the saddle. I stamp the tree characteristics on the rigging leather under the seat flap. This will forewarn future owners/users as to the intended use of the saddle and may prevent a horse or mule from suffering a terrible fit.
-
Harness leather saddle
EdOdgers replied to T Moore Medicine Hat Saddlery's topic in Saddle Construction
I've used harness leather for some components of saddles such as rig liner (flat plate rigging) and rear billets/cinches. I can't imagine being able to case harness leather adequately to mold a seat, swells, horn cover, blocking skirts, etc. I have had limited success with molding harness leather after casing with hot water (scabbards etc.) but I shudder to think of the effort required to install a saddle seat. It would be interesting to know how others have succeeded. Durability of harness is great, just don't think the lack of molding characteristics is suited to saddle building. -
Careful there....asking saddle makers for "best" rigging is likely to cause a fight. Joking aside, I'll stick out my neck and offer a couple of opinions: -Many mules have straight shoulders so I would avoid using "full" rigging position as it runs the risk of having the cinch chafe behind their elbow. My preferred position for a mule is 3/4. -Plan for a breast collar and breeching. Select your front rigging hardware so that it can accept having a breeching strap run through it. For example, if you are installing a flat plate or skirt rigging (my choice), I would use a #550 plate or similar and avoid the #5053. Speaking of rig plates, I'm not a fan of the multi-position rig plates that I've sometimes seen on mule saddles. At first glance this seems appealing but they create a very wide, rigid area under your leg and against the contour of the animal's side. Been there and regretted it.
-
I presume that activity on this site dropped off with the expanded use of Facebook. Many makers post on Facebook but with less give-and-take dialogue. I'd like to see this site revitalized.
-
I'm not sure what you mean when you say "...don't want to oil the flesh side of the leather." Rough out saddles get oiled in a similar manner as smooth out saddles, including the flesh side of the finished saddle. If you don't oil a rough out saddle on the flesh side, it will suck up water (rain) like a sponge and possibly loose its shape. With the exception of the tree-side of the skirts, which I oil before installing on the tree, I oil the entire saddle after assembly. After initial oiling, I may apply a saddle butter (Ray Holes or Obenauf's) or a heated mixture of bees wax and olive oil. The latter finish is a bit of extra work but gives a rough out saddle and incredibly weather resistant, durable finish which is great for a working saddle.
-
Angled stirrups can definitely be a valued feature on custom saddles. Twisted stirrup leathers (Hamley Twist) are standard on all saddles I've made and many have angled stirrups as well. A lot of riders find the angled or "canted" stirrups very beneficial, particularly shorter legged riders and riders of big barrelled horses. I have clients that insist on angled stirrups. I've been modifying monel stirrups for many years with leather wedges under the tread. The stirrup shown has a minimal wedge and shown with an optional leather "heel block." If more angle is desired, I add additional leather wedge. I understand that some maker of quality monel stirrups is now offering angled stirrup that don't require the wedge modification. I have yet to find s source but will be interested to learn.
-
If you are still pursuing this issue, I have a few ideas to offer. First, are you interested in a western or English saddle? If English, there are saddles available that come with various gullet irons that can be changed out to fit the wither of your horse. Also, as noted by Big Sioux, your horse appears to have an extreme dip or "rocker" that needs to be accommodated. This will be much easier to accomplish with an English saddle which is much shorter and relies a cushion of "flocking" to support the riders weight behind the withers. Western saddle trees bars are longer and must conform to the horses back along their entire length of about 22". Fitting this horse with a western saddle tree is going to be a challenge. If you are going to pursue fitting this mare with a western saddle tree, I recommend that you find a competent saddle or tree maker that uses the Lane card system. This system uses a series of templates to map the shape of the horses back, thereby informing the tree maker how to best fit the horse. You could buy a set of these cards if there isn't a saddle maker nearby that you can visit. Alternately, you could consult with a saddle or tree maker that can trial fit a number of bare trees on your horse. From the picture you posted It does not appear that the width or angle of the wither area is that extreme, however the rocker or dip in your horses back may pose the largest challenge. That too can be determined with the Lane card system. I suspect that the rocker required by this horse may exceed the practical limits that any tree maker will build as it is unwise to build a tree and saddle that will only fit a unique horse (After the horse is gone, the saddle will live on to sore every horse it is used on). If that is the case, your best option may be to fit the horse as best you can and finalize the fitting process with a customized pad. You can buy pad systems to fill in the void under the bars where your horse's back dips away, or you can have an experience saddle maker make one. In summary, you will have a much better chance to fit this horse with an English saddle. As stated in a previous post, you will not find a tack-store western saddle that will fit this horse acceptably. Fitting a western saddle will be very challenging and require that you get some knowledgeable help. Good luck.
-
Many good tree makers to choose from. With a few exceptions, the list is still good. You can add: -Dusty Smith, Buffalo, WY -Brian Seifert, Powell, WY I've been using Reed and Swanke trees for 20+ years and recommend them.
-
Pretty much in agreement with the two previous posts. Flat-plate riggings should stand on their own and not rely on the skirts for strength and rigidity. The ease of relining and rebuilding is one of the primary benefits of a flat-plate. If that goal isn't achieved or important, I'd much rather employ a skirt rigging. I have seen flat plates that are pop-stitched (very wide spaced with heavy thread) as a means to secure the skirts instead of lugs. I'm not a big fan of this either as the coarse stitching doesn't handle the shear forces well if there is much movement of the skirts relative to the tree and rig. I do like to cover the bars to keep them protected for long term durability. To do this I install a pocket for the back of the bars to fit into. This pocket begins where the flat-plate ends and is stitched to the skirts before applying the sheepskin. It eliminates the need for lugs, fully encases the bars and doesn't need to be altered or removed when relining. Once the bars are slipped into the pockets during final assembly, I but a couple of small screws through the pocket top into the bar. Another nice thing about this feature is that the pockets make for a very smooth surface (compared to lugs) under the jockeys, thus avoiding any depressions there as the saddle ages. Rob, you must live in my corner of the planet. I'm in SW Wisconsin.
-
Ron, I've been sourcing trees from Rick Reed and Ben Swanke for many years. Both are great people to work with and are excellent, knowledgeable craftsmen. The two saddles in the above photos are built on Rick's. Glad to help in any way I can. We all have the same goals and share the same passion. Ed
- 26 replies
-
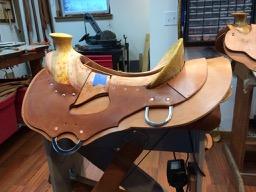
Ron, Ed here again. I was fitting the pictured seat the other day and realized I should clarify the comment I made about aligning the rear jockey with the seat jockey. I failed to mention that the "line" need not be straight and will more than likely be an arc as influenced by the shape of the skirts. The following photo says it best: I think that your rear rig scheme, pictured, is a good one. I see now that the rig panel isn't attached to the skirts for a few inches ahead of the rear D, so that you can fold it away for stitching the skirt perimeter. That was the puzzling part. Good problem solving. You asked to see other options for the rear rigging for in-skirts. In the above photo you can see my two most common in-skirt rig schemes. The foreground saddle has a slot type rear rig. It is actually very strong as the slot is 1" from the margin of the skirt and cut through three full thicknesses of skirting (rig panel + skirt + plug) surrounded by three rows of stitching. The layer you don't see is the skirt plug that extends forward of the slot before it is skived and terminated. I am confident that this slot will not be a failure point. Back rigs aren't under nearly as much strain but if a wreck occurred in which the back cinch was hung up, the failure point is most likely the attachment of the flank cinch buckle, followed by the billet tearing through at a hole for the buckle-tongue. I usually use this slot style for lighter weight saddles and make the rear billets removable (2 1/2 lb. reduction when rear rig not used). Shown below is the underside of this saddle illustrating the plug and slot. The saddle in the background of my first photo will have a D-ring for the back rigging. The rig panel hasn't yet been glued, stitched and trimmed to the skirts but you can see how this will go. It is similar to yours but is a bit simpler and doesn't require the added layer of leather. The rig panel will be stitched to the skirts all the way to the D-ring and again up the back side. The D-ring can be pivoted up to stitch the skirt perimeter for attaching the sheepskin. The D-ring ring is situated just below the tree bar ensuring that the rig lays down close to the skirt. No additional thickness extends ahead of the base of the cantle, where the riders leg hangs. The jockeys will hide all but the bottom of the D-ring. Here's a couple of detailed photos to illustrate: There are other schemes for in-skirts but these are my current favorites. Never hurts to look, explore, discuss. That's how we learn. Best of luck with your next saddle project. I'll be eager to see the results. Ed
- 26 replies
-
Correction to previous post, comment #3: "...To accomplish this, have your seat rear jockeys roughed in prior to fitting the seat.
- 26 replies
-
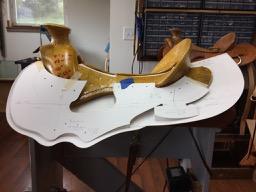
Ron, I just came across this now older post and was impressed with the photos of your saddle. I'm hoping that these comments can still be of some use. First off, this is an awesome saddle for #4, congratulations! Please accept my comments knowing that you've done a lot of great stuff with this saddle. -The skirts behind the cantle could flare upward a bit more to ensure that they don't put pressure on the horse. Yours are close to being OK but to be safe I'd rather see a little more rise. A saddle that is too flat here can really sore those horses with a lot of muscling at the top of their rump. Do this by increasing the angle on your skirt pattern where the skirts join. This is particularly important if you plan to lace the skirts together, all the way to the back. This, along with proper blocking of the skirts is important to the horse's welfare. I often recall the saying: "Ride the tree not the skirts." -The cut of the seat flap below the ear (concho at base of cantle) angles forward too much for my taste and should be nearly vertical before rounding out to form the seat flap. The resulting, rounder, fuller seat flap would compliment the skirts and overall lines of the saddle. -The rear jockeys and seat jockey should align as previously mentioned by Goldshot. What we mean is that an imaginary line starting along the bottom of the rear jockey should project forward and continue with the horizontal line of the seat jockey. The eye catches these lines and expects continuity. This look is a carryover from the "four-button-seat" style of saddle. To accomplish this, have your seat jockeys roughed in prior to fitting the seat. Use a straight edge to continue the imaginary line and cut your seat using that line as a guide. After doing this you might find that the seat jockey looks too deep. I don't think it will on this saddle but if you thought it was, you could expose a bit more swell by dipping the cut behind the gullet concho downward more, thereby reducing the apparent depth of the seat jockey. Incidentally, the gullet concho is placed very nicely. Referring to your previous response to Goldshot, these lines don't need to be perfectly horizontal with the ground when the saddle is on a horse, rather the lines of the back and seat jockeys need to align relative to each other. -You should cut a crescent out within the circle of the rig plate as was previously mentioned. Leave enough there to put a small "quarter-moon" plug between the rig and skirt there to help support the rig plate and smooth the transition. Not only will this cut create more room for passing the latigo but it will help make the rig look like a part of the skirt rather than an afterthought. Once you do that, you will find that you will want to round out the skirt more fully, ahead of the rig plat (around the 4 to 5 o-clock position). A bit larger, fuller radius there will improve the lines. I like the line of the skirt from the gullet concho to the front most arc, but from the bottom of the latigo keeper downward, it curves in too sharply toward the rig plate. Picky I know, but something to consider. -The seat jockey at the very front of the saddle should reflect or follow the line of the skirt. Also, the margin or reveal from the seat jockey to the skirt edge here could be less. I like to see about 3/8" or so. Yours appears to be about an inch. You started out with a nice reveal around the concho area and I would continue that or slowly increase it until rounding back to form the horizontal line of the seat jockey. -The distance from the back of the cantle to the rearmost line of the skirts could be longer to create a more balanced look. Yours appears to be about 4 3/4", maybe 5". As a rule I like to use 5 1/2" to 6". Given the tall cantle on this saddle, something closer to 6" would look better in my view. If you do so, you will also need to widen the reveal between the skirt and jockey. Just under 1/3 of the total length is a good rule of thumb (based on the "golden ratio"). That will translate to about 1 3/4" or so, depending on the depth. Some folks argue that a shorter backed horse needs short skirts. If the skirts are flared and blocked away from the horse (comment 1) longer skirts shouldn't interfere with the horse and can look so much more balanced and pleasing. -As previously mentioned, the seat's "ear" cut (base of cantle) should have been a bit lower or closer to where the cantle meets the tree bar. This would have prevented the appearance of the unsupported bump in the seat ahead of the cantle base. It's tricky to get the cut high enough so that the seat pulls down nicely, yet not so high as to cause the bump. To estimate this you can stack up the amount of leather you anticipate will be under the ears (rig, jockeys, cinch keeper, etc.) then add a bit more. Usually this will amount to 3/4" to 1" vertically above the tree bar. Better too much, as with this saddle, than too little. I like your cantle binding and the fact that you attempted to mold the seat leather back from the cantle rim such that the cantle binding is recessed behind the line of the seat. This often ignored detail will prevent excessive wear on the binding and gives the saddle a finished, professional look. -I can't see the fender too well behind the nice reata but suspect that a fuller, wider fender might better compliment the large taps. Again, something to think about as you attempt to pull all of the elements of the saddle together into a pleasing, balanced package. -I was puzzled about the construction of the back rig dee. It appears more like a flat plate in back but an in-skirt up front. No criticism, just curious. The rig position and depth look good. Overall this is an attractive, functional saddle that looks like a joy to ride. All of my comments with the exception of the first one are based on aesthetics and are purely a matter of taste. Use them or discard them as you see fit. I humbly submit them to help you develop your style. You're on track to building great saddles. Keep refining your work. Stay open minded and always remain a student. Ed
- 26 replies
-
I presume you are referring to saddles sold by Richard Caldwell of Alturas, California. Richard is a clinician and trainer of the Vaquero school of horsemanship. He sells some very nice gear, including saddles, at his clinics and on his website. The saddles he sells are made to his specifications by Bob Ray of Utah. Bob makes his own trees. Bob too has a website where you can check out his trees and saddles... Very nice. Ed Odgers


