.jpg.d60258221c476480a6e073a8805645bb.jpg)


Double U Leather
-
Posts
655 -
Joined
-
Last visited
Content Type
Profiles
Forums
Events
Blogs
Gallery
Store
Everything posted by Double U Leather
-
Thanks for the kind words all. I was pleased with how it turned out. This customer has one more on order that should be kinda cool too. It gets started today. Rohn....they attach to seat with upholstery tacks. Ten...there is actually a pretty good market for them. Obviously, it's more of a niche market, but I've sold several...and for a pretty nice lil price.
-
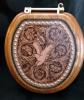
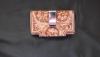
Here's the next order complete. This was a little different on a couple notes. First, the customer opted for just a natural colored center instead of the typical silhouette. I kinda like the way the eagle turned out. All black and it would have been a crow....LOL. I also tried a couple new flowers, as well as RTC resist. Overall, I liked how the whole thing turned out. Now if the customer likes it, it's golden. Anyway, have a look and let me know what ya'll think. Be blessed everybody.
-
Latest Belt
Double U Leather replied to Double U Leather's topic in Purses, Wallets, Belts and Miscellaneous Pocket Items
Bluesman...I think the border is 3/8" and then the stitch line is in the middle of that. As for thread, I think it's 138. I'll try to remember to check it tomorrow. BTW...thanks for the compliment. -
Latest Belt
Double U Leather replied to Double U Leather's topic in Purses, Wallets, Belts and Miscellaneous Pocket Items
Srbonner....LOL. I also watched that movie a million times when I was rodeoing. That one, and J.W. Coop. In fact, you talked about pretending to be Jr. Bonner, I pretended to be J. W. Coop...so far as to have a spur imbedded into a cast after I'd broken my foot. Thought I had a shot at making the circuit finals that year and didn't want to sit at home. DUMB IDEA!!! And the next dumb idea was after getting on a couple with the cast and spur and having zero success, going home and taking a hacksaw and cutting the cast off myself. My foot has been semi-jacked up since. Oh the joys of being young and invincible and dreaming of being a world champion. Anyway, thanks for the nice words about the belt. I'm starting to get things kinda dialed in I think. Buttons....I'm not sure what you mean about the back grounding process. I simply use a regular old Barry King 5 hole bar grounder and get after it. Then I put the normal Sheridan style finish on the whole thing. I hope that answers what you're asking. Thanks again for the compliments, and stay blessed. -
Latest Belt
Double U Leather replied to Double U Leather's topic in Purses, Wallets, Belts and Miscellaneous Pocket Items
Casing the item, as mentioned in the Stohlman book, is of utmost importance. When I make belts (or anything for that matter), the first step I take is to put packing tape on the backside of the project. Many people will use rubber cement and a thin piece of plexiglass or something similar. This is to prevent the leather from stretching during tooling. I think probably the rubber cement and plexiglass works best for larger type items. I've never tried it, but am about to the point to try it. After it's backed (taped or rubber cemented), I then run the belt under the faucet until the entire thing is wet. I then will run a glass slicker over it, going both directions. This step helps "firm" the fibers of the leather up that I'll be tooling. I usually have a couple projects going at the same time, so at this point I put the cased item in a plastic sack and let it sit for a while. Once the cased item has returned to almost the normal color, I'll then begin tooling. I know that early on, this was a step that I rushed and I'd tool things while it was still too wet. Tooling on a piece that is too wet will make the impressions "mush" around instead of being crisp. I will keep on tooling until the project is done, or until the end of the day has come. If I have more to tool, as I said before, I'll dampen it good and put it back in the sack. During the tooling process, I'll re-dampen the leather as needed. Some people use a spray bottle, I have always just used a sponge. When I'm dampening, I'm not trying to get it back to the wet stage from earlier, just damp enough to tool. Again, as I dampen, I will let it sit for a few seconds before I begin carving again. Usually, while I'm letting it sit, I'll strop my swivel knife, or take a drink of water, or take a chew...LOL. When I'm all done tooling, I remove the backing and let it dry overnight. The next day, I'll oil it and then let that sit overnight if at all possible. Next is the resist or Clear Lac stage. I apply the resist, and let it dry for at least 3-4 hours. Then antique. As for the "fuzzies", I line probably 99% of the projects I do. The only time I don't line something is if the piece with be attached directly to something else and the backside will never be seen. I guess the one thing I've learned when it comes to casing, oiling, dying, finishing, etc., is to not get in a rush. I've messed up more than one project by being impatient and trying to hurry things along too fast. If nothing else, this leather deal is teaching me patience...LOL. I hope this helped. Feel free to ask more questions if you need to. I'm by no means an expert. Just things I've learned along the way...and lots of things I've learned from people right here on LW. -
Latest Belt
Double U Leather replied to Double U Leather's topic in Purses, Wallets, Belts and Miscellaneous Pocket Items
Rosemary, I typically can carve one in a day. Throughout the process I'll just keep dampening it as I go. I always dampen the whole thing each time. That way, it all dries at the same pace when I'm ready for the finishing process. If I have a project that I don't get finished in a day, I dampen it good and put it in a plastic sack until the next day. Generally, it's ready to tool when I get back to it. Hopefully, that helps. -
Latest Belt
Double U Leather posted a topic in Purses, Wallets, Belts and Miscellaneous Pocket Items
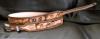
Here's the latest order done. It's a floral tooled, initial tipped belt with black dyed edges and initials. Hopefully, the customer likes it. Thanks for looking, and as always, let me know what you think. Stay blessed everyone.
-
Sr. Bonner....first, I just gotta know if you're Jr. Bonner's dad. If so, I've seen you in the movie a thousand times....LOL. As for the portfolio, it looks very clean and neat. You did a good job on it. And most definitely, a hug and an "I love you" is far more valuable than a stack of green paper. Keep up the good work, and keep the focus on what's truly important. Be blessed.
-
I'm not sure where to put this post, but I thought I'd put it here. If it needs to be moved, I'm sure our resident guru Johanna will figure out where it belongs. At any rate, I just wanted to tip my hat to Barry King. I ordered a swivel knife from him and mistakenly ordered the wrong size blade. Well, it so happened I was passing through Sheridan, WY this weekend and asked him if I could swap. Not only did he say yes, he was willing to meet me at 8 a.m. on a Sunday morning to make it happen. Just wanted to publicly say "thanks Barry". He's a stand up guy and makes awesome tools. Thanks again.
-
Miss Rodeo America Chaps
Double U Leather replied to Dink's topic in Clothing, Jackets, Vests and Chaps
Dink, Maybe we can team up on some things. Why don't you give me a call sometime next week, and we can visit about it. -
Miss Rodeo America Chaps
Double U Leather replied to Dink's topic in Clothing, Jackets, Vests and Chaps
Dink, That's good work as always. You are a chap making guru. Nice job. -
Let me see if I can explain better. The leather front pieces in the pic, go over the shoulder and meet in a V shape just about between the person's shoulder blades. They are attached together with kind of a baseball diamond shaped piece. The elastic is sewn to the bottom of the baseball diamond piece and then the other end of the elastic is sewn to another piece similar to the front buckle pieces. The piece in the back though isn't tapered for a buckle. That piece on the bottom end has another of the scissor snaps that attaches to the belt loop. As for shedding on clothes, I line everything I do, so shedding isn't a problem. I hope that answered your questions, and thanks for the nice words.
-
Cheryl....I don't have a pic of the backs of them, but there was a piece similiar to the front buckle parts that was then sewn to the elastic. I hope that makes sense.
-
Thanks Ferg for that tip. Would that work on larger items like notebooks and such? On legal pad notebooks, etc., I've tried gluing the center first and then bringing the sides up to match. I still get some wrinkles. If you think this trick would work on a larger item, I'll try it on the next big thing too. Thanks again for the pointer.
-
Ummmm Luke....I'm not a she....LOL. And I did look at it before I shipped it. Sure enough, the inside had a slight angle while the outside was straight. Point taken and filed away for future reference. I'm really hoping there won't be a whole lot of double loop edges in the future, but the customer is always right.
-
Hmmm.....I didn't even know that. I'm glad I didn't get it in the mail today. I'm gonna hafta look at the inside of it to see the difference. Thanks for the tip Luke. On a different note, I had a call today from an area fire department wanting helmet shields. I have sure enough done anything like that. They left a message so I haven't said yes or no, but that's dang sure out of my normal realm. WHERE'S ALL MY CALF ROPING, BELT WEARING, NOTEBOOK TOTIN' FRIENDS AT?.....These out of the norm projects are gonna tax me I think....LOL Hmmm.....I didn't even know that. I'm glad I didn't get it in the mail today. I'm gonna hafta look at the inside of it to see the difference. Thanks for the tip Luke. On a different note, I had a call today from an area fire department wanting helmet shields. I have sure enough done anything like that. They left a message so I haven't said yes or no, but that's dang sure out of my normal realm. WHERE'S ALL MY CALF ROPING, BELT WEARING, NOTEBOOK TOTIN' FRIENDS AT?.....These out of the norm projects are gonna tax me I think....LOL
-
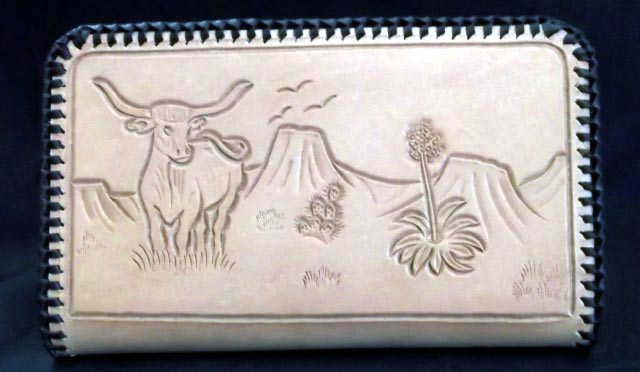
Here's the next item out the door. This was a bit outside of my realm, but it turned out pretty good. I decided to put the longhorn on so that when the customer was writing a check the cow would be standing up the right direction. Of course, that makes the cow upside down the other way. But, when the customer puts it in his pocket, the cow will be sticking out of his pocket instead of hidden. Oh the difficulties of figure type carving. I really rather enjoy the floral stuff a tad better. And BTW, I had forgotten how stinkin' hard on the fingers the double loop edge is. I undercharged this customer a tad I'm thinking (at least my fingers think that way)!! Anyway, take a look and let me know what you think. Stay blessed gang.

-
Iphone Case
Double U Leather replied to Double U Leather's topic in Purses, Wallets, Belts and Miscellaneous Pocket Items
Thanks for the compliments. Coda....no it's not a magnetic snap. I went with Velcro and that is just a concho. Mudruck, Phatdaddy.....Don't be skeered....just jump in....LOL. If I ever get real brave, I'll post some pics of my first attempts at Sheridan. It wasn't pretty!!! -
Iphone Case
Double U Leather posted a topic in Purses, Wallets, Belts and Miscellaneous Pocket Items
Just got this done for a customer who has ordered several things from me previously. The other iPhone case she had was a factory made job that only semi fit her phone and was not overly functional. Hopefully, this will suit her needs better. I think it turned out pretty good. Let me know what ya'll think of it. Thanks for looking and I hope all of you are blessed.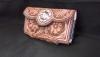
-
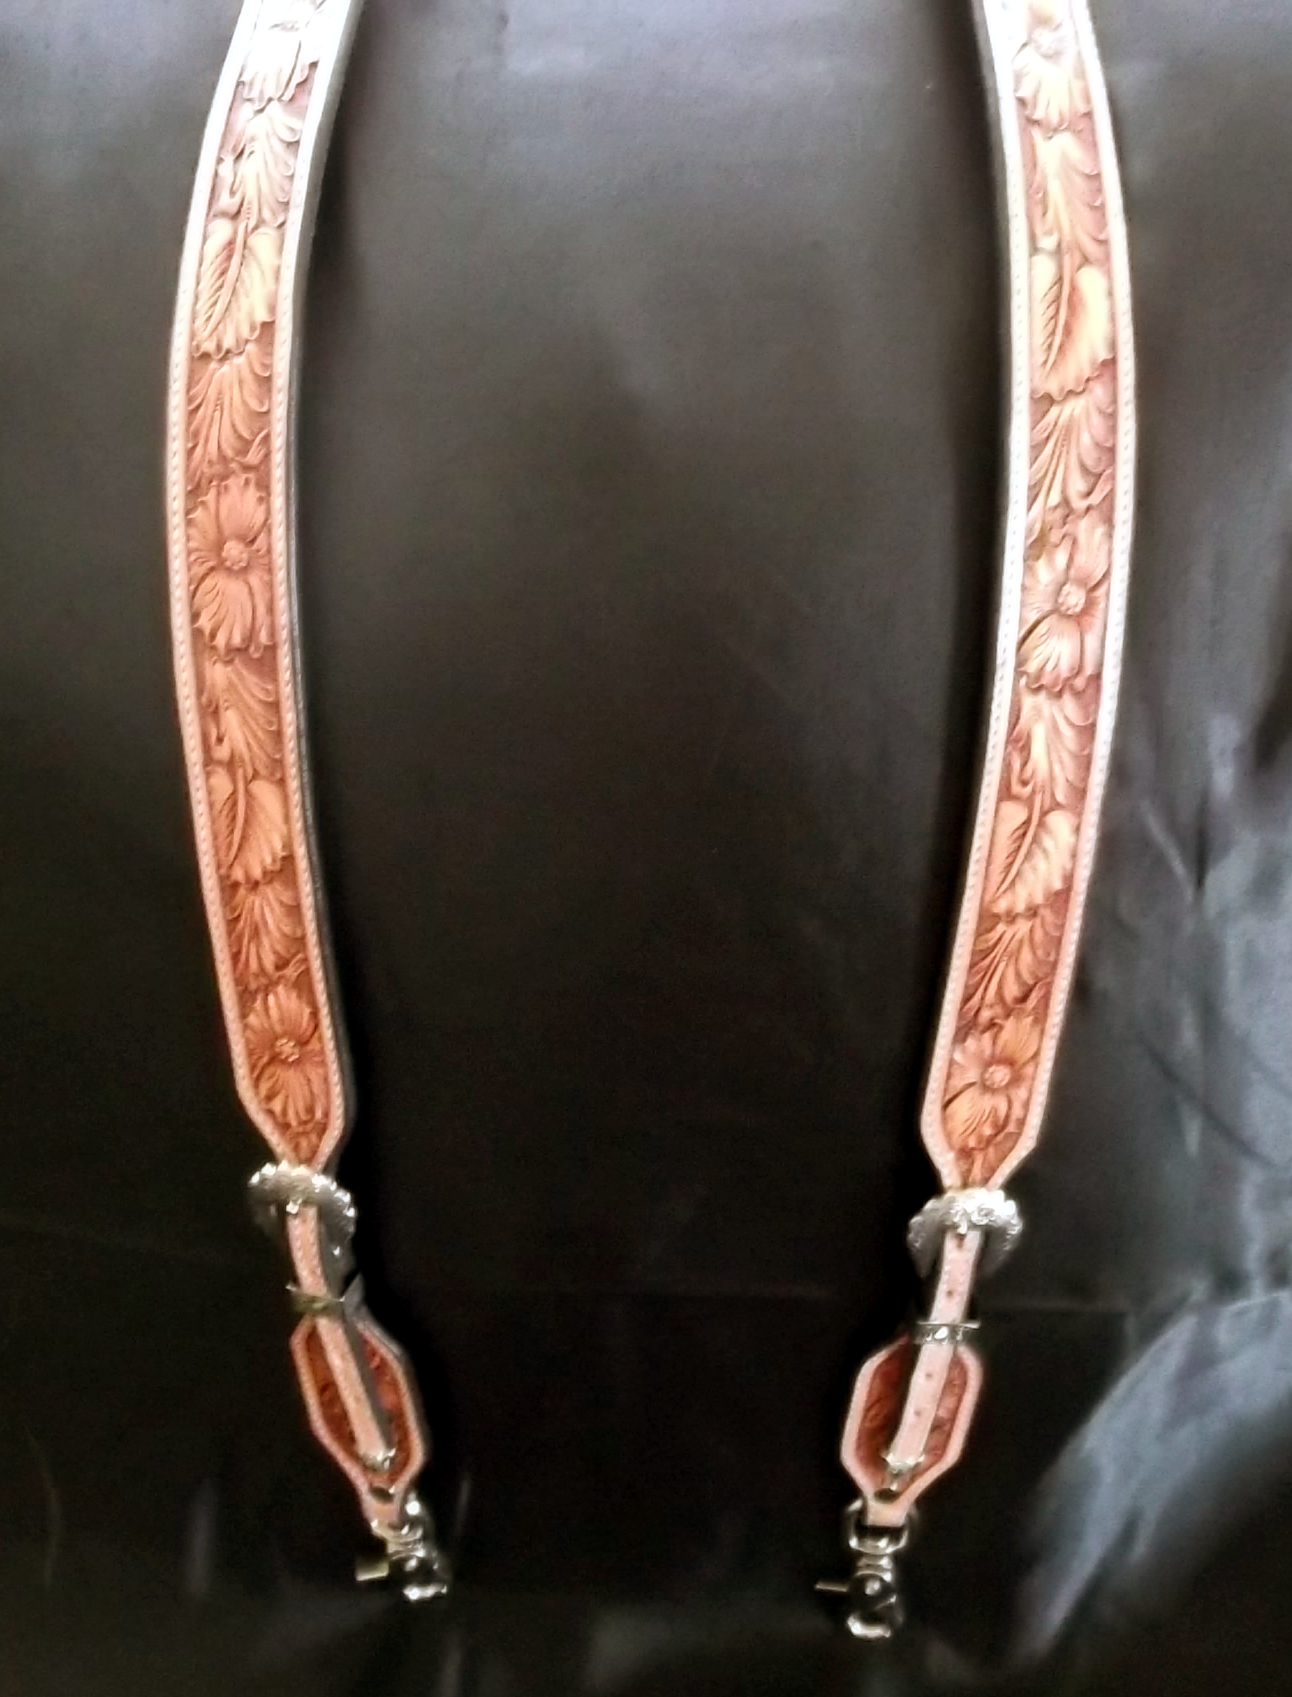
Thanks for the compliments gang. I've got a hunch, there will be some more orders for these type suspenders.
-
I haven't seen the one by Chan Geer, but I have a copy of the other one by Gardner and Fay. It's chock full of "how to" things for Sheridan style carving. I'd recommend it highly.
-
Here's the next project out the door. These are for a gal who saw a lady wearing a pair of fancy suspenders at a ranch rodeo and decided she wanted a pair as well. They turned out pretty good I think, although I can say, there were some parts that had to have a mulligan. I really hope I get some orders for bigger items like notebooks and rope cans here soon. These little, delicate items are far more difficult for me to do...LOL. Anyway, take a look and let me know what you think. Stay blessed gang.

-
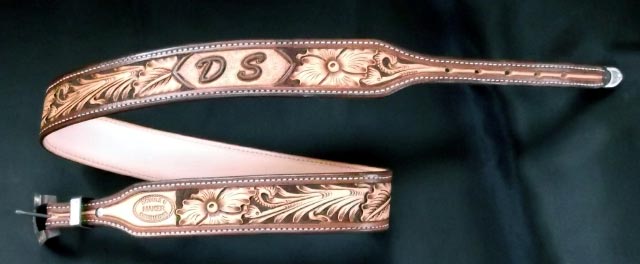
Here's the latest from the shop. The customer wanted his initials to rest on his right hip instead of the normal initials on the tip. I kinda like the idea. Anyway, have a look and let me know what you think. Thanks for looking. Stay blessed. P.S. Don't forget that He is alive!!!

-
Howdy, I'm in Greeley. Welcome to LW. This place will become addicting to you. Later on, they will show you where the part of forum is where you introduce yourself and say you're a LW addict....LOL. Welcome. Be blessed.
-
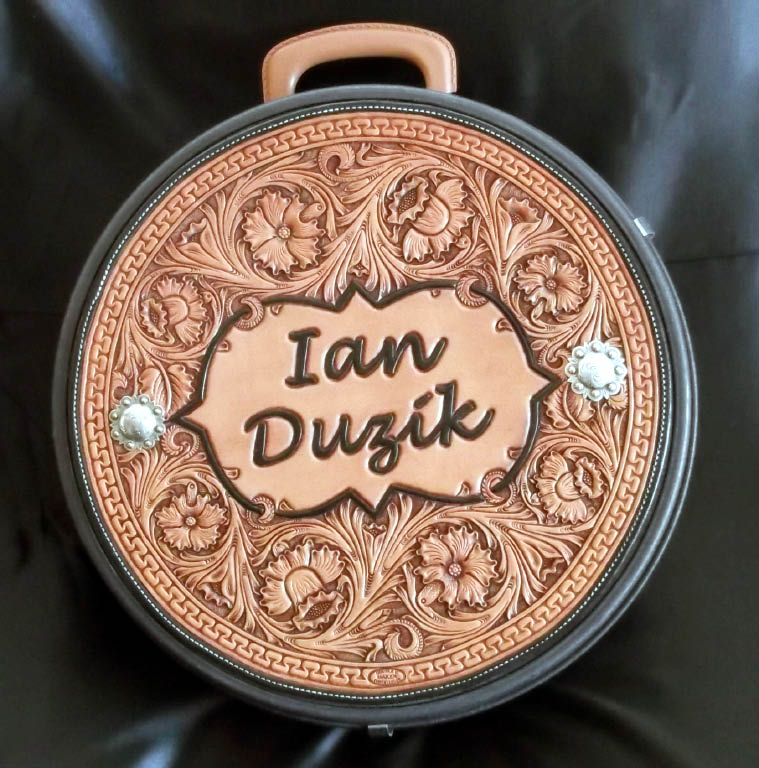
Here's a few examples of things I've done with fonts off the computer. The checkbooks were small enough I had to use stamps for some of the letters, but did a font on the word champion.