hidepounder
-
Posts
1,808 -
Joined
-
Last visited
Content Type
Profiles
Forums
Events
Blogs
Gallery
Store
Everything posted by hidepounder
-
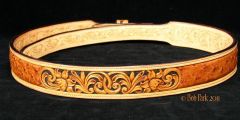
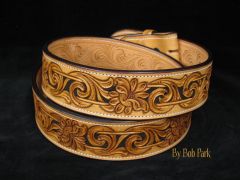
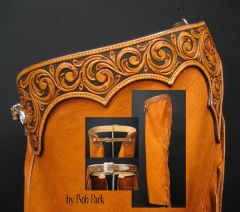
From the album: Bob Park
-
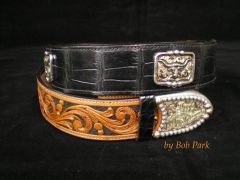
Bob Park Custom Leather
Images added to a gallery album owned by hidepounder in Our Leatherwork Galleries
-
-
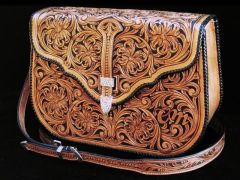
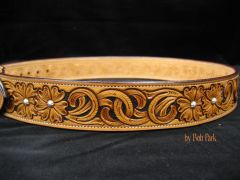
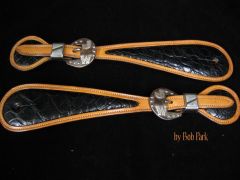
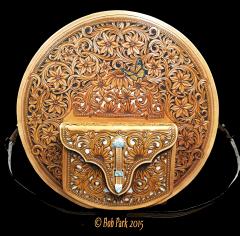
From the album: Bob Park Custom Leather
-
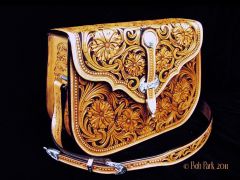
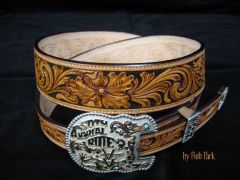
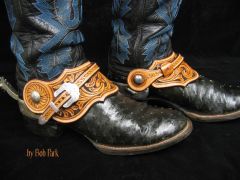
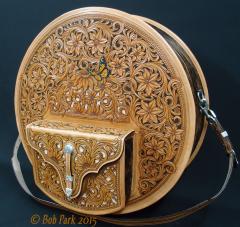
From the album: Bob Park Custom Leather
-
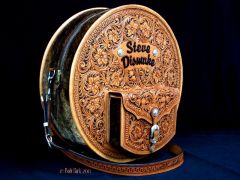
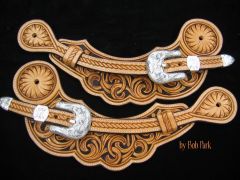
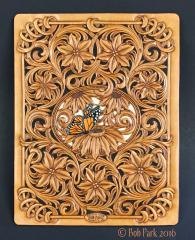
From the album: Bob Park Custom Leather
-
Saddle Stitching, Front/back Look Different?
hidepounder replied to bigtree's topic in Sewing Leather
The purpose for a stitching groove is to protect the thread from abrasion. Day to day wear can cause the thread to fray when it's not in a groove. A thread groove can be cut or simply "embossed" to help bring the thread below the surface level of the leather to protect it from abrasion. On heavier leather, the stitches can simply be pulled down tight enough to embed them and protect them from abrasion. Another frequently seen mistake is the use of thread which two or three times too large and completely out of scale with the project. Pretty stitches, Martyn!! -
Bennie Lovejoy & JenGranger... Your logic is fine. As I've stated before, casing is not a requirement to produce better work. It's just another "arrow in the quiver" so to speak. Will casing small pieces of leather provide a better result? Probably, but that's something only you can really answer thru trial and error. You know a lot depends on your particular environment, the quality of your leather and the difficulty of the tooling pattern. You may very well discover that when doing small pieces that you can finish in a single sitting, just don't require casing. I think it would be a good idea to try both methods and then evaluate the results. As far as having inconsistent impressions goes, i'd have to see exactly what you're referring to. In general inconsistent impressions can be caused by a number of things such as moisture content, quality of leather and inconsistent strikes. Tool quality can take it's toll also! Hope this helps! Bobby
-
I've received several emails regarding this thread and so i'd thought I'd weigh in. There is absolutely nothing wrong with wetting the leather and then tooling it. To me that is sort of the norm and I often do that myself. The advantage to casing, as some of you have mentioned, is to (1) aid in cutting, (2) extend tooling time, (3) aid in the "burnish" or color you get with the tools. It is not necessary to case overnight. The process can take just a few hours, which is depedent upon the environment. Many of us case over night because it's convenient to prepare tomorrows leather, today. Also, it is not necessary to use the refrigerator. The only reason to refrigerate is to prevent mold growth. Mold growth only happens when the leather has been too wet for too long in a warm environment. Finally the true differnece between cased leather and wetting the leather is this. Leather is cased only when ALL the fibers contain the same amount of moisture when the leather is in a TOOLABLE state. To achive this, the leather must be placed in a super humid environment, where evaporation has been slowed to a crawl. So SOME evaporation is required. This is why casing boxes work better than plastic bags. If you are using a plastic bag, it's necessary to let the leather dry somewhat before it is sealed in the bag. Old coolers make good casing boxes, especially when small adjustable vents are added to the sides and top. I hope this is helpful and Happy Holidays, everybody! Bobby
-
Hello everybody! I have a few seats left in several classes. I will be excepting walk-ins in "Antiquing & Finishes", "Burnishing" and "Exotic Inlays", so if you're on the fence or decide to change your mind, You're welcome to attend (until the room is full...first come first serve). See you there!!!!

-
That happens to me occasionally, too, but I've discovered that when it does I've usually used a little too much glue. It is also important to set the glue by using a wide faced hammer to pound the edges to insure a good bond. I'm assuming that you are using contact cement and not rubber cement. I also sand the the edge to insure the two pieces of leather are perfectly flush. That usually removes most of the residue. Hope this helps... Bobby
-
I don't have a website, but I'll always carry these and you can email me. I'm considering doing a website, but we'll see......
-
For anyone who is interested or hasn't already heard, I'm selling a new edge dye applicator that you fill with the water based or spirit dye of your choice and use like a Magic Marker. It's a high quality applicator and by far the best I've ever used! No more dipping into open bottles. Just remove the cap, apply the dye and when you're finished just snap the cap back on. They are $15ea plus shipping. For anyone interested, just send me an email: hidepounder@gmail.com
-
Hi Scott' When I use the Quick Slik or my own Edge Magic, I am substituting them for wetting the edge or using any soap at all. Both products work best for me with a cocobolo burnisher on a dremel. When using the Feibings saddle soap, either the white or the yellow will work. Someone told be they were the same but that the white was designed to be used with rawhide. I have no personal knowledge of that but it seemed to make sense and satisfied me at the time. I really can't tell any difference.
-
Hidepounder (Bob Park) 2015 Al Stohlman Award Winner!
hidepounder replied to silverwingit's topic in Leatherwork Conversation
I can't believe I never saw this thread! I just stumbled on it and read through all the great comments. Thanks to all of you for your kind sentiments. I hope I can continue to be of help to anyone who needs it. Best! Bobby -
Without seeing the before and after or watching you burnish, it's hard to say exactly what the problem is. However I have experienced some of those issues myself. I use Fiebings dye which is spirit based, and occasionally I think the alcohol takes it's toll. However, as saddle soap is water soluble, water based dyes may cause these issues too. I've also learned that the leather makes a difference, as does the cut of the leather. The bottom line for me is, when these issues occur, I re-burnish and that usually solves the problem. It also usually gives me a better edge than the first pass did. When I'm satisfied with the dyed edge I perform a final burnishing step which is applying paraffin to the edge and burnishing it well into the leather. Then I polish with a clean soft cloth. The paraffin will usually fill in a lot of those tiny holes and make them go away. With regard to the glued edge, be sure you are using a good quality glue, like Barge, Masters, Duall or WeldWood. Be sure you're gluing out to the edge. Don't glue heavy and be sure to pound the pieces when you connect them and then sand them to make them flush. Hope some of this helps.... Bobby
-
The process of burnishing, by itself, and the process of burnishing with saddle soap, does impair the amount of dye an edge will absorb. The dye penetrates the saddle soap easily, however not as thoroughly as when you apply dye to the raw edge. On occasion you will have little sections which need to be re-touched. You have to decide for yourself, what your priority will be...dye absorption or crisp edge. You also have to decide on how much effort you are willing or able to put into your edges. The outcome is usually commensurate with the effort. You could add steps which might give you the best of both worlds but it might take double or triple the effort. A good example is the application of edge dressings such as the Fenice products which Tandy sells. Utilizing those products you can get amazing results, but they take hours to apply. I tend to go for the better finish and if that means I have to re-dye occasionally or re-burnish, then that's what I'll do. But I'm not willing to invest the time required to use the new edge dressings. I'm not THAT impressed with they way they look anyway. Hope this helps..... Bobby
-
Sheridan Women Wallet
hidepounder replied to vhoang1102's topic in Purses, Wallets, Belts and Miscellaneous Pocket Items
Really nice job. In response to your PM, I see no real problems to pick on. The comments I'm going to make are just about style. I would eliminate a lot of use of the camoflauge tool on the stemwork and in the flowers. Instead, use a very narrow viener like Barry king makes around your flower center. Also, I would pull your mules feet tighter together, use a lighter strike and taper them off more quickly. On your decorative cuts, for me they are a little deep. Work on refining them a little more. You have good control of your knife and so the next step is practice tapering them and lightening up a little. Good job on this! -
I can't really answer that question because I've never tried to case latigo or harness leather, but my first thought would be that it would not case. My other thought is that neither of those leathers would be the appropriate choice for projects that need to be molded. I would think the answer is yes. The best leather for a project that needs to be molded is veg tan.
-
Contact the Leather Crafters and Saddlers Journal for scheduling. http://www.leathercraftersjournal.com/
-
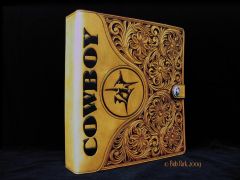
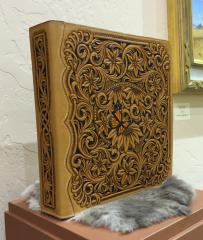
Here is a pad folio that I finished last weekend. Let me know you think...

-
The glass is used to preserve the cased leather. You case your leather first and then to preserve it, you place a sheet of glass on the leather which inhibits the drying process. To case, you first dip the leather in a water bath and then let it begin the dtying process. When the leather is "ripe", place the glass sheet over the top to hold moisture in. Using glass is something you use when you're tooling and need to stop and want to presrve the moisture content of the leather. Hope this helps.... Bobby
-
You're welcome, Doubletap and thanks for the feedback. Hope it helps and Happy New Year! Bobby
-
Yes, everything on the bag is machine sewn.
-
Thanks for the great comments everybody!
-
Thanks to all of you for the humbling comments!!!! I absolutely love the art we do and comments like these inspire me to strive to improve my skills. Your words are very much appreciated! Bobby