


WeekendHobby
-
Posts
25 -
Joined
-
Last visited
Content Type
Profiles
Forums
Events
Blogs
Gallery
Everything posted by WeekendHobby
-
Landis Regular Lock Stitch (Landis #1) Questions
WeekendHobby replied to WeekendHobby's topic in Leather Sewing Machines
Here is a video of the trouble with the pressure foot lift Here is a video of the timing issue between the needle and the shuttle -
Landis Regular Lock Stitch (Landis #1) Questions
WeekendHobby replied to WeekendHobby's topic in Leather Sewing Machines
Yes -
I have a Landis #1 (Landis Regular Lock Stitch Wax Thread Sewing Machine) that is in pretty rough shape but I think I've almost got it running. I have a couple of issues that I'm hoping someone can help me with. #1 - the timing seems off. The shuttle starts its travel back toward the machine before the needle has started to rise. So, there's no loop to catch. I'm thinking that I may need to rotate the hand wheel relative to the shaft but I'm hesitant to start fiddling with this until I get confirmation #2 - If I lift the presser foot it stays up and the only way I can get it to "release" is to pry up on the square bar that surrounds the spring. I assume that there is a better way and would love to know what it is. Thanks in advance for any help! Tom
-
Question: Skive before gluing liner or after?
WeekendHobby replied to WeekendHobby's topic in How Do I Do That?
Thanks! Thanks for that! I tested both ways and trying to skive after gluing was not pretty! -
Hi - I'm making my first project where I want to line a bag by gluing a thin leather to the main body (as a liner). I'm trying to decide if I should (machine) skive the body and then glue the liner to it, or if I should glue it all together and then skive the result. Any suggestions? Thanks in advance!
-
Inside Bevel on a Fortuna 50 Skiver... is that my problem?
WeekendHobby replied to WeekendHobby's topic in Leather Machinery
Update: After removing the bevel from the knife the skiver is behaving much more like the videos I see online. Thanks again to everyone for all the help! -
Inside Bevel on a Fortuna 50 Skiver... is that my problem?
WeekendHobby replied to WeekendHobby's topic in Leather Machinery
I'm curious if anyone has advice related to a replacement blade. One one site see 3 different blades ranging in price from $35 to $65. And those are all made in italy. Is there any difference in the steel, the edge, the cut, etc. between a Fortuna blade, a Fratelli blade, and any of the other choices out there on the market? If there is a "best" blade, which one, and why? PS. I started grinding yesterday. Did a fairly aggressive grind every time I could take a break from work. Managed to get through about 1/2 of the depth of the bevel so I'm hoping that I'll be done with this experiment by the end of the weekend after all. -
Inside Bevel on a Fortuna 50 Skiver... is that my problem?
WeekendHobby replied to WeekendHobby's topic in Leather Machinery
RockyAussie - that is exactly what I needed to know and seems to be the problem that I am having! Thanks to everyone for all the suggestions. Some updates based on things that have been said: I bought the machine used and the inner bevel was something that I noticed only when I was having trouble getting it to work consistently. mike02130, I did NOT create the bevel with the dressing tool :-) I'd guess that the previous owner had the emery wheel in there too high and it ground out the bevel I don't think it's possible to reverse the blade - it's a single pice and the non-cutting side is where the bolt holes are to attach it The blade is pretty short so I think that I'll buy a new blade AND try grinding this one down while I wait for it to get here I'll be very careful with the heat and take the time to grind it slowly in stages Good advice on blunting the blade - thanks Cumberland Highpower! It might take a week or so till I can get to it (since this is only a Weekend Hobby :-) but I'll report back when I'm done. Really appreciate all the help! -
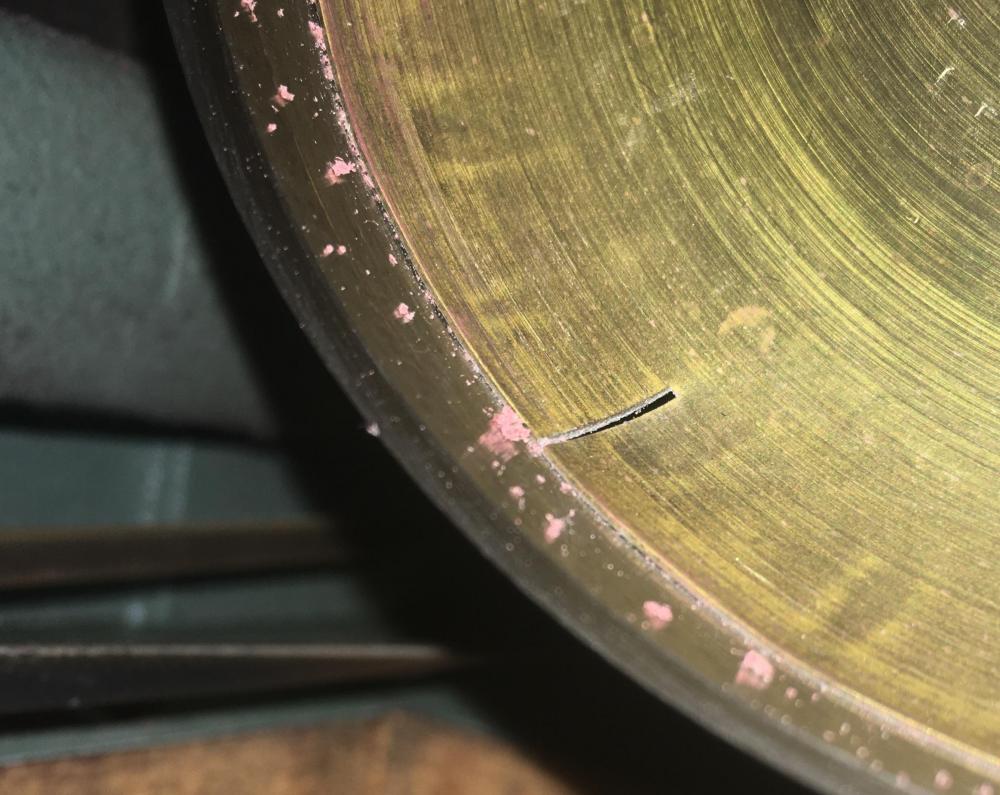
Hoping that someone out there will have some advice for me! I recently purchased a Fortuna Simplex and have been working to learn how to use it. I'm having a hard time getting consistency. It has a tendency to do OK then, suddenly, take a much deeper cut. I've read in the manual that the inside bevel on the bell knife is supposed to be "minimal" and I appear to have an inside bevel that is almost as strong as the exterior bevel and I can't figure out why there is even a bevel there at all as I am demurring with the stone and not letting my emory wheel touch the knife at all. The photo is not all that I hoped for but it's hard to get a picture in there! Any experience that anyone can share would really be appreciated. Tom
-
Fortuna model 10 skiver parts availability
WeekendHobby replied to AlizabethThomas's topic in Leather Machinery
any chance you have a service manual that goes with that? I'm trying to rebuild one right now and it would be nice to have some direction :-) -
Adjust Stepping Height of Presser Feet on Consew 206RB5
WeekendHobby replied to WeCover's topic in Leather Sewing Machines
There is also a great walk-through video on Youtube that covers most of the normal things you'd want to do on a 206 -
Thanks a million! This really does the trick.
-
Colt - thanks for the offer to take some photos of the wick placement in the top of a Consew 206 - hoping this reminder will spur you to action!
-
Thanks Greg - I appreciate your help. What this doesn't help me understand is how to situate the wick in relationship to the moving parts inside the machine. Really hoping that someone stumbles across the post and can take a picture.
-
Cow and Bison backpack
WeekendHobby replied to joelpete's topic in Purses, Wallets, Belts and Miscellaneous Pocket Items
I'm very appreciative for your taking the time to do this - I can get the sizes and everything from the cutting mat - great idea! Thanks! Tom -
I'm later to respond - but I'd really appreciate your help! Thanks
-
Hi - I'm hoping that someone with a Consew 206 would be willing to photograph the wick in the top of their machine to help me with the installation of a new one. My 206 RB-2 was acting a little odd and I realized that the wick at the top of the machine was in pretty bad shape. The machine runs great if I open up the top and oil it but the wick needs to be replaced. I know where to buy the wick but I can't find a threading diagram anywhere so I don't know where to put the new wick when I install it. I'd really appreciate any help that you can offer. Thanks!
-
Cow and Bison backpack
WeekendHobby replied to joelpete's topic in Purses, Wallets, Belts and Miscellaneous Pocket Items
Thanks - I'd appreciate the starting point! -
Cow and Bison backpack
WeekendHobby replied to joelpete's topic in Purses, Wallets, Belts and Miscellaneous Pocket Items
This looks really nice - I like the way you've approached the problem. Any chance you would be willing to share your pattern? -
Inline Cowboy presser feet on Cowboy CB4500
WeekendHobby replied to Wizcrafts's topic in Leather Sewing Machines
Thanks Wiz - I don't know why I did not think to look at the parts diagram for a better understanding of the components. Lesson learned! -
Inline Cowboy presser feet on Cowboy CB4500
WeekendHobby replied to Wizcrafts's topic in Leather Sewing Machines
Thanks Floyd - this has the process for adjusting the height of the lift (via the banana adjuster) but what I need to do is remove a gap underneath the outer presser foot. Right now, when the foot is down, there is a 2mm gap between the bottom of the foot and the throat plate. Since there are different heights for the different throat plates I assume there is some way to raise or lower the entire rod but I'm nervous to start lostening bolts without knowing what they're for ;-) Tom -
Inline Cowboy presser feet on Cowboy CB4500
WeekendHobby replied to Wizcrafts's topic in Leather Sewing Machines
Wiz - I'm looking for some information about how to make this kind of adjustment (my outer foot is too high on my Artisan 4000) - can you point me at any references? -
Edge Guide for Consew 225 (and clones)
WeekendHobby replied to KeithHideWorks's topic in Leather Sewing Machines
I've had great success with the Harbor Freight magnetic tool holder (https://www.harborfreight.com/18-in-magnetic-tool-holder-60433.html). I put the magnet side down on the table and the metal edge won't budge for anything. Putting it too close to the needle makes the feed dogs hit the metal edge but that was quickly solved with a few minutes on the grinder... -
FWIW, the original site seems to have moved - the links might work at archive.org For example - the first link is broken: http://ia700302.us.archive.org/16/items/leathercraftfora006855mbp/leathercraftfora006855mbp.pdf but this link works. So far I've been able to get all the books this way. https://archive.org/details/leathercraftfora006855mbp
-
The answer might be as simple as moving the snap seats further apart on the body so that the top piece is naturally pulled flat. If the buckling goes away by gently pulling the cover it might do the trick.
