-
Posts
417 -
Joined
-
Last visited
Content Type
Profiles
Forums
Events
Blogs
Gallery
Store
Everything posted by Leatherimages
-

How Do You Make Perfectly Round Corners?
Leatherimages replied to joobacca's topic in How Do I Do That?
I think Bob Beard of ProSeries Tools makes them in sizes. I'm not so sure about shaping a round punch. A corner cutter would need to straighten out at the edges of the corner. I've used my swivel knife for this kind of thing before. Just follow up your cut with you clicker knife and clean it up with a rasp or sand paper. -

The Cardinals
Leatherimages replied to Leatherimages's topic in Shoes, Boots, Sandals and Moccassins
I was just crusin' thru this section and saw I never followed thru with the request to see the aforementioned black pair. These were entered in the LCSJ's, World Leather Debut some time back. Black Ostrich with Black Kangaroo tops with tooled/filligreed collars. -

Question On Boots.
Leatherimages replied to switchblade5984's topic in Shoes, Boots, Sandals and Moccassins
Switch, I've kept your request in mind for the past few months, and have come up with an answer. Well actually the answer comes from a fellow shoemaker Paul Opperman, and member of the Honorable Cordwainers Company http://www.thehcc.org/. Paul has put alot of work into a tutorial on the mocassin style made by the companies you've mentioned above. I've posted a picture from his CD below. He sells the CD for $45. His contact information is, paul_opperman@hotmail.com. I haven't used the process he outlines, but I have skimmed it, and it looks like one could do a pretty fair job with the instructions. Good luck. -

Adhering Sole To Leather
Leatherimages replied to Leather Bum's topic in Shoes, Boots, Sandals and Moccassins
What can I use to scratch up the grain sides so the cement will provide a strong hold? I tried using 60-grit sandpaper and even a coarse wood rasp, but they do not seem to cut deep enough. . . Micah, It's not really necessary to go deep, you just want to open the grain. The primer coat will get in there and do it's job. I run 24 grit on my sander, and keep a piece of it on my bench to scrape small areas. You don't really need to create such a rough surface as the flesh side is. But the better you can break the grain, especially along the edges, the better your bond will be. There is a wire surface "sole rougher" available through shoe finders, maybe a local shoe repair shop could help you get one. Or maybe a barbeque grill wire brush would suffice. In the center area you can be a bit more random with your scratching, just be sure to compress the two layers from the center outward, to avoid air pockets, which can work their way out to the egdes and cause the layers to separate. I might be able to comment better if I could see what you're working with. And I don't quite see your three layer construction. Do you have any pictures? -
I'd recommend dying the leather before assembly, certainly before molding. The molding/burnishing is probably inhibiting the dye from penetrating. But oil after all molding is complete.
-

How To Use The Vergez Blanchard Plough Gauge
Leatherimages replied to jeansky's topic in Leather Tools
I can't speak from experience with this cutter, but I have had good results backing thin leathers with a firm paper of some kind, and running it thru strap cutters. Use rubber cement to easy removal. -

Adhering Sole To Leather
Leatherimages replied to Leather Bum's topic in Shoes, Boots, Sandals and Moccassins
Micah, I use Duall 88 Contact Cement. I've been getting mine from Seigels (sp) most often, but it's available elsewhere. Barge still works ok, I believe, we just need to change how we use it. If you scratch and brush the dust off, just cementing the EVA should be just fine. Good tight stitches could actually cut the crepe, so I'd advise against that. I'll recommend two coats, especially with cement as thin as we have now, with these toluene free cements. Think of the first coat for the underneath cells and fibers, and the second as for the union. Be deliberate around the edges, that's where dirt and dust get in, and can work the sole loose over time. If you're real good with a good sharp knife, you might get by without sanding the edge. But sanding, with good suction for dust, is the best way to get a good edge with crepe. One last thing about your veg-tanned footbed. (actually we usually only refer to the topside or insole surface as the footbed) But it's best if the flesh side is down, so as to provide a more porous surface for the cement. And again, I'll just emphsize the importance of scratching and dusting it clean before two coats. Good luck -

Grayson Perry's Bag
Leatherimages replied to AndyBates's topic in Purses, Wallets, Belts and Miscellaneous Pocket Items
Interesting. They're just so huge. The pictures that is. The construction looks good. What did you stitch them with? -
Ellen, funny;-) The purple around the top edges is goat, I think it came from Garlin Neuman. They are lined with a chrome lining we use alot for boot vamps. I believe GN has that too. Yeah, I suppose you'd say the veg is too stiff. Certainly it's too stiff if it's not milled. Milled is when they tumble it in huge vats. It comes out as raggy as chap leather, but it firms up when cased and modeled. So to work it I had to keep it cased and damp. I had to keep working it onto the plug, gathering the pipes in close. I did put a 45 degree angle on the edge, that helped it close up some, but it was still a challenge. I had to think of something to get a firm enough pink with what I had for my little doodle. So I mixed up a stain and went for it.
-
Hi you funny girl you, Thank you for being inspired by the mocs I did and posted for my Grandaughter. I used 6-7 oz. milled veg tooling leather from Wickett and Craig, but I wouldn't necessarily recommend it for a couple of reasons, which I can expound upon if interested. A 4-5 or 6-7 oz. chrome tanned leather would be much better. In fact there are some suppliers who sell leather specificly for Moccasins, such a Goliger Leather http://www.goligerle...r.com/chap.html . But really any chrome chap leather of sufficient weight will serve. I'd also recommend staying away from split leathers, too weak. For soles, you're local shoe repair shop should be willing to cut you off a chunk of 'sole gaurd' material. It's about 1/16" thick and comes in big 36" sq. sheets if you want the whole magilla. Super traction, it comes in neutral(or brack) and oak, such as I used on Gracie's. And as you can tell, it can be sewn, but you might need to keep your needle waxed with parrifin. Take a long stitch on your machine (maybe about7 or 8 spi., it can be hand sewn too of course. Plan it out, make a heavy paper pattern, sometimes canvas is a good pattern test, but be prepared to make a few before you begin to feel good about the pattern's functionality. For example, you may have seen the picture of the sole, which also shows how the heel tab is extending beyond the heelward edge of the sole piece. Not good. I'm sure when I see these next, later this year, it'll be confirmed to me that I should have made it that much longer. But that heel design is also part of the draw back of this pattern. A more stable counter, that won't collapse, is a good step, so to speek, toward a good pattern. Get all the books you can on the subject, (there's not alot). Have fun. Think it out. And remember, it's not brain surgery, (but a brain surgeon couldn't do it). As I said, for these I ordered the (I think they're called) Little Scout Mocs, and just changed the margin at the stitch holes for hand sewing, then I used an awl to punch my own. But with this design you must make sure you have an equal number on the plug as you do on the vamp, you'll see what I mean. I hope it's not too much information at first. Let me know if you'd like further explainations.
-

Gracie Beth's Pink Slippers
Images added to a gallery album owned by Leatherimages in Our Leatherwork Galleries
-
From the album: Gracie Beth's Pink Slippers
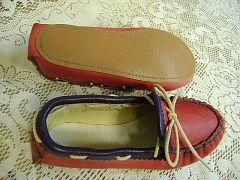
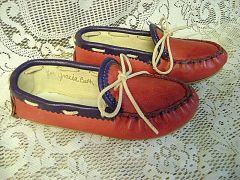
I also chose to use these as practice for lining this design. The pattern was reduced an amount equaling my guess of the loss from the "orange peel factor", plus the margin I wanted the lining to be short of the edge. This was because I didn't want the lining to show at the edge, but I still wanted it to be caught by the stitch. I had to guesstimate. I'll change some other parts of the pattern when I make her size 1-2 in a few months. I wonder what her brother is going to want. Cowboy boots maybe?© © leatherworker.net
-
From the album: Gracie Beth's Pink Slippers
Soles are hardly necessary on a slipper like this, (she'll out grown way too soon), but I wanted to do it for the practice.© © leatherworker.net
-
From the album: Gracie Beth's Pink Slippers
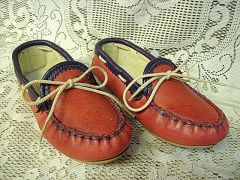
I didn't have an imprint or measurements of her feet at this stage, so I just ordered a size 11-12. I didn't want to use the shoe string lace look to close these, so I made my own pattern by simply reducing the stitch margin on the clicked out version. I cut my parts from milled veg 6-7 ounce leather, and stained them pink. I seriously reduced Feibings Cherry stain with Acetone, to get the pink (raspberry, really). The purple is 2oz. goat.© © leatherworker.net
-
From the album: Gracie Beth's Pink Slippers
At Christmas time last year we were in NY visiting our grandchildern. One day I received the Tandy moccasin kit I ordered for overnight delivery. So I assembled it with three year old Gracie sitting on my lap, and well all around me. She stayed with me though the whole time. Pretty good attention, I thought. Well awhile back while talking to her, I asked about how they were. She said, "Mommy says they keep getting smaller and smaller and smaller, because my feet keep getting bigger and bigger, and bigger! So when I asked her what color she wanted next, she said PINK!, of course. She such a princess. So, here's her Pocahontas slippers.© © leatherworker.net
-

Boots by PK BootMaker
Images added to a gallery album owned by Leatherimages in Our Leatherwork Galleries
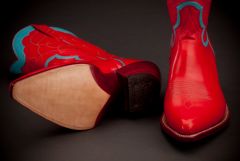
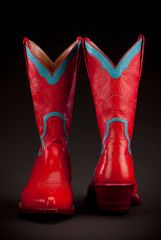
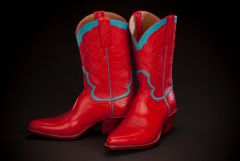
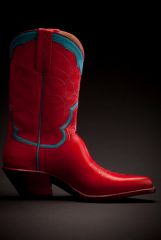
Here's a pair of Red and Turquoise Kangaroo boots I just finished. As a challenge of something alittle different for boots, I dyed the sole and heel edges. used Feibings Red with a touch of Buckskin to bring it back from burgandy. The single row of stitching is size 69 turquoise thread. -
From the album: Boots by PK BootMaker
© © leatherworker.net
-
From the album: Boots by PK BootMaker
© © leatherworker.net
-
From the album: Boots by PK BootMaker
© © leatherworker.net
-
From the album: Boots by PK BootMaker
© © leatherworker.net
-

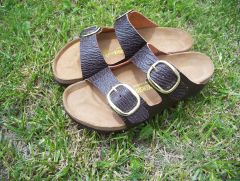
sharkskin Birkenstocks
Leatherimages commented on BuckARoux's gallery image in Our Leatherwork Galleries
-
Could someone help me please? TIA, Paul Name: Paul Krause UserName: Leatherimages IP Address: 71.209.174.26 Email Address: pkmaker1@hotmail.com
-
I'm sorry. I guess I need more help than I can understand from the Help section. In my settings I've got two external links set up for my web page blog. Can you tell me how the delete the second? And then I don't know if I've set things up properly. I want posts from my web page to appear on leatherworker.net. Help! TIA, Paul Name: Paul Krause UserName: Leatherimages IP Address: 71.209.174.26 Email Address: pkmaker1@hotmail.com


