NeilMott
-
Posts
118 -
Joined
-
Last visited
Content Type
Profiles
Forums
Events
Blogs
Gallery
Store
Everything posted by NeilMott
-
I've seen some waxes in pellets... so just buy them in pellets/small pieces and measure it out... it does sound pretty easy... beeswax and carnauba wax? Anything to consider about which type of each wax? I don't want any fragrances since my wife and I have bad allergies. White vs yellow beeswax? Best, Neil
-
Hey all. I watched a video by leathertoolz on youtube about a small burnishing iron. While waiting for it to heat up, he talked about how he disliked using 100% beeswax for burnishing because it can be kind of tacky afterwards. He found a 90% beeswax, 10% paraffin mix that gave a smoother less tacky look. I can't seem to locate such a mixture and I'd prefer to buy and not try to mix it myself. Here was the video and the mini-iron he reviews. Thanks, Neil
-
Top Coat for Baseball Glove leather? (on coasters)
NeilMott replied to NeilMott's topic in How Do I Do That?
Hey all. A long overdue update on my coasters. Here are a few of them, mostly what was above, but now they're treated with 2 coasts of 50/50 Resolene & water and stitched. I sent some others to a friend who's be "field testing" them and the top coat is holding up well. I haven't been conditioning the new ones I've made. I honestly forgot... the top coat, adding the sheen, does reduce the feel you'd get from the leather. As far as applying the Resolene, I'm using two daubers, one to apply the coat liberally, then a second to mop up what hasn't soaked in after about a minute (basically any areas that are pooling). Also, I made way too much of the resolene mix, but have been keeping it in a sealed Gladware container. Any issue with long term storage? I'm at about a month now. Neil
-
Top Coat for Baseball Glove leather? (on coasters)
NeilMott replied to NeilMott's topic in How Do I Do That?
for conditioners, I have Bicks 4 and Dr Jackson's hide rejuvenator... The Dr Jackson's will darken it, but not the Bicks. I've got daubers for the resolene... -
Top Coat for Baseball Glove leather? (on coasters)
NeilMott replied to NeilMott's topic in How Do I Do That?
ah this is good advice!! I bought Resolene for the project, so I'll go with that. Agreed that a little darkening will help bring out the colors a bit and the lettering. Should I use a sponge to apply the 50/50 resolene? If so, will a regular sponge like I use for dishes work? Side note, I realized that I also have the web from the gloves, which will be great for this type of project. I had been saving them, not knowing how to use them. Best, Neil -
Top Coat for Baseball Glove leather? (on coasters)
NeilMott replied to NeilMott's topic in How Do I Do That?
Well, if anyone ever sees this, this is how they turned out. I decided to not put any top coat on them... I figured the baseball leather would soak up some condensation, but it wouldn't affect the overall aesthetic. It's used leather anyway.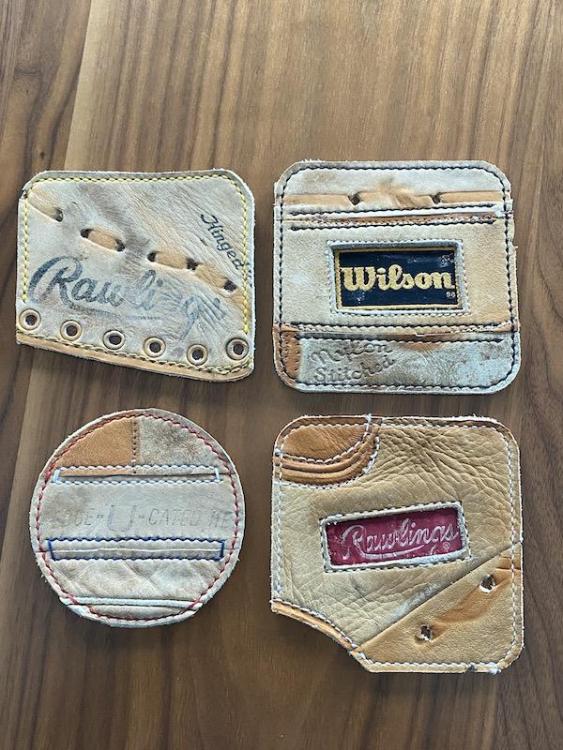
-
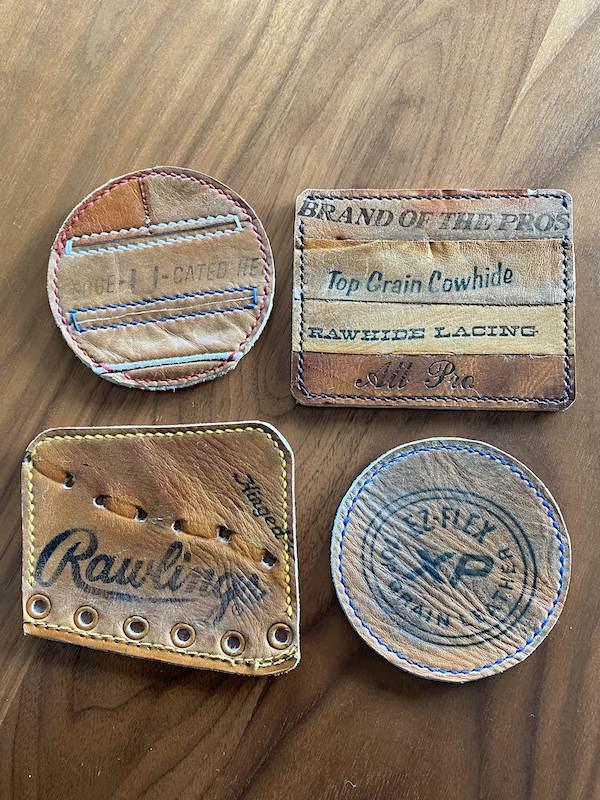
Hey everyone. I mostly make watch straps using baseball gloves. I tend to use the inner part of the glove and the fingers are mostly waste... Part of what I like about using a glove that was otherwise sitting in someones basement, is the up-cycling aspect. On my way back from a road trip, I thought of using the fingers and some of the extra patches I have for coasters. One of the ways to I thought of would be to use extra patches (Wilson or Rawlings), in an inset type of way along with some more standard, stitching the finger pieces together. The glove parts will go on top of some old leather that's pretty firm for the base. I'll glue the leather pieces on and then stitch. *circle leather cutter is in my amazon cart* Being a coaster, I figure it'd be best to have some water protection on them, but I don't want to change the color of the leather. I think the wear and patina the glove has accrued over the years should been left alone. I've searched around and most of the threads here about top coats is to use Resolene in a 50/50 mix with water. I also saw on a Weaver Leather video a spray on top coat called Saddle Lac. The ladder seems really quick, but for me, most importantly, it leaves only a little sheen and almost no change in color. If I went with the Saddle Lac, I was thinking I'd apply the top coat before any stitching, as it's a lacquer based top coat. I'd typically use waxed Tiger thread. What do you think? Am I thinking about this the right away? Anything else to consider? Best, Neil
-
Hey all. Bumping an old thread to see if anyone has or can make non-tapered templates for me... I'm looking for 20mm, 22mm, 24mm and 26mm non-tapered watch strap templates/patterns. In a pinch, the 26mm and 22mm are more in need now. If they are in "svg" format, a friend of mine can cut them out on his glowforge. I tried messaging tboyce, but he's not receiving messages now.... Thanks! Neil
-
Advice needed for working with Lin Cable (linen thread)
NeilMott replied to NeilMott's topic in Sewing Leather
That's really cool. More and more I'm doing some minimal stitching, so it's great to see it done on two piece watch straps. Here is the stitching all done. I forgot to take a picture of the back. I tied the ends into a double knot then tucked it into the inside near the keeper. I added a dab of Aquilim contact cement as well. Because I'm using 332 Lin Cable (0.77mm) the knot was kinda big. But I don't think it'll be noticeable. I think I could still do the same thing with the polyester bronze thread I ordered, but could seal the thread on the inside with the thread burner I just bought. That'd be nice too.
-
Advice needed for working with Lin Cable (linen thread)
NeilMott replied to NeilMott's topic in Sewing Leather
Wow, a lightbulb just went off!! Thank you! I don't often think about tucking the thread inside the strap like that because 95% of the time, I make regular 2 piece watch straps. I will give it a try tonight and update you. -
Advice needed for working with Lin Cable (linen thread)
NeilMott replied to NeilMott's topic in Sewing Leather
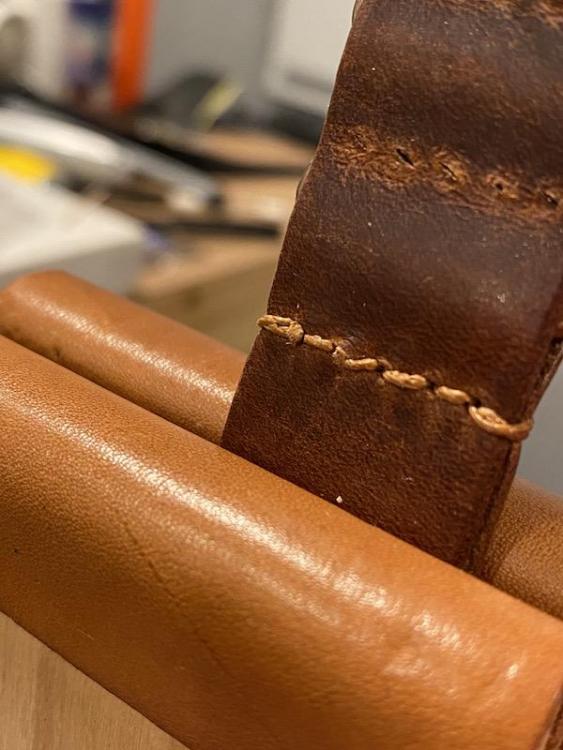
So, here's what I did on this nato strap. I backstitched and pulled the thread through almost all the way. I put a dab of Aquilim (I didn't have any glue or patience to wait a day) in the hole, then pulled the thread through. I then snipped the thread. I'd like to have backstitched the hole thing, but I wanted to try to maintain the look of a single thread through most of the middle stitching, as I think it looks better. But on the back, even with a decent set of snippers you have see the ends... People have said to add a dab of glue and kinda push them back in, but it seems like I'd be pushing the thread out the other side, or make it loose...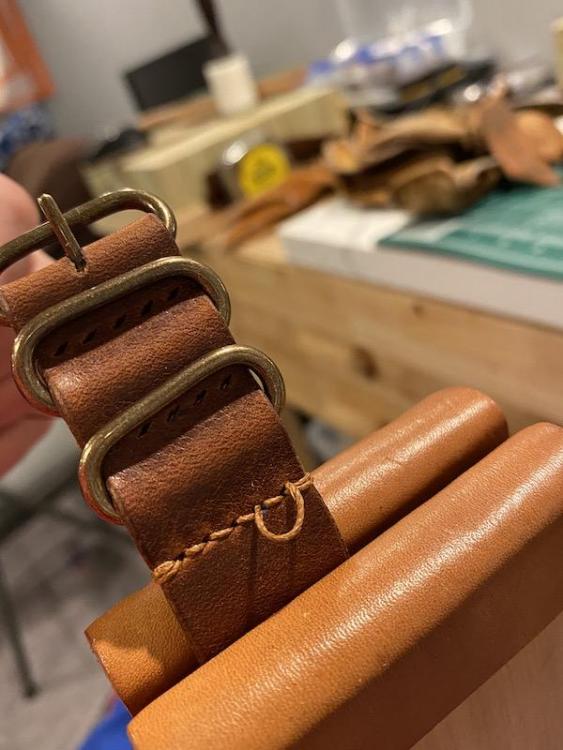
-
Advice needed for working with Lin Cable (linen thread)
NeilMott replied to NeilMott's topic in Sewing Leather
Great tips everyone. I use Aquilim 315 which is a white contact cement, but I shouldn't use that right? What would be the disadvantage of using that? It's a contact cement, but it does have some give if you don't let it tack up first. If not, I'll have to track down some white glue. Best, Neil -
Advice needed for working with Lin Cable (linen thread)
NeilMott replied to NeilMott's topic in Sewing Leather
Hey everyone. Thank you so much for the input. I just stitched a very small amount on a nato watch strap and like my other strap, I trim the thread after backstitching but I just don't like that I can't seal the thread. I do back stitch using Tiger as well, but prefer to seal the thread and I think it's also a cleaner look. Even if I trim the linen thread close it still sticks out a hair. I'd rather not put glue on it, but it seems I must. I did find some polyester thread from Fine Leatherworking that is bronze. It's not waxed but I can do that, and it'll seal when I'm done. I may go that route. I just hate buying the wrong product... but so goes this "hobby"! Best, Neil -
Advice needed for working with Lin Cable (linen thread)
NeilMott replied to NeilMott's topic in Sewing Leather
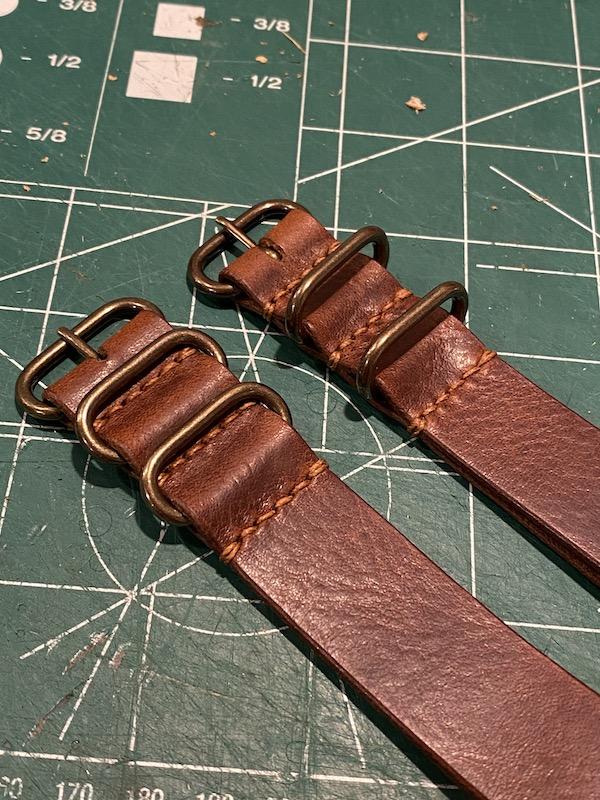
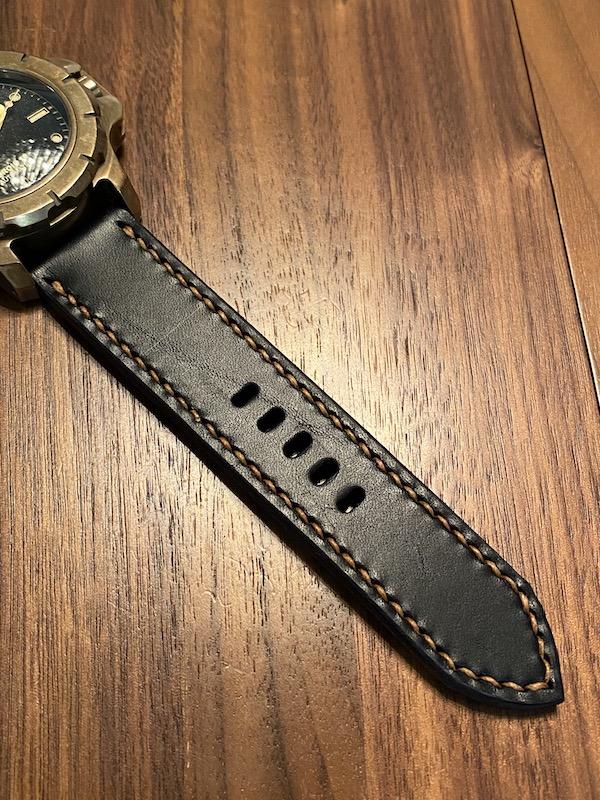
Hey Zulu. I appreciate the in-depth reply! Lin Cable does say it's waxed but just not a lot. I was waxing it and trying to smooth it, to thread the 002 needles I was using. It did help a lot. When I was stitching I noticed a tiny bit of fraying, but not a lot. I meant to post pics of the watch strap I made and will do so here. I usually backstitch one stitch, then singe the thread on the other side. I guess if I keep using this linen thread, I will try to backstitch further. I'm using 3.85mm Crimson Hide Japanese style stitching irons and find 0.8mm Tiger thread to be about right. I've used 0.6mm Tiger and that usually looks good too. I haven't tried the Twist thread b/c it's smaller than I usually like. I have also thought about using the Galaces thread, which another strap maker friend uses. Here is my US ebay source: https://www.ebay.com/itm/150D-0-8mm-284Yards-36-color-Flat-Waxed-Thread-Leather-Hand-Sewing-Stiching-Cord/183534785162?_trkparms=ispr%3D1&hash=item2abb86928a:g:T54AAOSwUu5b9Ny0&enc=AQAFAAACcBaobrjLl8XobRIiIML1V4Imu%2Fn%2BzU5L90Z278x5ickk8Fd9si%2FIbtWQr%2BhnlRwjDdLGsyQ2ZRBHbqdBxVTpgjMASe%2FwZX6HU3fZYwFNX9MJwtDtTvpaQn5zUHBV%2BbjiQvesTrw7p2g1x3XdNndTEZM5CNDb0DIkM2DplkyaNVX69XENq8BGeQu0iQTsNuM9L33WlpsvWhL8K%2F062%2FYyv%2FRNdFvssZ4bis%2BRpHunCzUG18YlvzV9ZTJwt3oBZiLDNVCQQrTOlPAvo2VtFrbW65FxRuHcarSVoNU6AWTGWyogYPbS3smJakAm7L4sHQkZSHfzcZyZsrPlm%2Fm6kCe7MqPc2hm3Zg6bhEr01su90Vq0UQMAC8bHv8cz7SXGzo%2BN4gKZYAUhE8a10ZjzJfWG5Xf3jrjmGC9Wb16HVQu1WAMEjqcysiGKVj3tY%2B8Hz%2Bl3Jh5KRxG6TQQwbY%2Fldtr7AnKvM9rw0hYLpWTcZeFGkQmiGmK2iBYyTlE1QLcwNCZium2kTiiQuRsd3zbUylJlixw7kPraAvANisbp8g3vqQ1wBgtv2Q0K4ypbKwtg2bZV7h%2FLzMfuWonwIQ4oO6RLiLMyOhGze58QmRyY0c4PtO5wgsFw66FxDZl%2BWsG6MSPRFw4uYgE6apbUHN0hKz%2BbZHVboixrmsK3eBmF%2B0llg12zL20FVtH4R5YHMbVPkfOamQRjSEtUlpdVzvQ4qQgMRITpQ%2FVpHgKGdn3UYGBurSVr02IDE7YytqXBht3G4yu%2BQWeKcfOoe5a5ZaYNl3r%2FBZW8f267PN5jdAbmmKe2hk%2FacBx9JQ09UMsHVaxsEkUl1Q%3D%3D&checksum=1835347851629e33fb7b73bd4a1dae3d7e9fd91f6134 The caramel and caramel1 look pretty close to bronze... Here's the watch strap: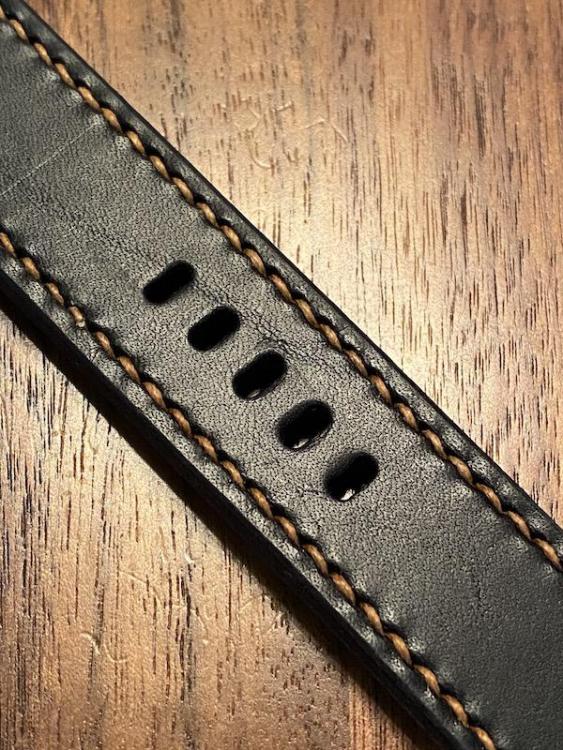

-
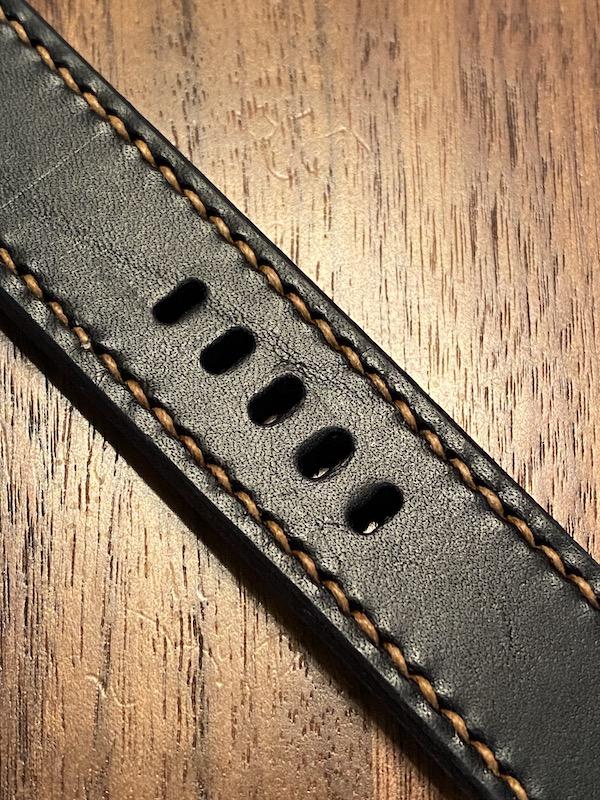
For nearly all my projects, I have been using Tiger thread. Tried Maine but it was way too waxy. I wanted to find a bronze thread and between me being partially colorblind (green/blue which basically messes up how I see a lot of nuanced colors) and a limited selection of threads that are actually called bronze, I bought some 332 (0.77 mm) Lin Cable from RM Leather. My impressions of Lin Cable is that it doesn't feel waxed. So before using it, I ran it over some beeswax twice. It definitely feels like cord....yes, yes, I know it is... just a way different feel in hand than Tiger. First issue I ran into was having to use a bigger needle than I prefer. Even with 0.8mm Tiger thread, I am able to use the smallest John James needle, size 4 (004). I don't think that can be avoided... When I pierce the thread and pull over the eye to create the knot, it can be bulky. One issue is that after stitching the long part of a watch strap, by the end the thread comes apart and I have to re-lock the thread. On one strap, I pierced the thread twice to avoid this, but it was more of a pain when stitching to pull 2 knots through a hole. The other issue I'd like some advice on his burning the ends of the thread once I nip the ends after my strap is stitched. My Bic lighter just wasn't doing it, and I did singe the leather at first. I heated up a nail and used that, but it was awkward to use. I found this thread burner on another post here (can't believe I didn't know these existed before!) and wondered if it'd be good for linen thread: https://www.amazon.com/dp/B07F9KMY2T/?coliid=I1F0NU3H28O3TJ&colid=L1VMVJAQOMGL&psc=1&ref_=lv_ov_lig_dp_it or this https://www.amazon.com/Beadsmith-TZ1400-Thread-Zap-Ultra/dp/B00W234YSW/ref=sr_1_4?dchild=1&keywords=thread+burner&qid=1598198671&sr=8-4 If you have any advice on using Lin Cable (because I do have a good amount of it now!) and how to address the above issues, I'd love to hear it! If you have a source of bronze synthetic thread, that'd be great too. I did see the synthetic non-waxed Supersew bronze thread at Fine Leatherworking, but I wasn't a major fan of that line of thread (I have some similar MBT thread). Best, Neil
-
First watch strap with lining, first time sewing
NeilMott replied to Nikos's topic in Sewing Leather
Hi Nikos. I'd say like others, you're getting some fraying... maybe use synthetic thread. You have a couple times where the needle priority (putting one needle behind the other before passing the 2nd needle through) is mixed up. What I always do is a "cast" I think it's called. I put the 2nd needle in front of the thread, pass through, then wrap the thread over the needle. This creates a knot. This was key for me to always keep the slant on my saddle stitching. I'm probably messing up the terms here, but that's the idea. As far as other ideas, depth of the punch and tension on the thread when tightening will change the slant quite a bit. With time you'll be more consistent with both. I speak from experience for sure! Neil -
new workbench and in need of a stool or chair
NeilMott replied to NeilMott's topic in Leatherwork Conversation
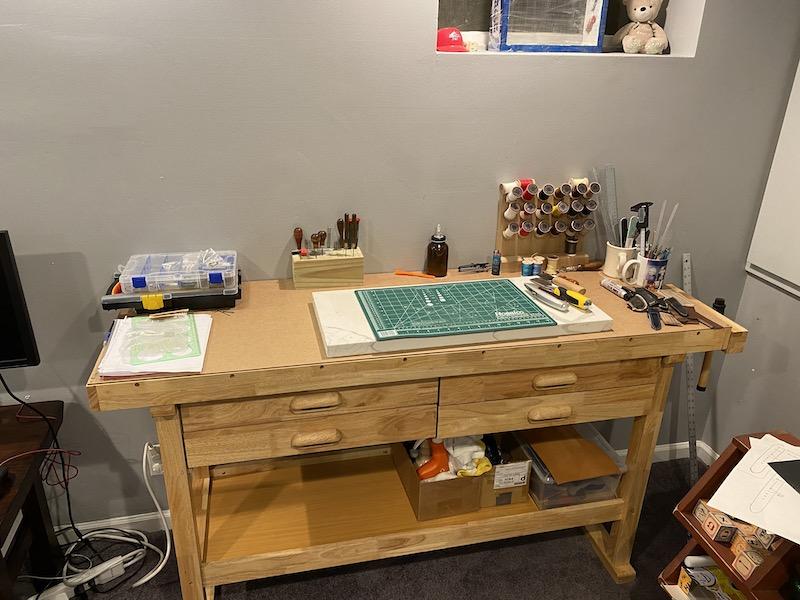
Hey Dan et al. I thought I'd report on the stool/chair that I decided on and my experience so far. Here is the link and a picture of the chair I bought: https://www.amazon.com/gp/product/B002FL3LTE/ref=ppx_yo_dt_b_asin_title_o08_s00?ie=UTF8&psc=1 Pic The chair itself is very comfortable. I'd say that I don't necessarily need the foot rest. There is the bottom shelf on the bench that'd serve that purpose. I would worry about how much pressure to put on that bottom shelf with my feet. My knees to hit the drawers which is a bummer. I think that DanC is right and that at some point I may raise the bench a little bit. I think I shift my body forward and my knees move back so that they aren't right on the drawers. Extending the workspace by adding a length of plywood for instance would also be a good solution. I'm limited in space as is, so that will have to wait. I did work on the bench for about a week before I got the chair and found it was a little bit low to work on for this type of work, and my shoulders (traps) got a little sore. So overall the bench is a good value and fairly well designed. I do think that I'll put together some type of peg board or magnetic strip to hold my tools and a task light to go on top of the bench. The drawers are nice, but not for everyday tools. As for the chair, my only flaw I'd say is that the seat isn't as wide as my old desk chair for when I stitch using the "pony" I have, which is located by the garbage can in the pic. Best, Neil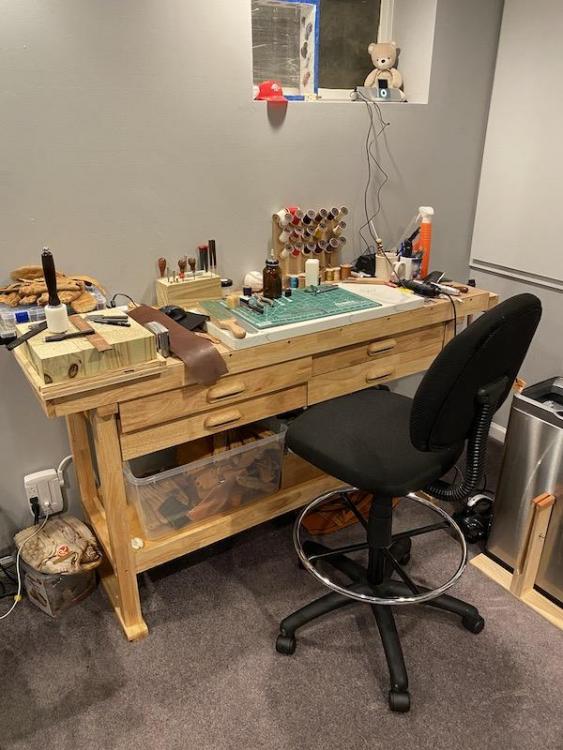
-
new workbench and in need of a stool or chair
NeilMott replied to NeilMott's topic in Leatherwork Conversation
great idea! I think I'm overthinking this... I don't think I need arms on my chair... I just tried a bar stool we have that goes under our countertop and it was a good size. Makes sense I guess that the countertop is 36 inches high, which is just higher than the workbench. I think the one I linked before will be too high. The bottom seating position is about 29 inches... -
Hey all. I just put together the Harbor Freight Winsor Workbench that many have bought here. I put masonite on the top to cover up the holes. Here's a pic of it: The height of the bench is about 34 inches. I was looking at something like this for a suitable chair. I checked all the local thrift shops and nothing is available. https://www.amazon.com/Boss-Office-Products-B16245-BK-Drafting/dp/B004I3ZRQM/ref=sr_1_15?dchild=1&keywords=height+adjustable+chair&qid=1596506663&sr=8-15 Any thoughts on something like this? Neil
-
emailed back yesterday. Sounds like a deal!
-
still available!
-
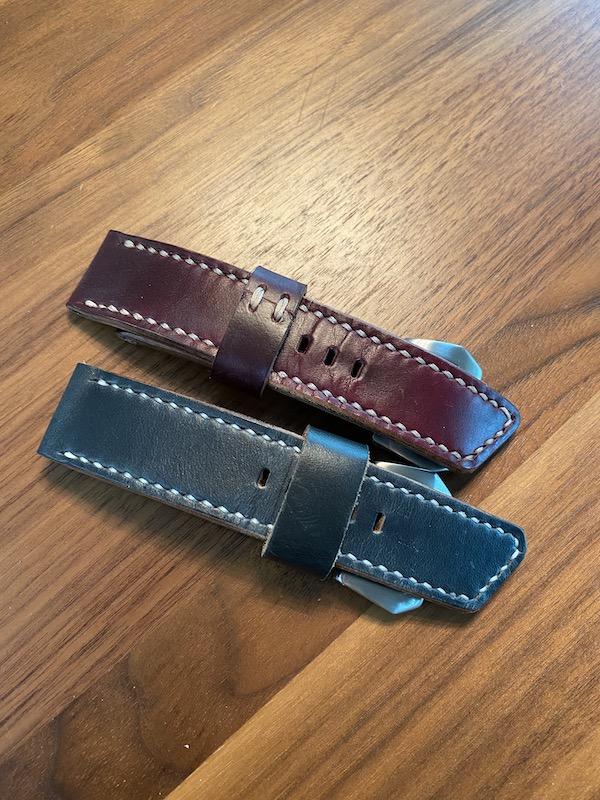
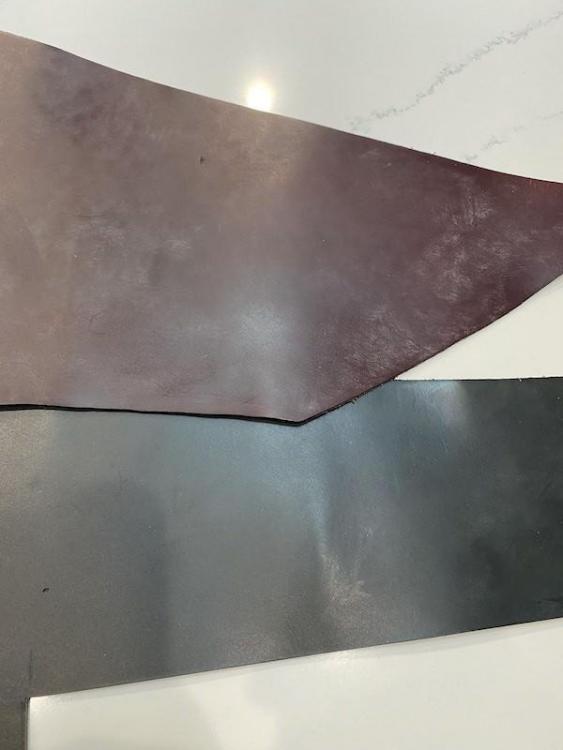
Still available. The Navy blue really looks like a dark charcoal black...
-
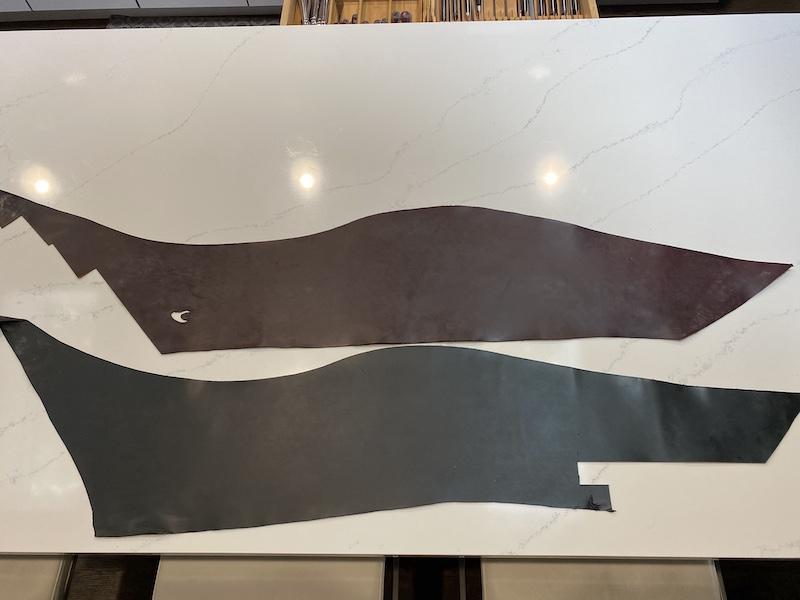
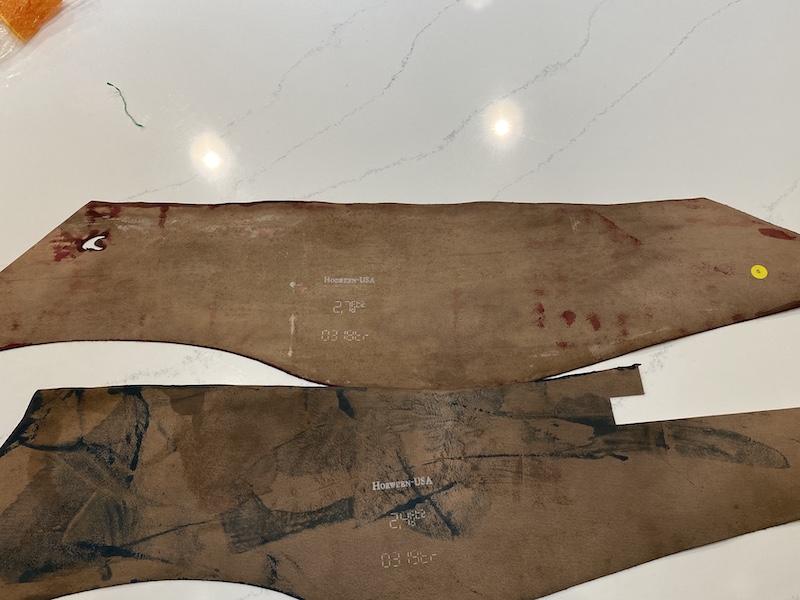
Hey everyone. I'm selling a couple of really nice Horween Horsebutt strips I recently purchased. These are first run Horween Horsebutt Strips (Chromexcel), 5/6 oz thickness. I took a gamble on these, never having used horse leather before. It is REALLY nice to work with. It skives and burnishes well and is a price performer (a good deal ;-D ). The size of these is listed at 2-2.9 square feet. I didn't know a lot about this leather, but Maverick leather sent this to me: The horse butt strips are often referred to as the north of the cordovan cut, as these are the section of the hide that is right next to the shell. Typically the horsefront or shoulder section of the hide is separated from the rear of the hide. The rear contains the strip and the shells. They are both veg tanned together for the first stage of tanning. Then the shells are cut from the strip and further veg tanned, where the strip then goes through its retan tanning process. I used these to make a couple watch straps, as seen below. The temper and quality of these is really really nice - slightly firm but they break in quickly. I actually bought these 2 plus a "natural" strip, which I'm keeping. I'm only selling these as they are a bit darker than I was hoping for. The navy blue is very dark. The colors are hard to tell by the photos, so I'm including pics of the watch straps I made using the leather. Selling both of these together, for $30 shipped in the US. You can message me here or email to nwmott@hotmail.com. I'm also selling a manual leather splitter listed on another thread. In each of the pictures, the burgundy hide is on top. Thanks for your time, Neil

-
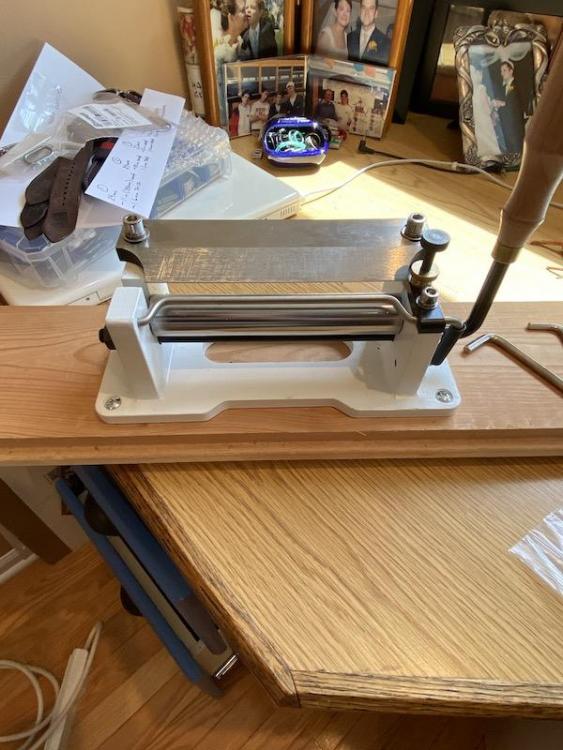
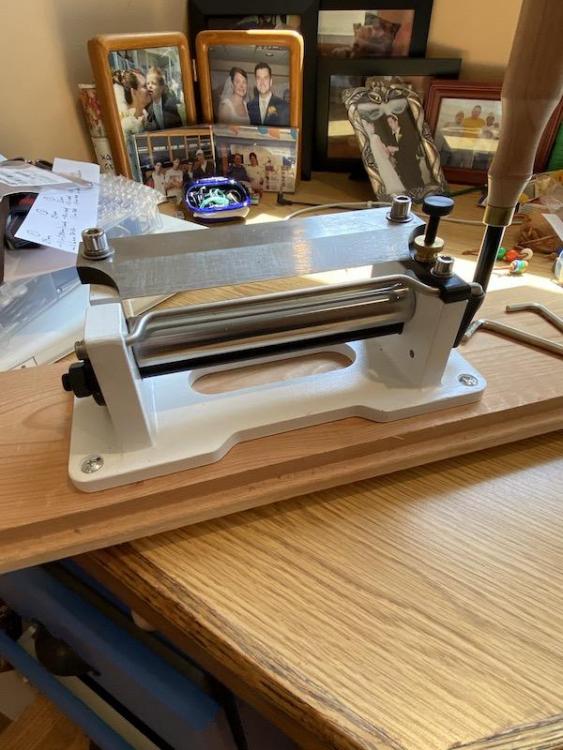
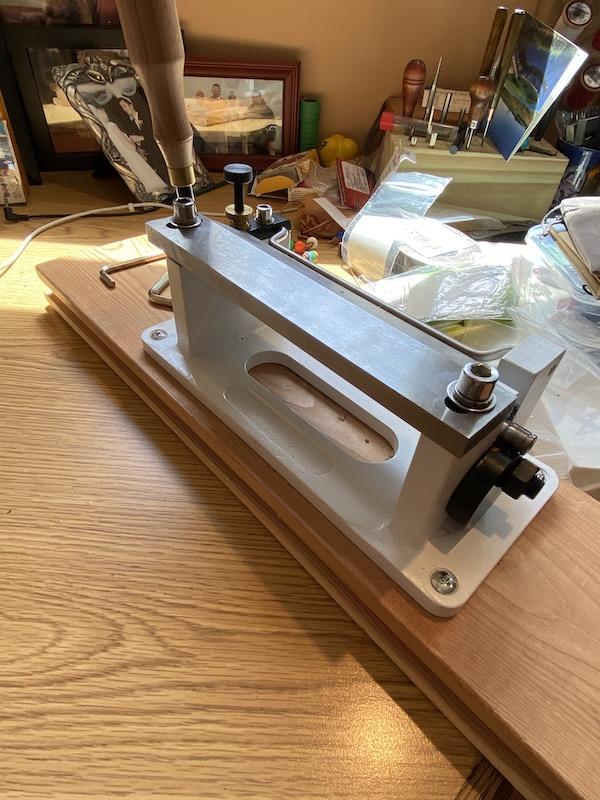
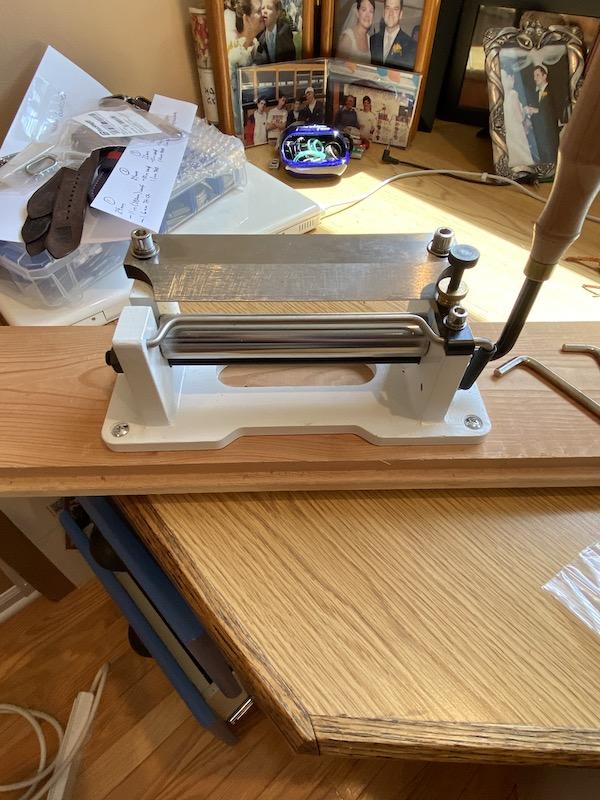
Hey all. I purchased this leather splitter/skiver a while back, but I'm not using it as much as I'd have thought. In truth, I may have used it a dozen times. With my workspace being pretty small, this is mainly a move to reclaim some space. These look like exact copies of the Cowboy leather splitters, so I saved $100+ and bought this one. It works as it should. I sharpened the blade a bit but I don't have any machines that would do a better job of it. As with any knife, it works better when it's scary sharp. I paid around $150 for this one. I'm asking $100 shipped in the US (knowing that shipping will be outrageous). This splitter will come packed up securely with the 4 screws I used to screw it down and the 2 allen drivers pictured. You can message me here or email to nwmott@hotmail.com Thanks for your time, Neil