


KatieG
-
Posts
224 -
Joined
-
Last visited
Content Type
Profiles
Forums
Events
Blogs
Gallery
Store
Everything posted by KatieG
-

What got you started in this hobby/addiction?
KatieG replied to Tac's topic in Leatherwork Conversation
Wow....it's so neat to see how everyone got started!!! What a fantastic thread idea! :-D Well.. February. last year my hubby decided that he wanted a pair of moccasins, and that he would rather make them than buy them. So off we went to Tandy!!! He also had an interest in the traditional leatherworking craft (he likes all the traditional crafts, honestly), and wanted to learn to carve. So I made a little suede bag for my youngest sister, and doodled in a notebook while he played with stuff. And one day I felt like playing, too. Finally got over my fear of screwing up... And I ended up making this: My first one was the little face. ^__^. The round thingy the second, the eye the third. I love it so much!!! I love being able to express myself in this form, and carve in the style that I enjoy! To take something from start to finish like this.... it's an amazing feeling. I love trying to turn the style I love into something unique and different and new....I guess I love the creating, and the sense of pride..and the joy I get when someone else likes my work, too. But that's how I got started: by chance, and a little bit of guts with a pinch of boredom... followed by capital-L Love!!! -
need gray shades???
KatieG replied to Jimbob's topic in Dyes, Antiques, Stains, Glues, Waxes, Finishes and Conditioners.
Another option might be to use a layer or two of a resist over the gray areas. They won't take as much color and turn grayer rather than black. -
Epic trifold wallet
KatieG replied to CarvedOn's topic in Purses, Wallets, Belts and Miscellaneous Pocket Items
Ah, Advent Children, it seems. Not too shabby! I like the detail in the background alot. Overall, good work, but I do see a few spots where I would have done the beveling differently, or taken a pear shader to press down layers in the armors. (Darn anime and game characters, not conforming to the rules of 3d...) The far left is the best of the 3 to me... love the smirk, well done on the expression!! <3 -
Very cool! Albums are indeed totally useful. You could do a celtic knot pattern in like seashells or something...like the love knot.
-
Well, I just got married in October sooooo... I would have loved to have gotten a specialized wedding album. (Granted, we got some very nice presents, but we are also big fans of homemade gifts; most of ours were store-bought or money - not like we're complaining...) I don't find handmade items tacky or inappropriate - I think that someone who takes the time to find out about the couple - how they met, first date, things they like, etc - and use that and their skills to create them something beautiful is touching and worth more than all the money in the world. (My hubby's aunt made us a crocheted blanket. Simple in design, but he is ecstatic over it! Loves it to death. And I've made off with it too!!) I've never been a big fan of the traditional, but for a wedding, it is kind of apropos. Are they getting married at a special venue? Any colors or patterns they like? Something unique about them you can add to make it extra-special? Or if not a photo album.. what are their interests? Maybe they like to play cards together... make a carrying case for a deck or two. Maybe it's golf - make them a scorepad keeper! I don't know the couple so I can't really say. It'd even be really neat if you could sneakily collect photos of the bride and groom as kids, teens, adults.... dating, etc... (from parents or friends) and fill the first part of the album of those (Heck, digital copies can be easily made or reprinted -or resized, edited, cropped, etc- so you could return the originals!), leaving the rest free for their new life together. Actually I kind of like that last idea. Darn it, now my friends need to get married!!!
-
Which finish do you use with acrylic paints?
KatieG replied to Wolle's topic in Leatherwork Conversation
I usually have a semi-steady hand, so I wait a few days or hours (depending on project size/how much paint) then go over with A. a spray sealer, or B. I brush on a liquid sealer. Usually I go for the liquid if I am using a wash.. sometimes a spray will leave spottles. Or I'll liquid then spray. I've used the Super Shene, Master Shine, and Leather Sheen, all work really well, depending on the type of finish you like. -
TIP FOR: Where to strop swivel knife.
KatieG replied to craftsman827's topic in Leatherwork Conversation
Oooh, I didn't think about a greeting card :-D I've been using a wood block with a leather scrap glued on one side, and some poundo board on the other. (So I can insert it into smaller places for poking holes without damaging the other side, works really nice.)... and while the rouge doesnt usually come off, the times it does is frustrating. A card! Think I may have some card stock layin' around.. Thank you -
Oh, I have a neat idea. Well, it's not mine originally but.... Saw someone on a craft site turn old cowboy boots into cute little purses. I imagine the same principle could be applied to the holsters. Purses should have a market, and something as unique and creative as "repurposed" holsters would be very cool!!
-
I think that bubbles would be a neat idea... maybe some gently sculpted "wave lines" with your modeling tool. I like the idea of seaweed, too, though... Even that fluffy backgrounder (it's used for trees and clouds) would be kind of neat, not quite so much dead space...Or, heck, that could be used to make coral. But so far, so good! ^__^.
-
I've seen that happen once or twice on perfectly good hides.. nothing quite that large though.... I'm thinking it might be the tanning as well. Try soaking it, not sponging it, to case it. Yanno, til the bubbles stop. (I've managed to dunk some oil-tanned before to make it wet enough to carve... soaking helps, in that case. If there's a way in, the water will find it. If it's too wet, well, wait a few minutes.) I disagree that it should "be replaced" - one part is no big deal. Heck, that water pattern looks really neat! Just dyed and made into a cover or something similar would look wonderfully distressed. I don't think I've used a sponge more than once or twice.. always been a good dunk or a spray bottle... so I can't comment on that to save my life. ^__^.
-
Watercolor Leather
KatieG replied to KatieG's topic in Purses, Wallets, Belts and Miscellaneous Pocket Items
Well, for the watercolors, I'm actually just washing out the EcoFlo paints from Tandy, since they are already water-based. I have items that I've used them on that are over a year old and are still holding true. Im still coloring with them as if they were watercolors, and using the techniques used in watercolor paintings. (I think I was just redundant there, I'm sorry.) And, of course, sealing helps. Probably should have mentioned to start which paints I was using, but since people seem to prefer to pooh-pooh Tandy's stuff, I kept quiet about it. I'd rather be judged on my work and not my supplies. -
Watercolor Leather
KatieG replied to KatieG's topic in Purses, Wallets, Belts and Miscellaneous Pocket Items
Thank you very much. -
Sublime work! Love it, it looks amazing.
-
Watercolor Leather
KatieG replied to KatieG's topic in Purses, Wallets, Belts and Miscellaneous Pocket Items
Actually my method has been to use Leather Sheen to seal to seal the color, then I can color over it with a perfect resist. ^_~. -
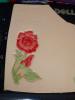
Messed up flap for a hip purse so I decided to use it for color test. I really love playing with washes and gradients in color... and this tutorial ( [link] ) on DeviantArt really inspired me. Rose by Al Stohlman, flair in carving by me... I'm not traditional, I'm not realistic.. so I'm trying to combine my style... with existing designs, until I get used to how more realistic things work. Rose: several wash layers of red and water. Towards the end I mixed in some purple. Stem and Leaves: several washes of various mixes of green, yellow, and light brown. I don't know the ratio, I go by looks. I went in variants of layers to get depth. I used white as a highlight, like light or dew... I love how this works, and can't wait to run amuck with it some more!!! <3 Left to go: Spray seal of leather sheen then an antique with Sheridan Brown Work time: about 2.25hours. ^,^.v Hope you like it!! <3
-
How to keep big tools from bouncing on thin leather
KatieG replied to azrider's topic in How Do I Do That?
I regularly use 2-4 leather (since spring last year, actually, used 2-3 until this past 2 months, and only used thicker leather once recently), with a tandy slab with poundo board glued to the underside. I've got a 1lb mallet, if it matters. As for work surface, I've used carpet, big wooden desk, little wimpy desk (not wood not metal.. something woodish that stays still long enough lol), massive wooden table with MORE poundo on it, my lap....All on carpet floors. (if that's all important. if not... *shrugs*) For tooling, I press down a bit more and walk in small sections... when it comes to pear shading I substitue a modeling tool.. or forego the mallet entirely and press-n-rub. It still works very well. ^__^. (And is faster than tool...tool...tool....) For stamping, I hold it down and hit it. I don't know how hard you hit, but my OCD self goes for 4-7 whacks depending on how hard I'm hitting. I tend to tool like a caffeinated butterfly - light and quick. If I'm showing someone else.. well then it's 2 firm hits. I tend to get good depth and color without going through the leather. Don't hold it loose, nor too firm. Too firm I run the risk of marking the leather and then moving it slightly without realizing it, or it becomes uneven. (Like tilting to one side or the other.) Too loose, I run the risk of it bouncing. Just practice until you find a good hold. It's different on thinner leather than on thicker. Hold it about as firmly as you would a pen or pencil when writing normally, not in caps or cursive....if that makes sense. If it's the spreading that's the problem... tape. Packing tape makes it sticky when you peel it off, go with scotch tape. If you don't mind trying to make it un-sticky, packing tape will have a better hold. For water content... when it looks dry and feels cool is PERFECT!!! Oh and the edges dry faster in a way guaranteed to drive you batty. I've got an ongoing practice piece at the moment where I'm working on the edges.. the middle is soaked but the edges dry out insanely quick. So work from the outside in if possible. If this helped, hurrah.. if not then I am sorry!!! best of luck, thin leather is so much fun to work with <3 -
Pricing is something that I worry about as well. I tend to have a niche - not many folks out there do my style in actual leather....but in order to sell to get a rep, I have to pack it all up and truck it to anime or scifi or comic conventions... which means affording travel, hotel, and table space. Haven't gone to a con yet, I'm a ruddy coward. So far the only prices I have figured out are keyfobs ($5-15 depending on design...15 being ridiculously designed), and simple small flasks (simple anime/manga symbols. talking about 25-30 per flask. huzzah.) As for time... I have no idea what my time is worth. To me, leatherworking is fun. Do I generally know how much time I spend on a project? Yes. My current piece, painting time for just the girl before the background is 4 hours. I wouldn't charge for drying times, since I can pick up another project and start or continue on it while the other piece dries (what am I, a lawyer?) or do something else (hey, we have to eat, too.). I know I can carve out a quick manga-style piece of 2in x 3in in about 15 minutes, but that's the more simplistic shonen-type manga versus the more detailed shoujo-type manga. The most I made working-working is like $8/hour. So what is my time worth? What is my husband's time worth, since he does the majority of the stitching and lacing for me? What are materials worth? When I'm paying almost $8 a square foot for the hide (I am in love love love with it.), and he's enamored of kangaroo lace for most projects.... that's kind of expensive. At the moment we are going to be doing a tote bag for $100, so... here's to hoping that's fair, the client seems to think so. My husband and I did a belt for $20 - the client said we undercharged... it was a simple black belt with the guy's current buckle. Really not difficult. (But it turn out awfully well for a simple thing. ^_^.) So I'm with you guys; figuring out what to charge isn't easy. Oh, and then there's trade....Like a bracer for beeswax. A dog collar for handmade soap. Seriously, pricing is hard.. but I do like that suggestion - make em wince but go for the money. We just set up an etsy account, so yeah. Here's to hopin'. Maybe this fall we'll get out to a con. Sorry for rambling. >,<.
-
Well.... Once we register a fictitious name, we will be Fuzzy Monkey Leatherworks. (we being my husband and I) Why? Well.. we have 7 of Webkinz's Cheeky Monkeys (well 6 monkeys, one bear who wants to be a monkey lol)..that are hilarious and adorable all at once. They keep popping up in random places with us, becoming a running joke. (Got one for him as a silly, we've acquired more.... etc etc.) Otherwise, I sign my carving as HM... My high school nickname was Honoo Moeru - meaning "burning flames" according to the friend who dubbed me Mo, due to my wanting red hair and I had a bad temper when people would mock my friends (I've always been a little weird)....and I'm Irish. BUt whatever. But it became a big part of me and who I am, heck the inside of my class ring says HM while the outside says "Katie".... so I've kept HM as a signature - it won't change, even though I'm married. Using it for art since High School and beyond!!! Okay that's random. *Wander off*
-
Wow that does look really nice!! How big are they, may I ask? Never seen a square tool before lol
-
Prairie States Leather Guild Spring Show Pics
KatieG replied to Johanna's topic in Special Events, Contests and Classes
Yay I saw my stuff!!! rofl That's great you posted the pics! I wasn't able to go, so I'm glad I could see pictures ^__^. Here's to hoping to make it to the fall show, eh? It looked like a lot of fun. -
Have you tried a hi-lite, if the antique or Tom's method don't give you quite the hue you're looking for?
-
Best Resist Ever :)
KatieG replied to KatieG's topic in Dyes, Antiques, Stains, Glues, Waxes, Finishes and Conditioners.
Well... I made a chart to show you what I mean, and I took pictures to boot! I kind of stamped it and colored it quickly, so the stamp's not as pretty as I would like it to be, and the color's a little streaky. I did all-in-one, dye, antique, and hi-lite here, showing how block out (1 coat), a wash, and white resist after being sprayed with Leather Sheen... I wiped it off 1/2 of each with water to show how THAT effects it to boot.. obviously if you want to just gently wipe off the paint with water, that's awesome. (I usually just do that lol). So! Here we go... Sorry, the images are big... apparently I FAIL at resizing.... If it matters, I did a Sheridan Brown antique gel mixed with a little bit of tan-kote, Chestnut Tan Hi-Light, Fudge Brown All-In-One Stain, and Evening Blue dye. -
Well... hope this is the right spot for this...and I don't know if other folks knew about it, so I'll share. I tend to do a good bit of color on pieces, including a lot of washes (which I am trying to improve ^^.; ). However, I also want to be able to hi-lite, stain, antique, or w/e over it. So I've tried Super Shene. I've tried Satin Shene. I've tried Block Out. I've tried Tan-Kote. I have tried all of these in varying layers of resist. Against various mediums. And almost every time, I have been sorely disappointed. It's disheartening to see hours of careful painting destroyed in a few swipes of color. *sob* (even through 7 layers of resist...) For some reason, I wanted to know if I could color through a seal like Master Shine or Leather Sheen. I figured Master Shine most likely not... But Matt at Tandy was talking with me about it, and actually set up the first test piece for me of Leather Sheen over color (used a red and also a white)... followed by a Sheridan Brown antique. Wanna know what? It's perfect. You have time to paint it all. Seal it with the spray (let it dry of course!!). Come back with your over color.... and still gently, lightly, take a damp papertowel or q-tip (w/e size you need) to remove the color. The white STAYS white. The washes stick. And, of course, the non-painted parts of the piece pick up that luscious color.To keep a non-painted part leather-colored, use block out. One coat with the paint, spray to seal, then do your color. I have so far tried it with two different antique gels, dye (need to be a teeny bit quicker with the water on the white, however.), all-in-one stain, and hi-lite. I am the happiest camper in the WHOLE WIDE WORLD!!!! *insert massive amounts of joy here* I'm going to make up some samples of the resists...Probably Wed or Thurs this week, and I'll try to take great pictures so I can share!!! Hope this helps anyone out there!!! ~Katie
-
Hello and welcome! Nice to see ya on here.
-
Hello, and welcome!!
