


ButtonLady
-
Posts
147 -
Joined
-
Last visited
Content Type
Profiles
Forums
Events
Blogs
Gallery
Store
Everything posted by ButtonLady
-
Machine dies for spots: top or bottom loading?
ButtonLady replied to ButtonLady's topic in Leatherwork Conversation
A machinist had to explain this concept to me. I iz dumb... -
Machine dies for spots: top or bottom loading?
ButtonLady replied to ButtonLady's topic in Leatherwork Conversation
I am seriously geeking out here... THANK YOU! Technically, we are an Osborne distributor, but very honored to be working with them to develop adapters for their machine. We're also working with SX Industries to develop our own line of dies (including spot). Leatherwork is still a little new for me; I'm a lot more comfortable with the button side of things! I took a look at the post you mentioned. I can certainly bring your suggestions to them. Yay! My mad patent searching skillz are up to the task. Allstarco sells a bottom loading spot die. Its advantages are (1) rhinestones + settings don't need to be pre-assembled; and (2) your fingertips don't get sore. This style appears to be the exception, with top loading dies being preferred (sore fingers notwithstanding). Ah... another one of those things that makes perfect sense that never occurred to me. Thanks! Dies I currently use, in various capacities, are all turned. I'm not sure what a screw machine is, or maybe I do and didn't know the name (?) -
Machine dies for spots: top or bottom loading?
ButtonLady replied to ButtonLady's topic in Leatherwork Conversation
Thanks so much, ryano! This is really helpful information. We're developing a spot die that fits Osborne machines, which was originally designed for making fabric-covered buttons. Die will be single loading. I'm trying to figure out whether people prefer top loading to bottom loading (pros and cons above). If I have this right: you can load spots into the top (prongs DOWN)... or into the bottom (prongs UP) but you can pivot the die to the top so that the spots are in the prongs DOWN position (?). That's pretty cool. This might be the 1911 patent (it describes a "rotating bottom plate"): https://patents.google.com/patent/US1041884A/en Okay, seeing the work in front of you when setting by machine is preferable to flipping over the leather. If you're loading spots individually by hand, are sore fingers a problem? —this is my primary concern. -
Machine dies for spots: top or bottom loading?
ButtonLady replied to ButtonLady's topic in Leatherwork Conversation
Thank you for sharing your technique and experience, tsunkasapa. I think I'm most impressed by your specially adapted screwdrivers! I have a lot to think about as I move forward with this project. -
Oops, forgot to mention I used T30 to T69 thread in my Juki 1541. It preferred bonded poly, but handled nylon much better after I loosened the bobbin tension.
-
I have the 1541 (not "S") from when I was sewing slipcovers. It was a new model back then; the safety clutch was not yet available. I used 8 -12 ounce cotton (canvas and twill) almost exclusively (not sure if that would be considered "lighter stuff"). Never had a problem with it. A tension issue turned out to be an overly tight bobbin —easily fixed. If I were still using it, I'd probably switch out the loud clutch motor for a servo.
-
Machine dies for spots: top or bottom loading?
ButtonLady replied to ButtonLady's topic in Leatherwork Conversation
Also clever! I wasn't even thinking about keeping the leather flat while you space the spots. The foam no doubt also prevents prongs from slipping out before they're set. Do you also use a foam block to cushion the spot fronts while you're bending the prongs? —or just a workbench or table? I apologize for all the questions, but this is fascinating and I'm thrilled you can share this information. Thank you! -
Machine dies for spots: top or bottom loading?
ButtonLady replied to ButtonLady's topic in Leatherwork Conversation
That's a clever way to do it. I assumed some spots would work their way loose "in progress" if not set one at a time. Clearly that's not the case. Are you using 2-prong or 4-prong spots? -
Machine dies for spots: top or bottom loading?
ButtonLady replied to ButtonLady's topic in Leatherwork Conversation
tsunkasapa, that is gorgeous work! Your spacing and application is absolutely perfect, and the finished effect is stunning —stitching is nice, too. Do you set spots (nail heads, etc.) with them facing you, or do you have to keep flipping the leather because you're setting them upside-down? -
Machine dies for spots: top or bottom loading?
ButtonLady replied to ButtonLady's topic in Leatherwork Conversation
A spot can also be called a "nailhead" (or "nail head") or "stud" —different names for the same thing! Based on the number of responses I'm getting... I'm guessing people here don't tend to use machine dies for application. Do folks in general prefer setting spots (nail heads, studs, etc.) by hand? -
Need assistance With Grommet Machine Press Dies
ButtonLady replied to OldguardleatherDaddy1990's topic in Getting Started
I'm so glad! Best of luck with your new endeavor. Machine die acquisition can be addictive (hence my extensive collection)... -
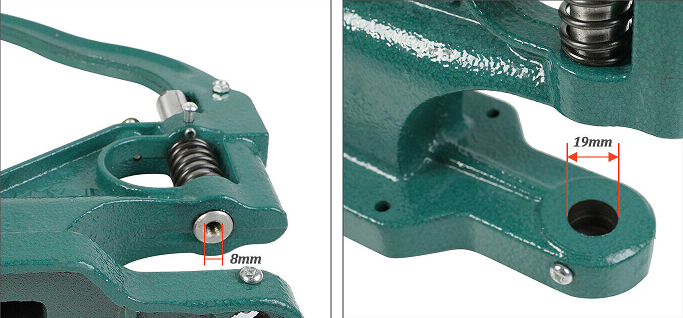
Need assistance With Grommet Machine Press Dies
ButtonLady replied to OldguardleatherDaddy1990's topic in Getting Started
Looks like a M8–19mm machine, meaning top die has 8mm diameter metric screw threads and bottom die shank is 19mm diameter. Get yourself a metric ruler and verify. Assuming my guess is right... this is a very common size. For example, here's a collection of dies on eBay that fit M8–19mm machines: https://www.ebay.com/c/13007373525 (I know absolutely nothing about the quality of the dies, nor the integrity of the seller —this is only an example). Sellers should be able to provide measurements upon request (many include them as part of the listing).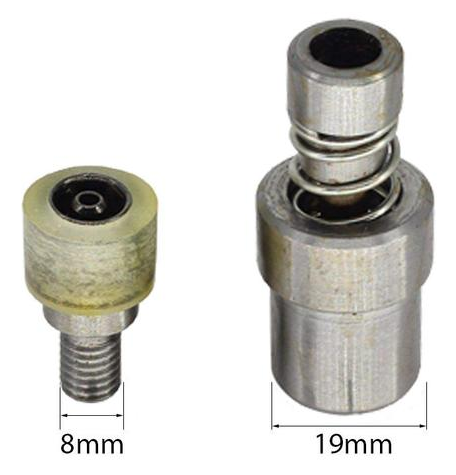
-
Machine dies for spots: top or bottom loading?
ButtonLady replied to ButtonLady's topic in Leatherwork Conversation
So, to clarify my question regarding machine dies for spots: Top Loading vs. Bottom Loading Do people (who set spots with machine dies) have a preference? Does it depend on the application? Help? -
WAWAK is the parent company of Cleaner's Supply. The WAWAK catalog and website might have more of what you need: www.wawak.com They are good people to work with —very helpful and knowledgeable. Not sure about their international shipping rates, but their domestic rates are extremely reasonable.
-
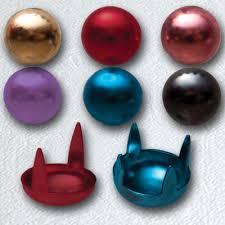
Machine dies for spots: top or bottom loading?
ButtonLady replied to ButtonLady's topic in Leatherwork Conversation
Oops... didn't cite the images. First is from Allstarco; second is from Standard Rivet. -
Machine dies for spots: top or bottom loading?
ButtonLady posted a topic in Leatherwork Conversation
There are two ways to load a spot (rhinestone, round, etc.) into a die. The way you do it depends on your machine and/or die brand: 1. Right side UP into the top die Pro... You can see what you're doing (your work is always visible). Con... Your fingers will be sore after pushing lots of sharp little prongs upwards into the die. Con... Rhinestone spots must be pre-assembled (= convenience, but at a cost). 2. Right side DOWN into the bottom die Pro... Your fingers will thank you. Pro... Rhinestone spots don't need to be pre-assembled (= potential cost reduction), although pre-assembled rhinestones can be used. Con... You need to keep flipping your work. So, before I get any deeper into The World of Spots... which setting method do people tend to prefer? As far as I can tell, the biggest benefit to top loading dies is always having your work in front of you, but does that outweigh the disadvantages? Thoughts and opinions are greatly appreciated!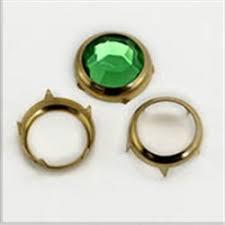
-
Important Customs news for UK/Eu leatherworkers
ButtonLady replied to fredk's topic in Marketing and Advertising
How will this work? I've sold goods to customers in the UK before (over £15 but under £135) and never encountered VAT. I knew it existed but figured it was the customer's problem (?). I read the announcement link, but still don't fully understand. -
I've always had a low opinion of "hammer"-type snap setters (I am a Snap Snob), but wow... that is one ingenious tool. I found a blog post review with some details: https://noonsknives.blogspot.com/2019/04/barry-king-snap-setters.html
-
That actually makes me feel a little better, thanks. I'm discovering limitations I did not anticipate with this project (mostly lack of clearance).
-
Judging by the measurements so kindly provided by @Sonydaze, it is indeed a chunky die. Too tall for a button press with a 3/8" adapter, but nice work with your "new" dedicated machine. It's a difficult job, but someone (something?) has to do it. Can I volunteer? I would like to sit in the corner and do nothing for a while.
-
THANK YOU, Sonydaze! That is a HUGE help! ☺☺☺
-
This is a few months late, but... I have a *huge* favor to ask of Matt S or any other owner of this die: Could you possibly measure the height of the top and bottom dies for me? —not the shanks, just height of the working parts. I'm trying to determine if I can use them in MY non-Weaver press, and whether there would be enough clearance between the dies. The shanks are 3/8" diameter... yes? I have an Osborne machine with prototype 3/8" die adapter.
-
Converting a Handy Jr Button Press to a Snap Press
ButtonLady replied to JJN's topic in Leather Machinery
Forgot to mention... Handy snap dies have been out of production for a very long time. They are very precious; I've never seen an old one for sale on eBay or anywhere else. -
This is even older (!)... but Osborne has one for Line 20 snaps (size 20 snaps will not work in a size 24 snap setter).
-
psst... Check your messages...