


Mulesaw
-
Posts
798 -
Joined
-
Last visited
5 Followers


Recent Profile Visitors


Mulesaw's Achievements
Leatherworker (3/4)
-
 Hi, I have no experience with gold plated items on horse tack, but I would guess that high end gold plates hardware would be plated on top of either high end brass/bronze or stainless steel hardware. So in that term I don't think that a humid environment makes any difference. I would be much more concerned with the abrasions from horse & rider, gold plating is very thin, and gold itself is soft, so it wouldn't take long time for the gold plating to wear off I guess. Especially on pieces such as buckles and D-rings etc. Please show us some pictures of your bridles, 🙂 Brgds Jonas
 -
Here is a link to another Fenda with a lot of pictures 🙂 It does look like that one has had the two arms riding on the top roller. Though I doubt that Rafflenbeul made it like that. My best guess is that the lumps on each of the arms is supposed to pres down into the little depression on top of the upper roller bearing guides (those that sit on top of the springs) So those two lumps should be the same height when you turn the adjustment handle on the top of the yoke. (It could be that if you have had them removed, that you have mixed them up, so the wrong one is on top?) Do you have any parts that look like they would fit in those depressions? Like a small disc for the arms/lumps to press on. That would raise the arms from the roller as far as I can see. If the springs are very hard to compress, you can start by screwing in a longer bolt, or a piece of threaded rod (I guess it is M12), then you put a washer on the threaded rod and a nut. You then tighten the nuts alternately to slowly press the yoke down. Once it is in place, you remove one threaded bar at a time and replace it with the original bolt. Brgds Jonas
-
Dyeing leather
Mulesaw replied to Samalan's topic in Dyes, Antiques, Stains, Glues, Waxes, Finishes and Conditioners.
Nothing like an instruction video that messes up. Incredible that a company don't re-take" the video. Brgds Jonas -
Equipe saddle, repair of worn saddle flap
Mulesaw replied to Mulesaw's topic in Saddle Identification, Restoration & Repair
Thank you for the nice comment, The best part (to me) was when the customer said the same thing, she takes really good care of her equipment, so it is fairly important to her that her equipment is well maintained. and it has to look decent. Brgds Jonas -
Old school Weaver creaser (like a Randall)
Mulesaw replied to ChaChi's topic in Leatherwork Conversation
I don't have a picture of a set up, but if it was up to me, I'd just make sure that there was enough space behind the machine to catch the straps when they have been creased. For electric power, I would try to get an old sewing machine motor with a foot pedal. That would keep both of your hands free to feed the straps. It is a really cool and good looking machine! Another thing, if you can mount the rollers individually, it would be a walk in the park, to hold a scotch brite pad to them to remove the light surface rust - without fearing that it would suddenly squeeze your fingers. The rollers that you don't use often could get a light oiling and be packed away. Brgds Jonas -
Beautiful work! The Conway buckles are indeed a very nice touch. Brgds Jonas
-
Equipe saddle, repair of worn saddle flap
Mulesaw replied to Mulesaw's topic in Saddle Identification, Restoration & Repair
My dedicated leather workshop still isn't finished, so I am still making saddle repairs in the living room 🙂 it is a delicate balancing act to keep that privilege, so I am afraid that bringing in free standing work lights might be stretching the patience of my wife a bit.. So far I either hang the saddle over the back of a chair, or sit with it in my lap. I think that I'll fold a blanket if I have to lay it down on the table, like you said - it can be folded and put away after the job. A good thing about working from the living room is that I can do it in the evening and still be part of family life. My patcher is also inside, and my wife thinks it is a cozy sound when I am using it to replace zippers in riding boots. It is foot powered, so pretty quiet. There is also a steady flow of tea and cake 🙂 Brgds Jonas -
[Intro][EN][FR] Newcomer LF manythings & a mentor in France!
Mulesaw replied to KawaLeForgeron's topic in Member Gallery
Welcome to the forum 🙂 There is a lot of good information to be found here on various leather projects. The best advice I feel I can give- is that many of the "complete tool sets" that are for sale are not of a very good quality, and will often contain things you might not use. Instead buy a couple of individual items and learn to use them, then you can always buy more if there is a specific thing you like/need. A good starting point is: A utility knife. marking wheel, diamond awl, a hole cutter (Lidl has a remarkably good one), a block of cork to act as backing for the diamond awl, some thread, a small pack of leather needles, some beeswax for the thread, a steel rule, a cutting mat. With the tools mentioned above, you can get a lot done. The next things I would get are: A stitching groover, an edge beveler, a skiving knife, sharpening tools for the skiving knife. It all depends on the type of leatherwork you would like to do. If you are going to focus on carving, you need some other tools, but those just mentioned will get you a long way in terms of hand sewing general items. If you plan to use a lot of rivets in your work, you are going to need a hammer and a small anvil too. Brgds Jonas -
Equipe saddle, repair of worn saddle flap
Mulesaw replied to Mulesaw's topic in Saddle Identification, Restoration & Repair
@jcuk Thanks for the nice comment. The only thing stopping me from sitting in the sofa is that that the light is a lot better in the other part of the living room 🙂 I have considered getting a small head lamp though, since no matter how I do it, I always end up with some of the work being done in a shade. Especially when I have to do any stitching on the flaps. That coupled with black thread is sometimes enough to warrant a small break and a cup of tea to sort of reset myself. I have occasionally considered making a padded table where I could lay saddles on while repairing them. But then again, it takes up space, so I am debating if I should make like a padded tablecloth to put on the regular table. That would take up less space. Brgds Jonas -
@Jen the Canuck Another option is to attache the D-ring with an extra strap the will sandwich the breastplate itself. Kind of like a ranger belt. You could make that strap out of some dark brown leather, to make it pop out a bit. Brgds Jonas
-
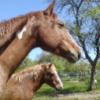
We need someone who is a lot more artistic than me to make a set of outlines of the discs that need to be sawed. If the inside of the individual laminations was sawed out, the completed heads wouldn't be terribly heavy. Brgds Jonas
-
If you took some 1/2" plywood, and laminated a horse head. The laminations should be placed like the head of the horse was split vertically lengthwise. (Terrible description) Each layer is simply glued and tacked to the next layer. Finally you make two ears from some leather and screw them on the top. Sawing out the laminations would probably require a scrollsaw or a small band saw. The first build will probably take a long time since you have to make patterns for all the laminations, but the next ones should be copy-paste and fairly fast to do. This is the best picture I can find to explain what I mean. Your horse head will need to be bigger and more detailed, with an open mouth etc, but the same basic idea. It will be clear to people what it is, but it won't be so detailed that it will take the focus from the head gear that you have on display. I am at sea right now, other wise I would be tempted to make an experiment myself 🙂 Brgds Jonas
-
Equipe saddle, repair of worn saddle flap
Mulesaw replied to Mulesaw's topic in Saddle Identification, Restoration & Repair
Hi Jim, Thanks for the nice comment, and also an interesting suggestion. In theory it shouldn't matter much to me - but in reality, I think it is very interesting. I think I'll try to ask my customer next time I see her, if she knows anything about the former owner. But I kind of doubt it. Otherwise I think she would have said something when we discussed the job. Brgds Jonas -
Equipe saddle, repair of worn saddle flap
Mulesaw replied to Mulesaw's topic in Saddle Identification, Restoration & Repair
Thanks for the very nice comment 🙂 -
If installed properly they can take a lot of beating. You need a special tool to install them. It is like a tapered punch that goes into a tapered hole. At least for very big ones. You could also use some small D-rings for the paracord. On your picture #2, the black stitch on the left (closest to the edge of your bag) - every 2" (give or take), you mount a D-ring. The D-ring can be mounted using either a thin strip of your leather or a strip of webbing. You can get D-rings in many sizes and colours, I would think that a 5/8" D-ring in brass would look good. Something sort of like on this picture: