


TomLine
-
Content Count
47 -
Joined
-
Last visited
Everything posted by TomLine
-
Books On Modern Holster Making?
TomLine replied to DaltonMasterson's topic in Gun Holsters, Rifle Slings and Knife Sheathes
Do a google for John Bianchi. He wrote a good book but it's more historic than technique; and he has dvd's available on making a cowboy holster. There's a lot of technique to making good cowboy stuff. My deal with making modern holsters is stitching. I ended up getting a used press from a friend. It's about a foot tall with a big lever like a slot machine. I mounted a diamond shaped leather stitching punch in it. I mark the lines with one of those wheel things, and then punch it out with the press (leather must be dry). Then stitch by hand. Sewing machines aren't something I want to get into; they're big, complicated, expensive, and I can do a hand stitch that's prettier anyhow. For a holster, cut it, dye it (if desired), then rub neatsfoot oil into it to soak the dye in and remove excess. Then dry it in the sun to get a good tan. Fit the gun with the leather wet, then hit it with atom wax and a soft cloth after it's dry. There's lot of products out there and you don't need but a few. Keep it simple and the final result is much better. Having tried many holster and actually using them, I swear by the Milt Sparks style inside the waist band holster with a slight forward cant. Work the leather wet so the butt of the gun turns inward as much as you can so it won't print on your shirt or jacket that covers it. Since the Sparks style is rough side out mostly, I apply resolene to keep it from getting ratty with use on the rough part and finish the top band and straps prettier with just a little oil to tan it, then wax and buff when it's dry. -
Holster Leather Question
TomLine replied to johnggrg's topic in Gun Holsters, Rifle Slings and Knife Sheathes
Chrome tanning is responsible for many cancer and leukemia deaths. It's takes less time and less labor to chrome tan leather. I've read you can identify chrome tanned leather by burning it and it will produce a green ash. -
Using Un-Dyed Leather ~ Who Does It?
TomLine replied to ShortBBL's topic in Gun Holsters, Rifle Slings and Knife Sheathes
I've tried dyes. I prefer neatsfoot oil sun tanned natural leather or leather that's been dyed in a tannery. -
Goverment 1911 Shoulder Holster
TomLine replied to johnggrg's topic in Gun Holsters, Rifle Slings and Knife Sheathes
Wouldn't go any heavier than 8/9 oz. I used the handsome military shoulder holster design itself for some rigs with different strap configs. The single strap is most comfortable, but of course the strap is visible across your chest. I skipped the retention strap since the holster sits vertical anyhow but I did put a snap in case I wanted to add one later since adding a strap would be quick to accomplish. I built them as a challenge as I find I prefer a nice IWB holster. They fit a surprisingly wide variety of John Browning type guns including the 1911, Hi-Power, and Tokarev. You can reuse your buckles from the knock off holster. It's tempting to make the straps wider, but it actually makes them stiffer and less comfortable. I prefer wearing the one I made with the G.I. width straps. I have a couple real ones; one is really cheap leather, and the other is Latigo I think. It's extremely pliable but way tough. The military had two shoulder designs. The M3 basic single strap is simple and best for use. The other more complex is the M6 with the strap that goes horizontal with snap across your chest. With some fiddling, the M6 straps can be re-arranged so the front chest strap goes under the right arm instead and hooks in the back to make a more police type strap configuration where there's no strap in front. The belt loop isn't used always depending on your build. -
I've made some beautiful shoulder rigs. They look great on TV but don't work in the real world. This is my opinion. I'll stick to it. You left out what kind of gun the holster is for and the size and build of the man it's being made for. Lots more variables in a shoudler rig than a belt rig for sure.
-
Weird Rig For A Weird Gun :)
TomLine replied to Jim March's topic in Gun Holsters, Rifle Slings and Knife Sheathes
I really like your rig. It's rugged looking like the gun. -
Holsters 3,4,5, & 6 (Pic Heavy)
TomLine replied to Sixer's topic in Gun Holsters, Rifle Slings and Knife Sheathes
I've given up on dyes. You can get that same color or better from light coats of neatsfoot oil and laying it in the sun. -
Magazine Pouch
TomLine replied to gregintenn's topic in Gun Holsters, Rifle Slings and Knife Sheathes
I had a friend help me make a mould. The inside is the same dimension as a 1911 mag. The picture is my prototype, not the actual mould but it will give you the basic idea. My mistake was using too heavy a leather in the finished pouch which is why the edges seem a bit fat. I sewed a long strap and snap on the back. It works really good. I painted hot beeswax on the wood after assembly to keep it from soaking up water. I soaked the leather, and pressed it all together in a vice. Be careful if you put plastic inside the mould that it doesn't get a wrinkle in it which will press into the leather. -
Do you want to make pancake style, belt style, inside the waist band style? What?
-
Shoulder holsters are rough to develop. A lot depends on the build of the person and the mass and dimensions of the gun they pack.
-
-
-
-
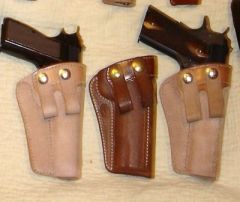
From the album: Pictures
I went more shallow to ride high, and wider than Milt Sparks (center) to keep the grip turned inwards more. I also don't use a stiffener so riding high in the holster keeps the mag release from getting pressed.© © leatherworker.net
-
I know nothing about sewing machines. The cobra looks great, the tippman looks frustrating. What's the difference beween class numbers; class 3 and class 4?? What does price and shipping run on the Cobras?
-
Shoulder Rig that Works!
TomLine replied to TomLine's topic in Gun Holsters, Rifle Slings and Knife Sheathes
Okay, I'll get the picture. Instead of hooking across the chest, you wrap it around behind the back. HEY that picture off the web is ME! -
I have tormented by torbid desire to develop a shoulder holster that works. I hate being gripped under the arms, and I can't have a strap across the chest. I think I finally hit it. It's a model in simplicity too. Based on U.S. Military holsters, I've hit on a rig that goes over the front of the left shoulder, behind the neck, down the front of the right shoulder, then around the back to hook back to the holster. Still a work in progress; the belt strap will either be eliminated entirely, or become very long. The main strap, will be stitched down the entire holster, not just at the top as it holds a lot of tension. Now I left the thing loose and unfitting, but that's become an asset. The holster will fit tons of small automatics, small to medium revolvers, and as big as auto as a hi power. A 1911 is a bit heavy for it. The rig fits a sweet spot that doesn't stick out the back or the front to print against your jacket. The leather is pliable, and there's no need for retention as the sweet spot the holster rides in under the arm keeps everything nice and snug. Figure on taking the main vertical strap all the way down as it's holding most of the tension. This would require shortening the horizontal strap a bit but not much. The belt strap doesn't do much. In fact, if too short, it ends up with your pants adding weight. HEY I just discovered it works well just to carry it like a bag over your shoulder and across the chest; like the old M3 military holster.
-
Where can I get a "US" stamp for military holsters. It looks a negative pattern with an oval around it. Worse case, I can trace one and have a machinist cut one I suppose.
-
I'd recommend trying a Milt Sparks kind of holster. Inside the waist band, rough side out. P.S. your work looks wonderful. Get some vanilla (okay Manila) folders and make your own patterns. If you do a sparks, cut the top just below the magazine release.
-
Is the wire on a military surplus canteen rig the same as on holsters?
-
J-Frame OWB Holster
TomLine replied to JoelR's topic in Gun Holsters, Rifle Slings and Knife Sheathes
I like my J frame holster to be a little deep because the center of gravity is so high on it. A retention strap solves that too. -
Full Custom Wildey gun rig
TomLine replied to DCKNIVES's topic in Gun Holsters, Rifle Slings and Knife Sheathes
This rig is amazing. The inlays. I like the pattern you applied to the retention thong. A little western phen-shey, I'd add a silver tip to the belt. -
Cut a channel for the thread to lay in. First I use a stitch groover to get a nice clean channel. Then I use a overstitch spacer tool mark where the holes go evenly. Then a use a saddler's punch (lacing chisel) to cut nice big fat square holes. They look awful, then close up on their own later. I got tired of bashing the chisel with a hammer, so I stuck the chisel in a press and just sit there and punch the holes pretty quick now. Getting the underneath side of the stitching looking good is the hard part now.
-
cross draw holster question
TomLine replied to figthnbullrider's topic in Gun Holsters, Rifle Slings and Knife Sheathes
Also consider how he uses it. I'd use a cross-draw, but when I sit in the car, it jabs my side or just becomes a pain. -
Come to Cincinnati. I'll pick you up at the airport. Take you out for a 4 way and a cheese coney, then take you back to the airport. I like Louisville. The General Patton museum at Fort Knox is way cool, and the machine gun shoot at Knob Creek is a definite. There's also a lot of whiskey distillery tours in the area. I also like West Virginia. It's like Colorado without the tourists.
-
Somebody asked me to try a Milt Sparks style holster. So I did. They came out pretty good. The 1911 one is still wet in the one picture. I wet moulded twice. First with regular water. Then dried it, then put maybe 10% ammonia in the water to stiffen up the leather. I DID NOT use any metal stiffener in the strap. I used gum trag on the rough side as a last step. I still could use a bit of critique on my edges I think. What turns the union black where the pieces meet??