


SUP
-
Posts
1,291 -
Joined
Content Type
Profiles
Forums
Events
Blogs
Gallery
Store
Everything posted by SUP
-
@DieselTech, i doubt I will be able to fix that knife myself. The others only have their handles come loose. The Rose knife, I will look for a bladesmith. Anyway, I am not touching any of them until I have the proper tools, except for cleaning the tangs and getting out as much rust as I can. Could you tell me where I can get the brass ferrules? I see many sellers but don't know which will be good. The thing is, everywhere I look, there are so many tools needed (that t I don't have), that I am wondering whether it makes more sense to just find a good bladesmith. I will continue to watch videos showing how to replace handles and then decide.
-
Thank you @Wepster. I will look for a bladesmith in my locality. For the Rose knife, I will need someone to repair the handle. The others, I might be able to do, once I get a handle broach. They are unfortunately sold out right now but as soon as it's available from somewhere or the other I'll work on those handles. Meanwhile, I can work to get the rust out and the tangs really clean.
-
I'm so glad to hear that! I'll look for someone here.
-
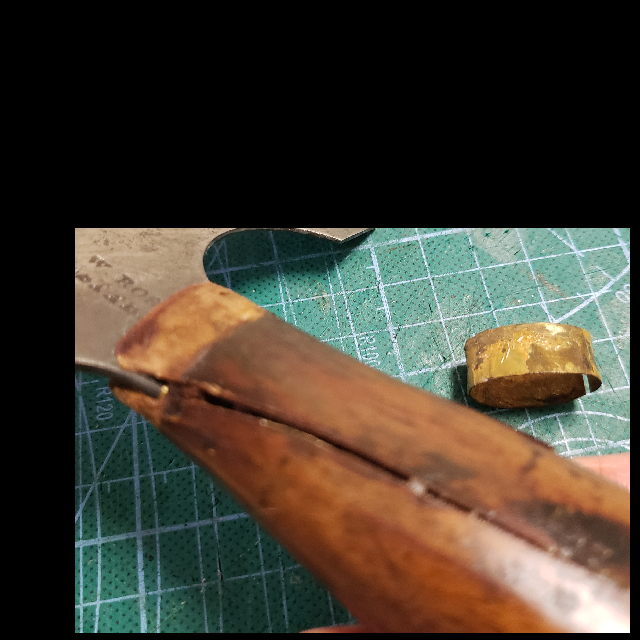
The thing is, the broken handle on the Rose knife is supposed to be original. So I would have liked to save it. Do you think it is possible? Would a bladesmith be able to do it if an amateur like me cannot? The other two handles have just come off and with the broach, I should be able to dig out whatever gunk there is inside and stick the tang back in, hopefully.
-
Okay. I will get a knife handle broach. It is to cut the slot in the wood to fit the tang, am I right? I will probably need to use one multiple times since I have several round knives, all old ones. One or the other is sure to lose its handle. I doubt I will be able to repair all the ferrules. I will clean them thoroughly and decide but at least one needs replacement. .
-
These are 2 of the knives. Now let's see if I can add the other pics. I always have trouble adding more than 2 pics no matter how small the size of the files. Cannot upload any more pics. Will try later or tomorrow.
-
I will. Thank you.
-
Coco bolo is beautiful. I will handle it for a while and see if it has any effects on me. If not, I would love to use it... if I can. Let's see if I can add knife repair skills to my repertoire! LOL
-

Price Comparison: Fiebing's Antique Finish (Paste) 4oz
SUP replied to BigDogPaul1962's topic in Suppliers
Thanks! -
@DieselTech Yes. I'll get the pics ready and put them up here. Will do it within a day or so. Thank you so much all of you..
-
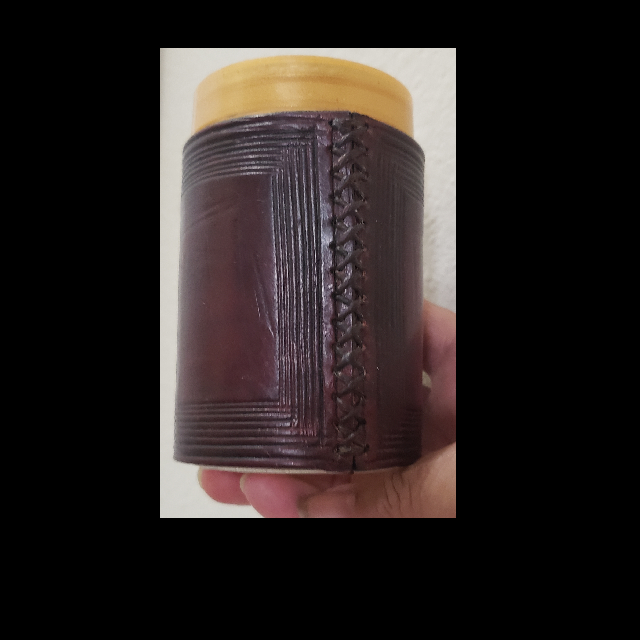
This is my Fruit Fly Trap Coozie - looks so much better than s plastic container with vinegar and dead fruit flies on display!
-
I thought of doing that to an earlier hand-made knife but chickened out. Everything too new for me. Another member here, @AlZilla even gave me some lovely coco bolo wood for it, which is safe. I look at both sideways periodically, trying to get up the courage to do it. But I cannot have that knife and these 3 out of commission. I need to pull up my socks or find someone to put the handles on the knives for me. I just want to be sure that I am not taken for a ride.
-
I'll put up pics this evening. Its Saturday morning - weekly shopping etc. time. I will be able to respond to any comments here at the same time.
-
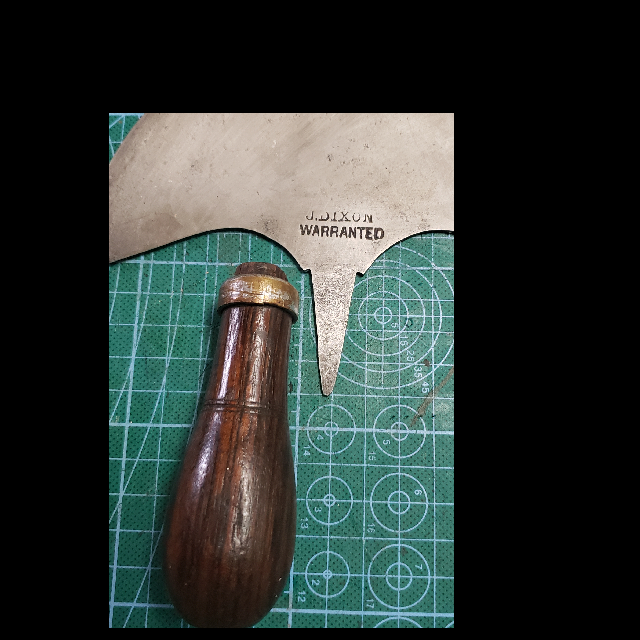
This week, three of my old knives have loosened or cracked handles. I am really miffed about it. The blades are fine. Is there anything that I can do? Or will I need a cutler or bladesmith? One of them, a Henckel, has a beautiful ebony handle that I am loathe to replace. I have cleaned it and kept it aside. I plan to call the company to ask if they have any suggestions. On another, the handle is completely cracked and will need replacement. That is a Rose, probably pre-1916. The third, a Dixon, the handle has come off and can be replaced or the same used, if possible. As much as possible, I like to keep things as is. I've been looking online and see plenty of ready-made handles - no idea of quality or even how to select the appropriate size. Any guidance is much appreciated.
-
Yep. That's the one @Wepster. Has anyone used it and is it any good? That's what I am wondering.
-
That's okay.
-
It is an electrical machine. Is that what you are talking about? The Owden hand held rollers I have as well and like them. It appears Tandy no longer produces these.
-
Where did you find the Owden edge dye roller machine? I can't find it on Amazon. I like Owden products.
-
@fredk I wish we had something like that here. I'm sure most people would not mind the 5% increase in taxes. But the insurance lobbies and their political lackies will not allow it. Now getting out of this topic before people jump on me about it!
-
@Double Daddy thank you.
-
Craftool Pro Edge Dye Roller machine. I might be able to get one but I am wondering if it works well. Does it use a lot of dye? Is it practical for the hobbyist? I would love to hear from people who are using it or have used it.
-
@Double Daddy, this is a good find. These days I find that often, Amazon does not always have the lowest prices. If it is a couple of dollars difference, I consider it a convenience tax! LOL
-
@BigDogPaul1962 that is a really good comparison of prices that you have done. Thank you for sharing that. I usually go to Tractor Supply Co. and did not realize that Walmart is often cheaper. Now, I will not feel comfortable buying anything without making a similar comparison! LOL.
-
@Handstitched everything has its advantages and disadvantages. Free medical treatment, free education etc. all have their downside as well, just like our paid systems here. Nothing is every really free, is it?
-
What @fredk says is so true. Besides, earlier it was just a matter of what people knew in their own locality and shared with each other. Now, we get knowledge from around the world. They undoubtedly use other products as well, do things in other ways. There is so much to learn, so much more to know.