


SUP
-
Posts
1,291 -
Joined
Content Type
Profiles
Forums
Events
Blogs
Gallery
Store
Everything posted by SUP
-
Exactly!
-
Yes, all the boots are so beautiful! I can only imagine the work that went into making them. You cannot put a value to such art. I am delighted with the books. They have so much information on saddlery in one and boots and boot making and makers in the other, with gorgeous photographs. I might not make boots or saddles but I can certainly appreciate and admire talent and these artists have it in spades.
-
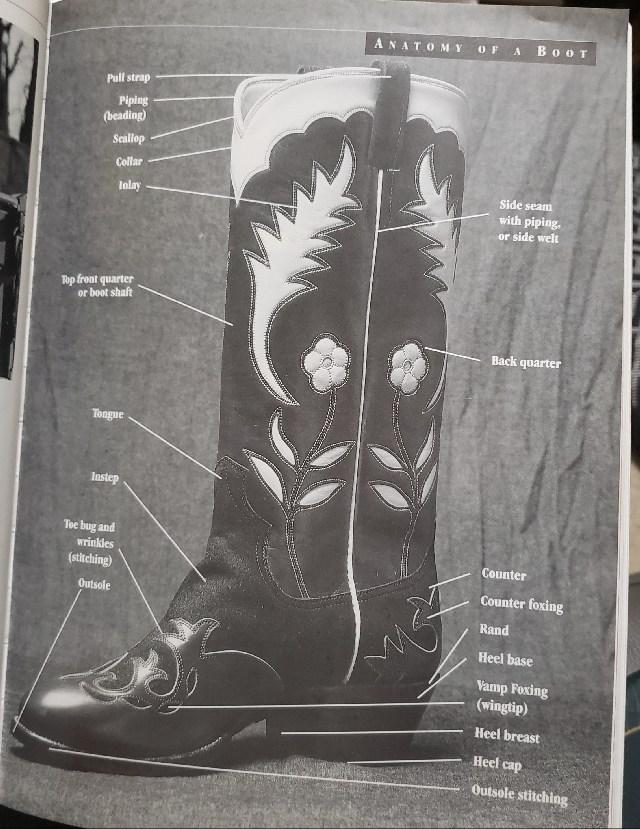
I picked up couple of books last week-end - both by Tyler Beard. One of them is a book about saddles and saddlery, and its makers and history. The other is about Cowboy Boots and everything about them. What I like in this book is the 'Anatomy of a boot', clearly shown. For those of use not used to using cowboy boots, this is new. It certainly is, to me. So I thought I would put up the photograph of that here, for anyone on this forum who, like me, does not have this information.
-
it is in this thread. If you want to purchase one, they come up periodically on Facebook Marketplace.
-
Yep. Those are lovely to use. I have one too. The previous owner made a seat for it but I use it without.
-
That is the fun of it all, isn't it?🙂 Learn so much more that way!
-
As @bruce johnson says, if you warm the spew and it melts, you could just wipe it off, isn't it? If you kept absorbent material - paper or cloth - on the leather and then warmed it through the material, it might get absorbed out more than just wiping it after warming. I have heard of spew removers as well though I have no idea how they work or what the final effect on the leather will be. https://www.leatherrepairco.com/products/leather-spew-remover There seem to be plenty of other brands available as well. Evidently happens often. Who knew?
-
Yes, I will do that. Thank you for that tip.
-
That's beautiful. I like the colors you have selected. And I like this idea. I'm going to do that on all my belts. I have made several for family and friends. This will keep their belt keepers getting lost and their coming back for replacements.
-

Help us identify this unknown exotic on Reddit!
SUP replied to nstarleather's topic in All About Leather
This is the closest that I can find. It is gator embossed cowhide. It could be embossed or it could be gator, a part of it. -
I just saw it called a 'love knot' on Etsy, presumably because it looks like little hearts.
-
@Klara Alcohol is often used to get rid of mold and mildew, isn't it? So if it is one of these, it might work, at least temporarily. As it is often used, I presume that the alcohol should not irreversibly damage the leather. If the white still remains, and there is no smell, it very well could be what @bruce johnson suggested, spew. There must be a way to manage that. So your bags will be usable.
-
Thank you @bruce johnson for that detailed explanation with photographs. Blood knot, spliced knot, slip knot, fisherman's knot, archer's knot.. so many names for one knot.. around the world I guess. Just a though, it would be fun if someone who knows knots and makes them, made a list of the different names for knots and put it up on this site. I have not made knots at all, else would have done so. If photographs were put up as well, people from all over the world could add the names used in their specific areas.
-
Very true. No reason why even the simplest things cannot be artistic and pleasing. It adds color and pleasure to life. I'm going to try and make that. Thank you for explaining how you made it.
-
@Beehive I have never done braiding although I always mean to. On your keyring dohicky, the symmetry appeals to my OCD brain. What type of braiding is that?
-
I'm glad you found the set. I've added my missing control piece. At this point, after Sept 2025, I plan to report once a year or so. A couple of hours to report once a year I think I can do. It appears, does it not, all in all, that leather in general is pretty forgiving of whichever oil we use, as long a we do use some oil to lubricate it? I like the mineral oil because there is absolutely no chance of rancidity no matter how much one uses. I realized that is significant because someone I know 'stuffed' her veg tanned leather bag (t make it 'healthy', don't ask) with first olive oil, then I know-not-what because she brought it to me stinking of rancidity. Not neetsfoot or mink or coconut because the former two do not turn rancid and smelly and the latter, I recognize the smell of rancid coconut oil and this is not it. I cannot get it clean - I actually, in desperation, washed and scrubbed it with soap and water and hung it to dry, twice, with not the slightest effect. The leather is not damaged in spite of that rough treatment. Just a little dry to the feel but the smell remains! Not cracked or warped either. used cold water and hung it to dry int he cold. Planning to use Limonene on it this week end. It is ruined anyway, she cannot use it, might as well experiment. Keeping my fingers crossed.
-
Oh. I didn't know that. And your leathers are fine, are they not? With the mineral oil based treatments?
-
I'm glad you found the information useful, @YanaG. Welcome into the forum.
-
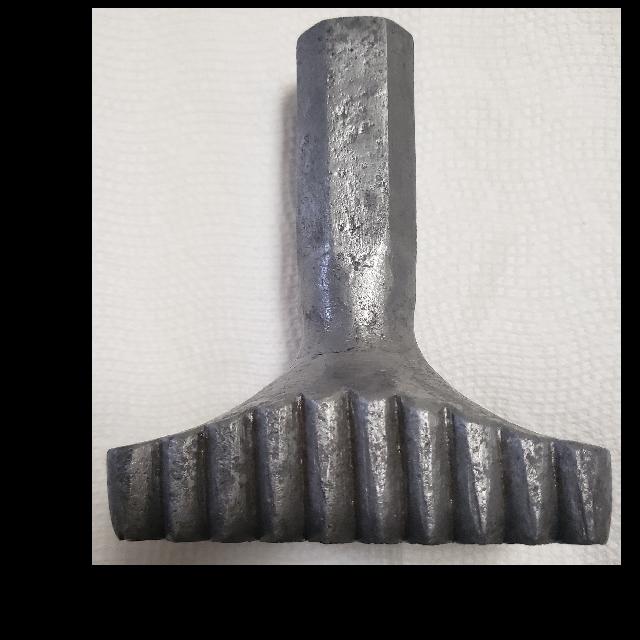
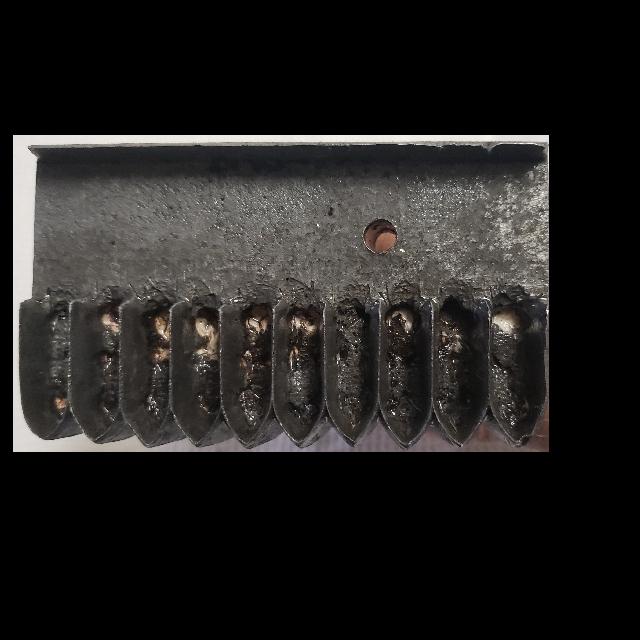
@BlackDragon Thank you for those photographs. It shows clearly how the tool is used. Yes, maybe I should start with children's shoes, on which I can put 'kilties'. Why that name, I wonder. @bruce johnson do you know? I wonder how this tool came to be in a house which had no other leatherworking tools or items. Hmm.
-
Ah! Thank you, @bruce johnson. I seem to be ending up with plenty of cordwainer's tools. Maybe I should start thinking of making shoes other than simple moccasins. . I will find other uses for it too though, like the other tools that I have. Half the time, 'not knowing' is the best teacher!
-
Looking at it again, it struck me. There is a cutting edge across from the fringe cutting section. i think, maybe, this is used to cut streamers fringed on one side... of leather? May be of use in ren faires for people setting up stalls! They cannot have anything modern apparently, so if they want streamers with writing, this is what they would use, I guess. If I ever decide to sell anything at a ren faire, I have this to decorate the stall!
-
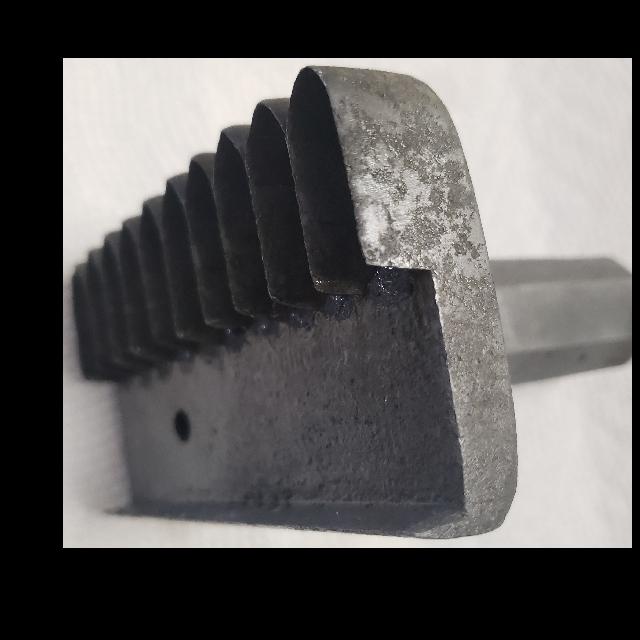
Yes, That is very probable! but when would such a heavy punch be needed? Do you know?
-
I got this at an estate sale on the last of 4 days. No one seemed to know what it is. Several people said it is a leather worker's tool but no one knew what it does. I do not even know whether they are right or just guessing. It is heavy - 1 1/2 kgs. The punch section is 2 ½ inches by 4 ½ inches. Height of the punch section is ¾ inch at the narrow ends and 1 ¼ inch at the widest. Total height is about 4 ½ inches. The pinking section, for want of a better name, has each division about 1 1/4 inch long and about 1/2 inch wide. The sections are sharp, so evidently to be used as a punch. If anyone knows that this is I would love to know too.

-
Beautiful work! Your pattern is simple and elegant and your thread matches the leather exactly. So it does not distract and one notices the beauty of the bag itself, and the workmanship. Especially the French edges which add polish. Your edge finishing is beautiful as well. Since you have asked, maybe you could polish the edges up where the leather strips are folded for the rings, where the leather curves in. And maybe the strap could be leather as well.
-
How to simulate battle wear for LARP armor
SUP replied to ThisIsMyFirstRodeo's topic in How Do I Do That?
You would need to wear it and move around a bit to see where natural wrinkles appear. Brush against a wall or tree to see where it would protect you. Take it off and make those changers more prominent. Dampen and fold and wrinkle it in the areas which do get naturally folded where you wear it. Use different gauges of sandpaper to roughen prominent areas and darken with wax like Tony shows in his Dieselpunk.ro tutorial on aging leather or you can use paint. Roughen the entire thin, throwing it around a bit so there are no pristine areas, dragging it on the ground maybe. Test the techniques first though - roughening the leather with different gauges of sandpaper, painting where needed, Tony's technique of using wax to age the leather, wetting and creasing and wrinkling the leather. Hit with a mallet if the wrinkles do not remain . You want the roughening up. These techniques I heard about from people who make armor to wear for ren faires and cosplay and LARP when I visited Tandy once and some people there were making armor. I do not do it personally but since these people did, I presume they know what they are talking about. I noted it all down. Sounded interesting.