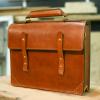
Members 5 Spice Posted February 17, 2014 Members Report Posted February 17, 2014 Well, I had a little time over the holidays and thought I'd try making a few leather items. It started out with a belt...I couldn't find a buckle I liked anywhere, so I made one. Brass and Ebony, all hand sculpted, and I fashioned a simple belt to go with. Then I thought I'd try leather stitching....I always thought one needed a sewing machine, but I was definitely misinformed. That's when I found you all here at Leatherworker. How inspiring. I started with the two card holders to figure out how to stitch and what tools and materials to use and then just jumped in with the briefcase. Quite pleased with my first go. Comments and critiques are very welcome. I know that they are far from perfect, but please remember that these are my first items. Thanks for all the inspiration. Kai Quote
electrathon Posted February 17, 2014 Report Posted February 17, 2014 I like the lamination on the buckle. Also, for just learning, your stitching looks very good. Quote
Members papadanny Posted February 17, 2014 Members Report Posted February 17, 2014 Very nice belt buckle and all of your work is very clean and subtlely (if that is a word) functional.. Quote
Members MonicaJacobson Posted February 18, 2014 Members Report Posted February 18, 2014 Very nice! Especially the belt buckle. How did you make it? Everything else is really nice too. I especially like briefcase. If everyone started out making it look that easy, leatherworking would be a great deal less expensive. Quote http://monicajacobson.com/ https://www.etsy.com/shop/TrimGoTrix?ref=si_shop
Members cst Posted February 18, 2014 Members Report Posted February 18, 2014 Far from perfect? Maybe, but it makes my first stuff look I made it in the woods with rocks and bones and ten thumbs! Quote
Members 5 Spice Posted February 18, 2014 Author Members Report Posted February 18, 2014 Thanks for the kind words everyone! The buckle is made from a piece of flat bar brass. I made a press form to give it a gentle curve, then sanded the ebony to match the radius. The two pieces are glued together and shaped and sanded by hand starting with files and ending up with 2500 grit sandpaper. So much elbow grease goes into getting it to shine like that. The most difficult part of the process, in my opinion, is the central tine. It's mostly shaped while still in rod form, then heated with a torch to red hot, quenched in water then bent in place on the belt. Sometime it takes several heatings to get it bent tightly around the centre of the belt. I had never worked with the brass beofre this project and a lot of this was trial and error. Luckily it works a lot like wood, so my workshop came in very handy. Quote
Members bigorange Posted March 5, 2014 Members Report Posted March 5, 2014 very nice indeed , how does the card case close? Quote
Members 5 Spice Posted March 7, 2014 Author Members Report Posted March 7, 2014 Biugorange, Here are a couple of pics of the reverse of the card holders: Quote
Members Colt W Knight Posted March 7, 2014 Members Report Posted March 7, 2014 Nice. Makes me want to build a briefcase. Quote


Recommended Posts
Join the conversation
You can post now and register later. If you have an account, sign in now to post with your account.
Note: Your post will require moderator approval before it will be visible.