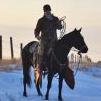
Members rdl123 Posted July 9, 2014 Members Report Posted July 9, 2014 Hello All, This project is pretty much wrapped up now - Assembled this last night. I'd like to say thanks to all who helped me out on this project and to all who pointed out things I should do different next time - This forum/website has been the most valuable education tool to me so far... Now, I would like honest criticism from all of you saddle makers out there - I want to know what to do different /better next time. I am open to all critiques on fit, shape, function etc... A few things I have noticed: 1. Rear jockeys - Not tight enough - Didn't cut them deep enough so very hard to get them really tight. Next time will add 1/2" extra. 2. Rigging plates - Too round on front edge and too far up fork - not quite as clean as ideal @ front end. 3. Cheyenne roll - Stitching on back looks like hell. Need to really practice on that, 4. Rear rigging plate set too high. Caused issues with seat ear and saddle strings 5. 13" Wide cantle - Probably do a 12.5" or maybe even 12" next time. 5. Plug rigging plates next time to eliminate bump @ rigging plate. 6. Consider using 2.5" stirrup leathers. Here are the pics I snapped yesterday evening - Oil is still evening out. Once again, thanks to all who helped me on this! Kind Regards, Ron L Quote
Members DoubleC Posted July 9, 2014 Members Report Posted July 9, 2014 Ron awesome job on the saddle. Heck awesome just considering doing one. I think it's beautiful. Cheryl Quote http://www.etsy.com/shop/DoubleCCowgirl
Members CWR Posted July 9, 2014 Members Report Posted July 9, 2014 Ron, I think you did a fantastic job on that saddle. The one thing that really jumps out at me is the placement of the screw at the fork. I would move that up and forward. It looks like your leg might rub on it now. It could even cause some interference with the stirrup leathers. I like to put them about he center of the fork and about 3/4 to one inch down. Once again great job. You got your next tree ordered yet? CW Quote 1 Thessalonians 4: 11,12
Members Goldshot Ron Posted July 9, 2014 Members Report Posted July 9, 2014 Ron, It looks good, especially for your first, wouldn't have known it if you didn't mention it. Not much to critique since you've mentioned most items; and, that's mostly in your mind. I do have one suggestion, and it's only the way I do it. I've found that if you reverse the way you put on your horn wrap, you'll center the wrap on the front of the fork better, so that when setting the saddle on the fork and horn, it protects the front of the fork cover better. By this I mean, take your wrap forward and around into the hand hole instead of going through the hand hole first. Also, as straight forward as rear jockeys appear (like no brainer as far as construction) they can be a real pain to get them centered and looking in proportion to the rest of the saddle. I've had on occasion to make three sets of jockeys until I got what I wanted. Can't wait to see your next creation, Ron Quote
Members GrampaJoel Posted July 10, 2014 Members Report Posted July 10, 2014 Your saddle look pretty nice to me. Yes there are things to change. There always will be. Everybody makes changes until they can do it in their sleep. Now to ( your )critique. 3. Cheyenne roll - Stitching on back looks like hell. Need to really practice on that. I have found that a lot of production saddles look pretty bad too. I use a method I like when my stitching is likely to show on the rear of the Cheyenne roll. I center my stitch measurement wheel and make the stitch marks on the front of the cheyenne roll. Then I push my awl through the center mark at the top of the cantle as straight as I can. Aiming to hit the groove on the back side. I then take the whole left on the back side by my awl and once again use the stitch marking wheel centered on the hole I just made. For me, this method pretty much lines up front and back stitch marks. Then all I have to do is aim well when I press the awl through. Your mileage may vary. Joel Quote
Members BondoBobCustomSaddles Posted July 10, 2014 Members Report Posted July 10, 2014 Ron, I thought that I commented on this last night, but; maybe I was just dreaming! Any way, yes you will always find things you will want to do different on the next one, but all in all, you done good pilgrim. Now all you need to do is ride it!!!! That's where you will find your likes and dislikes. Bob Quote
rktaylor Posted July 10, 2014 Report Posted July 10, 2014 Ron, You know I do not have the trained eye that others do, but the 'flow' looks great (rear jockeys onto the skirts and the seat jockey). It all 'fits' together. I can see the issue you point out with the rear rigging but it certainly doesn't look bad. I see CW's point on the screw also. If either of those are your worst mistake, pat yourself on the back. I really like the tooling on the rear jockey. The way that you blended the border and basket weave with the floral design. Very nice indeed. Take some time to ride it before you start your second. Randy Quote
Members Big Sioux Saddlery Posted July 11, 2014 Members Report Posted July 11, 2014 This is really a nice job for a first saddle. It looks way better than my first one. Back when I started, there were very few books, and damn poor ones at that, and no videos. Most of my education has been (and still is) seeing what was wrong with stuff that came in for repair, knowing what I liked personally and what irked me about equipment I used, and lots of trial and error. I'd pick up a little here and there from asking lots of questions of the guys whose work I liked. I'm still learning every day and I've been working on saddles for about 35 years. For the critique, and I by no means consider myself any kind of an expert, besides the things already mentioned by others, there are several things that you could work on when you build your next one. First of all, the Blevins sleeve is on backwards. The plate is made to fit into the recessed area of the slide, and the printing on that recessed area should be right side up. Try it and you will notice the difference. The Nevada twist could be better. You have only twisted the fender leg, and I like to build some twist into the whole fender. Notice how the end of the fender leg, where the Blevins plate is riveted in, looks like it is starting to un-twist. The stirrup leather is affected by this, and would not lay flat against a horse. I would also work on finishing your edges a little more. I see little fuzzies, and it's not a real slick burnished edge. There are slight imperfections made by both your knife when you cut the parts, and your edger. These are all picky little things, but if improved, would add to the overall finished look of your work. I would bevel the sheepskin back a little more. There are places it looks a bit ragged. I use an electric sheep shearer as well as a mane roaching scissors., and spend a lot of time on this step. One other thing that can be tougher to get right is the front of the fork cover. I would bring the edge of it a bit further forward so there is no lip showing in front of it. It took me several saddles before I was satisfied with the front of my fork covers. And since there are several different ways to finish the front, it takes that many more to become proficient at all of them. I have a drawer that is specifically reserved for saddle parts that I have messed up, and there are 2 fork covers in it. They can be a challenge. I like the tooling on the rear housing also. Tooling is not my strong suit, and I don't enjoy doing it as much as the other steps in a saddle project. Plus my hands are full of arthritis so it hurts! Nice job and let us know how it rides. Quote
Members rdl123 Posted July 11, 2014 Author Members Report Posted July 11, 2014 Hello All: Thanks for the kind words and the critiques!! CWR: You had me sweating on the screw location, Luckily I am tall and skinny and like to ride with my legs hanging fairly straight down! In this position the screw is about 2" away from my leg even when I swing my stirrups as far forward as I can! However, going forward the screw location will be up and forward!! Grampa Joel: I will have to try that trick - The worst problem I had was trying to aim the dang awl...I would do good for seven stitches and then get off track...hard to correct once you have a hole where you don't want one. Big Sioux: Thanks for the compliments but thanks even more for catching issues! Can't hardly believe I had that one Blevins sleeve on backwards - Not sure what I was smoking when I put that on... I agree on the Nevada twist - I noticed it didn't sit like I wanted it to but I wasn't sure what to change...Any advice on what to do there? This morning I tried to squeeze some twist into the entire fender length...I will also try to get some more twist on the actual Blevins buckle area...Any tips you have to do this better will be appreciated. Regarding the fleece - I used a pair of $30.00 walmart electric hair clippers - Worked good actually - However I will go over again and clean up the edges...And regarding the fuzzies - Burnishing is not my favorite activity - However about the time you must have been typing this I was going over the saddle edges with canvas, a bit of moisture and beeswax...I'll keep at it until they stay down forever...Seems like I would get the edge looking great, then, a few days later they would re-appear...The fork cover - I agree on this too - I wish that lip was about 3/16" to 1/4" farther forward..When I test fitted it, it looked good -When I actually glued it up and stretched it in the dang thing refused to work forward - I'll bet I spent an hour and half trying to coax that thing forward...However, next time I will know to make the fold about a 1/4" forward of where I did last time... Anyhow - Thanks for catching these issues, really helps to get another viewpoint and a more experienced eye on it - I've got a second tree on order with Glenn Christman... See if I can't resolve some of these things on saddle #2. Anyhow, likely take this thing out on Saturday and see if we can't get some rope grooves worked into the horn wrap and pack that fleece down a bit...I just hope the seat I put in proves comfortable... Keep the critiques coming! Regards, Ron L Quote
Members Big Sioux Saddlery Posted July 12, 2014 Members Report Posted July 12, 2014 Ron I will address your questions either tomorrow or Monday. I will try to get a couple pics of what I am talking about on both the fender and fork cover. I don't have time today; have other stuff going on that I can't possibly wiggle out of:) Have a great weekend! Quote
.jpg.d60258221c476480a6e073a8805645bb.jpg)

Recommended Posts
Join the conversation
You can post now and register later. If you have an account, sign in now to post with your account.
Note: Your post will require moderator approval before it will be visible.