Members Jenn64 Posted July 23, 2021 Author Members Report Posted July 23, 2021 On 7/22/2021 at 10:28 PM, Tugadude said: My process depends on the thickness of leather I'm dying. With thinner stuff, if I can, I dip-dye it. The dye goes all the way through readily. I then lay it on a clean piece of cardboard and I rub the surface gently, blotting it really, to remove any excess and then I let it dry. If it is overly stiff, I will use either Carnauba Cream or Neatsfoot Oil to soften it. I like the results I get. On thicker stuff I apply dye in two directions. I go "east to west" on the first pass and then "north to south" on the second. I then will usually add a bit more and do it in a circular fashion. That eliminates any chance of streaking. It may sound like a lengthy process, but I'm usually dying fairly small pieces at a time, maybe 2 feet square or so. I apply the dye with a rag. I've heard some say they get good results from an applicator, but I've never tried it. I have rarely dyed the backside on thick leather. Arhh yes, the multi directions is a great anti-streak technique, glad you mentioned that, thanks! I never use daubers they are just too narrow & never happy with the end result, I'll stick with high density sponges & I love my air brush. Quote
Members Jenn64 Posted July 23, 2021 Author Members Report Posted July 23, 2021 22 hours ago, ScottWolf said: Where I have found doing this makes a difference is when you have a piece of leather or a leather item where there are sections/portions that are drier or dried out from age/use than the surrounding areas. Applying water to dampen (not soak) the entire piece/section before dying results in a more uniform dye job when it dries. As mentioned, it may result it a slightly lighter finish and take a little bit longer to dry but its nothing a second coat won't fix if you want it darker, but it ensures that the end product doesn't have spots/areas that are darker/lighter than the surrounding leather. That makes sense regarding dry area's, that's what possibly went wrong with the larger piece I dip dyed with the dye grabbing in certain area's....note to self....will moisten beforehand & see if I gain bettter results! Thank you Quote
Members Jenn64 Posted July 23, 2021 Author Members Report Posted July 23, 2021 21 hours ago, fredk said: Whatever type of dye I use I dampen the grain side of the leather before I dye and as I dye it I reckon it helps the distribution of the dye thru the leather, giving me less patches of differing colour density. Initially the dye colour might be light but I just apply more coats of dye to get an even depth of colour Yeah that's true, that's what I do with the neatsfoot for even colour, it can also lighten a little but not much & like you will just recoat...thanks fredk Quote
Members Silverd Posted September 8, 2021 Members Report Posted September 8, 2021 Pro dye is an alcohol / oil base liquid. So, I'm not sure how using water to help the dye migrate through the grain of the leather is a good solution...but if it works!. Alcohol is water compatible however, the oil is not and the oil is the carrier of the Dye. I've have used either nothing or Goof Proof in the past but recently started applying saddle oil to the grain surface before dying using pro dye (which I typically spray on). Both the oil and the Goof Proof serve to prepare the leather to receive the Dye and even out the absorption. I would also say the process reduces how dark the results will be. This can be helpful for dyes that tend to go dark...like Dark Brown or Mahagony. The spray process is very controllable and allows me to create various finish values using the same dye and on the same piece. Darker along the edges provides an element of Faux patina that suggests the product has aged. I will spray adjacent panels at the same time as they appear in the final assembly. This allows me to carry the faux shading across both pieces which really looks nice in the final product. For those thinking this is a lot of work given the gun cleaning etc...I typically leave dye in a gun for several weeks before it will need flushing with Acetone and possibly tear down. I usually have at least two guns running different shades to support multiple projects simultaneously. I also spray water base contact cement that I use to laminate. Love the spray gun! Black Dye is difficult to keep from cross contaminating Red Dye is the easiest to work with and to keep uniform Blue Dye will turn Purple if applied too well Light brown base with dark brown edging can make a new piece look very aged Hope this helps! Silverd Quote
Northmount Posted September 9, 2021 Report Posted September 9, 2021 If you are dying details and you find the dye wicks quickly beyond the line or cut, I find it helps to moisten the leather a little so it doesn't wick so quickly beyond where you want the edge to be. Large items I will dip dye if it fits my container or I can pass it through like a belt for example. I don't bother moistening before hand in cases like that, or when dying something that won't fit. A little oil after helps even out the colour. Quote
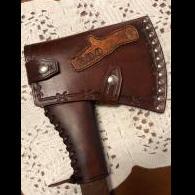
Members Jenn64 Posted September 23, 2021 Author Members Report Posted September 23, 2021 On 9/9/2021 at 9:30 AM, Silverd said: Pro dye is an alcohol / oil base liquid. So, I'm not sure how using water to help the dye migrate through the grain of the leather is a good solution...but if it works!. Alcohol is water compatible however, the oil is not and the oil is the carrier of the Dye. I've have used either nothing or Goof Proof in the past but recently started applying saddle oil to the grain surface before dying using pro dye (which I typically spray on). Both the oil and the Goof Proof serve to prepare the leather to receive the Dye and even out the absorption. I would also say the process reduces how dark the results will be. This can be helpful for dyes that tend to go dark...like Dark Brown or Mahagony. The spray process is very controllable and allows me to create various finish values using the same dye and on the same piece. Darker along the edges provides an element of Faux patina that suggests the product has aged. I will spray adjacent panels at the same time as they appear in the final assembly. This allows me to carry the faux shading across both pieces which really looks nice in the final product. For those thinking this is a lot of work given the gun cleaning etc...I typically leave dye in a gun for several weeks before it will need flushing with Acetone and possibly tear down. I usually have at least two guns running different shades to support multiple projects simultaneously. I also spray water base contact cement that I use to laminate. Love the spray gun! Black Dye is difficult to keep from cross contaminating Red Dye is the easiest to work with and to keep uniform Blue Dye will turn Purple if applied too well Light brown base with dark brown edging can make a new piece look very aged Hope this helps! Silverd Wow Silverd thank you so much for your detailed reply, I haven't checked in for a month or more, hence late acknowledgment I've never heard of Goof Proof, just looked that up & can't seem to access it in Australia, maybe why I'm oblivious to it, but if I could get my hands on it without paying exorbitant international freight expenses I'd grab some in a flash...but don't like my chances! Yeah I'll be steering clear of the wet dying unless as mentioned the leather is extra dry or maybe I won't even do that as I find smearing a little neatsfoot also tends to rememdy that problem...nice to know if I run short of neatsfoot I can fall back on saddle oil. Yeah I love my air brush too, it just offers so much more control, I recently made a "facehugger" mask using the same technique for edges, turned out great, I may have a pic of or two of that! Thanks for colour tips too much appreciated. Yep you definitely helped! Jenn PS Check out the pics...excuse the different colour outcomes between both pics, one is under lights the other in daylight. Quote
Members Jenn64 Posted September 23, 2021 Author Members Report Posted September 23, 2021 On 9/9/2021 at 12:42 PM, Northmount said: If you are dying details and you find the dye wicks quickly beyond the line or cut, I find it helps to moisten the leather a little so it doesn't wick so quickly beyond where you want the edge to be. Large items I will dip dye if it fits my container or I can pass it through like a belt for example. I don't bother moistening before hand in cases like that, or when dying something that won't fit. A little oil after helps even out the colour. Thanks for the anti wicking tip Northmount, I'll remember that as I'm overly cautious dying details, absolutely hate watching it wick while I sit there saying "Stop, stop, stop"....it doesn't seem to listen & keeps flowing on it's merry way....then I swear, lol! I've not had great success dip dying large items so I'm steering clear, belts & small items I'm fine with but anything large I'm just awkward & uncordinated & stuff it up. Jenn Quote
PastorBob Posted September 23, 2021 Report Posted September 23, 2021 52 minutes ago, Jenn64 said: Wow Silverd thank you so much for your detailed reply, I haven't checked in for a month or more, hence late acknowledgment I've never heard of Goof Proof, just looked that up & can't seem to access it in Australia, maybe why I'm oblivious to it, but if I could get my hands on it without paying exorbitant international freight expenses I'd grab some in a flash...but don't like my chances! Yeah I'll be steering clear of the wet dying unless as mentioned the leather is extra dry or maybe I won't even do that as I find smearing a little neatsfoot also tends to rememdy that problem...nice to know if I run short of neatsfoot I can fall back on saddle oil. Yeah I love my air brush too, it just offers so much more control, I recently made a "facehugger" mask using the same technique for edges, turned out great, I may have a pic of or two of that! Thanks for colour tips too much appreciated. Yep you definitely helped! Jenn PS Check out the pics...excuse the different colour outcomes between both pics, one is under lights the other in daylight. Nice work. Very clean, and I like the dye job on it. Quote In God's Grace, Pastor Bob "While we were yet sinners, Christ died for us." - Romans 5:8 www.PastorBobLeather.com YouTube Channel
Members Cumberland Highpower Posted September 24, 2021 Members Report Posted September 24, 2021 So many replies I feel like maybe I learned something here also. I dye quite allot, but always submersion dye in a 5gal bucket...Something different I guess. Often fully finished goods, stitched and all if the thread is brown or black. I found that a quality leather dyes much better. Herman Oak, Wickett, etc. They don't just dye better, they dry quicker and the color is more consistent. Quote
Members Silverd Posted November 17, 2021 Members Report Posted November 17, 2021 On 9/23/2021 at 8:34 AM, Jenn64 said: Wow Silverd thank you so much for your detailed reply, I haven't checked in for a month or more, hence late acknowledgment I've never heard of Goof Proof, just looked that up & can't seem to access it in Australia, maybe why I'm oblivious to it, but if I could get my hands on it without paying exorbitant international freight expenses I'd grab some in a flash...but don't like my chances! Yeah I'll be steering clear of the wet dying unless as mentioned the leather is extra dry or maybe I won't even do that as I find smearing a little neatsfoot also tends to rememdy that problem...nice to know if I run short of neatsfoot I can fall back on saddle oil. Yeah I love my air brush too, it just offers so much more control, I recently made a "facehugger" mask using the same technique for edges, turned out great, I may have a pic of or two of that! Thanks for colour tips too much appreciated. Yep you definitely helped! Jenn PS Check out the pics...excuse the different colour outcomes between both pics, one is under lights the other in daylight. My gosh man, absolutely beautiful work. Silverd Quote


Recommended Posts
Join the conversation
You can post now and register later. If you have an account, sign in now to post with your account.
Note: Your post will require moderator approval before it will be visible.