Spinner
-
Posts
1,373 -
Joined
-
Last visited
Content Type
Profiles
Forums
Events
Blogs
Gallery
Store
Everything posted by Spinner
-
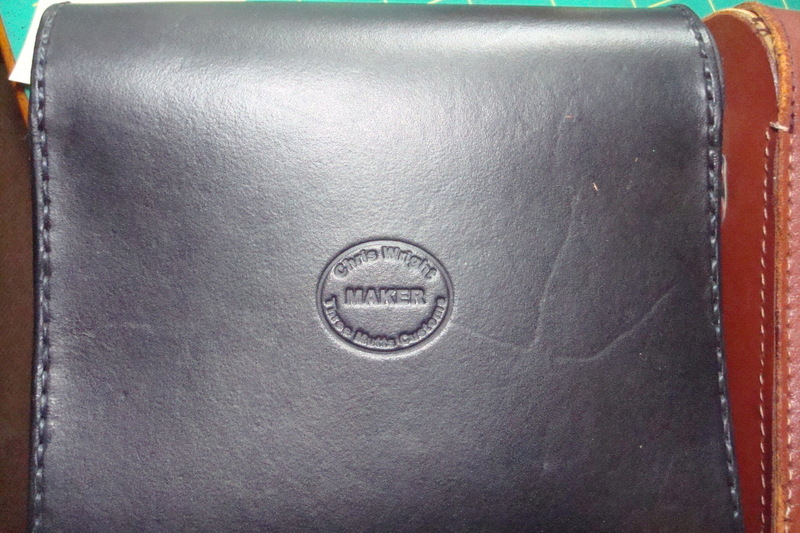
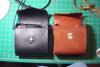
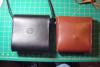
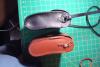
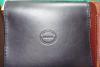
Binocular Case
Spinner replied to Spinner's topic in Purses, Wallets, Belts and Miscellaneous Pocket Items
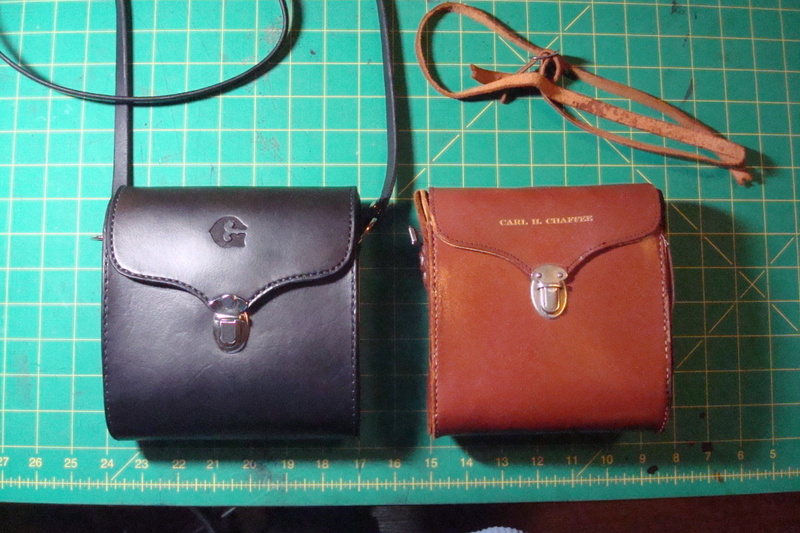
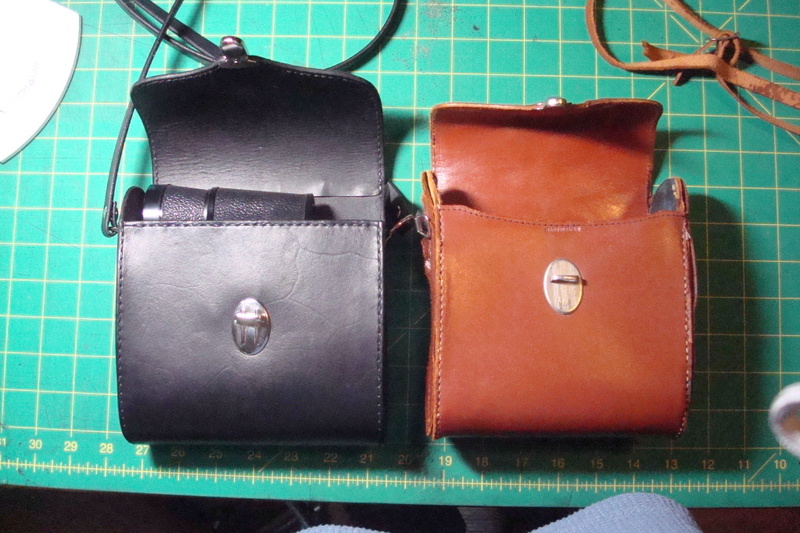
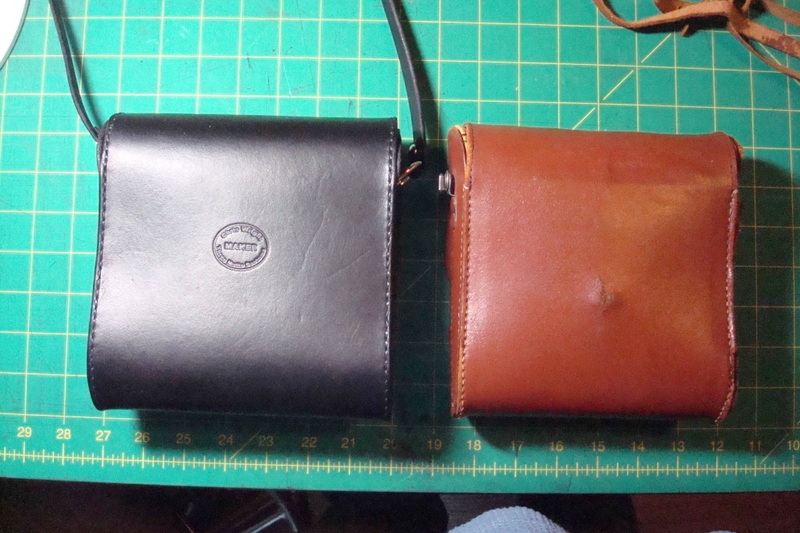
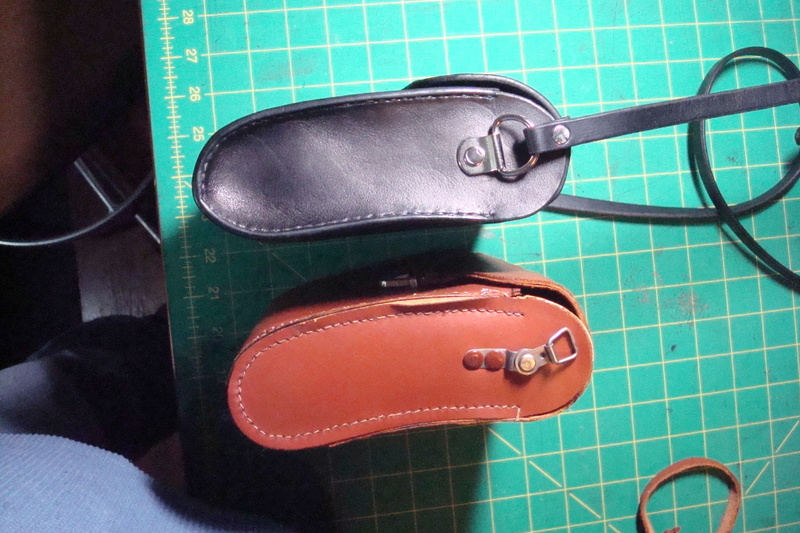
Thanks Kate & Merlin, this was also a first for me as I hadn't ever made a bag using the beveled edges & angled stitching holes. Makes for a great edge but hole punching and stitching are a bit more of a pain. -
My boss has a pair of binoculars that his grandfather used in WWII and a case that he used but previously belonged to another soldier. Not wanting to subject the case to further damage but still wanting to be able to use the binoculars and store them securely, he asked me to make the same case but to update it with better stitching and 100% leather instead of the cardboard/lining leather they used for the original case. So here is my recreation of the bag but in black/chrome with his family last name initial tooled into the lid. 6oz. W & C leather with 1.5oz kidskin lining on the inside of the flap. I also updated the strap from the 3-4oz. originally used to 8oz to help the new one last as long if not longer than the original. Enjoy! Chris

-
Um, I dunno. I actually don't know if he has a profile on LW.net now that I think about it. His website does have his email address on the contact page though: http://www.petermain.com/ He also offers his books there. Be prepared to spend the next 30 minutes or so browsing the photo gallery on his website though, his work is easy on the eyes but hard on the ego.
-
Harbor Frieght has them for fairly cheap but I have found in the past that their bleeder valves (for letting the air out when you're done for the day) tend to fail faster than others. Home Depot, OSH & such usually have Big Red (Craftsman/Husky) compressors on sale a number of times a year. Any size compressor will work but keep in mind that the smaller the tank section the more often it will turn on and some (like mine) can get noisy in a small shop. I can dye quite a few pieces with mine before it even thinks about turning on but it also takes up the same amount of space a small motorcycle does. If size/noise aren't a factor, a decent 3-4 Gal. compressor will suit most folks needs. It will turn on after about 5 minutes of solid spraying (which is quite a bit when spraying dye) and only takes a minute or two to fill completely back up (most turn on when 1/2 empty so you can keep working). Here's one similar to my last compressor that did the job for quite a while: http://www.homedepot.com/h_d1/N-5yc1vZ1xhc/R-202018102/h_d2/ProductDisplay?langId=-1&storeId=10051&catalogId=10053#BVRRWidgetID If you have a little more room & cash to spend and plan on doing detail work or larger projects, go with something like: http://www.homedepot.com/h_d1/N-5yc1vZ1xhc/R-100653165/h_d2/ProductDisplay?langId=-1&storeId=10051&catalogId=10053#BVRRWidgetID To give a comparison, this is what a starter airbrush specific compressor (quiet, small & no maintenance but won't run tools) starts at: http://www.dickblick.com/products/paasche-d500-air-compressors/
-
Drop him an email through the forum to indicate interest. He replies pretty quickly. I was just talking to Peter about these last week, he has a bit of a waiting list so keep that in mind when inquiring.
-
My wife just picked one up for me for Christmas that was on my list and I'm loving it. I asked for the one-ton as it has a few more doodads that I will use for making brackets and such that I use for my motorcycle bags and I'm a firm believer in getting a machine bigger than you think you'll need...that way the extra is there for that one time you need it. Here's the link to the one I currently own and like using: http://www.smallpart...&qid=1292518819 One of the nice things about it is the handwheel as well as the pull bar. The press shaft is also drilled out already. It's slightly smaller than the handle used for Tandy stamps but a quick touch with a grinder or file to the Tandy handle and it fits perfectly. The throat opening is also tall enough to allow for the full length handles Tandy stamping to be used. It also comes with a few standard press heads that work nicely for rivets. For $88 with free shipping, it's hard to beat.
-
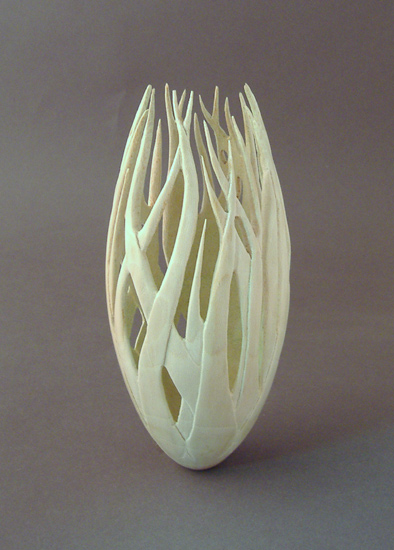
68206_474396254182_834879182_5448166_3570187_n.jpg
Spinner commented on Fellowsgarden's gallery image in Our Leatherwork Galleries
 That's a trip to look at. I like it!
 -
Yep, it's a standard inlet. My recommendation is to buy the quick connect threaded nipple & receiver instead of threading a hose directly to it. HF has those in packs for cheap. I have one of these guns for the grunt work and the Badger 155 airbrush for detail work. The two together make a great combo for both full coverage and highlight work. As for how they compare, the touch up gun is actually a hvlp gun as well but due to it's size they call it a touch up gun. The touch up gun is actually nicer to use (I have owned all three types we're discussing here) as it has a similar spray pattern width but has a lower air pressure requirement and lower air consumption meaning your compressor won't be kicking on as often. http://www.harborfreight.com/air-tools/air-accessories/5-piece-industrial-series-air-tool-quick-coupler-set-4873.html http://www.harborfreight.com/air-tools/air-accessories/air-tool-accessory-kit-42716.html
-
Fantastic Leather Edge Burnisher
Spinner replied to Bobby hdflame's topic in Hardware and Accessories
Yep, individual heads are now available: http://cgi.ebay.com/Fantastic-Leather-Burnisher-HEAD-ONLY-NEW-Even-Better-/220707670271?pt=LH_DefaultDomain_0&hash=item336333c8ff (not my store, just found the link) -
The top two are single action airbrushes. For just coverage they would be fine. For any kind of control purposes yuo'd be better off with the Badger 155 knock-off at the bottom. It's a dual action airbrush that will allow yuo to control volume and air flow at the same time. The hoses can be picked up at any hobby supply store like Hobby Lobby or Michaels for $5-10 Cleaning - just use water or Denatured Alcohol depending on the type of dye used last. Fill the cup about 1/2 way and then shoot the cleaner through until the spray is clear/white. The remove the cup, spray until nothing comes out and then wipe out the cup.
-
Definitely not preval if you have a compressor already. The Preval can pop off the base (gets dye everywhere) and uses about twice the amount of dye for the same area. if you want a gun with a bigger spray zone than an airbrush but want the same control and compressor hookup, check out a touch up gun: http://www.harborfreight.com/touch-up-air-spray-gun-66871.html I have one and love it for doing large single color pieces - it covers twice the area an airbrush will in a single pass with slightly better penetration. The cup is also just about the right size for a full 4oz bottle of dye also so it's great for production run spraying. At $14.99 it's hard to go wrong.
-
Fantastic Leather Edge Burnisher
Spinner replied to Bobby hdflame's topic in Hardware and Accessories
The thing to mention/note, one of the reasons for the price difference between wood and the wood felt wheels is that with the wool/felt, (with properly prepared edges) once you use it you're done. They are also more involved to make. With a wood burnisher, it speeds up the process by giving you a finished edge which is then quickly buffed to a shine by hand. -
Fantastic Leather Edge Burnisher
Spinner replied to Bobby hdflame's topic in Hardware and Accessories
Not a problem. You mention an industrial lathe, are you a woodturner or just have one for odd jobs? If you turn and are looking for a turning related site that is similar in style to LW.net, check out WoodturnersResource.com it's a site I started 10 years ago as an educational website and it just grew. I've passed it on to more capable & current folks, but they are a good bunch. I still turn, but on a much smaller scale. Back in the day, my 'baby' was a Powermatic 3520A and did some crazy stuff with it.
-
Fantastic Leather Edge Burnisher
Spinner replied to Bobby hdflame's topic in Hardware and Accessories
The reason for using cocobolo or rosewood is that they are have natural internal oils and have very dense grain patterns which make them highly resistant to heat & heat cracking. The process of burnishing builds up a great deal of heat in the wood and most domestic woods have wider grain patterns (meaning more spring wood which is softer) and pretty dry once cured. This caused them to burn more than burnish and then tend to break down faster. South American exotic woods are simply better at heat resistance and dispersion and hold their shape better than say maple, ash, walnut or the other common domestics. For me, it also helps that I have a decent sized stash of Cocobolo from my production woodturning days. -
Some good looking sleeves & holders Joe. Checked out your website too, some nice work there too. Looks like we're neighbors as well, I work near 8th & Fig. ------------------------------------------------------------------------------------------------------------------- For Menolly & others - if you're looking to make ipad, kindle, etc. holders as a repeating project, check out ebay. There are a bunch of folks there that sell dummy units. I have one for the iPad that I use for measurements & pictures, much cheaper than buying the real thing (they're about $30) and it doesn't matter if I scratch it or get it wet. Here's one I've used and was happy with: http://stores.ebay.c...BestMart?_rdc=1
-
Looking good David. I notice in the updated pictures that you altered the scales on the dragon's back when you cut them from what you had when you traced/drew them. Any insights as to why? Was it due to a scaling (no pun intended) issue or simply a layout change or...? Just curious...always educational to hear why folks do certain things. Chris
-
Thanks for the tip TwinOaks...now I just need to find a feed store near downtown Los Angeles. hehe...not too many horses where I live (unless you count the iron kind)
-
I need a custom dye color mixed for a bib job I'm working on. A Burgundy/ Wine color per the client's request to match the two tone paint on his bike, black & burgundy. I wanted a true color instead of using a trick like brown antique over red as true burgundy has a hint of blue and yellow per my color charts. So, after some research and mix testing, here it is. Unfortunately, Fiebing doesn't make some of the colors needed so Eco-Flow was used. 18 parts Scarlet Red 10 parts Evening Blue 4 parts Sunshine Yellow If you want/need a little darker, add 1-2 parts of Coal Black until you have the shade you want. I used a liquid medicine measuring syringe from the local drugstore (cost about $3) to do the measurements in CCs. Makes about 4-5 tsp or dye, which a quite a bit when airbrushing it on. Computers don't show color differences that well, but here are a few sample shots: Here's the test panel against my black & silver tank: Here it is against my medium brown denim jacket so show the difference:
-
LOL...you guys took that a bit wrong. Travis was giving me crap for being the dork that didn't turn the bottle around. I had just been going through all of the colors to find the ones I wanted to mix a couple of new colors, like Burgundy and Ruby versus using tricks like medium antique over scarlet so my mind wasn't catching that it was simply backwards vs. being a fancy-schmancy name for a color. ;-)
-
LOL...I obviously wasn't looking very hard. Mentioned in the local Tandy today and the manager Travis says, "oh you mean the 'Noir' Antique". Every other color was in English except the black. WTF?! HAHA @ myself
-
I'll be interested in seeing the replies to this. Only antique I can find is brown and I'd like to either find or create a black antique to use for heavy outlines on items that are dyed with other colors like blue, red, etc.
-
hey Steve, Thanks, it did come out pretty decent. Funny thing is, this is a way old post. This was my first whale-tail bib and I'll be doing my 13th this week. here's how this one turned out way back when. Looking back I have found areas to improve on but it's still pretty good and the client loves it so I can't complain too much. I think I still would have preferred it saddle tan with antique over the black and red but it works.
-
Hey Lady, best place to start is with cloth templates. They can be laid down on the tank without scratching it, marked on with fabric markers, cut, etc easily. the only issue you may run into if you're not handy with the tools & bike parts is getting the bolt holes & brackets marked out right. I specialize in bikes I either own or own the tanks for (yes, I buy spare gas tanks of different models) so i can pull them apart and get perfect matches for the brackets and such. Once you have a good pattern, the leather part is easy. Many folks use heavy leather and such for bibs but it's not necessary. The best I have found is 5/6 ounce. It molds around curves easy enough but still have enough meat for tooling, lacing, etc. I use 1/8" kangaroo lace with triple loop lacing for the edges and then 3M 90 spray glue (the hardcore stuff - one step above 3M 77) to attach the felt liner to the back. I use the same pattern for the felt and then once attached will trim the excess felt away from the edges so it all comes out smooth and provides full coverage. many bib makers don't line under the speedo but I do. it's that bit of extra that separates! When you have the pattern, cut the leather, lay out the holes and then do your tooling and lacing slots before molding it to the tank. It's a major pain to do either of those after the bib is molded. Once it's all tooled and punched, lay a piece of felt over the tank and then the leather on top of that and do any molding necessary. having the felt on the tank protects it from rubbing wet leather on the paint and also creates the additional space you will need for the liner which is the last step. Once the bib sets up and dries, remove it from the tank, then you can dye, lace, finish and line it. hope this helps! Here's a picture of what I mean by using fabric to do the template. you can see how I am laying out the center lines, pocket area and using a print out of the artwork to get everything lined up. Also notice the tape. It's blue "Painters Tape" available at any hardware store. Blue tape has a very low adhesive so it doesn't mark the paint or leave any residue. no muss, no fuss!
-
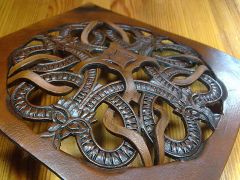
That's awesome Roo, love the scrolls & knife work.