Spinner
-
Posts
1,373 -
Joined
-
Last visited
Content Type
Profiles
Forums
Events
Blogs
Gallery
Store
Everything posted by Spinner
-
Welcome to LW from another Chris. I'm sure most folks stumble onto new hobbies the same way but either way you're in good company. Don't know much about horse saddles but there are plenty that do here. And just remember, the only dumb questions are the ones you ask when you're drunk!
-
Yep, Stohlman shows a couple of different techniques in How to Carve Leather for trees and shrubbery. Even now it's still a go-to book for me.
-
Well, in theory I could turn them as small as 3/32" in diameter (I used to specialize in thin stem goblets) if I adjusted the design but I'm not sure how well they would hold up. How small were you thinking? I'll be doing some turning this weekend and can probably play with designs if you can give me an idea on size. Feel free to email me with ideas/details at chris@threemuttscustoms.com Chris
-
Hey Bevan, Been pretty busy with the leather lately now that I finished off the main batch of orders and a few special requests. You should have your buddy's burnishers in a day or two. Chris
-
What Tool To Use To Shave Leather For Buckles
Spinner replied to cudofcow's topic in How Do I Do That?
give these a look see. I have both and out of the two prefer the second one. Just seems to be more consistent and easier to control even though it's called a beveler it works nicely for skiving. http://www.tandyleatherfactory.com/search/searchresults/3025-00.aspx?feature=Product_1&kw=skiver http://www.tandyleatherfactory.com/search/searchresults/3001-00.aspx -
Another Christmas Present Done,,,
Spinner replied to BearMan's topic in Books, Journals and Photo Albums
You're right Bear, the balancing act is the hardest part and you really nailed it with this one. The lacing is some of the cleanest I have seen recently. Mind sharing what thread/supplier you used? I can get my channels and holes and such looking nice, I think the last bit I need to do is upgrade the thread I'm using to better quality. Thanks, Chris -
+1 to Gimp for Free software. Next price step would be Xara (about $90), it has all the functions of Illustrator without the pricetag. I've been using Xara for about 10 years now and still love it.
-
They offer it but in talking to Glenn (sp?) about it he said it's actually a pain for them, they can do it but prefer cards. Frankallen, Check what the requirements for a paypal pro account are. I have one that I use regularly for my business and with the upgraded account, paypal supplies a debit/mastercard to access your funds. They even have a 1% cash back program on the debit card. It's worked out nicely for me in separating my personal & business budget without having to deal with a bank and send paypal back & forth (most of my receipts end up coming via paypal anyway).
-
Another Christmas Present Done,,,
Spinner replied to BearMan's topic in Books, Journals and Photo Albums
Ed, I really like this one. Sheridan isn't really my cup of tea but the colors really make this jump. The idea and execution of the back of the cover is great, has a very organic feeling to the basket weave openings, almost biological. Is the stitching by hand or machine? I have some covers to make for my nieces' and nephews' Quads (Mormon stack o' bibles & books in one) for Christmas and this gives me loads of inspiration. Thanks for sharing, Chris -
Looks real good Steve, glad you figured out the fins, they look nice. Chris
-
Hey Folks, I have been looking for these buggers for awhile to use on my tank bibs with detachable pockets. I finally found a US distributor that will deal with me but the minimum order size is 200 pieces (of each side). I'm wondering if other folks are interested in getting them in small quantities which I could arrange and combine to make one order to reach the minimum quantity. The Buddy-Lok system is a two piece lash tab set up that locks with a 90 degree twist making them really nice for items that need to have a good strong attachment point but can be detached quickly. One side is designed to be used with straps and both sides have channels so they can be stitched. They are made from ABS and can be stitched on by hand or with a good sewing machine. Here's a pic of the samples I received the other day. If enough people are interested I'll work it out to do a group order and then ship the individual orders to everyone. It looks like it would be about $2 per set plus shipping from me to you for your lot (they are fairly lightweight so shipping should be minimal @ $2-5 depending on the number you get). Feel free to reply here or PM or email me if you're interested. Thanks, Chris
-
How Do You Know What Weight Of Leather To Use?
Spinner replied to Thumper's topic in Motorcycles and Biker Gear
Nothing wrong with that Steve. I've only made 2 sets of saddle bags and the requests were for a less rigid style bag that would lay down better when not loaded so the gussets were 5/6oz while the main front/back/lid were 9/10 oz.. They were pretty thin bags (only 2 1/2" deep) to carry a laptop, light jacket, etc. If I were doing more rigid/traditional bike bags I'd likely go with 9/10 oz all over too. -
I used some on a woodworking project a few years back and have used them when I was installing car stereo systems years ago. They are great to use, very easy. You might need to get a bigger punch depending on what size you're looking at (they work better when the holes are precise) and a tip: put a small bit of locktite on them when assembling to keep them from untwisting as the chain works back and forth often...will help keep them from unscrewing over time.
-
Hey Steve, I'm thinking the same method that Peter Main describes here: http://leatherworker.net/forum/index.php?showtopic=8208 for tooling 3-D lettering might work. Peter does amazing things using just a modelling tool. Check out the last pic of the boy walking up the stairs...With very little tooling depth you can create a good amount of detail using perspectives and shadow lines. Chris
-
I would suggest you guys check out the Pecard line of conditioners & dressings. I have started using them lately for my motorcycle leathers (chaps, tank bibs, bags, etc) and so far the results have been great. They have lines of finishes for different purposes as well, motorcycle, equine, etc. For my finishing process here's what has worked well for me: after cutting & tooling - wipe surface down with alcohol to remove excess dirt & hand/tool oils > dye (Fiebing spirit based) > a coat of neatsfoot oil, let it soak in > a coat of Fiebing Tan-Kote, let dry > rub in a coat of Pecard's smooth leather conditioner > finish off with Pecard's weatherproof leather dressing (comes in natural and black). The leather ends up with a nice soft sheen and a good supple feel. I've been getting great feedback from recent customers about water beading up and running off and no water stains yet so it's working for me. The nice part is Pecard's sells the dressing in 2oz. sample jars that I recently started including with big orders for folks to keep their leather looking good. Finish will also vary by project... In reading some of the other articles on LW regarding hard leather items like holsters, many folks appear to simply dye, a coat of neatsfoot, then apply a coat of Resolene (let fully dry) and then put a top coat like Aussie wax or Atom Wax with Balm to finish it off.
-
Sounds good. I just called my dad and gave him a head's up that you might contact them so you wouldn't be a stranger.
-
Hey X, You came to the right place. My parents do custom embroidery as their side gig. They're pretty darn good to and have an awesome pair of machines. They can even help with the digital conversions. Tell them you're a leatherworking friend of mine and they'll likely charge you extra. Seriously though, they are very competitive with pricing and have NO minimum order size. They can do shirts, ball caps, dress shirt monograms, and probably a bunch of other stuff. ~Chris Here's their link: http://www.seamsands...embroidery.html Here's the contact info: Telephone: 303-255-3174 Email: seamsandsuch@copper.net Ask for Bruce or Kay
-
Looking good there Steve! i really like the steer skull in the first one. They both look great. Chris
-
Hey Sinner, If it's the factory seat, you won't need a dremel or rivets. The pans are made from a medium density ABS material and the factory staples the covers to the pan. I have done 2 like this so far and they staple fairly easily with a good heavy duty stapler. I'd only go with 8 oz. maximum on the leather as you'll be doing quite a bit of wet molding to get it on there. If it's just a basic recover & dress-up, use the original vinyl to make yourself a template to start with. Once it's all put together, stretch it to shape on the top and pull down over the bottom edge. From there, use a good glue (high strength contact cement works well) to get it in position and holding and then staple through the leather and pan. You want to make sure to use staples that are slightly longer than 1 layer of leather plus the pan thickness to ensure they get through and hold. The foam and outer layer of leather will be enough to keep them from contacting the rider. For extra padding, it's a pretty common practice to dish out the foam where the rider(s) sit and add a layer of closed cell foam or light-medium density memory foam. The new, better foam should provide a more comfortable ride. If need be, yuo can buy different thicknesses of it and dish out a one inch deep section for medium density and then lay a 1/4 inch light density on top of that and simply feather it in. Foam can be glued to foam using 3M 90 spray glue. As for cutting the foam, knives work but will leave choppy, messy edges. A good, cheap alternative is to get an electric bread/carving knife from your local chain store like Target or Walmart. They usually sell for about $12-15 new and have dual blades that smoothly sheer the foam making it cleaner and easier to shape. Hope all this helps! Chris
-
Thanks Troy! Thanks Big Steve. These two were bound for Hertfordshire. Not sure where that is in relation to where you are. That would be pretty cool if you ran into them though. Chris
-
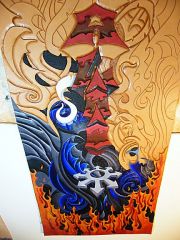 Very cool! I noticed you started coloring before (it appears) it's all tooled? Or will part of it not be tooled, just cut? The design is pretty sweet too.
 -
Cutting, Drilling And Polishing Antler And Bone
Spinner replied to UKRay's topic in How Do I Do That?
Hey Ray, Actually standard woodworking tools (saws, dril bits, lathes, sand paper, etc.) all work fine on antler. It's less dense than most exotic hardwoods and cuts, sands and polishes rather easily. Just attack it like you would any piece of good solid wood and you'll be fine. if the antler in question is too porous or feels "crumbly" on the inside due to being too dried out, you can stabilize it with CA Glue (super glue). Just make sure to coat the entire bead as the glue will cause slight discoloration. One thing to note, freshly cut antler smells like crap. Literally. Actually, it smells like crap that has been sprayed by a skunk and then dipped in a sewer. In other words, work in a well ventilated area and clean up the dust when you're finished otherwise it will linger. Chris -
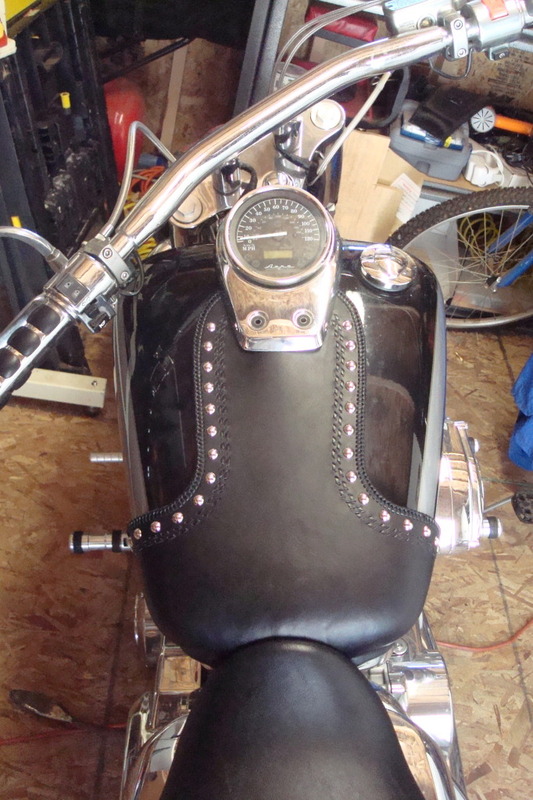
Thanks for the kind words DS and Dirtclod. Thumper, my design is based on the Peaceful Cruisin bibs that a lot of VTX folks used to buy (PC retired this year from custom work). They actually only went 1/2-3/4 on their bibs as well and I've read that this will solve the speedo buzz VTXs have. I have 5 different patterns for these bibs depending on the style the customer wants, so definitely make yourself one. What I did was to tape some duck cotton/light canvas fabric onto my gas tank with blue painters tape, find the center line and mark the line. Once you have the center line, draw your design for one side and make sure to do the full wrap and everything (just don't stretch the fabric otherwise the pattern won't be true). Once it's all wrapped around the tank and your design is drawn, fold the pattern in half at the centerline and then cut it out; this should give you a full pattern. Transfer that to leather and put center line registration marks in areas that won't show so the leather can be lined up. Case the leather really well (you should be able to manipulate it anyway you want). The lay the leather on the tank, line it up to center and tape the top down to the tank under the speedo to keep it from stretching down too much. Once it's in place and secured, start at the leading edges and wet mold the leather to the tank working both sides evenly back towards the center. I use medium sized binder clips with a piece of scrap leather between the clips and the bib leather to avoid marks. As you make your way around the tank, clip that area to the tank seam and keep going. If the leather bunches up under the tank, just keep moving the bunch towards the center (near the tank bolt) as this will be trimmed/hidden by the seat. Once it's all formed and clipped, let it sit in a warm area (but out of direct sunlight) until the leather feels room temp. At this point, you should be able to remove the binder clips and finish molding the lip & edge. Use a bone folder to define the line where it wraps over the tank seam, get everything folded and tight underneath, etc. At this point you can also cut a V-shape out over the tank mounting bolt at the seat and use that relief to get wrinkles/edges tight underneath. Once your satisfied with the bottom edge, let it dry completely. A couple of tips: * When you make your pattern, add two little tabs at the underside of the leading edges. This will be for velcro to secure underneath the tank. * If you are going to do any tooling, lacing or stitching, punch the holes before doing the wet molding. It's much easier to do when the leather is flat and the holes won't stretch out of shape if the leather is cased properly. * Make a felt version of the pattern (only the part that covers the top of the tank) before wet-molding. Tape the felt to your tank with blue painters tape and wet mold over the felt. The reason for this is it will create an air pocket under the bib so when you glue/stitch the felt to the back the bib still fits properly. Otherwise it will be really tight and not fit well when fully assembled. Let me know if you want me to send a photo of my pattern to give you a starting point. It won't fit your bike, but you'll understand what your pattern should look like. Hope this all makes sense!
-
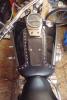
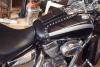
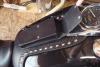
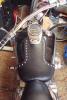
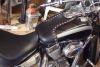
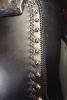
Here are the latest 2 bibs I have made for a custom request from a couple of gents in England. 5/6oz W & C leather, decorative double buckstitch and triple loop laced edges with 12mm domed rivets running between. At total of 23 yards of 1/8" kangaroo lace and 30 rivets on each one. The pocket was a new design for me, moisture is a big concern over there so I designed the pocket to have no 'gutters' for water to sit in, all seams are either covered or downward facing and the lid has long gussets to ensure water stays out. When I asked how often they rode in the rain, their response was, "if we didn't ride in the rain, we'd never ride!" One of the guys wanted a pocket, the other wanted just the bib itself. They also chose different wrap styles. Finish is a bit more hardcore than usual because of this. After dying & burnishing, I used neatsfoot oil, then tan-kote, then Pecard's leather conditioner followed by Pecard weatherproof leather dressing (2 good coats of the last). Enjoy! Chris P.S. - you might notice some bowing on the wider bib in the photos. This is because I didn't want to bolt down the speedometer and possibly put scratches in the bib before it was centered and attached with the velcro underneath. Once the owner mounts it on his bike, bolting everything down won't be an issue and there won't be any bowing.