


Wizcrafts
-
Posts
7,814 -
Joined
-
Last visited
Content Type
Profiles
Forums
Events
Blogs
Gallery
Store
Everything posted by Wizcrafts
-
The Type Of Sewing Machine You Need To Sew Leather
Wizcrafts replied to Wizcrafts's topic in Leather Sewing Machines
Art; That sounds like a good plan. I will work on it this weekend. I have to go make holsters and sew stuff today. Catch you later on... -
The Type Of Sewing Machine You Need To Sew Leather
Wizcrafts replied to Wizcrafts's topic in Leather Sewing Machines
Wait until I have time to review what all I've posted in this huge topic. I want to make sure there is nothing I left out that would be relevant to the topic. I'll let you know if/when to lock this topic. Till then I'll try to steer new posters into starting their own topics. -
The Type Of Sewing Machine You Need To Sew Leather
Wizcrafts replied to Wizcrafts's topic in Leather Sewing Machines
Please post your questions as a new topic on the forum. You will get all kinds of answers from our sewing members. -
The Type Of Sewing Machine You Need To Sew Leather
Wizcrafts replied to Wizcrafts's topic in Leather Sewing Machines
No, I don't. You should start a new topic and ask for other members who might know about that machine. This topic is for general information about types of machines for sewing leather, not specifics about any particular make or model (although it sometimes gets that way). -
Ya got me figured out Pilgrim. I admit being addicted to old sewing machines.
-
Cheryl; I guess I like the little bugger, especially after all the time I put into rebuilding the motor and associated gears. It will still make a nice on-location machine for hemming things, or repairing dress belts on location (flea markets, bike shows, etc). It is in a carrying case, not a table. Now I understand the speed problem you have. That old pushbutton foot pedal is not easily controlled, especially when it is so old. The pot pedal that came with mine finally lost its slow speeds and I had to replace it. Wish I'd done that sooner.
-
My Singer 15-91 sews about the same as yours does on leather. It is okay up to about 1/8 to 3/16 inch, then it gets very hard to penetrate additional layers or feed them without dragging down the stitch length. It only uses thin #69 thread (11 pound test). I did try to use a #20 needle and #138 thread in mine and almost blew up the motor. You can buy a solid state control pedal that will give you much better control of the motor. I got mine from Toledo Industrial Sewing Machines. I had to wire it up, but from what I read from you, wiring a pedal won't be a problem. BTW: I bought my 15-91 from a local Salvation Army store for $75.00 plus tax. I now have about $175 in it, after buying replacement parts, an even-feed foot and the solid state pedal.
-
The Type Of Sewing Machine You Need To Sew Leather
Wizcrafts replied to Wizcrafts's topic in Leather Sewing Machines
Neither of those machines has been produced in a very long time. The 7-25 is very ancient and you may have a hard time finding any parts for it, should it need any. Parts for the Singer 132k6 may be available from former Singer industrial sewing machine dealers. I once had a 132k6 and found it to be an excellent machine for sewing thick buffing wheels and nylon webbing projects. It was so-so on leather, due to the sometimes unpredictable snap action of the spring foot. If you can tame the spring foot, the 132k6 can stitch as long as 2 to the inch (12.5 mm), with #277 thread, into no more than 1/2 inch of leather, webbing, or cloth. Feed is via bottom feed dog and a spring loaded snap-forward outer foot that follows the top layer as it moves back. If the spring snaps forward too soon, stitch length varies all over the place. This happened to me when I tried to edge stitch belts that had been polished with Carnauba creme, or glossy wax. You would be better served with a modern, still in production, walking foot machine with triple feed and a large bobbin. Most of these machines can sew 3/8 inch (10 mm) of leather, with up to #207 bonded thread, using a #24 leather point needle. -
Looking For Specs For A Sewing Machine...
Wizcrafts replied to FHL FERG's topic in Leather Sewing Machines
That machine resembles a Cowboy CB2500 and Techsew GA5-1. If this machine has the same specs, it can sew up to 7/16 inch of leather, using needle sizes 23 through 26 (plus or minus a size). It can handle thread sizes 138 through 346. Like the aforementioned machines, it will be bottom feed only, with a flat fixed presser foot and has a large cylindrical bobbin. These machines are based on the ancient Singer 45k25. They are good machines for sewing just under a half inch, but where the tooth marks on the bottom are not normally seen, or considered unacceptable by the end buyers of the goods produced on the machine. -
If any of you are going to the Sheridan Wyoming leather show this month, I could get the Union Lockstitch to the show with a friend who will carry it for $200. I'd need to know by Tuesday, May 8, to have time to break it down and get it to him. Otherwise, the deal is cash and carry from Flint, Michigan, or you pay someone to have it picked up and trucked to you. Call me at eight one oh - four two two - five three oh one
-
Doug has informed me that he might be willing to trade the Randall R132 strap cutter (with all extra parts) for an Adler 205-374, complete, in good working condition. Otherwise, the machine is still for sale for $3500, cash and carry, Flint, Michigan. If you want it shipped, you'll have to pay him extra for palletizing it, etc. Since his business hours now vary, please leave a message on his machine if nobody answers your call. His name and number is: Doug Monroe 810-732-4907
-
A lot of the 29-4 patchers were built in the 1920s and 30s. They were used by cobblers for shoe and boot repairs. Most were badly worn out by their 50th birthday.
-
If you have $1200 to spend on a sewing machine, why are you looking at a century old shoe upper patcher? What do you intend to sew with your next machine?
-
Without seeing close-up photos and a report concerning the play in the presser bar/feed crank, I would have to advise you that, unless the machine has no more than a few dozen hours of use, $1200 is more than unfair; it is highway robbery. The machine is probably between 90 to 100 years old, and while that in itself does not determine its worth, the amount of slack in the feed and shuttle driver mechanisms and condition/absence of required tensioning components does. If you go and inspect the machine and find it to be in very good condition, with almost immeasurable slack in the presser foot feed mechanism, $500 to $600 would be a more than generous (private party) offer. OTOH, if there is considerable free movement of the lifted presser foot (forward/backward), or tensioning parts are missing, binding, or broken, $250 - $300 would be a fair price, considering what it will cost to have it brought up to specs. A worn out 29-4 patcher will have a small maximum stitch length, or may not feed at all. Even if it is as tight as the day it was built, 5 stitches per inch is all it will give, into about 1/8 inch of leather. At 1/4 inch, the maximum it can sew, the stitch length may drop to no more than 6 or 7 per inch. The 29-4 is not suitable for use with thread heavier than #92, top and bottom. The bobbins are very tiny and don't hold very much thread. The machine was made for repairing tears in boots and shoes (with frequent bobbin and top thread color changes) and is most frequently used to sew patches onto leather biker vests. The only way a 29-4 would be worth more is if it has been rebuilt by an industrial sewing machine mechanic who is selling it through a dealership with some warranty. The dealer would have presumably replaced all worn, broken and missing parts, timed it, tensioned it and tested it on leather. They will also be able to supply needles, bobbins and bobbin cases for it, as well as a threading rod and thread. Such a rebuilt to specs machine could go for upwards of $1000, treadle operated. Patchers mounted on cast iron bases are not easily converted to motorized machines, with the exception of using a 1.5 amp (150 watt) home style motor and solid state controller. The motor bracket would have to be custom fitted to a hole you would have to drill and tap into the lower back section of the machine. I have such a setup on my long arm Singer patcher and the motor can barely start the machine on its own. Perhaps it would be easier to turn over a little bitty 29-4.
-
Toro 4000 Update And New Questions
Wizcrafts replied to ouchmyfinger's topic in Leather Sewing Machines
I use #138 thread on guitar straps, sewn at about 5 stitches per inch, with a #23 needle. For belts, it depends on the style and thickness of the belt. Dress belts, as Art mentioned, are usually sewn with thin thread, like #69. The thread is only there to keep the glued thin layers from separating over time. The stitching is not usually noticed by the wearer or other people. Dress belts are often sewn at 8 to 10 stitches per inch, with a #16 needle and #69 thread. Move up to more serious 8 ounce veg-tan belts that are lined with 4 ounces of suede, and you need at least #138 thread (w/ #22 or #23 needle) to properly secure that package. 6 to 7 stitches per inch is about normal for these belts. Ramp it up a notch, Bam! If you build double leather belts, between 3/16 to 5/16 inch thick, the thread I use is #277, sewn with a #25 needle, at 4.5 to 5 stitches per inch. If you decide to enter the Stratosphere and make gun belts and weight belts that approach 3/8 inch thickness in areas, you may prefer to use #346 thread, sewn with a #26 or #27 needle, with a stitch length of 4 to the inch. All of the above examples are based on my own experience and opinion. Whenever possible, use an S point leather needle. Since your questions pertain to a Toro 441 clone, you are limited in the sizes of needle available with a leather point. Most of our dealers only stock S point, system 794 needles in sizes 23 and up. If you need to sew with thinner thread and smaller needles, they will probably be regular round point needles. -
I hate to have to tell you this, but that machine is probably not ever going to sew with #346 bonded thread. Not unless the dealer changes the needle bar to take system 328 needles, which are available in sizes 23 up. It takes a #26 or larger needle to sew with #346 thread. The machine you linked to takes up to a #23 needle, which is for #207 thread, maximum. If you intend to sew with #346 thread, consider a machine such as the CB2500 or GA1-5
-
Check with any upholstery shops. They always have extra walking foot machines on the floor somewhere. Drapery shops sometimes use walking foot machines. Leather garment makers and repairers use walking foot machines. Other than these, you will be struggling with a straight stitch machine if you try to sew real leather, using #138 thread.
-
Toro 4000 Update And New Questions
Wizcrafts replied to ouchmyfinger's topic in Leather Sewing Machines
It might help feed certain materials better, especially when backtacking. You would also need to buy a slotted throat plate that matches the width and travel of the feed dog and a screw to secure it inside the end of the arm (unless one is already present. YouTube, but there are not very many feet available for the 441 clones. Really, all there are are the blanket feet and harness feet (left, right and double toe). I prefer pre-lubricated thread, over liquid silicon in a pot. When the machine shakes, the silicon sloshes out of the container and drips onto my foot. Toledo Industrial Sewing Machines sells Cowboy branded lubricated thread. Weaver also sells a lubricated thread, if you have a State tax number and registered business name. In lieu of lubricated thread I have an add-on wax pot bolted on top of my machine. I keep it filled about 1/3 up from the bottom with liquid silicon and run otherwise dry top thread through it. The lube makes it easier to pull the knots up into the leather and for the needle to go through dense leather without grabbing inside it. -
If you buy the right machine you could purchase replacement springs for the top tension desks and presser foot. But, it is best if you buy a machine already designed and adjusted to use #138 thread. Have you looked into the Juki LU-1508 series?
-
I just re-read the specs for the Juki DDL-8700, and apparently, only sub-model 8700H is able to use a #22 or 23 needle. It is also possible that the H model has heavier pressure springs. You'll have to contact Juki to see if this is true. Also, self oiling machines must be operated at high speeds to get the oil pump to deliver the oil to all ends of the wicks. Leather sewing is done at very slow speeds and the sump pumps may not distribute enough oil to the bearings at slow speeds.
-
RedDevil; Did you pay attention to this description of the Juki DDL-8700: "By thoroughly investigating and modifying the sewing mechanisms in order to achieve low-tension sewing, the machine flexibly responds to various kinds of materials and produces beautiful seams of consistent quality." That is the opposite of what you will need to sew hard material with hard thread. You will be doing high tension sewing if you use #138 thread and a #22 needle. You need a slow speed, manually oiled heavy duty machine, with extra heavy top tension and pressure springs. The shuttle driver may need to be opened up to allow #138 thread to go around the bobbin case. For sure, you'll need to change the presser foot to either a Teflon or a roller foot. It's almost certain that the needle bar clamping screw may have to be replaced, to allow it to be cranked down incredibly tight to keep the needle bar from slipping under the impact.
-
There may be a burr, or foreign material bonded on the metal adjuster shaft, or the tension disks. Remove and clean/buff, or replace the threaded tension adjuster shaft and the disks. Watch the top thread and see if it is looping over any objects that might affect the pull on the thread. Some black thread is very springy and tends to form loops that interfere with the tension.
-
Three causes of the top thread wrapping around the shuttle carrier come to mind. Wrong length needle. If the needle is too long, the eye of the needle will be too low, causing the loop to be pulled under the carrier. Use 29x3 or 29x4 needles. Broken top of a needle shaft stuck in the needle bar. This happens when a brittle steel needle is overtightened with the needle securing screw. The broken top can get jammed into the mounting hole. When you replace the needle with the normally correct type, the length is too long and the eye too low. Remove the mounting block, unscrew the needle screw and tap hard on a solid surface to try to dislodge a broken needle shaft. Shine a light into the screw hole and try to see if there is a broken piece in the upper section. Incorrect threading of the top thread could allow this to happen. Check the thread path.
-
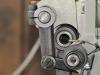
The arm I referred to is on the left in this photo. It cranks the inside foot up and down once the outside foot is all the way down. Loosen the big hex head bolt on top of the arm and you can freely reposition the inside presser foot, in relation to the point of the needle. Usually, if the inside foot hits too soon or too late, the work gets pushed back towards you by the feed dog (bad dog!).
-
I concur. I just tried this (specific rotation position of pressure adjuster) on my CB4500, with the same results. Who woulda thunk it?
