-
Posts
589 -
Joined
-
Last visited
Content Type
Profiles
Forums
Events
Blogs
Gallery
Everything posted by Grey Drakkon
-
Have you tried dying and then very carefully going over it with a light grit sandpaper? That might highlight the raised areas, but would probably change the texture. It's something to try, anyways.
-
Is the photo sideways? The carving is very nice, but the layout is a bit odd as it is.
-
Yeah I'm going to retake the pics with a real camera, my phone was doing a piss poor job last night, and I didn't realize it until the pics were posted.
- 2 replies
-
- tboyce
- coin pouch
-
(and 3 more)
Tagged with:
-
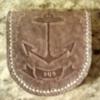
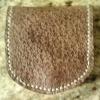
Thought I'd show off a piece that involves several firsts for me. Tboyce was generous enough to make and share this pattern for a coin pouch,so it was my first time using a member's pattern here. I also just got my dixon pricking irons and awl, so it was my firsttime using them. Also my first time using the stitching pony that I just finished making today. Also just got the mahogony dye and used that.Oh, also just got those snaps and used them for the first time. Considering all these firsts, I'm pretty happy with how it turned out! Whoops, forgot that the tooling was done with new tools too! This will be a gift to my dad. The anchor is from the Rhode Island state flag.
- 2 replies
-
- tboyce
- coin pouch
-
(and 3 more)
Tagged with:
-

Sheridan Style Pic Frame
Grey Drakkon replied to IngleGunLeather's topic in Floral and Sheridan Carving
Actually it seems to be more like a mat, which fits into a frame, than a stand alone frame. I could be mistaken though. -

You Never Know What You Are Going To Get In To
Grey Drakkon replied to taintedelephant's topic in All About Us and Off Topic
If you have a frame shop near you go in and ask if they have any. Customers come in with posters and half the time leave the tube so most frame shops are happy to offload them for free or cheap. -

Face Wallet Gag Gift
Grey Drakkon replied to Kaje's topic in Purses, Wallets, Belts and Miscellaneous Pocket Items
I can see it now, some day in the future he misplaces his wallet and calls up a store he was at. "Hi, I think I might have left my wallet at your store, can you please check for it?" "Sure! Can you please describe it?" "It looks and sounds like me." "......" -

Advice Wanted On Pricking Irons/stitching Awl
Grey Drakkon replied to Grey Drakkon's topic in Leatherwork Conversation
I did see that tip and thought it was pretty clever. Fortunately I already have a giant box of bandaids due to the cardinal rule: Do not bleed on the artwork. I'll have to put up pics of my kludge job of my first stitching pony, finishing it up just in time! -

Advice Wanted On Pricking Irons/stitching Awl
Grey Drakkon replied to Grey Drakkon's topic in Leatherwork Conversation
I'm quite excited, I just got my irons and awl in the mail yesterday! Didn't get home until late so I couldn't play with them, but I did manage to stab myself with the awl by testing the point. Man it's sharp! I expected it to need sharpening so I lightly touched the tip and felt it go through skin. Can't wait to see it in action! -

What To Do With Ugly Colored But Textured Skins
Grey Drakkon replied to Tiara's topic in All About Us and Off Topic
Haha yeah I never would have guessed the snakeskin being used for nails, I bite mine way too much and only use nailpolish as a means to slow me down, since I'm a destructive picker and need to remove the polish before attacking my nails again. I also never had any inclination to "girly" stuff, always chasing animals, hiding in the woods, doing my best to become an only child when I have three siblings. ...Probably more than anyone wanted to know. >_> Anyways, I was thinking how incredible this stuff would look as an inlay for a dragon shape. -

What To Do With Ugly Colored But Textured Skins
Grey Drakkon replied to Tiara's topic in All About Us and Off Topic
The shed snake skin has some excellent potential, not only for ornaments but on 2-d applications like paper. It could be a lot of fun to make some ACEO's (artist trading cards, 2 1/2"x 3 1/2") just to bang out some fun forms. I'd love to see these hides combined with raku fired pottery, ( https://www.google.com/search?q=raku+pottery&espv=2&tbm=isch&tbo=u&source=univ&sa=X&ei=sdOJVIv7FIqbyAT4t4GgAw&ved=0CDkQsAQ&biw=1024&bih=677 ) some of it (usually the American made kind) can have that iridescent beetle sheen and crazed finishes that would go hand in hand with your leathers. -

What To Do With Ugly Colored But Textured Skins
Grey Drakkon replied to Tiara's topic in All About Us and Off Topic
Fantastic, and I mean that in every definition of the word! Have you thought of using mica powder (it's used in polymer clay for various effects) mixed with the finish to add another layer of shine/color? They come in all sorts of colors, this is a tutorial for polymer clay but it shows you how strong the mica colors can be: http://thebluebottletree.com/free-polymer-clay-tutorial-mica-leaf-pendants/ I imagine if you put a coat of clear finish on the hide, wiped off the raised areas and poured on mica powder, you could get some interesting outlined scale patterns. Damn, now I want to try it! -
Hey another archer! I have a recurve of my own that I got this year, which brought all my friends with bows out of the woodwork. Lovely quiver, and excellent job on the font and lion! I like the decorative zig zag stitching too, suits the theme nicely.
-
Thanks! If I remember right, the patterns were from a celtic shield boss. Made those when I took ceramics in college.
-

Advice Wanted On Pricking Irons/stitching Awl
Grey Drakkon replied to Grey Drakkon's topic in Leatherwork Conversation
I'm happy to be getting such a great discussion! I love seeing physical comparisons like that, so thanks. -

Advice Wanted On Pricking Irons/stitching Awl
Grey Drakkon replied to Grey Drakkon's topic in Leatherwork Conversation
Thanks for clarifying, because I was stumped after counting the tines a few times and still coming out to 7 per an inch. Maybe that's the issue between the suppliers, when one says "7 per an inch" one is talking about stitches, the other is talking about tines. Neither one is wrong, they're just talking about two different things. -

Cleaning The Meander/basket Weave Pattern
Grey Drakkon replied to rockinjleatherwork's topic in How Do I Do That?
Bummer that you did all that extra work for naught, but I suppose it was a learning experience. -
Liquid latex can usually be found in art stores where watercolors are sold. I would definitely experiment on a scrap piece of leather from the hide you're using first, because it's VERY liquid when it first goes on. You apply it with a brush, let it dry, paint another layer or two over it and let those dry, then paint/dye/spray as usual, wait for it to dry a bit then peel off the latex usually lifting up an edge with a sharp blade. Using that stuff is how I made these bowls:
-

Advice Wanted On Pricking Irons/stitching Awl
Grey Drakkon replied to Grey Drakkon's topic in Leatherwork Conversation
I agree with the others, unless you're using them for really thin leather I'd be leery of those irons, and even then I'd be careful with how I used them. As for the Joseph Dixon irons, I've ordered them and am anxiously awaiting them. Has anyone in the U.S. ordered from them? How long did you wait for them to arrive? I keep checking the mail every day for them. -

You Never Know What You Are Going To Get In To
Grey Drakkon replied to taintedelephant's topic in All About Us and Off Topic
Welcome to the club! I figure there's far worse things than being addicted to leather since it keeps ya busy and out of trouble...Until you get near some tools you just need to have, oh, or maybe some new patterns to try out, oh, or some nice new leather... >_> No, I don't suffer from an addiction, I love every minute of it! ;D -

Cleaning The Meander/basket Weave Pattern
Grey Drakkon replied to rockinjleatherwork's topic in How Do I Do That?
Oh I think I know that gunk that you're talking about, it's nearly tar-like! I'd be tempted to go in there with a dental tool and see if it can be picked out. -
I'm more of a book hoarder than a collector, since it's more along the lines of "is this something I want to read?" Need to build another book shelf, or three...Maybe four. >_< I also have a bad habit of picking up Pathfinder figurines even though I don't have the chance to play too often. Need to make more shelves for those, too. I'm in danger of collecting recurve bows, I've only got the one so far but the only thing stopping me from getting a messload more is money.
-
I'd also be leery of a request to leave off a maker's mark, especially if you display it on a spot that isn't prominently displayed. Like Wyoming Slick, I've seen marks that were just gigantic and to me at least took away from the overall look of the piece, but if it was on the back or under a flap I can't see any reason to object to it. You might want to explain that you use your maker's mark to not only brand your particular work, but to identify it if for some reason it would need repair. I work at a frame shop, and we put a sticker on the back of each frame we make. If someone brings in a frame where the picture has come loose behind it and our sticker is on the back, we take it apart, fix it, and put it back together again for free since it was done at our place. If it has no sticker or was done elsewhere though, they're charged for labor and materials since it's not something we did that caused the piece to come loose. (of course this is only for pieces that have come loose on their own, falling off the wall or actual physical damage gets properly charged) When you explain that your mark is added insurance he may reconsider.
-

How I'm Gonna Sew A Box From Individual Parts Of Leather
Grey Drakkon replied to Lillian ADju's topic in Sewing Leather
I should say, I'm also interested in this because I have a set of leather "dice" at my shop that I use to pin down curled up paper. EVERYONE comments on them and I know I'd sell a ton if I ever get around to making some of my own! (prior owner got them out of some catalog) They're pretty simply made, the stitching is an overstitch that's looped around the outside which doesn't seem to bother anyone. I'll have to get on the ball and make some to see how they turn out.- 18 replies
-
- box
- individual parts
-
(and 2 more)
Tagged with:
-

How I'm Gonna Sew A Box From Individual Parts Of Leather
Grey Drakkon replied to Lillian ADju's topic in Sewing Leather
I don't have enough time to watch the entire video right now but I got up to the part where he says the leather needs to be at a 45 degree angle. Working in a frame shop, I can tell you that mat cutters are set at 45 degrees...I might need to experiment with some leather at work.- 18 replies
-
- box
- individual parts
-
(and 2 more)
Tagged with:


