Sixer
-
Posts
351 -
Joined
-
Last visited
Content Type
Profiles
Forums
Events
Blogs
Gallery
Store
Everything posted by Sixer
-
Good to know... I'd like to avoid having to buy another fake gun Although... I do need a Springfield XDS. Are those being made yet? Thanks!
-
I have an order for a H&K P7M8 holster. I own a regular P7 (PSP) model. Can I use my H&K P7 to mold a holster for a P7M8??? Thanks!
-
I don't if this will help or not... found a few on Etsy as well. http://www.dreamtimecreations.com/product/13339/craftool-pyramid-rivet-setter-12/ http://www.etsy.com/search?includes%5B%5D=tags&q=pyramid+rivets
-
Man... I just looked a bit more, and these are harder to find than I thought! That said... I would think that if you find some, you'd want the biggest one available. I dunno!? I'll keep an eye out though!
-
Next time try Google... I hear it's a great way to search Just kidding. But seriously here is a link I found with a quick search - http://mainelineleather.com/catalog/product_info.php?cPath=37_118&products_id=1912&osCsid=b121391599f0726662bb452722646518 Craftool, so it sould be available other places. Cheers.
-
Hi Ferg, Just curious how the metal piece is secured to the press? Thanks!
-
That's good info on the the 1/4" steel. Sorry for the confusion... but I was actually referring to the "jig" in the OP... more info from 50yrs would be great!
-
I've been wanting to do something exactly like this! I have the press, with a bore in the ram.... Any more details on the jig? Thanks!
-

Gum Trag Resists?
Sixer replied to renegadelizard's topic in Gun Holsters, Rifle Slings and Knife Sheathes
I've done this before... Gum Trag is not my friend. Honestly, I don't think I'll use it again. -
Xd9 Iwb Holster Pattern
Sixer replied to glockanator's topic in Gun Holsters, Rifle Slings and Knife Sheathes
Glockanator, What type of IWB holster are you going for ? Single clip, double clip, belt loops? -
Xd9 Iwb Holster Pattern
Sixer replied to glockanator's topic in Gun Holsters, Rifle Slings and Knife Sheathes
No offense... but it's fairly easy. I'd be willing to help you come up with your own IWB design! What part of the pattern process is giving you problems? -
First "gun" Belt... Questions
Sixer replied to Sixer's topic in Gun Holsters, Rifle Slings and Knife Sheathes
Great info guys! I really appreciate the input. Keep it coming -
First "gun" Belt... Questions
Sixer replied to Sixer's topic in Gun Holsters, Rifle Slings and Knife Sheathes
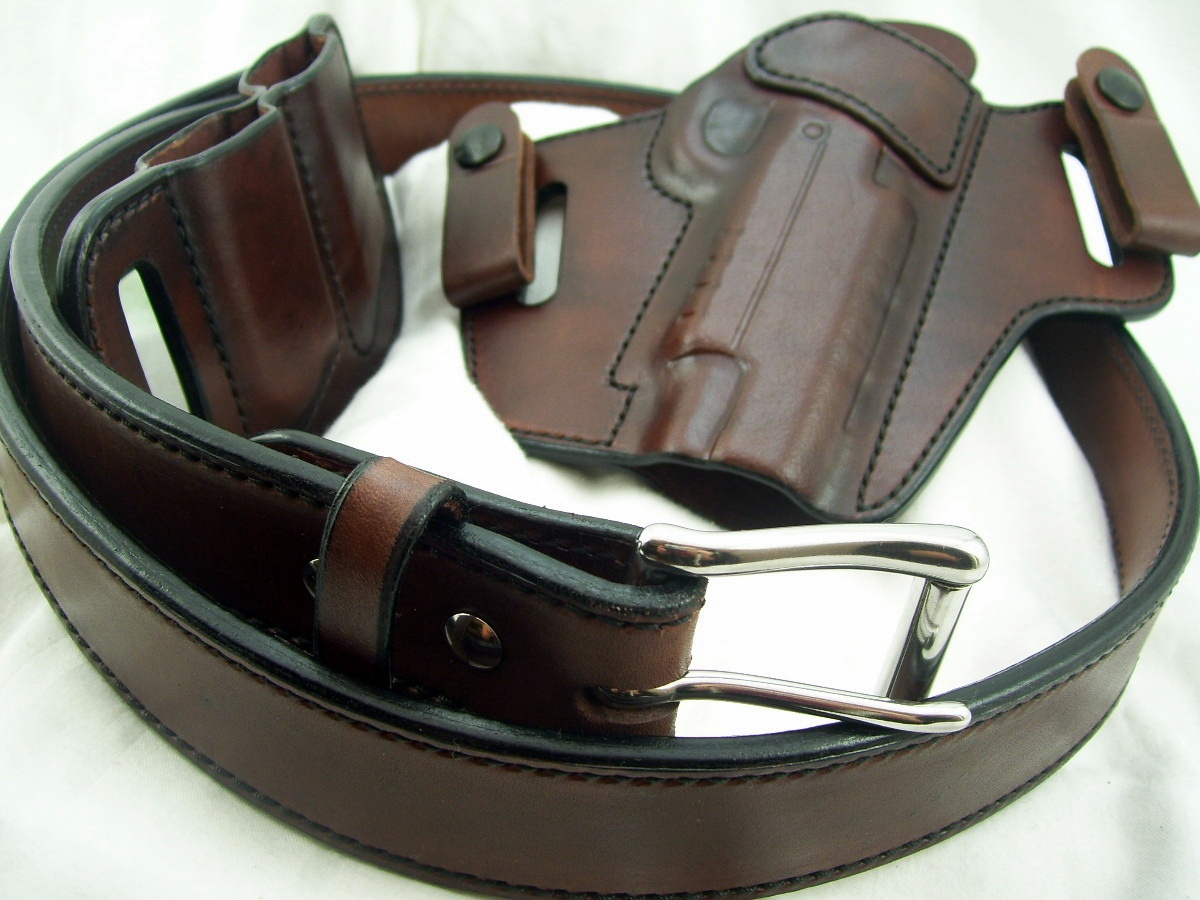
Thanks for the input guys! Shooter, I may have to pick up one of those splitters... Is it Tandy's "High Tech" splitter? Dwight, I was actually going to PM you but I figured I had bugged you enough in the past few weeks, haha. Do you have any pics of your belt burnisher? I definitely need a different setup for burnishing belts. As far as the thickness, it's just a HAIR over 1/4 ". I "ordered" 7/8 oz leather... but who knows. It's definitely not thick enough to be 8/9 oz, but I will certainly be measuring the strips from now on. Here is a pic of the belt, holster, and mag carrier.... not a great shot of the belt, but all I have for now. It doesn't show the wrinkles, but they are definitely there
-
So I finally attempted my first gun belt... It was way more frustrating than I anticipated. Actually, I technically made 3 belts this weekend... but 2 of them ended up in the "box" I used two layers of 7/8 oz double sholders that I ordered from Weaver's. I payed an extra $9 to have them cut the hide into 1.5 in strips, which I really liked. My first issue was skiving/ splitting. I decided to try and and split each piece at the buckle and keeper area to minimize thickness when it's folded over. I did this with a hand skiver, which made it nearly impossible to get a consistent thickness and took way too much time and effort. Is there a better way to do this that doesn't require a $500+ piece of equiptmen Secondly, two layers of this 7/8 oz leather made a belt that was just over 1/4 inch thick. Extremely sturdy... but IMHO a bit thicker than I would like. I'm thinking that 2 layers of 6/7 oz would be more than sufficient. Any thoughts? Next issue was the burnishing. Normally on my holsters (different leather) I can get an egde that's slicker than snot... not so much on the belts. I'm using a coco-bolo "drill press" burnisher that is great, but I have to think there is a better way / setup for burnishing belts. I eventually got a nice edge, but I feel like it took much more time and effort than it should have. Finally, my biggest issue / dislike of the finished product were the wrinkles that formed after the belt was completed. I had glued the pieces, punched the holes, stitched it up, dyed the leather, edged the belt, applied the finish, and added the hardware... only to have the belt (mostly the back side, bunch up / wrinkle.) I'm thinking this might be due to the leather... not sure... but how do I prevent this from hapening? I'm sure I'll have more questions to follow, but any help / tips / guidence would be greatly appreciated! Thanks in advance! I'll try to get some pics up soon
-
How Do I Know When It's Time To Toss A Needle?
Sixer replied to Sixer's topic in Leather Sewing Machines
Thanks Wiz! I'll give that a try... and definitely with the power off -
Ok, I'm new to sewing machines... so this may be a stupid question. Fortunately, I have no shame and will literally ask anything How do I know when it's time to change needles on my Cobra Class 4? I'd rather not just wait until it breaks... but there is no need to throw away a good needle! I know the manual says "every 12 hrs of sewing" but I don't keep a timer by my machine... and I have no idea if I'm even close to 12hrs of actual sewing. Furthermore, I go REALLLY slow... so shouldn't I be good for more than 12 hours!? Haha Thanks in advance!
-
hahahaha... I need to update my avatar... KP in a Mermen uniform
-
I ALMOST ordered from these guys. Decided to call first... the guy was kind of short with me, told me they didn't have the colors as advertised... and that I should try the Thread Exchange (which I had already done). I won't be sending the sewing machine outlet any of my $$$. What a joke. Anyway... Weaver's ( http://www.leathersupply.com/ ) does have RED bonded nylon in 277 but I'm fairly sure they do NOT have it in 346. Also, you need to have a business tax ID to order from them... just FYI. Good luck.
-
New Gunbelt And Holster Combo
Sixer replied to goodfella's topic in Gun Holsters, Rifle Slings and Knife Sheathes
Wow! Great looking rig. -
Cobra Class 4 - A Couple Questions From A Rookie User
Sixer replied to CodyG's topic in Leather Sewing Machines
1. That servo motor is tricky to adjust at first... Do what Andrew said and also read the manual. You would think that it wouldn't be that complicated... but it is. 2. Make sure that the needle comes all the way up before you take your work out. This way the stitch is completed. You'll need to manually pull the thread to create enough slack before actually taking your leather out... but if the needle is all the way up it should work. -
I just picked up one of these... http://springfieldleather.com/16721/Lace%2CBoot%2CBlk%2C1-8%22x108%22/ The length of the brush stem is adjustable, so you can control how far into the actual adhesive it goes. That alone should eliminate some mess. There are different replacement brush sizes available as well... so that should help you control the amount of glue you apply. For me, a "light coat" is just that... a light coat. Not really sure how to explain it??
-
Thanks Jeremy! The thread is from Marine Thread Company - http://www.mainethread.com/waxed_cord.html I'm not exactly sure what size I ordered, but they will send you a sample of the different sizes and colors they offer. As far as the horse hide... I've bought from both Springfield and Zach White. I could be mistaken, but I think the horse butts all come from the same tannery, so where you and I buy it probably doesn't matter all that much. Hate to see a good looking holster go to the reject bin! I wish I knew what to tell you... My main gripe with horsehide is the inconsistency... nature of the beast, I guess
-
Was it from the same hide as the previous holster? I've noticed on some hides there are areas that are less dense than others. Also, most hides I've seen vary in thickness quite a bit... just some thoughts. I use horsehide quite a bit... the heat helps it dry quicker, but I haven't found that it makes a big difference on the stiffness. It's hard to say exactly why it didn't turn out as stiff as the other one. Personally, I don't let it soak for that long. I submerse it in hot water for approx 30 seconds and that's usually enough. You can always give it another dip in the water if you need to... Not sure if that helps at all... worth a shot
-
Xdm 45 Compact Vs Xdm 40 Compact
Sixer replied to Sixer's topic in Gun Holsters, Rifle Slings and Knife Sheathes
Thanks for the info Tac! I already have the blue gun for the 9mm/.40 Xdm so I'm going to give it a shot with that. I will be sure to leave a bit of extra space on the stich lines and not go too crazy on the molding. HOPEFULLY that works... I know of one way to find out If it doesn't work I'll be sure to let you know. -
Pay Now, Or Pay Later?
Sixer replied to particle's topic in Gun Holsters, Rifle Slings and Knife Sheathes
Like Spinner said, each item is custom made... so the last thing I want, is to be stuck with a holster that someone decides they don't want or can't afford a few weeks down the road. I ask for at least half of the total amount due before I start a project... then collect the remaining balance before it ships. Seems to be working great so far. Suprisingly, most customers I've dealt with prefer to pay the full amount up front... I have no problem with that either.