Sixer
-
Posts
351 -
Joined
-
Last visited
Content Type
Profiles
Forums
Events
Blogs
Gallery
Store
Everything posted by Sixer
-
Hi Lorne, Just my personal preference, but I always burnish AFTER dying my leather. Not really sure if it matters, but some burnishing formulas prevent the dye from penetrating the leather. If your using Atom Balm Wax you will want to apply it BEFORE you apply your final finish. So basically... 1) Dye 2) Burnish 3) Atom Balm 4) Super Sheen At least that's how I'd do it
-
 Very cool! I really like the contrast in color and grain. Tooling looks great... Nice work!
 -
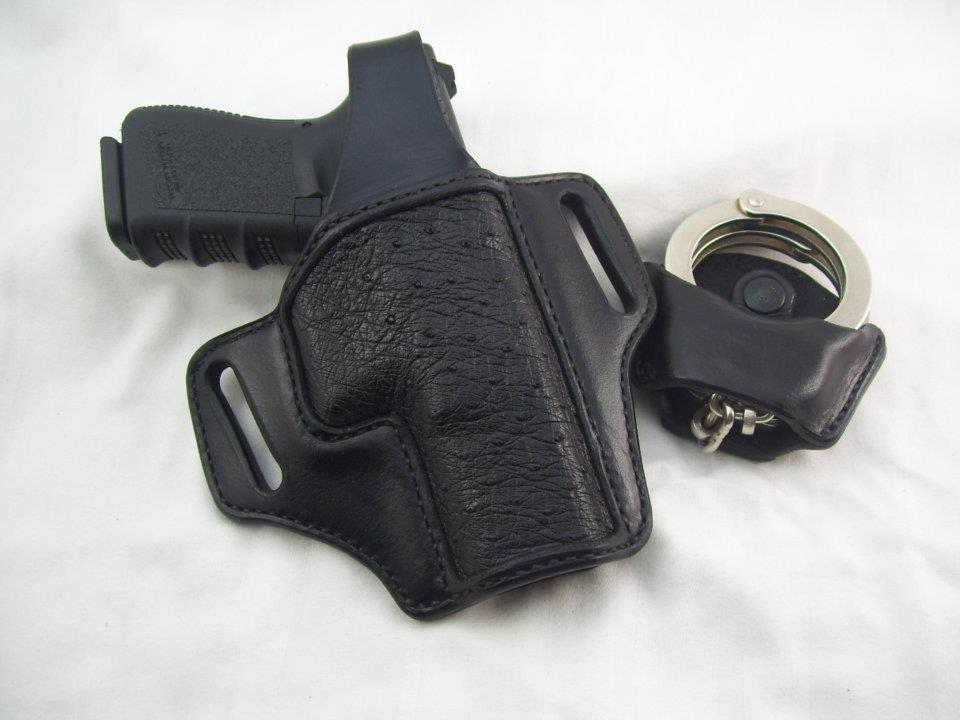
Glock 22 Duty Holster W/ Inlay + Cuff Holster
Sixer replied to Sixer's topic in Gun Holsters, Rifle Slings and Knife Sheathes
Matt, Thanks! The cuff holster just unsnaps with the "thumb"... What exactly is a "pull-thru" snap? Nick, Thanks for the kind words! -
I finished up this holster for a LEO friend not too long ago. I was happy with how the holster came out ... but not so much on the cuff pouch. The "thumb break" area on the cuff pouch wrinkled quite a bit. The pic does not show it very well, but believe me the wrinkles are there and I'm not a big fan of how it looks... especially because it was not intended to be wrinkled. Any suggestions on how to avoid "bunching" or wrinkling of the leather while still keeping it flexible enough to use? Thanks
-
Another Wrap - Full Size 1911
Sixer replied to mattsh's topic in Gun Holsters, Rifle Slings and Knife Sheathes
Great looking rig! What color is that btw? -
The elephant looks great! The stitching looks great as well.
-
PM on the way! Thanks
-
Busted, I would definitely be interested in some of your black rivets if you can track them down! No big rush, but I could use some in both sizes. I wouldn't need a huge quantity. Just let me know if you come across them Thanks!
-
Hahaha... I would have to agree! This post is nearly a year old now, in which time I have seen the light I keep Black, Drk Brown, and Lt Brown handy in 32 oz bottles and the occasional Mahogony, Saddle Tan, Red, etc. in 4 oz bottles. Good advice on the pan sizes and sources... I need to start keeping an eye out. I actually have yet to dip dye anything. For now I've just been using disposable sponge brushes, which I've found to be fairly quick and clean, while still getting good saturation. I'll also touch up the lighter browns with an airbrush to try and achieve a consistent dye job... still hate doing light brown
-
Spinner, sounds like your priorities are in the right place Just want to say "thanks" for the burnisher I received from you. I can honestly say that it was the BEST $30 I've spent on a leatherworking tool. Top notch work and service to boot. Enjoy your new spare time!
-
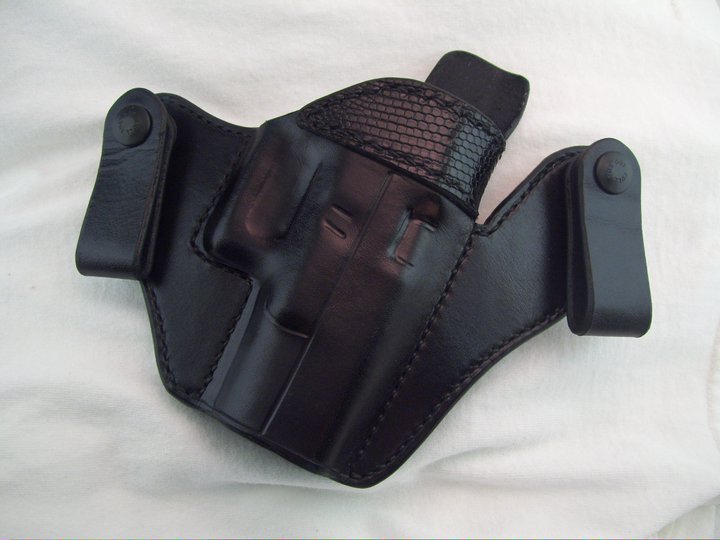
I Hate Making Reinforced Iwb Holsters...
Sixer replied to Sixer's topic in Gun Holsters, Rifle Slings and Knife Sheathes
Well, here is the final product.... Not too bad for my second attempt at this type of holster, although I did forget to include the sweat shield on the main back piece of the holster. Luckily I remembered it in time to add it to the reinforcement piece. Thanks for the help!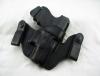
-
I just went to Etsy.com and did a search for "belt buckle" in the sub-category "supplies". There were a ton of results... Might be worth browsing. Here is one that is fairly similar - http://www.etsy.com/listing/61125742/belt-buckle-blank-base-rectangle-silver?ref=sr_gallery_28&ga_search_query=belt+buckle&ga_order=most_relevant&ga_ship_to=US&ga_view_type=gallery&ga_page=9&ga_search_type=supplies&ga_facet=supplies
-
V3.0 Of My First Holster Pattern
Sixer replied to mlapaglia's topic in Gun Holsters, Rifle Slings and Knife Sheathes
Fair enough The customer is always right! I'll be interested to see how it turns out. You've certainly done the planning and prep part of the work... now time for the fun stuff -
Gonna need a picture to help on that one.
-
I Hate Making Reinforced Iwb Holsters...
Sixer replied to Sixer's topic in Gun Holsters, Rifle Slings and Knife Sheathes
That's one of the things I hate most about making this holster. Personally, I don't use a stitching pony / horse for any of my holsters. I cut and burnish the reinforcement piece first. I only burnish the bottom part of the piece because I usually need to re-sand it after glueing it on to even it out. I go ahead and mark my stitch lines on the bottom of the reinforcement piece as well. That way I don't have to manuver around the flaps later on. Once I have the piece glued in place, I use an awl chucked in a drill press to make my holes. I place a few pieces of thick scrap between the part I'm poking holes in and the flaps, so I don't put any holes where they aren't supposed to go. After that, I plop down in front of the TV and start stitching... again being careful not to stick the flaps with my needle. It's a little tedious, and I'm not sure if my way is the "right" way... but it works for me. Hope that helps! ETA - Here is a link to a post by Woolfe that helped me quite a bit... not much on the stitching but good info http://leatherworker.net/forum/index.php?showtopic=22992 -
New Holsters We Are Making
Sixer replied to goodfella's topic in Gun Holsters, Rifle Slings and Knife Sheathes
Nice, clean, and simple. I like it! How's the retention? Just curious. -
I Hate Making Reinforced Iwb Holsters...
Sixer replied to Sixer's topic in Gun Holsters, Rifle Slings and Knife Sheathes
Thanks fellas... I really just needed to complain a little As far as the burnishing goes... I do burnish the entire reinforcement piece before stitching it on... though I always seem to lose that smooth edge when I get it wet to mold. I think what I did wrong the first time was not leaving enough room between the mouth and front flap. I adjusted the pattern this time around so I would have just enough room to get in there and do what i need to do. Particle, I'll take your advise and give it a good burnishing before and after wet molding! I'm a bit more encouraged today. After stitching the reinforcement piece on I found that the front and back fit together nicely... something I was conerned about. Anyway, thanks for listening to my previous rant and I appreciate the advice! Pics to follow! -
V3.0 Of My First Holster Pattern
Sixer replied to mlapaglia's topic in Gun Holsters, Rifle Slings and Knife Sheathes
Are you sure there is "no need to be gentle"? Along with with the outline of the pattern being too "square" ... it looks like the gun is seated too deep in the holster to get a good grip. Just a thought. -
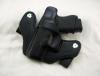
These things are tricky to the point that I don't even enjoy making them. The reinforcement piece is a PITA to line up correctly and even worse to hand stitch. I feel like I could ruin this holster at ANY stage in the process. That drives me nuts. It's also near impossible for me to get a good burnished edge between the front flap and the reinforcement piece. I have a pic of the first one I made... but right now I'm thinking it must have come together by pure luck, because I'm convinced the one I'm working on now is destined to fail. Anyway, just wanted to vent a little bit and see if anyone had any helpful insight on making this type of holster. Any suggestions are welcome

-
Thanks for your willingness to share! Statements like this are always refreshing... Good on you and GREAT looking holster
-
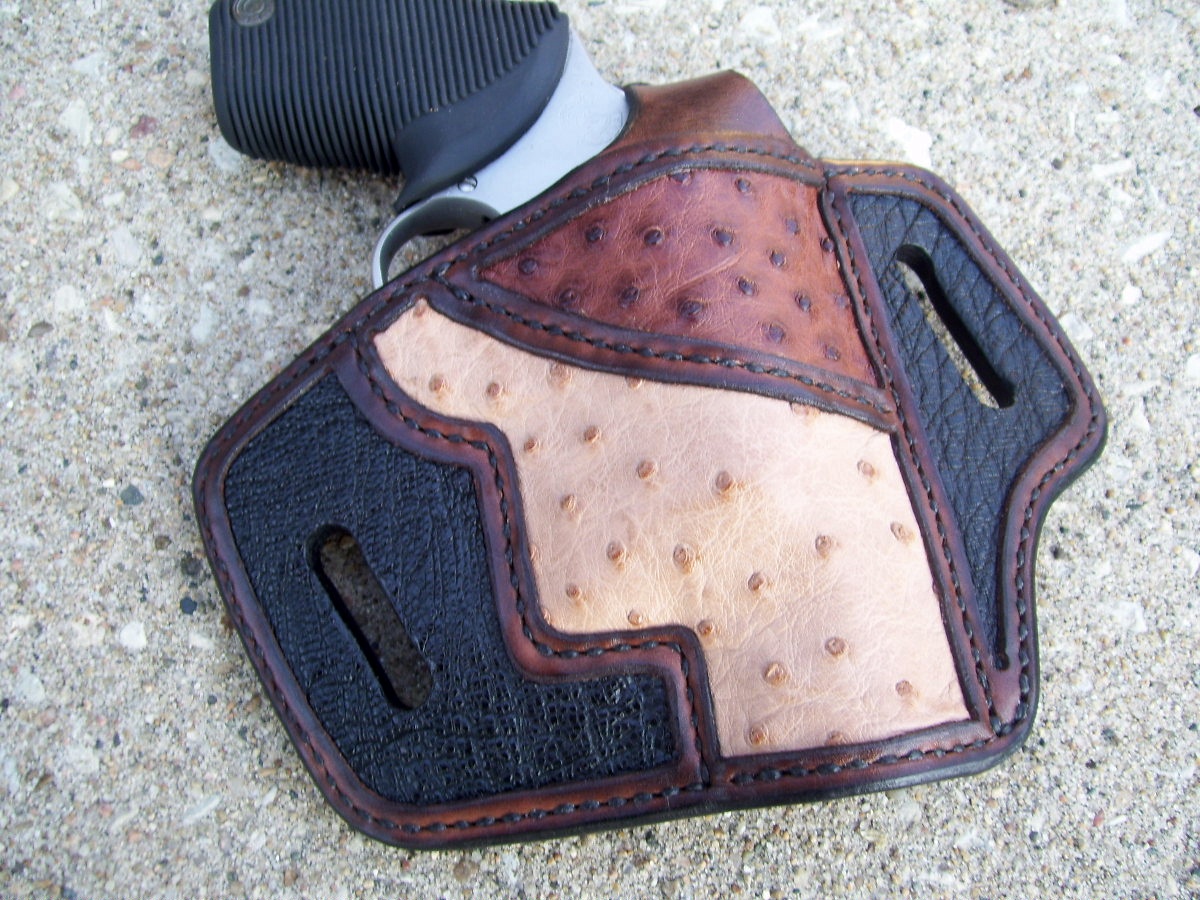
Thanks Particle! IF I had to guess... I'd say you could make at least 8-12 holsters like this one with the 2 lb bag. 2lbs, even in "scrap" is quite a bit of ostrich! Some of the pieces are big enough to cover the entire front of a small to medium semi-auto holster. I'm assuming that these bags probably vary quite a bit, so I'm not sure if I just got a good bag or if this is the standard... I do know that it was well worth the $15 or $16 bucks YMMV
-
How To Make A Double Action Revolver Holster And Gunbelt
Sixer replied to bronco72's topic in How Do I Do That?
My best advice would be to pick up a copy of Al Stohlman's "How to Make Holsters". It gives you simple step-by-step instructions and even provides patterns for various holsters, as well as a shoulder rig. Well worth the $13 http://www.amazon.com/How-Make-Holsters-Al-Stohlman/dp/1892214989 -
Johanne, The pieces where great! Actually better than I had expected. I really didn't need much, but there were plenty of nice medium and small usable pieces, in black, brown, and a light tan color. I'd say about 33% of the ostrich skin had quills. I don't have any pics of the bag of pieces itself but here is a pic of the holster I made using the ostrich from SLC. I'd also recommend giving SLC a call before you place your order. If you let them know what your looking for they can usually get you what you need. Hope that helps! Cheers,

-
I've been asked to make a holster in light brown with stamped letters. The letters need to be colored black. I don't have a steady hand, so using acrylic paint with a brush would likely end up very bad. Dyeing the letters black will look sloppy as the dye will bleed into the light brown. I've seen a number of great looking lettering and stamps with different colors. So I ask... "how do I do that!?" Thanks!
-
Scroll down toward the bottom of the page and you'll see the various thread sizes. I'd give them a call... $35 for a spool of thread seems a bit steep.