Rod and Denise Nikkel
-
Posts
423 -
Joined
-
Last visited
Content Type
Profiles
Forums
Events
Blogs
Gallery
Store
Everything posted by Rod and Denise Nikkel
-
Rick has moved to the Bozeman Montana area and has his shop up and running, still building trees. We have his new phone number number. Anyone else who wants it, please PM us and we can give it to you.
-
Same problem, but on more than one site. And I thought it was just my stupidcomputer...
-
built a saddle on a flex-tree?
Rod and Denise Nikkel replied to Mike Craw's topic in General Saddlery Discussion
We have been hesitant to post here because it may be seen to be self-serving, which is honestly not the case. But since no one else has yet come up with the same things we would say, here goes… Disclaimer: We know in general about flexible bar trees, but have not spent time studying any brand specifically, and these are more general comments and questions relating to all flexible trees. For the horse, the benefit of being ridden in a saddle rather than bareback is that the rider’s weight is spread over a larger surface area, causing less PSI in any one spot. With a rigid tree, the weight is spread pretty evenly over the surface area that is in contact with the horse (if it fits well). We see some possible problems with a tree that is flexible. 1.) It flexes, therefore it sags under the rider’s weight, putting more pressure in the center of the bars than on the ends of them. Yes, it distributes the pressure better than riding bareback would, but not as well as a rigid tree. And while most people don’t ride bareback for any great length of time, they will ride in a saddle like this for hours at a time, which may lead to problems. 2.) Any type of saddle has an interface between a movable horse’s back and a rigid structure somewhere. With a rigid tree, that is the whole surface area of the bars. For something like this, it is where the fork and cantle attach. These have the potential of becoming pressure points. 3.) Is the shape of the bar one you would accept and use if the tree were rigid? If not, the areas of concern to you will not be problem free just because the tree flexes. Flexible or not, it still needs to fit as is. 4.) Because we live further north than the vast majority of the world’s population, we know by experience how stiff everything (including ourselves) becomes when it gets cold. At what temperature are these bars still flexible, and at what point do they stiffen up? Combined with #3 above, this may also cause problems. Just our 1.93 cents worth (2 cents American). -
Need to compress pics
Rod and Denise Nikkel replied to Rod and Denise Nikkel's topic in Computer Help
I have Microsoft (sorry all you tech people who know better) Office Picture Manager. It will compress with options of Documents, Web pages and E-mails. Total initial size of 5 pictures = 5.15 MB. At document setting compresses to 1.38 MB. At web-page setting compresses to 272 KB and at e-mail setting to 34.7 KB. I imported the same 5 pictures full sized into Word and added some commentary. Word compressed them at document setting (200 dpi – as if I know what that really means…) to 123 KB, and it looks OK printed out. So I can just do that, but… I was doing the same thing a while ago, and the stupidcomputer managed to compress one page I was working on with 11 pictures on it to 90KB. How did it do that? It still looks OK printed out too. I would like it to be that small, but I don’t know what it did to get it that small. I wonder if this picture optimization thing has anything to do with it. But then, when I don’t click Apply, just Cancel, it doesn’t seem to compress anything at all. AAAUUUGGGHHH!!! -
When I am putting pictures into a document I want to upload to the net, I need to compress them since we and a lot of people who read them are still on dial up. When I import a picture into Word, and go into the Format Picture section, I can ask that it compress the picture. When I ask it to do that, I get a box that asks if I want to use “picture optimizationâ€Â. What does this do and what does it mean as far as size goes? Thank you for your help. Denise
-
Romey, it IS very straight forward. Dennis has worked with this to make it as easy as possible to use, even by horse owners who know nothing about fitting saddles. They can fit the cards to their horses and give the results to their saddle maker. Once we check out a bunch more horses ourselves, we will know what is more "normal" in North America, so if we get some "odd" numbers given to us, we can recheck them to make sure it was done right. If the owner has a number of similar horses, we can make a tree to fit that average shape or "style" of horse. If they have horses that really vary in size and shape, at least we know that and can tell them that one saddle will not fit all their horses well, and it will be easier for the owner to see why. The neat thing about this system is that it lets every tree maker decide how make his trees fit the different shapes. The saddle maker would no longer have to worry about whether he ordered the right size for that customer's horses. It is difficult to know how one maker's trees fit compared to another's unless you have a few trees and a bunch of different horses all at the same time. Now, they would just give the information from the cards to the tree maker, who would then know what the shapes of the horses this tree is being made for. The tree maker, on the other hand, can work to fit a quantified shape, and not base their fit on a description like "big, wide Quarter Horses but with good withers", which is often the best we can get now. Even people who ride many different horses often ride a general "type", and that style can be quantified with this system. If they ride many different types of horses, they will know what shape this saddle will fit best and can decide what to do padding wise for ones that are close to that shape, or know that they need to change saddles for some horses. Being able to quantify a shape in some way has so many uses. We are currently experimenting with how these cards work and how we can use the information from them in building our trees. Some saddle makers are also trying them out so see if the system is useful for them. Dennis is very open to questions, comments, suggestions for improvements, etc. This is something that could be a very useful tool to help the industry and, ultimately, the horses.
-
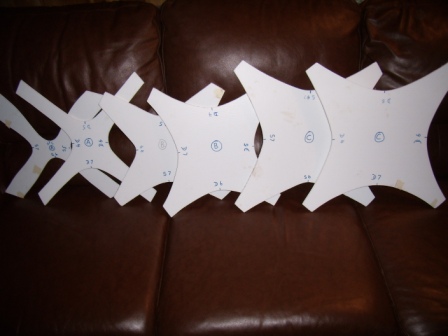
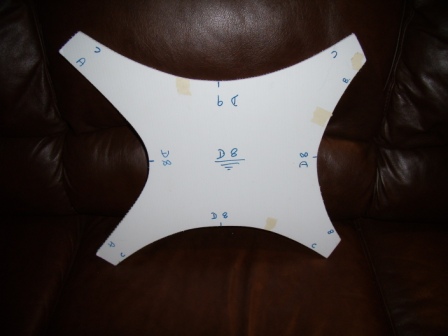
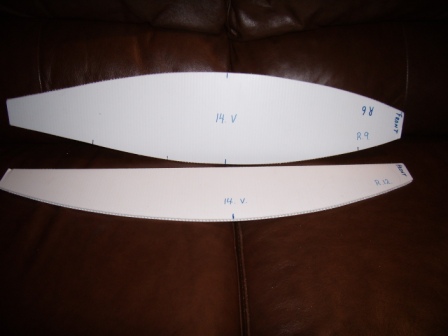
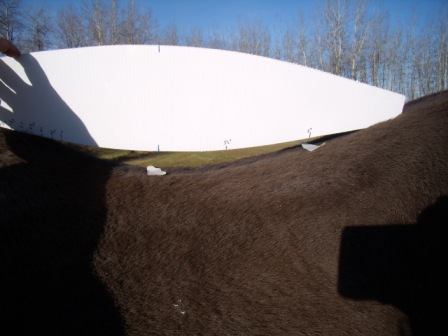
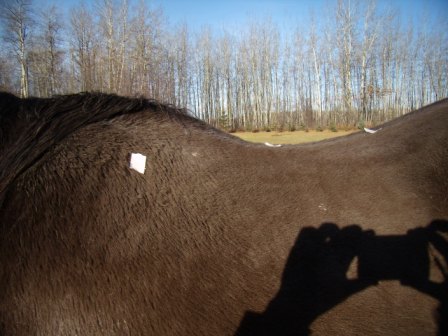
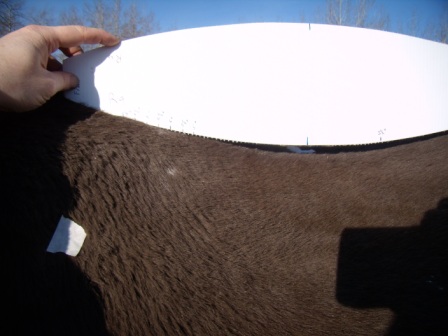
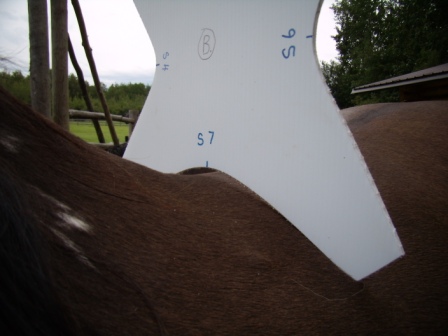
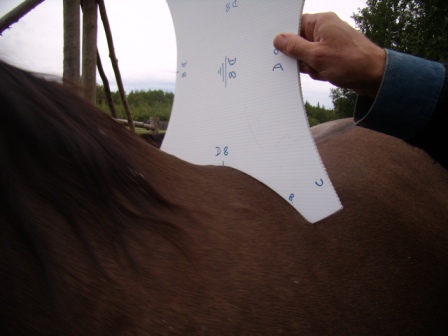
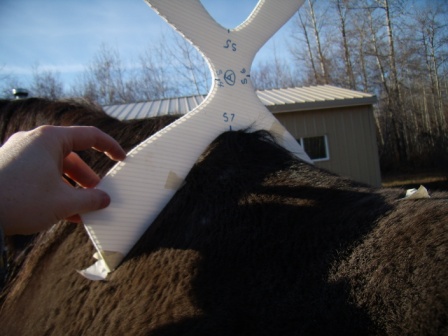
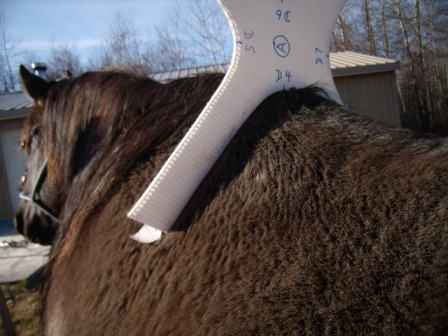
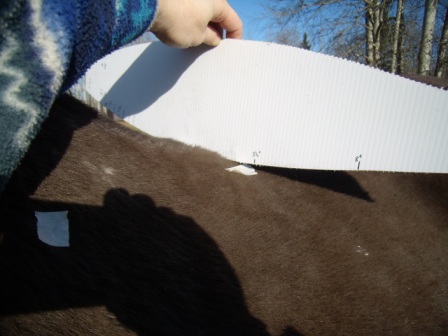
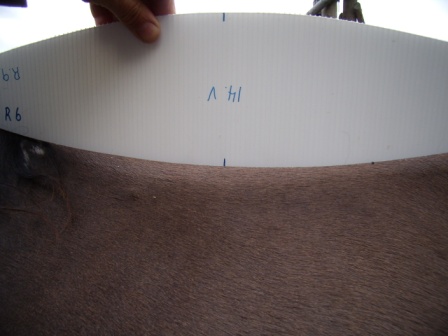
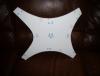
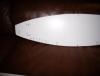
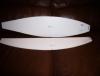
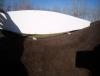
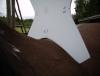
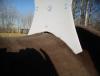
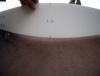
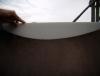
Here is a pictorial tutorial of how Dennis Lane's Equine Profiling Cards work. This system is designed to enable anyone to easily determine the shape of the card that fits correctly at four different places on a horse's back. The numbers can then be communicated to anyone else who has the card system - saddle makers, tree makers, etc. Dennis has used the system well in Australia with his trees, and has now made it available to us in North America. A number of people are trying it out. Dennis doesn't do a lot of on a computer, but has worked with us on this post. He is looking for more saddle makers to test out his system and communicate back how it works for them. He appreciates any comments about the system as he is trying to make it as user friendly and globally accurate as possible. 1.) Become familiar with the cards. There are four different shapes (S4, S5, S6, S7) on the S cards and four (D4, D5, D6, D7) on the D cards for each of the A, B and C positions. There is one extra card that has the A, B, and C position for shape D8, and a D9 shape for the C position. There are three shapes to determine rock - R9 is the middle, R6 is flatter and R12 has the most curve. There is a "ruler" on a rock card to help you measure more conveniently. 2.) Stand your horse as squarely as possible on flat ground. Find the lowest spot on your horse's back. This is the B position. 3.) Using a ruler, mark a spot 8" behind this spot. This is the C position. 4.) Feel for the back of the horse's shoulder blade. Mark this spot. This is the A position. 5.) Measure and record how far forward this spot is compared to the low point of the horse's back. (This horse measures 8".) 6.) Take one of the cards for the B position and place it on the horse's back at the B position you have marked. You are trying to find the shape that most closely matches the shape of your horse. Record this. This one obviously doesn't fit. But this one does. 7.) Do the same for the C position. In all cases you are looking for fit all along the card, but especially where the bars fit on the horse's back. This one still has some clearance in the center, and the ends stick in a bit. This one fits. 8.) And the A position. This one seems to fit well down below, but the shape is wrong up top. This one fits. 9.) Next, measure 3" down from the centerline of the horse at position B. 10.) And C. 11.) Place the rock patterns perpendicular to the horse (not vertical compared to the ground) along this line 3" off the centerline. Make sure the center mark on the pattern (marked 14 V) is at the B position. Keep the horse as square as possible with his head in its normal working position. You are trying to find the card that most closely matches the shape of your horse. Record this. If the card has too much rock compared to the horse, it lifts off the back. Too little and the center doesn't meet, as in this case. This one fits all along. 12.) Fill out the form sent to you, including the horse's name, age, sex (and number of foals if a mare), breed, what they are used for and any other comments about the horse, along with your results. Send it your tree maker. Dennis also asks that you send him a copy, via e-mail or snail mail, so that he can continue to build his data base and improve his system to fit the North American horses as well. Dennis is now a member of this board. If anyone is interested in getting a copy of Dennis's system, please PM him. If you have questions about the system, or comments on what you have found in using it, please post them. The more discussion, the more we learn!


-
Beware of reporters who don't check their facts. 600 lbs the average size of a mature cow? Maybe a Dexter (a miniature breed)! 600 lbs is the size of a nice weanling in this area.
-
Can someone explain why you don't want the hides salted to make rawhide from them. What does salting do to damage the hide for making rawhide? I (Denise) am curious about this fact.
-
Just make sure you DON'T want to make rawhide from it before you salt it, because you can't use salted hides to make good rawhide.
-
exchange rates
Rod and Denise Nikkel replied to Rod and Denise Nikkel's topic in All About Us and Off Topic
Yesterday, it was 92.5 cents Canadian for one US dollar. Today, 91.15. Almost 1 1/2 cents difference. Not a lot on a $10.00 purchase, but when you start getting into the big ticket items, it makes a BIG difference. As far as the world not being fair, why are Canadians still going to the States and paying thousands of dollars less for the same vehicle as what they would in Canada? And why are the manufacturers telling US dealers they can lose their license to sell that brand if they knowingly sell to Canadians, and refusing to honor warranties in Canada if the vehicle was purchased in the States? -
exchange rates
Rod and Denise Nikkel replied to Rod and Denise Nikkel's topic in All About Us and Off Topic
Greg, that is a problem, isn't it. Too bad we aren't making more with all those "price hikes". : Frustrating, I'll say... So, until you guys start using the Canadian dollar as your currency, I guess we play the game... (Hope you didn't turn ALL your money over at 66 cents when you moved down there.) -
Wow, lots of angles to look at this from. I have wondered about charging not per day or hour, but with the basis of the price of the final product. For us, that would mean charging the cost of X number of trees. That way the dollar figure would change naturally as the value of the product changed. I think that might also help the student evaluate how quickly he could recoup the cost of his education. How many trees does he have to build to “pay off†the teaching part of his start up cost? I like Regis’s idea that teaching skill is a consideration. Being able to do and being able to teach are two different things, and if you can’t teach well, you might be charging a lot for the privilege of watching you work. Having a planned course as such makes sense as well. Good teachers plan their lessons ahead of time. Using the analogy of giving a man a fish versus teaching him to fish, I think the price needs to be higher than just what they would pay picking up a custom ordered item that took you the amount of same time to make. The knowledge is worth something. I would agree that sharing knowledge, giving out tips and discussing things with other makers is generally a give and take situation. Teaching someone a skill in a “formal teaching setting†is something different, especially if it is not just a hobby or interest, but “tuition†for a career. In the same way, I would also think that written instructions, patterns, or, in our case, the charts with measurements to use, have to be worth something as well. It is one thing to trade a pattern or show something to another worker. It is another to give a person access to everything on your wall, along with instructions on how to modify them as they need to. That also has to be worth something. But then you would need to subtract the learning you gain by teaching, and the intangible value of giving back to others what you have received. That, as has been pointed out by a few people here, is hard to put a value on. And choosing who to teach is also a difficult question to consider carefully. Lots to think about…
-
Last January, if I took a US cheque into our Canadian bank, I would get $1.10 Canadian per US dollar. Today I would get 92 1/2 cents. That is a 17 1/2% drop in about 10 months. (You guys got to talk to your government...) How has this been affecting you Americans? Or the other countries in the world that deal with the US?
-
"close contact" western saddles
Rod and Denise Nikkel replied to bruce johnson's topic in General Saddlery Discussion
Johanne, You have an excellent tree maker down in NSW - the Dennis Lane that Bruce mentioned. Not only has he developed a system for easily communicating the shape of a horse between owners and saddle and tree makers, he also makes the hybrid trees the barra talks about, along with traditional stock saddles and western saddles. If you contact him, I know he can help you understand a lot of these concepts and get you a tree that will work for your horse. If you are interested, PM me and I will give you his e-mail address. -
"close contact" western saddles
Rod and Denise Nikkel replied to bruce johnson's topic in General Saddlery Discussion
Yes, we would agree with this basic concept - sometimes. That would work on a horse like this one where the muscle falls away from the spine in an A shape. As you widen the bars, the whole tree will sit lower on the horse's back. The saddle maker in this case would need to be very sure that his groundseat across that space doesn't touch the spine, which can cause serious damage to the horse. But, widening the space between the bars will have basically NO effect in lowering the rider on this horse, where the back is much flatter. At least, not for the first 5 inches or so... And, while (how do I put this politely) the center of your behind will be closer to the spines of the vertebrae on the first horse, unless you do something different in the construction of the saddle, you still have the same thickness of material between your seat bones and the horse's back. So I don't see that you have gained anything. Combine that with the fact that to design a tree to fit lower down the sides of the horse than "normal" and still get it to fit the horse properly, you will have to change the angles of the bars and the amount of twist in them, most likely the amount of rock in them, and possibly even the profile of the bottom of the bars. As Andy says, it can be made to fit, but it would have to be designed to fit there. And are you widening just the back, or the whole tree? Widening the whole tree affects the front more than the back. So you can't just order a wider tree to get closer contact. It won't fit your horse properly any more. So overall, as far as trees go, we think the only thing that really can be done to get the rider's seat bones closer to the horse is to make the bars themselves thinner. And then you are playing that balancing game with strength. This topic has been bugging me all day, because one of the HUGE fallacies we have fought for years is the idea that to get your saddle "right down on the horse" you make it wider. I have never heard of this in reference to the cantle area or close contact before, but it is a very common idea among ropers who want the fork low to the withers to decrease the leverage placed on the saddle when roping. So they buy super wide trees to get them low, and this is what happens, (and what will happen if you just order a wider tree to get "close contact" at the back): 1.) Since the tree is too wide for their horse, and the front end of their horse is more A shaped than the back, the front of the tree goes lower than the back, tipping it forward on the horse. This makes the tree go "downhill" on the horse, increasing the pressure on the front bar pads. This is a MAJOR problem. 2.) Since the tree is too wide for the horse, it isn't shaped to fit how low it is sitting. Generally what happens is that the top of the bar surface area is all that is contacting the horse, increasing the pressure there, while the bottom sticks off into space. 3.) Occasionally, the top of the spine is contacted by the saddle, either at the withers or by the cantle gullet or even the groundseat if the horse is very A shaped. What is “nice and close†when you first saddle up can easily hit after riding a while. (Off topic here, but to conclude with this pet peeve - There are two parts of a tree that affect the clearance up front - the bar component and the fork component. The way you get a fork to sit down low on a horse is NOT to order a wide tree. Order the correct fit for the horse, and order a low gullet or hand hole height. The difference will be in the fork component, the fork will still be low to the withers, and the horse will thank you.)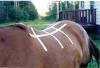

-
This question is directed primarily at those who are "professional" (ie. they do it for a living) leatherworkers. If you have someone come to you who is serious about wanting to make a living doing what you are doing, how do you figure out what to charge them for their education?
-
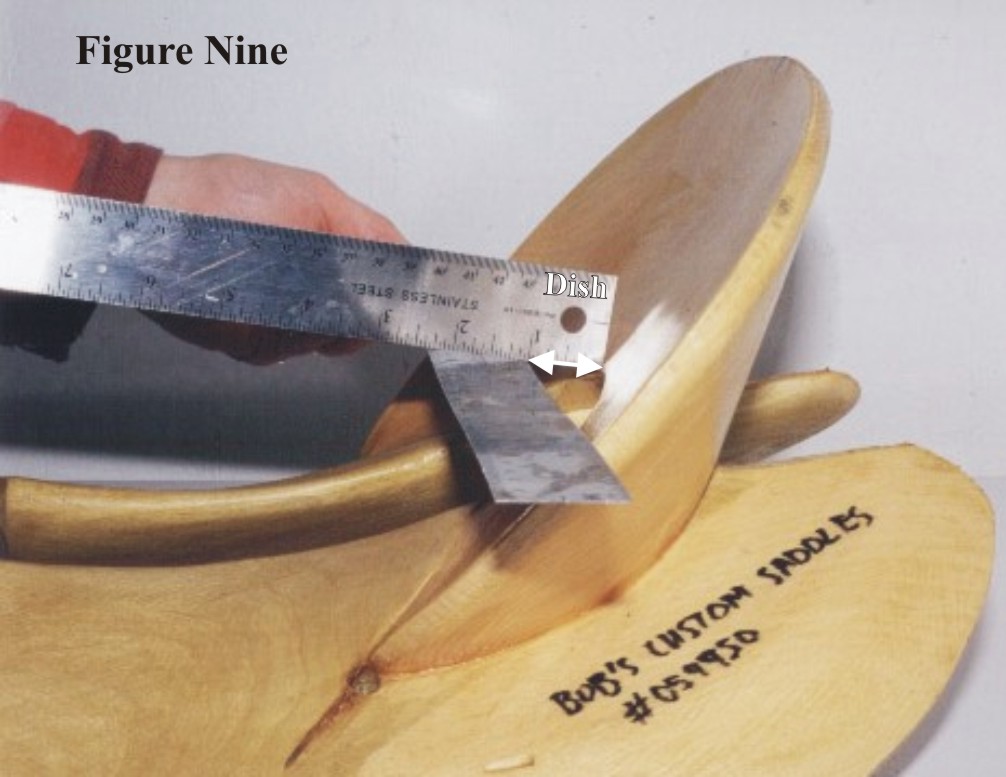
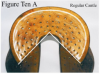
Alan, The way we measure dish is by laying a ruler along the the front edge of the cantle and measuring in to the top of the cantle gullet. I am not familiar with how you are measuring. Could you explain further? Easy answer - No, standing a cantle up doesn't affect the dish you put into it. You can still put 1 1/4" dish into any angle of our regular cantles. Complicated answer - except... If the angle you choose doesn't physically allow you to have the deep or shallow dish you want. Basically, the more stood up a cantle is, the more dish it can have in it without making the cantle too thin. And there is a limit to how little dish you can put in a cantle depending on those cuts on the bars. Those limits will vary with cantle angle. Standing the cantle up and choosing the same dish will affect the slope of the face of the cantle. It will also get more upright. Confused enough yet? Any tree maker we have talked with has said that cantles are the most complicated part of the tree, and we sure agree with them!
-
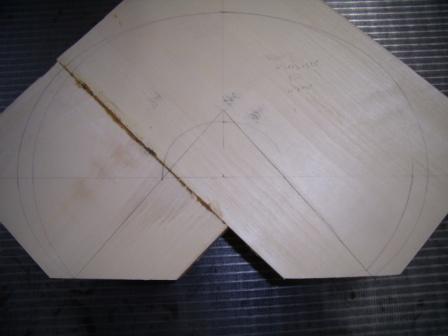
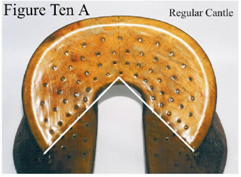
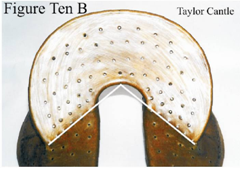
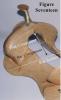
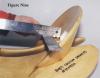
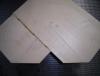
Answer - it might, but it doesn't have to. Depends how you make them. In this picture, I have drawn a wider cantle as the starting point. Then I have drawn a narrower one as well. On the right hand side (looking at the picture) I drew the cantle so the point is a bit up the line which would move the points back and up on the bar. On the left hand side I drew it so they both came to the same point. Either one would make an acceptable cantle. We decided a number of years ago that in order to be as consistent as possible with thigh length, we would keep that point the same on all cantles (with very rare exceptions). So on our trees, no, the shape and width of the cantle doesn't affect how far down and forward the points go on the bar. But on other maker's trees, it might. And in comparing between makers, your guess is as good as mine. Another factor that David didn't mention but that also makes a difference in where those cantle points end up is the angle of the cut on the bar (or, for those makers who don't have a cantle cut, the angle on the bottom of their cantle). Here are two pictures of cantles with two different angles to that cut on the bar. (Please ignore the writing on the pictures, but these are the clearest ones I have at the moment.) I assume every tree maker has slightly different angles here, which is just one more reason why you can't compare between makers without actually looking at the two trees side by side. Just a quick note on the two trees you have listed that we built. The High Country has a stood up fork, which makes the thigh length longer. But it also happens to have the cantle at the most laid back angle we make, which makes it shorter. The cantle could easily be stood up another notch, but the thigh length on this tree as is will be large enough to fit all but the very largest riders out there, so it is unlikely that you would want to do that with this tree. That Wade has the cantle at the middle angle, and it also could be stood up a notch or even two to increase the thigh room if you wanted. (If you keep the seat length the same and stand the cantle up more, the effect is to hold the middle of the top of the cantle in place, and move the bottom back, which increases the thigh length.) These are the types of things that can be maneuvered to get the thigh length the rider needs, even if they are set on a specific number for seat length and won't listen as you tell them that it really doesn't matter that much anyway.

-
Bruce, I know you can't put company names on the trees, but I am assuming that there are a number of different makers represented in this group. One thing David mentioned was the effect that standing the fork up has. On our trees, the thigh length is 3/4" longer with a stood up fork compared to the same tree with the same fork leaned ahead our normal amount. Of course, others makers will have different amounts of difference. Some makers work really hard to keep their thigh length and seat length comparable, regardless of cantle height. That means they can't give you the option of cantle angle and some other things because that is what they use to keep them comparable. I don't know if they keep them comparable if the fork is stood up or not. That would be a lot more difficult. A question for you saddle makers: Would you prefer that seat length and thigh length always correlated (within one maker's trees, because you will NEVER get the different makers the same - they do things too differently, you know ), or would you like to have the option of choosing the cantle angle? Or does it matter so long as you know what you will be getting when you order?
-
Hey Ashley the saddle looks real good. We both would have liked a little larger horn on it which would have balenced the look with the large fork, but that is what the customer wanted. Even so it looks good. What is the stamp that you used? Rod
-
A customer who is not a member here (yet, we're working on him) asked us to ask this question for him. "When I drill out the tree for the front strings, I have never been able to not drill through the lacing, and I have never had anyone be able to tell me how to not drill through the front lacing. Does anyone here know how to do this?"
-
Recently, when we were talking with a very accomplished saddle and tree maker, he told us his formula for figuring out what he might like to use as a thigh length for a saddle tree. The “thigh length†is the room between the front corner of the cantle and the back of the fork where the rider’s thigh goes. This really is the important thing to get correct when trying to get the right size of saddle for a rider. (If the rider is hitting any of the places used to measure seat length when they are riding, they are in BIG trouble.) Using basic geometry (Circumference of a circle = pi (3.14) X Diameter), he takes the circumference of the rider’s thigh and divides by three to get the approximate diameter. He then adds an inch to account for leather, extra room etc. He says generally this gives him a pretty good idea on what distance he wants there in order to fit the rider well. Of course, the thigh length you want will depend a bit on the fork style (swell vs. slick, bucking rolls or not, leg cut on the swell fork or not), and how tight the rider likes to be in his saddle. This sounds like a pretty simple way to get an idea of size. What do you saddle makers think? Do you think it would work for the way you build saddles?
-
Johanna, Please thank the sender for this information. We will print it off and give it to the museum as well. Denise
-
OK, Different problem here. We see the map, but when we click on Add Yourself, nothing happens. Huh??