Reaper
-
Posts
280 -
Joined
-
Last visited
Content Type
Profiles
Forums
Events
Blogs
Gallery
Store
Everything posted by Reaper
-

Pancake - Glock 22
Reaper replied to JeffGC's topic in Gun Holsters, Rifle Slings and Knife Sheathes
Very nice for sure Jeff! I really like the lines and the belt loops are a nice touch. -
Anyone Give You The Look Of Horror...
Reaper replied to Shorts's topic in Gun Holsters, Rifle Slings and Knife Sheathes
Something people who fear guns and those on the side of the White hats never seems to get, in my opinion is the fact that a gun is nothing more then a tool. You can pick up Hammer, Nails and Saw making the most beautiful Church, Cribb or Stable. Or you can knock em out, nail em spread egale then quarter em... Excluding the fact that when Iasked I tend to repeat what Massad Ayoob said once in writing when asked why he carries a gun "Because you won't" -
First Holster Project- Iwb
Reaper replied to Nooj's topic in Gun Holsters, Rifle Slings and Knife Sheathes
Heat gun = cracks for you too? -
First Holster Project- Iwb
Reaper replied to Nooj's topic in Gun Holsters, Rifle Slings and Knife Sheathes
Dip dye it black? -
First Holster Project- Iwb
Reaper replied to Nooj's topic in Gun Holsters, Rifle Slings and Knife Sheathes
Ditto with Big-O, you should have enough clearence at the trigger guard so that you can get a firm grip with using atleast your middel and ring fingerLooks very nice and should be one you have to turn down offers on at the ranger all the time! ps: I just took a second look and noticed that the back flap actually is between you thumb/heal of thumb and the gun. In a crisis situation when fine motor skills are flying out the door, there could possibly be a snag on presenting the weapon. "Left hand flashes to your right side and snatches your cover shirt clear as your right hand drops and you grasp the weapon and you actually have locked your weapon into the holster because the flap is binding between the back side of the grip and you thumb." just a thought... -
1911 Holster-Ideas
Reaper replied to marine mp's topic in Gun Holsters, Rifle Slings and Knife Sheathes
Sounds to me that a Galco - Jac Slide style belt slide holster would do the trick for you. [link]http://www.copsplus....rge/gal-jak.jpg[/link] gaaa, I hate IExplorer....

-
Making My Logo! Please Help And Critique!
Reaper replied to bigo5552000's topic in How Do I Do That?
you could use it as a Brand with the script font. and yes I thought at first it was a Sailboat... -
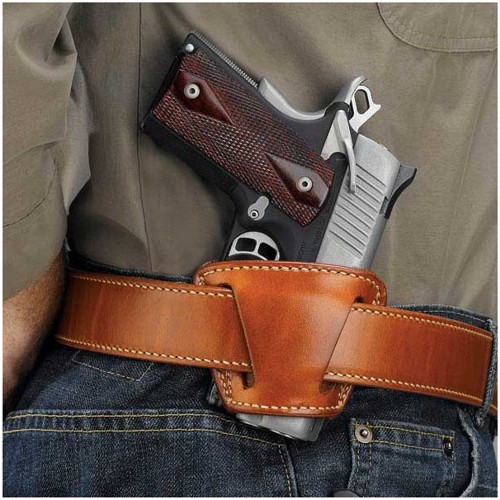
Very very nice, they look to belong together. I love the Sig 228 it is a natural point of aim, dead on and handsome. The holster compliments it even further, I think anyone would love to have such a rig to hold such a peice.
-
You want it to make you breakfast too?
Reaper replied to Shorts's topic in Gun Holsters, Rifle Slings and Knife Sheathes
I can feel it for sure, sounds like my older brother. Two holster five suggestions and complaints and they didn't cost him a thing.... -
You want it to make you breakfast too?
Reaper replied to Shorts's topic in Gun Holsters, Rifle Slings and Knife Sheathes
Customers seem to be the same across the board for sure. Back when I fabricated and installed Pool Enclosures, we would assemble the walls with the doorways intact. You would take the top of the jamb (door header) and tack it with a screw on each side to hold the bottom together. Once everything was finished as far as setting up the structure (roof on, all walls up) one of us would start working on screening walls while another would screen the roof. It seems that everyone would walk out and look at what we were doing, take a look at that door header tacked near the pool deck and ask ( Is that going to stay there? I don't want to trip over it! We would tell them that it did stay there because the doors were hug above them and the ground bugs needed a way out. they would ask "Really?" and we would say yes, it is called a "Bug Escape" -
Where To Find Belt Clips?
Reaper replied to rccolt45's topic in Gun Holsters, Rifle Slings and Knife Sheathes
</link>www.knifekits.com <link> good things -
HAH! I like you already...
-
Very nice! I've yet to do an Avenger style and can only hope to get it close to what you've done here.
-
I miss Jark...
-
Contour Stitch Line
Reaper replied to cstephens's topic in Gun Holsters, Rifle Slings and Knife Sheathes
Same here as Dwight pretty much. I use a Groove Stylus if I feel like it, though I tend to leave the stitch grove on the whole of the pocket seam around the gun. I fear that with the twisting and shoving of un-re-holstering the thread could pull through over time. Oh, and I either Punch, Poke or Drill all of my stitch lines on one half and then place the two together using the the one with the holes as a template, tack stitching at a few points so they do not move. -
Might find something here you can explode? Use an editor and Scale it up to the width you need? http://www.sbearstra...s.html#patterns Click on the image of the two partial vertial belts on the website above and download the PDF? the image in the replay is a partial sample of the patterns in the PDF
-
mm, Dave, just started out myself but had a Saddle maker point me to "Justins Boot Cream" it can be left flat or buffed out to a lusted as you like...
-
Leather Covered Gun Case
Reaper replied to Kowboyboots's topic in Gun Holsters, Rifle Slings and Knife Sheathes
Those would be an Item for sure at most Public Ranges!pssst... carr52,, your age is showing -
Hand Pattern Cutting Help
Reaper replied to cstephens's topic in Gun Holsters, Rifle Slings and Knife Sheathes
Starting out myself with leather, but have been doing layout and metal work off and on for year. I use a Razor knife with a retractable blade, as mentioned before, used for drywall and construction in general. One thing I picked up over the years was when scoring out a pattern hold the knife with the pinky, ring and middle fingers. Then place the thumb upon ontop of what I am scoring/cutting so it is a comfortable distance from the point where the knife tip is place where I want to start my cut at. I check to make sure that I have a good range of motion and then lock my fingers stiff, pull the knife along the curve keeping it on the line ( using my hand and knife as a drafting compass ). If what I am cutting out is along the lines of an S curve, I will stop at or right before the point of the two curves intersecting so I can finish the cuts ensuring the meet. -
Attaching Straps To An Iwb Holster
Reaper replied to Reaper's topic in Gun Holsters, Rifle Slings and Knife Sheathes
Good deal woolfe, I'll pick some up next HDepot trip in the morning. I am going to head up to tri-city-screws ( big construction supplier here in Pinellas ) and see what the prices on bulk are and what other options they might have. Let you know after I do, might be lower cost and come in different colors/metal type also. -
Attaching Straps To An Iwb Holster
Reaper replied to Reaper's topic in Gun Holsters, Rifle Slings and Knife Sheathes
Sounds good K-Man, I'll do so when I get things caught up around here. My wife has me remodeling the house *sigh* and it seem if I take anytime for anything else these last few weeks she ends up standing over me asking about when it will be finished. ( about ready to tell her to call a contractor, but I like sleeping in bed too much ) -
Attaching Straps To An Iwb Holster
Reaper replied to Reaper's topic in Gun Holsters, Rifle Slings and Knife Sheathes
Thank you GreginTenn, I wasn't really sure how much glue would add. I'll definitly skip it because I end up with more on me than what I am working with. Same with Cualking, Paint and most anything else you would rather not take a bath in -
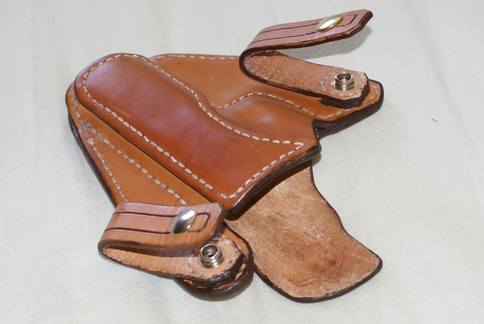
Hello everyone from Humid/Wet Saint Petersburg Florida! New to the site and also to leather. I started messing with making a holster about 5 weeks ago and am stumped on much of it but learning as I go. I have worked most of my life in fabrication in some shape or form either doing mechanical design, layout or production and I took Tailoring as an Elective in high school. ( all the girls took it and I was one of 2 guys in a class of 30 ) I actually did learn some skills I never ever realized until later in life. Anywho... This is the first Holster I feel is worth continuing with out of the three I have worked on so far. I know the stitching leaves much to be desired with missed stitches and the edges are not finished all the way. ( this is a kind os Beta? ) What I am wondering about at this point is the correct manner in which to attach the straps so they are solidly affixed. < these straps are stitched around the line-24's without gluing at this point, but I wonder if it is enough? Should I glue also or is stitching enough? Oh. also, should I glue the front and back together before stitching the edges? any thoughts and or input would be great and appreciated.

-
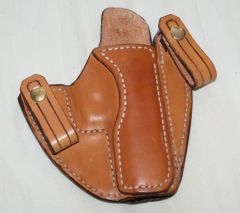 The first holster I have made worth looking at after starting messing with leather 1 month ago.
 -
I am totally new to leather craft, but did take Taloring in school years ago. I also have worked with Stainless Steel in a custom fab shop and have a Mechanical Design back ground. I am not finding the basic part of the process in making a holster a problem, but I wonder if Stitching alone is good enough to attatch straps with line 24 snaps on a hoslter and expect it to last? Also should I glue the front and back of the hoslter before stiching to add strength so it last longer?