


Bob Blea
-
Posts
1,771 -
Joined
-
Last visited
Content Type
Profiles
Forums
Events
Blogs
Gallery
Store
Everything posted by Bob Blea
-
Looks pretty good for a first effort. Your beveling looks rough and that may be because your leather was too wet, or you just need practice walking the tool for a smoother appearance. Also, it looks like you missed beveling where the fingers and thumbs of the hands overlap, so you aren't getting the appearance of depth there you could. Also, I would work that background tool right up to the hands to you don't get that beveled halo effect around them. But overall it looks really good. The viewer can clearly see that these are two hands, and the detail you captured is really good. As far as basic tools go, you need a good beveler or two, swivel knife, shaders. If this is the kind of work you will be doing (which I would call more figure carving) you probably want to look for figure bevelers as they are more suited to this sort of work.
-
The KK Tutorial in this section deals with a very similar situation to this: http://leatherworker.net/forum/index.php?showtopic=9940 He solves it by stitching a bound edge to the wallet, though if you don't have a sewing machine this would be time consuming to do.
-
 I wonder if deglazing that area with something like denatured alcohol would remove the whatever it is. I use that sometimes to strip laquers (Neat Lac/Clear Lac/Wyosheen) off leather. Maybe you could try a small area and see if it helps at all.
 -
Did you notice anything unusual when you applied the dye? Did the dye seem to soak in any differently? It doesn't look like it from the end result but I thought I would ask. I'm thinking some other substance is already on the leather and acting like a finish but I don't know why it would allow the dye to penetrate but not the Resolene. What kind of dye was it?
-
Looking For People Who Started Rough But Found Their Craft Anyway
Bob Blea replied to lydian8's topic in How Do I Do That?
I certainly didn't start off carving well. I do have a bit of an artistic background (I used to paint in oils) and even did some painting of flower still lifes, so I was drawn to floral carving off the bat. The best advice I was given was to take a small floral craftaid design for a corner and carving it five times in a row, critiquing it each time and working on improving those parts I didn't like. Number each one and then go back and compare number 5 to number 1. You will be amazed how much improvement you will see. Also, make sure your not trying to do too complex of a carving. Start with some of the Tandy craftaids, particularly the older ones that don't have such fine linework and tight scrolls. For me it really has been just a matter of practice, and occasionally making a duplicate of something because I didn't like how the first item turned out and knew I could do better. -
Dharma Pigment Dye On Veg Tanned Leather?
Bob Blea replied to KateB's topic in Leatherwork Conversation
Hello Kate, I've never heard of these pigments but if they work on fabric they may work on leather too. However, soda ash is NOT the same as Baking Soda: http://en.wikipedia.org/wiki/Sodium_carbonate The article discusses it's use with this type of dye and it sounds like it's primarily used to ensure the pigment will bond to plant based fibers, so that suggests that particular pigment may not be best for leather. However, if the manufacturer says it works, they've probably tried it. -
Day Planner
Bob Blea replied to JM Rhoades's topic in Purses, Wallets, Belts and Miscellaneous Pocket Items
You have been learning well. That is nicely carved and finished. And, welcome to the forum. Hope to see more of your work! -
That looks fantastic! Someone is going to be very proud to own that case.
-
Hello Neil and welcome to the forum! What type of artwork are you looking for specifically? You could try a Google search for the item your looking for (say skulls and flames) and adding 'line art' on the end. So it might read 'flame line art' and you will get a lot of artwork that could be translated to leather. You might have luck by searching for 'whatever coloring page' as sometimes you will find outline artwork for your subject that you can make work as a tracing pattern. Bob
-
Going back to the first video, the edges look nice and the bag looks nice but to me it seems odd that they don't stitch the parts together, they are only glued. I'm not a high end bag or purse maker but seems like a quality bag should be stitched too.
-
I think it looks great. I really like the design! Can't wait to see the finished product.
-
I Need Someone Who Can Draw Good Sheridan Patterns
Bob Blea replied to RiverCity's topic in Floral and Sheridan Carving
PM sent. -
I can make a few suggestions. For where the knots cross over each other, bevel the top part of the knot (the part closest to the viewer) first, then bevel the one behind it. Then, make sure you matte down the one that goes under at the point where it meets the upper knot. That way there isn't a strong ridge where the lower knot meets the upper one, and it looks more like a ribbon that passes under the upper part of the knot. It can also help if you used a checkered or lined matter on the lower knot, so that it picks up antique and enhances the look that it is in the background. Also, once you are done beveling the entire shamrock, matte around it with a checkered matter or a pebble backgrounder (or just a regular backgrounder if that is all you have.) That will make the Celtic knot stand out more from the surface of the leather, especially if you are antiquing the piece. If you want to add texture to the knot itself, I've used a Tandy hair tool to lightly cut parallel lines along the flow of the knots and I think it looks OK, but I generally just leave them plain. Finally, when you are done beveling the knots, run a modeling spoon along the edges of the knot to round them off a bit. It makes them look better than a sharply beveled line. Hope this helps, Bob
-
Thanks all. They eyes are definitely not what they used to be. I wear reading glasses now while stamping stuff like this to make sure I can see exactly how well things line up. It also helps to use a straight edge to check alignment from time to time.
-
That's really nice artwork. You really captured the look of an ancient stone carving.
-
Can Resolened Leather Handle The Washing Machine?
Bob Blea replied to DavidL's topic in How Do I Do That?
My wife has a carved wallet with a butterfly design that was painted with acrylics, and then antiqued. It has survived three trips through the washer without any damage to the painting, and almost no effect on the leather or antiquing. And it doesn't even have a finish coat like resolene. Since Resolene is an acrylic product like the paints, I would think it would hold up pretty well too. I would recommend trying your finish on some scrap of whatever kind of leather you are interested in and letting it have a few washer cycles to see how it really holds up. Try a couple of formulations on the same piece including one area that is left natural, to see how it is effected and how it wears. Make sure you try a 50/50 mixture too. Generally Resolene is too strong to use without cutting it with water. You can easily end up with a think plastic-y coating that isn't flexible and cracks easily. If you do this experiment, be sure to post the results. There are probably many here that would like to hear the results, myself included. -
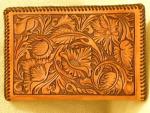
Celtic Knot 5X8 Notebook
Bob Blea replied to Bob Blea's topic in Purses, Wallets, Belts and Miscellaneous Pocket Items
Ha! thanks tatehunt! -
Chief, the first think I noticed was the tip of the belt handing down too. I think the keeper is a good addition. I think your partially right on the strap being too dark. I think if you had used a resist on the carving and lettering so that was a light or natural color, it would be fine. You just loose the tooling details when it's really dark. But otherwise I think it looks really good. Like the buckle and belt end with it. The dark leather creates a nice contrast to the silver. Bob
-
Celtic Knot 5X8 Notebook
Bob Blea replied to Bob Blea's topic in Purses, Wallets, Belts and Miscellaneous Pocket Items
Thanks again for the nice comments all! Shtoink, I realized what movie it was from. I didn't remember it until you posted the picture but I like the layout of the cover. It would be a fun challenge to try and make since the snake-knot would need to be an applique. -
I thought about Leather Balm with Atom wax because I have a checkbook that I finished that way that is holding up really well, but I worried that in an application like a belt or a strap there might be run off issues especially if it was hot. I'm assuming you don't see any issues with the finish rubbing off due to humidity, etc? Thanks for the feedback, Bob
-
I make notebooks like that and I typically use 4/5 oz leather with a pigskin liner that gives it a bit more rigidity. I wouldn't go any less that this weight without some sort of stiffener added to it. Also, it's pretty hard to tool or stamp much thinner that 4 oz. You could make it from 10 oz and it would be very stiff and thick, like a hardback book cover. That's OK if that is the feel you are looking for.
-
Hello, and welcome to the forum! How totally amazing to have tools handed down through the generations like that. The stories they could tell.
-
Hello Leila, I've been playing around with some finishes for the flesh side of leather. I've made a key fob that I tried sealing with three different types of sealant to see how they wear. It has Wyosheen, Tan Kote and Resolene in three different test swatches on the back. So far it seems like the Tan Kote is holding up the best, and probably the one I like least is the Wyosheen. It and the Resolene may have needed thicker coats to do well, but rubbing in the Tan Kote seemed to smooth down the fibers and leave a finish that is holding up in my pocket. Bob
-
What To Do With The Wibbly Wobbly Edges Of Hides?
Bob Blea replied to ERoyal's topic in Leatherwork Conversation
Do you make anything that you wet mold into a shape? This stretchy leather might be very useful for molding. Also, molded items are sometimes 'baked' on very low heat to dry them out and harden them. The belly of a hide can be very stretchy and useful for any application where the leather needs to be formed (like say a mask) but there are areas right around where the leg meets the cow that are so loose they really aren't worth anything. -
 That looks amazing, I really like it!